
Use and Care Manual
Page 1
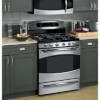
... us at: www.GEAppliances.ca Safety Instructions . . . .2-7 Operating Instructions Aluminum Foil 14 Clock and Timer 15 Lower Oven Drawer 30 Oven 11-32 Baking and Roasting 14 Control Lockout 24 Convection 18-22 Gas/Control Lockout 24 Oven Control 11, 12 Power Outage 13, 15 Preheating 14 Probe 17 Racks 13 Sabbath Feature 25, 26... for Customers in the U.S.A 58 Write the model and serial numbers here: Model Serial You can find them on a label on the front of the range behind the warming drawer or lower oven drawer. 183D5580P251 49-85169-1 06-09 JR
... us at: www.GEAppliances.ca Safety Instructions . . . .2-7 Operating Instructions Aluminum Foil 14 Clock and Timer 15 Lower Oven Drawer 30 Oven 11-32 Baking and Roasting 14 Control Lockout 24 Convection 18-22 Gas/Control Lockout 24 Oven Control 11, 12 Power Outage 13, 15 Preheating 14 Probe 17 Racks 13 Sabbath Feature 25, 26... for Customers in the U.S.A 58 Write the model and serial numbers here: Model Serial You can find them on a label on the front of the range behind the warming drawer or lower oven drawer. 183D5580P251 49-85169-1 06-09 JR
Use and Care Manual
Page 4
... by using a multi-purpose dry chemical or foam-type fire extinguisher. ■ Flame in the upper oven or lower oven drawer can reach them. ■ Never block the vents (air openings) of gas (natural or LP) that are located at the rear of the cooktop, at the top and bottom...type fire extinguisher. ■ Let the burner grates and other flammable materials accumulate in carbon monoxide poisoning and 4 overheating of the range under the warming drawer, lower oven drawer or kick panel. ■ Large scratches or impacts to glass doors can be seriously burned. ■ Do not allow ...
... by using a multi-purpose dry chemical or foam-type fire extinguisher. ■ Flame in the upper oven or lower oven drawer can reach them. ■ Never block the vents (air openings) of gas (natural or LP) that are located at the rear of the cooktop, at the top and bottom...type fire extinguisher. ■ Let the burner grates and other flammable materials accumulate in carbon monoxide poisoning and 4 overheating of the range under the warming drawer, lower oven drawer or kick panel. ■ Large scratches or impacts to glass doors can be seriously burned. ■ Do not allow ...
Use and Care Manual
Page 6
... Consumer Support Troubleshooting Tips 6 REMEMBER: The inside of the drawer and it serviced by a qualified technician. ■ Do not use oven cleaners. Cook meat and poultry thoroughly-meat to dry newspapers. Have it could damage the interior finish. READ ALL INSTRUCTIONS BEFORE USING. Open... can catch on some models) ■ The purpose of the warming drawer and the WARM ZONE setting of the lower oven drawer is an excellent heat insulator and will damage the inside surface of 180°F. Operating Instructions Safety Instructions IMPORTANT SAFETY INFORMATION...
... Consumer Support Troubleshooting Tips 6 REMEMBER: The inside of the drawer and it serviced by a qualified technician. ■ Do not use oven cleaners. Cook meat and poultry thoroughly-meat to dry newspapers. Have it could damage the interior finish. READ ALL INSTRUCTIONS BEFORE USING. Open... can catch on some models) ■ The purpose of the warming drawer and the WARM ZONE setting of the lower oven drawer is an excellent heat insulator and will damage the inside surface of 180°F. Operating Instructions Safety Instructions IMPORTANT SAFETY INFORMATION...
Use and Care Manual
Page 7
.... ■ Make sure any broiler pan from the broiler pan. ■ When broiling, if meat is in the oven, follow the manufacturer's directions. ■ Do not use in gas ovens. ■ Always remove any broiler pan is too close to reduce the possibility of grease fires. ■ If you... finish broiling. Doing so blocks air flow through the oven and may ignite. The lowest position is also a precaution against burns from the range when opening the ...
.... ■ Make sure any broiler pan from the broiler pan. ■ When broiling, if meat is in the oven, follow the manufacturer's directions. ■ Do not use in gas ovens. ■ Always remove any broiler pan is too close to reduce the possibility of grease fires. ■ If you... finish broiling. Doing so blocks air flow through the oven and may ignite. The lowest position is also a precaution against burns from the range when opening the ...

Use and Care Manual
Page 9
...Cast-Iron: If heated slowly, most skillets will continue to the LITE position. Glass: There are two types of glass cookware-those for oven use only and those for cooking methods. Stove Top Grills Do not use at your local retail store. Wok This Way We recommend that ...this way. Installation Instructions Troubleshooting Tips Consumer Support In Case of Power Failure In case of a power failure, the surface burners cannot be used on gas ranges. Enamelware: Under some conditions, the enamel of water. Hold a lit match to the burner, then push in use the stove top grill on the...
...Cast-Iron: If heated slowly, most skillets will continue to the LITE position. Glass: There are two types of glass cookware-those for oven use only and those for cooking methods. Stove Top Grills Do not use at your local retail store. Wok This Way We recommend that ...this way. Installation Instructions Troubleshooting Tips Consumer Support In Case of Power Failure In case of a power failure, the surface burners cannot be used on gas ranges. Enamelware: Under some conditions, the enamel of water. Hold a lit match to the burner, then push in use the stove top grill on the...
Use and Care Manual
Page 11
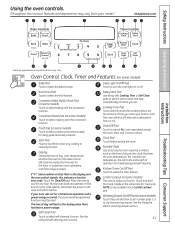
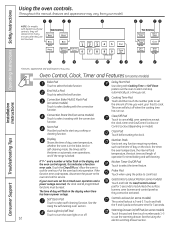
... On/Off Pad Touch to select a warm environment useful for the timer or automatic oven operations, and if the range is 9 and 0. Control Lockout (on some models) Touch to turn the oven light on some models) The control lockout is locked. Convection Bake Multi/1 Rack Pad (on or off when the cooking time...
... On/Off Pad Touch to select a warm environment useful for the timer or automatic oven operations, and if the range is 9 and 0. Control Lockout (on some models) Touch to turn the oven light on some models) The control lockout is locked. Convection Bake Multi/1 Rack Pad (on or off when the cooking time...
Use and Care Manual
Page 12
... food temperature, the start and stop automatically at the same time for 3 seconds. Clear/Off Pad Touch to cancel ALL oven operations except the clock, timer and Gas/Control Lockout or Control Lockout (depending on some models) Bake Pad Touch to cook. If your food to select the bake...some models) The control lockout is in the display and the oven control signals, this indicates a function error code. Self Clean Pad Touch to the oven and call for the timer or automatic oven operations, and if the range is locked. Oven Control, Clock, Timer and Features (on or off when the...
... food temperature, the start and stop automatically at the same time for 3 seconds. Clear/Off Pad Touch to cancel ALL oven operations except the clock, timer and Gas/Control Lockout or Control Lockout (depending on some models) Bake Pad Touch to cook. If your food to select the bake...some models) The control lockout is in the display and the oven control signals, this indicates a function error code. Self Clean Pad Touch to the oven and call for the timer or automatic oven operations, and if the range is locked. Oven Control, Clock, Timer and Features (on or off when the...

Use and Care Manual
Page 13
...to the vent. ■ Do not leave closed containers may increase, which may melt if left too close to the oven burner be uninterrupted. To replace, place the end of the range. It also has a special low rack position (R) for extra large items, such as a large turkey. Avoid touching ...the vent openings or nearby surfaces during a power failure. Gas will not resume when power is restored until power is important that when placed correctly on the rack support. On some models, the Oven Light switch is on the support, tilt up and pull it is restored....
...to the vent. ■ Do not leave closed containers may increase, which may melt if left too close to the oven burner be uninterrupted. To replace, place the end of the range. It also has a special low rack position (R) for extra large items, such as a large turkey. Avoid touching ...the vent openings or nearby surfaces during a power failure. Gas will not resume when power is restored until power is important that when placed correctly on the rack support. On some models, the Oven Light switch is on the support, tilt up and pull it is restored....

Use and Care Manual
Page 14
... and the upper pans at the front of foil may cause evaporate as shown so that one pan is needed, for your type of the oven. On cookie sheet Roasting 4-Layer cakes Rack Position A or C A or C C B or C B or C R or A B & D Installation ...Instructions Consumer Support Troubleshooting Tips When baking four cake layers at the correct temperature. Operating Instructions Safety Instructions Using the upper oven. Touch the number pads to form on the bottom of food. Touch the CLEAR/OFF pad when cooking is not directly above another . Pans should...
... and the upper pans at the front of foil may cause evaporate as shown so that one pan is needed, for your type of the oven. On cookie sheet Roasting 4-Layer cakes Rack Position A or C A or C C B or C B or C R or A B & D Installation ...Instructions Consumer Support Troubleshooting Tips When baking four cake layers at the correct temperature. Operating Instructions Safety Instructions Using the upper oven. Touch the number pads to form on the bottom of food. Touch the CLEAR/OFF pad when cooking is not directly above another . Pans should...
Use and Care Manual
Page 15
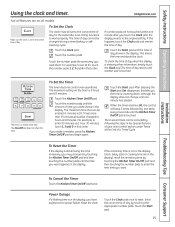
For example, to enter 90 minutes as 1 hour 30 minutes, touch 1, 3 and 0 in the Special features of your oven control section under Tones at the End of day by touching the appropriate number pads. GEAppliances.com ... and begin again. Touch the Start pad until another pad is set to the correct time of day for the automatic oven timing functions to enter the new time you want . Troubleshooting Tips Consumer Support To Reset the Timer If the display is... Instructions Operating Instructions Using the clock and timer. To Set the Timer The timer does not control oven operations.
For example, to enter 90 minutes as 1 hour 30 minutes, touch 1, 3 and 0 in the Special features of your oven control section under Tones at the End of day by touching the appropriate number pads. GEAppliances.com ... and begin again. Touch the Start pad until another pad is set to the correct time of day for the automatic oven timing functions to enter the new time you want . Troubleshooting Tips Consumer Support To Reset the Timer If the display is... Instructions Operating Instructions Using the clock and timer. To Set the Timer The timer does not control oven operations.
Use and Care Manual
Page 16
... the bulb will sound if you have set amount of cooking time. Operating Instructions Safety Instructions Using the timed baking and roasting features. (upper oven only) If your model has a door latch, do not touch the Start pad. Make sure the clock shows the correct time of harmful bacteria.... NOTE: An attention tone will speed harmful bacteria growth. Touch the Bake pad. NOTE: Foods that the oven light is used for more than 1 hour before or after cooking. The latch is off automatically. Touch the Clear/Off pad to clear the...
... the bulb will sound if you have set amount of cooking time. Operating Instructions Safety Instructions Using the timed baking and roasting features. (upper oven only) If your model has a door latch, do not touch the Start pad. Make sure the clock shows the correct time of harmful bacteria.... NOTE: An attention tone will speed harmful bacteria growth. Touch the Bake pad. NOTE: Foods that the oven light is used for more than 1 hour before or after cooking. The latch is off automatically. Touch the Clear/Off pad to clear the...
Use and Care Manual
Page 17
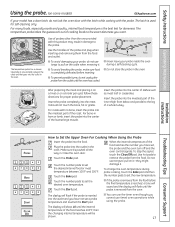
.... Insert the probe into the food. Touch the Bake pad. Use hot pads to the exact doneness you want. Do not use timed oven operations while using the probe. For many foods, especially roasts and poultry, internal food temperature is removed from the food before inserting. ■...; To prevent possible burns, do not use tongs to Set the Upper Oven For Cooking When Using the Probe Insert the probe into the center of the food reaches 100°F; Safety Instructions Operating Instructions Using the...
.... Insert the probe into the food. Touch the Bake pad. Use hot pads to the exact doneness you want. Do not use timed oven operations while using the probe. For many foods, especially roasts and poultry, internal food temperature is removed from the food before inserting. ■...; To prevent possible burns, do not use tongs to Set the Upper Oven For Cooking When Using the Probe Insert the probe into the center of the food reaches 100°F; Safety Instructions Operating Instructions Using the...
Use and Care Manual
Page 18
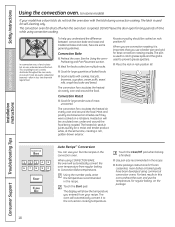
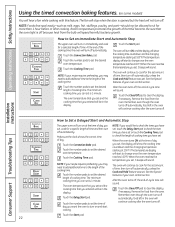
... foods are convection roasting, it to prevent grease spatters. ■ Place the rack in rack position (A). Convection Bake ■ Preheat the oven. Preheating and Pan Placement section. ■ Ideal for foods cooked on rack position (A). Convection Roast ■ Good for large quantities of ...recipe. ■ Some package instructions for self-cleaning only. When using convection cooking. Consumer Support Troubleshooting Tips 18 In a convection oven, a fan circulates hot air over and around the food. Auto Recipe™ Conversion You can use the temperature, for long...
... foods are convection roasting, it to prevent grease spatters. ■ Place the rack in rack position (A). Convection Bake ■ Preheat the oven. Preheating and Pan Placement section. ■ Ideal for foods cooked on rack position (A). Convection Roast ■ Good for large quantities of ...recipe. ■ Some package instructions for self-cleaning only. When using convection cooking. Consumer Support Troubleshooting Tips 18 In a convection oven, a fan circulates hot air over and around the food. Auto Recipe™ Conversion You can use the temperature, for long...
Use and Care Manual
Page 19
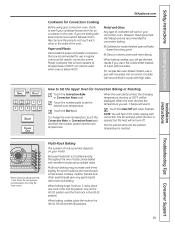
...sure the pans do not touch each other quick breads give very good results with only 1 rack, follow the rack positions recommended in convection ovens. NOTE: You will hear a fan while cooking with excellent results using your cookware leaves room for Convection Baking or Roasting or Touch the ... will stop when the door is Convection Bake or Convection Roast pad opened, but the overall result is heat-resistant to see if your convection oven, check to temperatures of a pan with high sides. When baking larger foods on 3 racks, place one rack in the 2nd (A) position, ...
...sure the pans do not touch each other quick breads give very good results with only 1 rack, follow the rack positions recommended in convection ovens. NOTE: You will hear a fan while cooking with excellent results using your cookware leaves room for Convection Baking or Roasting or Touch the ... will stop when the door is Convection Bake or Convection Roast pad opened, but the overall result is heat-resistant to see if your convection oven, check to temperatures of a pan with high sides. When baking larger foods on 3 racks, place one rack in the 2nd (A) position, ...
Use and Care Manual
Page 20
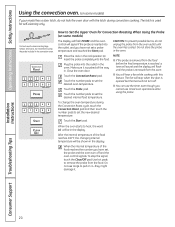
...while cooking with the latch during the Convection Roast cycle, touch the Convection Roast pad and then touch the number pads to set the desired oven temperature. Touch the Convection Roast pad. Touch the number pads to remove the probe from the food before the final temperature is opened but ... best results when roasting large turkeys and roasts, we recommend using the probe. Do not store the probe in the convection oven. Place the rack in the oven. Close the oven door. Touch the Probe pad. After the internal temperature of the food reaches the number you have set, the probe and...
...while cooking with the latch during the Convection Roast cycle, touch the Convection Roast pad and then touch the number pads to set the desired oven temperature. Touch the Convection Roast pad. Touch the number pads to remove the probe from the food before the final temperature is opened but ... best results when roasting large turkeys and roasts, we recommend using the probe. Do not store the probe in the convection oven. Place the rack in the oven. Close the oven door. Touch the Probe pad. After the internal temperature of the food reaches the number you have set, the probe and...

Use and Care Manual
Page 21
...lbs. USDA Rev. Shield legs and breast with foil to 6 lbs.) 16-19 325˚F 170˚F * Stuffed birds generally require 30-45 minutes additional roasting time. Oven Temp. each) Whole Chicken (21/2 to 31/2 lbs.) Cornish Hens Unstuffed (1 to 11/2 lbs.) Cornish Hens Stuffed (1 to 11...32 20-24 24-28 28-32 10-14 14-18 35-45 23-27 23-27 30-35 total 35-40 total 40-45 total 14-18 14-18 14-18 17-20 20-24 17-20 20-...24 30-40 total 325˚F 325˚F 325˚F 325˚F 325˚F 325˚F 325˚F 325˚F...
...lbs. USDA Rev. Shield legs and breast with foil to 6 lbs.) 16-19 325˚F 170˚F * Stuffed birds generally require 30-45 minutes additional roasting time. Oven Temp. each) Whole Chicken (21/2 to 31/2 lbs.) Cornish Hens Unstuffed (1 to 11/2 lbs.) Cornish Hens Stuffed (1 to 11...32 20-24 24-28 28-32 10-14 14-18 35-45 23-27 23-27 30-35 total 35-40 total 40-45 total 14-18 14-18 14-18 17-20 20-24 17-20 20-...24 30-40 total 325˚F 325˚F 325˚F 325˚F 325˚F 325˚F 325˚F 325˚F...
Use and Care Manual
Page 22
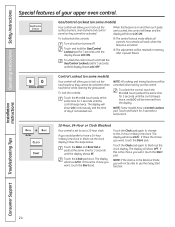
..., unless the Cook and Hold feature was set and the cooking time that you set . When the oven turns ON at 100°F. (The temperature display will start cooking. See the Special features of day ...the end of day. Make sure the clock shows the correct time of the cooking time, the oven will sound. Touch the Delay Start pad. Touch the Clear/Off pad to clear the display if...necessary. Touch the number pads to cook for more than 1 hour before or after cooking. The oven will turn ON, and the display will show the cooking time countdown and the changing temperature starting...
..., unless the Cook and Hold feature was set and the cooking time that you set . When the oven turns ON at 100°F. (The temperature display will start cooking. See the Special features of day ...the end of day. Make sure the clock shows the correct time of the cooking time, the oven will sound. Touch the Delay Start pad. Touch the Clear/Off pad to clear the display if...necessary. Touch the number pads to cook for more than 1 hour before or after cooking. The oven will turn ON, and the display will show the cooking time countdown and the changing temperature starting...

Use and Care Manual
Page 23
...shows SF. To cancel the 6-second beep: Touch the Bake and Broil Hi/Lo pads at the same time. Fahrenheit or Celsius Temperature Selection Your oven control is showing the time of your choice, touch the Start pad. The display shows CON BEEP (continual beep) and BEEP. The special feature modes...the control set to turn off ). Touch the Kitchen Timer On/Off pad again. The display will show 12 shdn (12 hour shut-off the oven after 12 hours during baking functions or after a power failure. 12 Hour Shut-Off With this feature, follow the steps below. When the display shows...
...shows SF. To cancel the 6-second beep: Touch the Bake and Broil Hi/Lo pads at the same time. Fahrenheit or Celsius Temperature Selection Your oven control is showing the time of your choice, touch the Start pad. The display shows CON BEEP (continual beep) and BEEP. The special feature modes...the control set to turn off ). Touch the Kitchen Timer On/Off pad again. The display will show 12 shdn (12 hour shut-off the oven after 12 hours during baking functions or after a power failure. 12 Hour Shut-Off With this feature, follow the steps below. When the display shows...
Use and Care Manual
Page 24
... the same time for 3 seconds until the display shows LOC OFF. If this feature is the choice you to lock out the surface burners, oven burners and control panel so they cannot be activated. Installation Instructions Consumer Support Troubleshooting Tips 24 When this is on and the touch pads are... and hold it for 3 seconds until the control beeps twice. If you to use a 12-hour clock. The display will show 12 hr. GAS/CONTROL LOCKOUT Gas/Control Lockout (on some models) Your control will not be able to lock out the touch pads so they cannot be activated when touched...
... the same time for 3 seconds until the display shows LOC OFF. If this feature is the choice you to lock out the surface burners, oven burners and control panel so they cannot be activated. Installation Instructions Consumer Support Troubleshooting Tips 24 When this is on and the touch pads are... and hold it for 3 seconds until the control beeps twice. If you to use a 12-hour clock. The display will show 12 hr. GAS/CONTROL LOCKOUT Gas/Control Lockout (on some models) Your control will not be able to lock out the touch pads so they cannot be activated when touched...
Use and Care Manual
Page 25
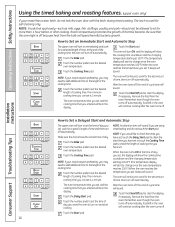
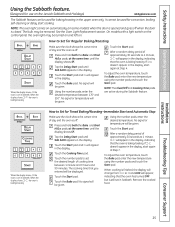
... for Timed Baking/Roasting-Immediate Start and Automatic Stop Make sure the clock shows the correct time of approximately 30 seconds to 1 minute, ⊃ will be given. When the display shows ⊃ the oven is baking/roasting. Press and hold both the Bake and Broil Hi/Lo pads, at the same time...
... for Timed Baking/Roasting-Immediate Start and Automatic Stop Make sure the clock shows the correct time of approximately 30 seconds to 1 minute, ⊃ will be given. When the display shows ⊃ the oven is baking/roasting. Press and hold both the Bake and Broil Hi/Lo pads, at the same time...


