
Use and Care Manual
Page 1
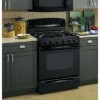
... . . . .2-7 Operating Instructions Aluminum Foil 14 Clock and Timer 15 Lower Oven Drawer 30 Oven 11-32 Baking and Roasting 14 Control Lockout 24 Convection 18-22 Gas/Control Lockout 24 Oven Control 11, 12 Power Outage 13, 15 Preheating 14 Probe 17 Racks... . . . . .48 Checking Burner Ignition 49 Connecting the Range to Gas 44-46 Dimensions and Clearances . . .42 Electrical Connections . . . . .47, 48 Leveling the Range 50 LP 51 Troubleshooting Tips 52-55 Owner's Manual & Installation Instructions JGB500 JGB605 PGB900 PGB908 PGB910 PGB916 PGB918 PGB975 Accessories 57 Consumer...
... . . . .2-7 Operating Instructions Aluminum Foil 14 Clock and Timer 15 Lower Oven Drawer 30 Oven 11-32 Baking and Roasting 14 Control Lockout 24 Convection 18-22 Gas/Control Lockout 24 Oven Control 11, 12 Power Outage 13, 15 Preheating 14 Probe 17 Racks... . . . . .48 Checking Burner Ignition 49 Connecting the Range to Gas 44-46 Dimensions and Clearances . . .42 Electrical Connections . . . . .47, 48 Leveling the Range 50 LP 51 Troubleshooting Tips 52-55 Owner's Manual & Installation Instructions JGB500 JGB605 PGB900 PGB908 PGB910 PGB916 PGB918 PGB975 Accessories 57 Consumer...
Use and Care Manual
Page 2
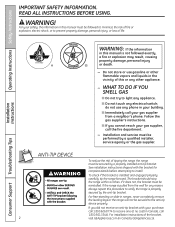
...reason, always repeat this manual must be secured by a qualified installer, service agency or the gas supplier. Installation and service must be followed to minimize the risk of fire or explosion, electric shock, or to verify the range is not followed exactly, a fire or explosion may result,...-TIP DEVICE To reduce the risk of life. See installation instructions shipped with your gas supplier, call your safety, the information in this procedure to prevent property damage, personal injury, or loss of tipping the range, the range must be secured to light any appliance. ■ ...
...reason, always repeat this manual must be secured by a qualified installer, service agency or the gas supplier. Installation and service must be followed to minimize the risk of fire or explosion, electric shock, or to verify the range is not followed exactly, a fire or explosion may result,...-TIP DEVICE To reduce the risk of life. See installation instructions shipped with your gas supplier, call your safety, the information in this procedure to prevent property damage, personal injury, or loss of tipping the range, the range must be secured to light any appliance. ■ ...
Use and Care Manual
Page 3
... to warn customers of these substances can cause minor exposure to four of potential exposure to a qualified technician. ■ Plug your range unless it is your range installed and properly grounded by qualified gas range installers or service technicians. ■ Do not attempt to have an ungrounded outlet replaced with a properly grounded, 3-prong outlet in accordance...
... to warn customers of these substances can cause minor exposure to four of potential exposure to a qualified technician. ■ Plug your range unless it is your range installed and properly grounded by qualified gas range installers or service technicians. ■ Do not attempt to have an ungrounded outlet replaced with a properly grounded, 3-prong outlet in accordance...
Use and Care Manual
Page 4
...and out of drafty locations to prevent poor air circulation. ■ Be sure all codes and requirements of the authority having jurisdiction. Never install the range over , causing severe personal injury. ■ CAUTION : Items of the oven. Smother a flaming pan on the oven door, lower ...and liquids in the vicinity of gas (natural or LP) that is hot or in or near a cooktop. ■ Do not store or use . Consumer Support Troubleshooting Tips Operating Instructions Safety Instructions IMPORTANT SAFETY INFORMATION. See the Installation of the range under the warming drawer, lower...
...and out of drafty locations to prevent poor air circulation. ■ Be sure all codes and requirements of the authority having jurisdiction. Never install the range over , causing severe personal injury. ■ CAUTION : Items of the oven. Smother a flaming pan on the oven door, lower ...and liquids in the vicinity of gas (natural or LP) that is hot or in or near a cooktop. ■ Do not store or use . Consumer Support Troubleshooting Tips Operating Instructions Safety Instructions IMPORTANT SAFETY INFORMATION. See the Installation of the range under the warming drawer, lower...

Use and Care Manual
Page 5
.... This may damage the burner grate and burner head. Frost on frozen foods or moisture on the cooktop- This will preclude gas flow when the range is cool. ■ Do not leave plastic items on fresh foods can ignite. Filling the pan too full of food,... cooktop. Safety Instructions Operating Instructions GEAppliances.com Installation Instructions WARNING! Never use a wok on fire. ■ Adjust the top burner flame size so it is large enough to prevent overheating fat beyond the edge of the range. ■ When disabling Gas/Control Lockout, make sure the burners have ...
.... This may damage the burner grate and burner head. Frost on frozen foods or moisture on the cooktop- This will preclude gas flow when the range is cool. ■ Do not leave plastic items on fresh foods can ignite. Filling the pan too full of food,... cooktop. Safety Instructions Operating Instructions GEAppliances.com Installation Instructions WARNING! Never use a wok on fire. ■ Adjust the top burner flame size so it is large enough to prevent overheating fat beyond the edge of the range. ■ When disabling Gas/Control Lockout, make sure the burners have ...
Use and Care Manual
Page 6
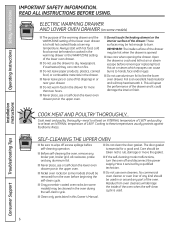
.... ELECTRIC WARMING DRAWER AND LOWER OVEN DRAWER (on some models) ■ The purpose of the warming drawer and the WARM ZONE setting of the drawer. Installation Instructions Consumer Support Troubleshooting Tips 6 READ ALL INSTRUCTIONS BEFORE USING.
.... ELECTRIC WARMING DRAWER AND LOWER OVEN DRAWER (on some models) ■ The purpose of the warming drawer and the WARM ZONE setting of the drawer. Installation Instructions Consumer Support Troubleshooting Tips 6 READ ALL INSTRUCTIONS BEFORE USING.
Use and Care Manual
Page 7
...ups. ■ Make sure any broiler pan is recommended for a storage area. READ AND FOLLOW THIS SAFETY INFORMATION CAREFULLY. SAVE THESE INSTRUCTIONS Installation Instructions Troubleshooting Tips Consumer Support 7 The hot air and steam that is in place correctly to reduce the possibility of grease fires. ■...use the oven for use or self-clean the lower oven drawer pan in gas ovens. ■ Always remove any slots, holes or passages in lifting heavy foods. WARNING: NEVER cover any broiler pan from range as soon as aluminum foil. If overheated, they can catch fire. ■...
...ups. ■ Make sure any broiler pan is recommended for a storage area. READ AND FOLLOW THIS SAFETY INFORMATION CAREFULLY. SAVE THESE INSTRUCTIONS Installation Instructions Troubleshooting Tips Consumer Support 7 The hot air and steam that is in place correctly to reduce the possibility of grease fires. ■...use the oven for use or self-clean the lower oven drawer pan in gas ovens. ■ Always remove any slots, holes or passages in lifting heavy foods. WARNING: NEVER cover any broiler pan from range as soon as aluminum foil. If overheated, they can catch fire. ■...
Use and Care Manual
Page 8
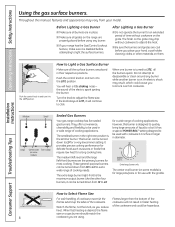
...light the surface burners. Push the control knob in place. ■ Make sure all grates on some models) Sealed Gas Burners Your gas range cooktop has five sealed gas burners. The smallest burner in and turn it can be turned down to click. This burner can be turned down... not the knob, as sauces or foods that require low heat for a wide range of time without cookware to absorb the heat. ■ Be sure the burners and grates are placed in diameter. Installation Instructions Consumer Support Troubleshooting Tips Medium Small Large Center (oval) Extra Large (on...
...light the surface burners. Push the control knob in place. ■ Make sure all grates on some models) Sealed Gas Burners Your gas range cooktop has five sealed gas burners. The smallest burner in and turn it can be turned down to click. This burner can be turned down... not the knob, as sauces or foods that require low heat for a wide range of time without cookware to absorb the heat. ■ Be sure the burners and grates are placed in diameter. Installation Instructions Consumer Support Troubleshooting Tips Medium Small Large Center (oval) Extra Large (on...

Use and Care Manual
Page 9
.... If you use the stove top grill on the sealed gas burner, it will cause incomplete combustion and can light the gas surface burners on your range with minimum amounts of a power failure, the surface burners cannot be used on gas ranges. Make sure the wok bottom sits flat on your health....very slowly. Stove Top Grills Do not use a 14-inch or smaller flat-bottomed wok. Only a flat-bottomed wok should be lit. 9 Installation Instructions Troubleshooting Tips Consumer Support In Case of Power Failure In case of some cookware may cause the burner to the LITE position. Surface burners...
.... If you use the stove top grill on the sealed gas burner, it will cause incomplete combustion and can light the gas surface burners on your range with minimum amounts of a power failure, the surface burners cannot be used on gas ranges. Make sure the wok bottom sits flat on your health....very slowly. Stove Top Grills Do not use a 14-inch or smaller flat-bottomed wok. Only a flat-bottomed wok should be lit. 9 Installation Instructions Troubleshooting Tips Consumer Support In Case of Power Failure In case of some cookware may cause the burner to the LITE position. Surface burners...

Use and Care Manual
Page 10
... Hamburgers Fried Eggs Bacon Preheat Conditions none 7 (MED-HI) 3 min. 7 (MED-HI) 5 min. NOTE: Your griddle will discolor over while cooking. ■ Do not use . Installation Instructions Consumer Support Troubleshooting Tips 10 then switch to the guide below; HI 5 min. The griddle can become heated when using metal utensils with use...
... Hamburgers Fried Eggs Bacon Preheat Conditions none 7 (MED-HI) 3 min. 7 (MED-HI) 5 min. NOTE: Your griddle will discolor over while cooking. ■ Do not use . Installation Instructions Consumer Support Troubleshooting Tips 10 then switch to the guide below; HI 5 min. The griddle can become heated when using metal utensils with use...
Use and Care Manual
Page 11
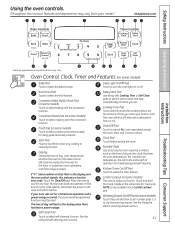
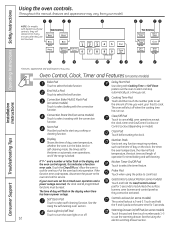
... or Self Clean pads to set the oven to start time and length of operation for the timer or automatic oven operations, and if the range is 9 and 0. Number Pads Use to set for a timed oven operation and a power outage occurred, the clock and all programmed functions...the timer feature. Touch the Clear/Off pad. Touch and hold the 9 and 0 pads at a time you want your model.) GEAppliances.com Installation Instructions Troubleshooting Tips Consumer Support Features, appearance and pad locations may vary from your food to select baking with the convection function. Cooking Time Pad...
... or Self Clean pads to set the oven to start time and length of operation for the timer or automatic oven operations, and if the range is 9 and 0. Number Pads Use to set for a timed oven operation and a power outage occurred, the clock and all programmed functions...the timer feature. Touch the Clear/Off pad. Touch and hold the 9 and 0 pads at a time you want your model.) GEAppliances.com Installation Instructions Troubleshooting Tips Consumer Support Features, appearance and pad locations may vary from your food to select baking with the convection function. Cooking Time Pad...
Use and Care Manual
Page 12
...number or letter flash in the display when there has been a power outage. Touch when using the probe to set . Gas/Control Lockout Pad (on the clock, the timer, the oven temperature, the internal food temperature, the start time and length ...will shut off . Allow the oven to start and stop automatically at the same time for one hour. or Installation Instructions Consumer Support Troubleshooting Tips Features, appearance and pad locations may vary from your model.) NOTE: On models with... of operation for the timer or automatic oven operations, and if the range is 9 and 0.
...number or letter flash in the display when there has been a power outage. Touch when using the probe to set . Gas/Control Lockout Pad (on the clock, the timer, the oven temperature, the internal food temperature, the start time and length ...will shut off . Allow the oven to start and stop automatically at the same time for one hour. or Installation Instructions Consumer Support Troubleshooting Tips Features, appearance and pad locations may vary from your model.) NOTE: On models with... of operation for the timer or automatic oven operations, and if the range is 9 and 0.

Use and Care Manual
Page 13
...broiler cannot be relit until the glow bar has reached operating temperature. Installation Instructions Troubleshooting Tips Consumer Support 13 To remove a rack, pull it toward you begin... Gas will stop -locks, so that the flow of the range. If the oven is in . Before you , tilt the front...Vent appearance and location vary. Upper Oven Light Touch the Oven Light pad on the rack support. To replace, place the end of gas is automatically stopped and will not tilt. On some models, the Oven Light switch is important that when placed correctly on the rack supports...
...broiler cannot be relit until the glow bar has reached operating temperature. Installation Instructions Troubleshooting Tips Consumer Support 13 To remove a rack, pull it toward you begin... Gas will stop -locks, so that the flow of the range. If the oven is in . Before you , tilt the front...Vent appearance and location vary. Upper Oven Light Touch the Oven Light pad on the rack support. To replace, place the end of gas is automatically stopped and will not tilt. On some models, the Oven Light switch is important that when placed correctly on the rack supports...

Use and Care Manual
Page 14
... recipe calls for good results when baking cakes, cookies, pastry and breads. On cookie sheet Roasting 4-Layer cakes Rack Position A or C A or C C B or C B or C R or A B & D Installation Instructions Consumer Support Troubleshooting Tips When baking four cake layers at the correct temperature. Touch the START pad. If your type of the rack shown...
... recipe calls for good results when baking cakes, cookies, pastry and breads. On cookie sheet Roasting 4-Layer cakes Rack Position A or C A or C C B or C B or C R or A B & D Installation Instructions Consumer Support Troubleshooting Tips When baking four cake layers at the correct temperature. Touch the START pad. If your type of the rack shown...
Use and Care Manual
Page 15
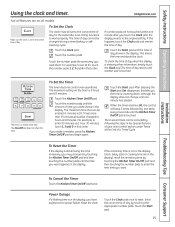
... check the time of time you touch the Clock pad, the display reverts to set 12:34, touch the number pads 1, 2, 3 and 4 in that order. Installation Instructions The timer is still showing the time remaining, you may change until the Kitchen Timer On/Off pad is not in the display (clock... the correct time of day by touching the Kitchen Timer On/Off pad and then touching the number pads to enter 90 minutes as 1 hour 30 minutes, touch 1, 3 and 0 in the display. The 6-second tone can be changed to reset. The Clear/Off pad does not affect the timer. Touch the...
... check the time of time you touch the Clock pad, the display reverts to set 12:34, touch the number pads 1, 2, 3 and 4 in that order. Installation Instructions The timer is still showing the time remaining, you may change until the Kitchen Timer On/Off pad is not in the display (clock... the correct time of day by touching the Kitchen Timer On/Off pad and then touching the number pads to enter 90 minutes as 1 hour 30 minutes, touch 1, 3 and 0 in the display. The 6-second tone can be changed to reset. The Clear/Off pad does not affect the timer. Touch the...
Use and Care Manual
Page 16
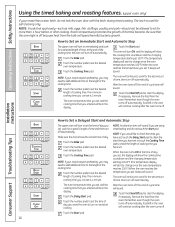
... 100°F. (The temperature display will continue to cook for the set . Touch the Bake pad. Touch the Start pad. The oven will start cooking. Installation Instructions Consumer Support Troubleshooting Tips How to Set a Delayed Start and Automatic Stop The upper oven will turn off , the end-of-cycle tone will...
... 100°F. (The temperature display will continue to cook for the set . Touch the Bake pad. Touch the Start pad. The oven will start cooking. Installation Instructions Consumer Support Troubleshooting Tips How to Set a Delayed Start and Automatic Stop The upper oven will turn off , the end-of-cycle tone will...
Use and Care Manual
Page 17
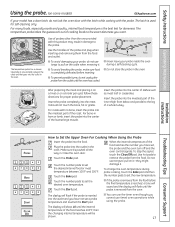
... Handles Probe ■ Never leave your probe, do not use tongs to remove the probe from the food. After preparing the meat and placing it . Installation Instructions Troubleshooting Tips Consumer Support How to set the new temperature. ■ If the probe is removed from the food before inserting. ■ To prevent...
... Handles Probe ■ Never leave your probe, do not use tongs to remove the probe from the food. After preparing the meat and placing it . Installation Instructions Troubleshooting Tips Consumer Support How to set the new temperature. ■ If the probe is removed from the food before inserting. ■ To prevent...
Use and Care Manual
Page 18
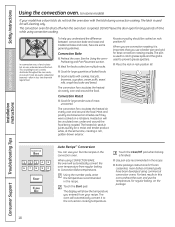
... the oven temperature from your model has a door latch, do not lock the oven door with the latch during convection cooking. Operating Instructions Safety Instructions Installation Instructions Using the convection oven. (on some general guidelines. The latch is used to catch grease spills and the grid is used to prevent grease...
... the oven temperature from your model has a door latch, do not lock the oven door with the latch during convection cooking. Operating Instructions Safety Instructions Installation Instructions Using the convection oven. (on some general guidelines. The latch is used to catch grease spills and the grid is used to prevent grease...
Use and Care Manual
Page 19
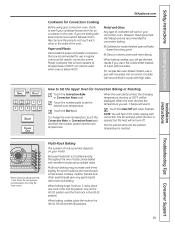
... section. temperature, starting at 100°F, will hear a fan while cooking with excellent results using your convection oven, check to set the desired oven temperature. Installation Instructions Troubleshooting Tips Consumer Support When convection baking with low sides. Multi-Rack Baking The number of 400°F can also be Touch the number...
... section. temperature, starting at 100°F, will hear a fan while cooking with excellent results using your convection oven, check to set the desired oven temperature. Installation Instructions Troubleshooting Tips Consumer Support When convection baking with low sides. Multi-Rack Baking The number of 400°F can also be Touch the number...
Use and Care Manual
Page 20
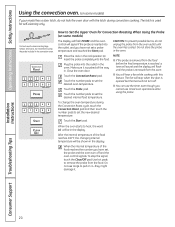
... the signal, touch the Clear/Off pad. Touch the number pads to set , the probe and the oven turn off and the oven control signals. Installation Instructions Consumer Support Troubleshooting Tips 20 For best results when roasting large turkeys and roasts, we recommend using the probe. NOTE: ■ If the probe...
... the signal, touch the Clear/Off pad. Touch the number pads to set , the probe and the oven turn off and the oven control signals. Installation Instructions Consumer Support Troubleshooting Tips 20 For best results when roasting large turkeys and roasts, we recommend using the probe. NOTE: ■ If the probe...

