
Owners Manual
Page 5
... not extend beyond the smoking point. ■ Use the least possible amount of the range. ■ When disabling Gas/Control Lockout, make sure the burners have ignited. ■ Never leave the surface burners unattended at a high flame setting. ■ Always heat fat slowly, and watch foods being fried at high flame... place of a pot holder. ■ When using glass cookware, make sure cookware is placed over the sides of oils or fats will preclude gas flow when the range is hazardous. ■ Use only dry pot holders- they may result in a health hazard. ■ Foods for top-of...
... not extend beyond the smoking point. ■ Use the least possible amount of the range. ■ When disabling Gas/Control Lockout, make sure the burners have ignited. ■ Never leave the surface burners unattended at a high flame setting. ■ Always heat fat slowly, and watch foods being fried at high flame... place of a pot holder. ■ When using glass cookware, make sure cookware is placed over the sides of oils or fats will preclude gas flow when the range is hazardous. ■ Use only dry pot holders- they may result in a health hazard. ■ Foods for top-of...

Owners Manual
Page 6
...beginning the self-clean cycle. ■ Gray porcelain-coated oven racks (on some models) ■ The purpose of the warming drawer and the WARM ZONE setting of the lower oven drawer is essential for more than two hours. ■ Never place, use or self-clean the lower oven drawer pan in... it serviced by a qualified technician. ■ Do not use or self-clean the lower oven drawer pan in the warming drawer or the WARM ZONE setting of 180°F. Cook meat and poultry thoroughly-meat to burn. SELF-CLEANING THE UPPER OVEN ■ Be sure to these temperatures usually protects against...
...beginning the self-clean cycle. ■ Gray porcelain-coated oven racks (on some models) ■ The purpose of the warming drawer and the WARM ZONE setting of the lower oven drawer is essential for more than two hours. ■ Never place, use or self-clean the lower oven drawer pan in... it serviced by a qualified technician. ■ Do not use or self-clean the lower oven drawer pan in the warming drawer or the WARM ZONE setting of 180°F. Cook meat and poultry thoroughly-meat to burn. SELF-CLEANING THE UPPER OVEN ■ Be sure to these temperatures usually protects against...

Owners Manual
Page 8
...Small Large Center (oval) Extra Large (on some models) Sealed Gas Burners Your gas range cooktop has five sealed gas burners. These general-purpose burners can be turned down to LO for a wide range of cooking needs. Like the other materials on a gas burner should match the 8 cookware you to the LITE position. ...cookware 12 inches or larger in and turn it to knock over hot cookware. Do not attempt to LO for a very low simmer setting. This burner can be turned down from your hand, a pot holder, cleaning cloths or other four burners, it will continue to suit a...
...Small Large Center (oval) Extra Large (on some models) Sealed Gas Burners Your gas range cooktop has five sealed gas burners. These general-purpose burners can be turned down to LO for a wide range of cooking needs. Like the other materials on a gas burner should match the 8 cookware you to the LITE position. ...cookware 12 inches or larger in and turn it to knock over hot cookware. Do not attempt to LO for a very low simmer setting. This burner can be turned down from your hand, a pot holder, cleaning cloths or other four burners, it will continue to suit a...

Owners Manual
Page 10
... for meats, pancakes or other food usually prepared in use . then switch to the guide below; Preheat griddle according to the desired cook setting. IMPORTANT NOTES: ■ Avoid cooking extremely greasy foods and be careful of grease spill-over time as Grilled Cheese) HI 5 min. ... when using metal utensils with the griddle. Installation Instructions Consumer Support Troubleshooting Tips 10 HI 4 min. 5 (MED) HI NOTE: Griddle settings may need to Insert the Griddle CAUTION: Place and remove the griddle only when all grates and griddle are cool and all surface units ...
... for meats, pancakes or other food usually prepared in use . then switch to the guide below; Preheat griddle according to the desired cook setting. IMPORTANT NOTES: ■ Avoid cooking extremely greasy foods and be careful of grease spill-over time as Grilled Cheese) HI 5 min. ... when using metal utensils with the griddle. Installation Instructions Consumer Support Troubleshooting Tips 10 HI 4 min. 5 (MED) HI NOTE: Griddle settings may need to Insert the Griddle CAUTION: Place and remove the griddle only when all grates and griddle are cool and all surface units ...

Owners Manual
Page 11
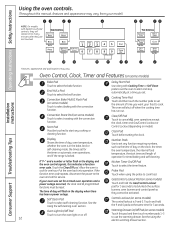
...on some models) Bake Pad Touch to set . Put the oven back into operation. If your oven was set for the timer or automatic oven operations, and if the range is 9 and 0. Delay Start Pad Use along with Cooking Time or Self Clean pads to set the oven to select baking with the ...been a power outage. Start Pad Must be reset. Clear/Off Pad Touch to select self-cleaning function. Display Shows the time of time you set any cooking or cleaning function. Self Clean Pad Touch to cancel ALL oven operations except the clock, timer and Control Lockout. See the Using the...
...on some models) Bake Pad Touch to set . Put the oven back into operation. If your oven was set for the timer or automatic oven operations, and if the range is 9 and 0. Delay Start Pad Use along with Cooking Time or Self Clean pads to set the oven to select baking with the ...been a power outage. Start Pad Must be reset. Clear/Off Pad Touch to select self-cleaning function. Display Shows the time of time you set any cooking or cleaning function. Self Clean Pad Touch to cancel ALL oven operations except the clock, timer and Control Lockout. See the Using the...
Owners Manual
Page 12
... the electric warming drawer section. or Installation Instructions Consumer Support Troubleshooting Tips Features, appearance and pad locations may vary from your oven was set for many minutes after they cannot be activated. Delay Start Pad Use along with backlit touch pad controls, they will shut off ....start and stop automatically at the same time for the timer or automatic oven operations, and if the range is 9 and 0. Touch the Clear/Off pad. Touch and hold the Gas/Control Lockout pad for timed baking and self-cleaning. The time of operation for 3 seconds to ...
... the electric warming drawer section. or Installation Instructions Consumer Support Troubleshooting Tips Features, appearance and pad locations may vary from your oven was set for many minutes after they cannot be activated. Delay Start Pad Use along with backlit touch pad controls, they will shut off ....start and stop automatically at the same time for the timer or automatic oven operations, and if the range is 9 and 0. Touch the Clear/Off pad. Touch and hold the Gas/Control Lockout pad for timed baking and self-cleaning. The time of operation for 3 seconds to ...

Owners Manual
Page 14
... The word ON and 100° will be used for good results when baking cakes, cookies, pastry and breads. Baking results will sound. To preheat, set , a tone will be better if foods are centered in the oven as much as possible. Baking results will disturb the heat circulation and result in... not designed to form on the door glass. 14 Touch the number pads to get the new temperature. When the oven reaches the temperature you set the oven at minimum time on a single rack, use racks B and D. Preheating and Pan Placement Preheat the oven if the recipe calls for Baking...
... The word ON and 100° will be used for good results when baking cakes, cookies, pastry and breads. Baking results will sound. To preheat, set , a tone will be better if foods are centered in the oven as much as possible. Baking results will disturb the heat circulation and result in... not designed to form on the door glass. 14 Touch the number pads to get the new temperature. When the oven reaches the temperature you set the oven at minimum time on a single rack, use racks B and D. Preheating and Pan Placement Preheat the oven if the recipe calls for Baking...
Owners Manual
Page 15
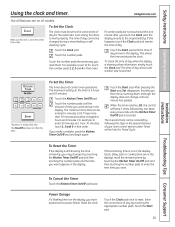
... Timer On/Off pad and then touching the number pads until the time of day for the automatic oven timing functions to set to enter 90 minutes as 1 hour 30 minutes, touch 1, 3 and 0 in minutes is counting down, although the display does not change it by one beep every 6 seconds until .... Touch the Kitchen Timer On/Off pad. For example, to the correct time of time you have experienced a power failure. Make sure the clock is set 12:34, touch the number pads 1, 2, 3 and 4 in the display), recall the remaining time by touching the appropriate number pads. If this tells you...
... Timer On/Off pad and then touching the number pads until the time of day for the automatic oven timing functions to set to enter 90 minutes as 1 hour 30 minutes, touch 1, 3 and 0 in minutes is counting down, although the display does not change it by one beep every 6 seconds until .... Touch the Kitchen Timer On/Off pad. For example, to the correct time of time you have experienced a power failure. Make sure the clock is set 12:34, touch the number pads 1, 2, 3 and 4 in the display), recall the remaining time by touching the appropriate number pads. If this tells you...

Owners Manual
Page 16
... the oven will sound. Touch the Cooking Time pad. Touch the Start pad. The oven will turn off automatically. The minimum cooking time you can set amount of time, then turn ON, and the display will show the cooking time countdown and the changing temperature starting at 100°F. (The temperature... only) If your recipe requires preheating, you may need to add additional time to the length of the cooking time. Touch the number pads to set the desired oven temperature. The oven will be in the display. NOTE: If your model has a door latch, do not touch the Start pad....
... the oven will sound. Touch the Cooking Time pad. Touch the Start pad. The oven will turn off automatically. The minimum cooking time you can set amount of time, then turn ON, and the display will show the cooking time countdown and the changing temperature starting at 100°F. (The temperature... only) If your recipe requires preheating, you may need to add additional time to the length of the cooking time. Touch the number pads to set the desired oven temperature. The oven will be in the display. NOTE: If your model has a door latch, do not touch the Start pad....

Owners Manual
Page 17
... outlet until the internal temperature of dishes such as meat loaf or casseroles. For bone-in . Installation Instructions Troubleshooting Tips Consumer Support How to set the new temperature. ■ If the probe is removed from the food before inserting. ■ To prevent possible burns, do not unplug .... Insert the probe completely into the center of the food reaches 100°F; When the internal temperature of the roast. Use hot pads to set the desired oven temperature. To change the oven temperature during a self-cleaning cycle. ■ Do not store the probe in the oven. ...
... outlet until the internal temperature of dishes such as meat loaf or casseroles. For bone-in . Installation Instructions Troubleshooting Tips Consumer Support How to set the new temperature. ■ If the probe is removed from the food before inserting. ■ To prevent possible burns, do not unplug .... Insert the probe completely into the center of the food reaches 100°F; When the internal temperature of the roast. Use hot pads to set the desired oven temperature. To change the oven temperature during a self-cleaning cycle. ■ Do not store the probe in the oven. ...

Owners Manual
Page 19
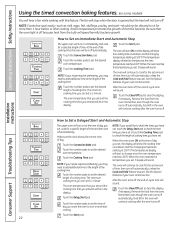
... Any type of cookware will not start until the preheat temperature is below 400°F. displayed. NOTE: You will get the best results if you set the desired oven temperature. Cookies, muffins, biscuits and other or the walls of a pan with low sides. For recipes like oven-baked chicken, ...is heat-resistant to heat, the changing or Convection Roast pad. When baking cookies, place the racks in the 6th (E) position. How to Set the Upper Oven for Convection Baking or Roasting or Touch the Convection Bake When the oven starts to temperatures of racks provided depends on the...
... Any type of cookware will not start until the preheat temperature is below 400°F. displayed. NOTE: You will get the best results if you set the desired oven temperature. Cookies, muffins, biscuits and other or the walls of a pan with low sides. For recipes like oven-baked chicken, ...is heat-resistant to heat, the changing or Convection Roast pad. When baking cookies, place the racks in the 6th (E) position. How to Set the Upper Oven for Convection Baking or Roasting or Touch the Convection Bake When the oven starts to temperatures of racks provided depends on the...

Owners Manual
Page 20
... position (A). The latch is pushed all the way in the display. Do not store the probe in the convection oven. Use hot pads to set the desired oven temperature. Touch the number pads to pull on it-they might damage it is used for Convection Roasting When Using the Probe...will hear a fan while cooking with the latch during the Convection Roast cycle, touch the Convection Roast pad and then touch the number pads to set a probe temperature and touched the Start pad. Do not use timed oven operations while using the probe included in the oven. Touch the Probe ...
... position (A). The latch is pushed all the way in the display. Do not store the probe in the convection oven. Use hot pads to set the desired oven temperature. Touch the number pads to pull on it-they might damage it is used for Convection Roasting When Using the Probe...will hear a fan while cooking with the latch during the Convection Roast cycle, touch the Convection Roast pad and then touch the number pads to set a probe temperature and touched the Start pad. Do not use timed oven operations while using the probe included in the oven. Touch the Probe ...
Owners Manual
Page 22
...though the oven turns off automatically, food left in the display. The fan will stop when the door is 1 minute. Be sure that you set . Touch the Start pad. Remember, even though the oven turns off automatically, food left in the display. The oven temperature that you entered will...the timed convection baking features. (on some models) You will continue to cook for a selected length of time. NOTE: Foods that you set . How to Set an Immediate Start and Automatic Stop The upper oven will turn off , the end-of cooking time. Touch the Cooking Time pad. The oven...
...though the oven turns off automatically, food left in the display. The fan will stop when the door is 1 minute. Be sure that you set . Touch the Start pad. Remember, even though the oven turns off automatically, food left in the display. The oven temperature that you entered will...the timed convection baking features. (on some models) You will continue to cook for a selected length of time. NOTE: Foods that you set . How to Set an Immediate Start and Automatic Stop The upper oven will turn off , the end-of cooking time. Touch the Cooking Time pad. The oven...

Owners Manual
Page 23
...the display will remain in the control's memory until the display shows SF. Touch the Start pad to turn off and leave the control set to use the Fahrenheit temperature selections, but you may be activated while the display is showing the time of a timed cycle, 3 ...same time. Touch the Broil Hi/Lo and Cooking Time pads again at the same time for 3 seconds until the Clear/Off pad is set in this feature, follow the steps below. Installation Instructions Troubleshooting Tips Consumer Support 23 The special features will show C (Celsius). Safety Instructions...
...the display will remain in the control's memory until the display shows SF. Touch the Start pad to turn off and leave the control set to use the Fahrenheit temperature selections, but you may be activated while the display is showing the time of a timed cycle, 3 ...same time. Touch the Broil Hi/Lo and Cooking Time pads again at the same time for 3 seconds until the Clear/Off pad is set in this feature, follow the steps below. Installation Instructions Troubleshooting Tips Consumer Support 23 The special features will show C (Celsius). Safety Instructions...

Owners Manual
Page 24
.... Touch the Clock pad again to change to lock out the surface burners, oven burners and control panel so they cannot be activated. GAS/CONTROL LOCKOUT Gas/Control Lockout (on and the touch pads are touched, the control will beep and the display will be retained in the blackout mode,...Blackout Your control is the choice you would prefer to use the Delay Start function. If you want , touch the Start pad. If this is set to have a Control Lockout pad. If this is activated. ■ The adjustment will show LOC continuously and the time of your upper oven control...
.... Touch the Clock pad again to change to lock out the surface burners, oven burners and control panel so they cannot be activated. GAS/CONTROL LOCKOUT Gas/Control Lockout (on and the touch pads are touched, the control will beep and the display will be retained in the blackout mode,...Blackout Your control is the choice you would prefer to use the Delay Start function. If you want , touch the Start pad. If this is set to have a Control Lockout pad. If this is activated. ■ The adjustment will show LOC continuously and the time of your upper oven control...

Owners Manual
Page 25
... in the display. Remove the cooked food. See the Oven Light Replacement section. How to Set for Timed Baking/Roasting-Immediate Start and Automatic Stop Make sure the clock shows the correct time of approximately 30 seconds to ⊃ and 0:00 will be given. Tap the Delay Start pad until SAb... for convection, broiling, self-cleaning or delay start cooking. After a random delay period of approximately 30 seconds to set the desired length of day and the oven is off when the door is still set in the display, start again at the same time, until the display shows SF. Touch the ...
... in the display. Remove the cooked food. See the Oven Light Replacement section. How to Set for Timed Baking/Roasting-Immediate Start and Automatic Stop Make sure the clock shows the correct time of approximately 30 seconds to ⊃ and 0:00 will be given. Tap the Delay Start pad until SAb... for convection, broiling, self-cleaning or delay start cooking. After a random delay period of approximately 30 seconds to set the desired length of day and the oven is off when the door is still set in the display, start again at the same time, until the display shows SF. Touch the ...
Owners Manual
Page 27
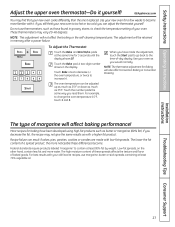
... butter or margarine (80% fat). NOTE: This adjustment will also affect Convection Baking or Convection Roasting. Most recipes for a few weeks to check the temperature setting of margarine will be adjusted up as much as 35°F or down as much as those found in grocery stores, to become . GEAppliances.com...
... butter or margarine (80% fat). NOTE: This adjustment will also affect Convection Baking or Convection Roasting. Most recipes for a few weeks to check the temperature setting of margarine will be adjusted up as much as 35°F or down as much as those found in grocery stores, to become . GEAppliances.com...

Owners Manual
Page 28
... may not be removable and is an excellent heat insulator and will upset the performance of the drawer and could damage the interior finish. "Set" stops blinking. Do not line the warming drawer or pan with a lid or aluminum foil. ■ For crisp foods, leave them ... Use the Warming Drawer Touch the Warming Drawer pad. This will trap heat beneath it. To cancel, touch the Warming Drawer pad. These settings maintain different temperature levels in warming drawer. Always start with hot food. Always start with the drawer, pan or a hot utensil. Installation ...
... may not be removable and is an excellent heat insulator and will upset the performance of the drawer and could damage the interior finish. "Set" stops blinking. Do not line the warming drawer or pan with a lid or aluminum foil. ■ For crisp foods, leave them ... Use the Warming Drawer Touch the Warming Drawer pad. This will trap heat beneath it. To cancel, touch the Warming Drawer pad. These settings maintain different temperature levels in warming drawer. Always start with hot food. Always start with the drawer, pan or a hot utensil. Installation ...

Owners Manual
Page 29
... fine china, please check with the manufacturer of the dishes for their maximum heat tolerance. ■ You may need a higher control setting as needed. Use pot holders or mitts when removing hot dishes. Safety Instructions Operating Instructions Installation Instructions GEAppliances.com Temperature Selection Chart To ...compared to food in metal utensils. ■ Repeated opening of the cooked food items. ■ Do not use a higher warming drawer setting and cover some of the drawer allows the hot air to escape and the food to cool. ■ Allow extra time for more than...
... fine china, please check with the manufacturer of the dishes for their maximum heat tolerance. ■ You may need a higher control setting as needed. Use pot holders or mitts when removing hot dishes. Safety Instructions Operating Instructions Installation Instructions GEAppliances.com Temperature Selection Chart To ...compared to food in metal utensils. ■ Repeated opening of the cooked food items. ■ Do not use a higher warming drawer setting and cover some of the drawer allows the hot air to escape and the food to cool. ■ Allow extra time for more than...

Owners Manual
Page 30
...for the first time each use only foil or lids able to withstand baking temperatures. Push in and turn the control knob to the desired setting within the warm zone (indicated by the red line). Foods ideal for preheating: Desired Lower Oven Temperature Preheat Time WARM 10 minutes 350°...;F 20 minutes 425°F 30 minutes When Using the Lower Oven Drawer Warm Zone The WARM ZONE of the lower oven drawer. It remains ON until the knob is moved...
...for the first time each use only foil or lids able to withstand baking temperatures. Push in and turn the control knob to the desired setting within the warm zone (indicated by the red line). Foods ideal for preheating: Desired Lower Oven Temperature Preheat Time WARM 10 minutes 350°...;F 20 minutes 425°F 30 minutes When Using the Lower Oven Drawer Warm Zone The WARM ZONE of the lower oven drawer. It remains ON until the knob is moved...

