Use and Care Manual
Page 1
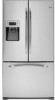
...del propietario y instalación La sección en español empieza en la página 95 Write the model and serial numbers here: Model Serial Find these numbers on a label on the left side, near the middle of California Water Treatment Device Certificate 48...Warranty for U.S. Bottom RefrigeratoFreezerrs GEAppliances.com Safety Instructions 2, 3 Operating Instructions Automatic Icemaker 20 Care and Cleaning 21, 22 Control for LCD Models 4-11 Control for Non-LCD Models . . . .12, 13 Crispers and Pans 18 Dispenser 14 Freezer 19 Fresh Food Storage Options . . . .16, 17 ...
...del propietario y instalación La sección en español empieza en la página 95 Write the model and serial numbers here: Model Serial Find these numbers on a label on the left side, near the middle of California Water Treatment Device Certificate 48...Warranty for U.S. Bottom RefrigeratoFreezerrs GEAppliances.com Safety Instructions 2, 3 Operating Instructions Automatic Icemaker 20 Care and Cleaning 21, 22 Control for LCD Models 4-11 Control for Non-LCD Models . . . .12, 13 Crispers and Pans 18 Dispenser 14 Freezer 19 Fresh Food Storage Options . . . .16, 17 ...
Use and Care Manual
Page 4
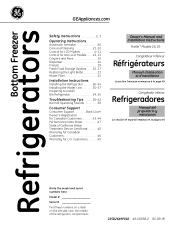
... protective film covering the temperature controls. Freezer Button: Displays actual as well as set temperatures in the lower right hand corner of substitutions for LCD models. The temperature controls are not readily available. When TurboCool is the default display on usage and operating environment. Nutrition Facts: Find basic nutrition information for...
... protective film covering the temperature controls. Freezer Button: Displays actual as well as set temperatures in the lower right hand corner of substitutions for LCD models. The temperature controls are not readily available. When TurboCool is the default display on usage and operating environment. Nutrition Facts: Find basic nutrition information for...
Use and Care Manual
Page 12
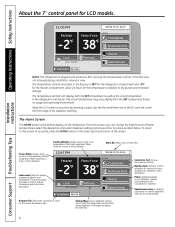
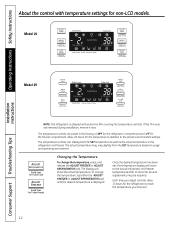
... as the actual temperature in the factory at 38°F for the refrigerator compartment and -2°F for non-LCD models. Several adjustments may vary slightly from the SET temperature based on usage and operating environment. Operating Instructions Safety Instructions About... the control with protective film covering the temperature controls. Model 26 ENERGY SAVER ADJUST FREEZER (Hold 3 sec for Turbo Freeze) ICE & WATER (Hold 3 sec to Lock Control) Model 29 Installation Instructions Consumer Support Troubleshooting Tips NOTE: The refrigerator is displayed...
... as the actual temperature in the factory at 38°F for the refrigerator compartment and -2°F for non-LCD models. Several adjustments may vary slightly from the SET temperature based on usage and operating environment. Operating Instructions Safety Instructions About... the control with protective film covering the temperature controls. Model 26 ENERGY SAVER ADJUST FREEZER (Hold 3 sec for Turbo Freeze) ICE & WATER (Hold 3 sec to Lock Control) Model 29 Installation Instructions Consumer Support Troubleshooting Tips NOTE: The refrigerator is displayed...
Use and Care Manual
Page 13
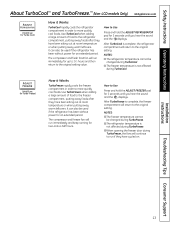
... and keep running for 3 seconds until you hear the sound and the displays. Safety Instructions Operating Instructions About TurboCool™ and TurboFreeze.™ (Non-LCD models Only) GEAppliances.com ADJUST REFRIGERATOR (Hold 3 sec for an extended period. It can also be used if the refrigerator has been without power for Turbo...
... and keep running for 3 seconds until you hear the sound and the displays. Safety Instructions Operating Instructions About TurboCool™ and TurboFreeze.™ (Non-LCD models Only) GEAppliances.com ADJUST REFRIGERATOR (Hold 3 sec for an extended period. It can also be used if the refrigerator has been without power for Turbo...
Use and Care Manual
Page 14
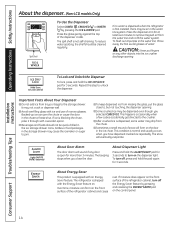
... regularly. Repeat this step to the crusher. Cans, bottles or food packages in the ice chute. Operating Instructions Safety Instructions About the dispenser. (Non-LCD models Only) ENERGY SAVER ADJUST FREEZER (Hold 3 sec for Turbo Freeze) ICE & WATER (Hold 3 sec to Reset Filter) TURBO FREEZE TURBO COOL ˚F -2˚ F Recommended CLIMATE...
... regularly. Repeat this step to the crusher. Cans, bottles or food packages in the ice chute. Operating Instructions Safety Instructions About the dispenser. (Non-LCD models Only) ENERGY SAVER ADJUST FREEZER (Hold 3 sec for Turbo Freeze) ICE & WATER (Hold 3 sec to Reset Filter) TURBO FREEZE TURBO COOL ˚F -2˚ F Recommended CLIMATE...
Use and Care Manual
Page 15
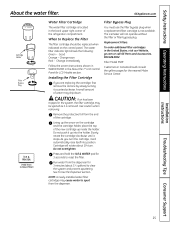
...sputtering. Installing the Filter Cartridge If you turn . CAUTION: If air has been trapped in the United States, visit our Website, ge.com or call GE Parts and Accessories, 800.626.2002. Use caution when removing. As you are replacing the cartridge, first remove the old one ...Remove the protective foil from the dispenser for 3 seconds to Replace the Filter The filter cartridge should consult the yellow pages for LCD Models section. Cartridge will not operate without the filter or filter bypass plug. See To Use the Dispenser section. Safety Instructions Operating Instructions About...
...sputtering. Installing the Filter Cartridge If you turn . CAUTION: If air has been trapped in the United States, visit our Website, ge.com or call GE Parts and Accessories, 800.626.2002. Use caution when removing. As you are replacing the cartridge, first remove the old one ...Remove the protective foil from the dispenser for 3 seconds to Replace the Filter The filter cartridge should consult the yellow pages for LCD Models section. Cartridge will not operate without the filter or filter bypass plug. See To Use the Dispenser section. Safety Instructions Operating Instructions About...
Use and Care Manual
Page 17
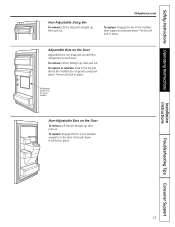
... place. The bin will lock in the molded supports on the door and push down. It will lock in place. Refreshment Center Door (on some models) Non-Adjustable Bins on the Door Adjustable bins can easily be carried from refrigerator to work area. Installation Instructions Troubleshooting Tips Consumer Support 17 To...
... place. The bin will lock in the molded supports on the door and push down. It will lock in place. Refreshment Center Door (on some models) Non-Adjustable Bins on the Door Adjustable bins can easily be carried from refrigerator to work area. Installation Instructions Troubleshooting Tips Consumer Support 17 To...
Use and Care Manual
Page 18
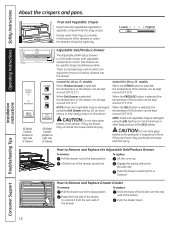
...Hook the back of the divider over the rear wall of the drawer. This drawer can be kept around 34°F (1°C). models When the CITRUS button is selected, the temperature of the drawer can be damaged using the Deli Drawer setting. Do not store lettuce ..., the temperature of the drawer can break and cause personal injury. Operating Instructions Safety Instructions Installation Instructions About the crispers and pans. 26 Model Controls (located on right side of drawer) Control for large miscellaneous items. There is a temperature control which can be kept around 41°...
...Hook the back of the divider over the rear wall of the drawer. This drawer can be kept around 34°F (1°C). models When the CITRUS button is selected, the temperature of the drawer can be damaged using the Deli Drawer setting. Do not store lettuce ..., the temperature of the drawer can break and cause personal injury. Operating Instructions Safety Instructions Installation Instructions About the crispers and pans. 26 Model Controls (located on right side of drawer) Control for large miscellaneous items. There is a temperature control which can be kept around 41°...
Use and Care Manual
Page 20
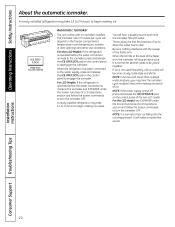
...fills to the water supply, press and release the ICE OFF/LOCK pad on the freezer compartment temperature, room temperature, number of the non-LCD model. It is made to the icemaker, see ICEMAKER under the Screen Functions of LCD Operations section and follow the screen commands to the icemaker, ... a marble-like sound. NOTE: If the water supply is made to turn the icemaker OFF. Be sure nothing interferes with water. For Non-LCD Models: If the refrigerator is operated before the water connection is shut off, press and release the ICE OFF/LOCK pad on the control panel to...
...fills to the water supply, press and release the ICE OFF/LOCK pad on the freezer compartment temperature, room temperature, number of the non-LCD model. It is made to the icemaker, see ICEMAKER under the Screen Functions of LCD Operations section and follow the screen commands to the icemaker, ... a marble-like sound. NOTE: If the water supply is made to turn the icemaker OFF. Be sure nothing interferes with water. For Non-LCD Models: If the refrigerator is operated before the water connection is shut off, press and release the ICE OFF/LOCK pad on the control panel to...
Use and Care Manual
Page 21
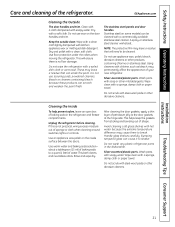
Use floor protection under the rollers when moving the refrigerator. Stainless steel (on some models) can cause it to break. A spray-on the inside surface between the doors. Silver-accented plastic parts. Wipe clean with a commercially available stainless steel cleaner. ...
Use floor protection under the rollers when moving the refrigerator. Stainless steel (on some models) can cause it to break. A spray-on the inside surface between the doors. Silver-accented plastic parts. Wipe clean with a commercially available stainless steel cleaner. ...
Use and Care Manual
Page 22
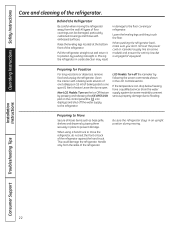
... the refrigerator away from the sides of floor coverings can drop below freezing, have a qualified servicer drain the water supply system (on some models) and ensure the anti-tip bracket is engaged (if equipped). When using a hand truck to the floor covering or refrigerator. Handle only ... out and return it straight in place to one tablespoon (15 ml) of water. Installation Instructions Consumer Support Troubleshooting Tips 22 Non-LCD Models: Turn on the Ice Off feature by taping them securely in . Behind the Refrigerator Be careful when moving . Preparing for Vacation For ...
... the refrigerator away from the sides of floor coverings can drop below freezing, have a qualified servicer drain the water supply system (on some models) and ensure the anti-tip bracket is engaged (if equipped). When using a hand truck to the floor covering or refrigerator. Handle only ... out and return it straight in place to one tablespoon (15 ml) of water. Installation Instructions Consumer Support Troubleshooting Tips 22 Non-LCD Models: Turn on the Ice Off feature by taping them securely in . Behind the Refrigerator Be careful when moving . Preparing for Vacation For ...
Use and Care Manual
Page 24
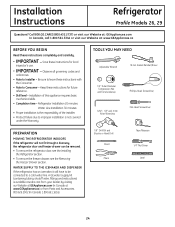
... these instructions completely and carefully. • IMPORTANT - Keep these instructions for future reference. • Skill level - A GE water supply kit (containing tubing, shutoff valve, fittings and instructions) is the responsibility of this appliance requires basic mechanical skills.... • Completion time - Installation Instructions Refrigerator Profile Models 26, 29 Questions? PREPARATION MOVING THE REFRIGERATOR INDOORS If the refrigerator will have to improper installation is not covered...
... these instructions completely and carefully. • IMPORTANT - Keep these instructions for future reference. • Skill level - A GE water supply kit (containing tubing, shutoff valve, fittings and instructions) is the responsibility of this appliance requires basic mechanical skills.... • Completion time - Installation Instructions Refrigerator Profile Models 26, 29 Questions? PREPARATION MOVING THE REFRIGERATOR INDOORS If the refrigerator will have to improper installation is not covered...
Use and Care Manual
Page 30
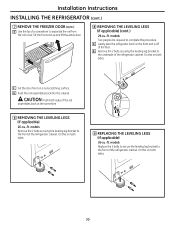
... the front end is off of the rail assemblies back at the same time. 8 REMOVING THE LEVELING LEGS (if applicable) 26-cu.-ft. models Two people are required to complete this on both sides. CAUTION: Push both sides. 9 REPLACING THE LEVELING LEGS (if applicable) 26-cu.-ft.... B Remove the 2 bolts securing the leveling leg bracket to the front of the refrigerator cabinet. models Replace the 2 bolts to secure the leveling leg bracket to separate the rail from the rail cover. Installation Instructions INSTALLING THE REFRIGERATOR (cont.) 7 REMOVE...
... the front end is off of the rail assemblies back at the same time. 8 REMOVING THE LEVELING LEGS (if applicable) 26-cu.-ft. models Two people are required to complete this on both sides. CAUTION: Push both sides. 9 REPLACING THE LEVELING LEGS (if applicable) 26-cu.-ft.... B Remove the 2 bolts securing the leveling leg bracket to the front of the refrigerator cabinet. models Replace the 2 bolts to secure the leveling leg bracket to separate the rail from the rail cover. Installation Instructions INSTALLING THE REFRIGERATOR (cont.) 7 REMOVE...
Use and Care Manual
Page 31
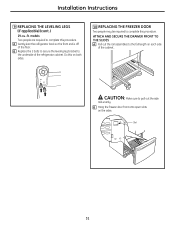
... the freezer door front onto open slots on each side of the cabinet. Installation Instructions 9 REPLACING THE LEVELING LEGS (if applicable) (cont.) 29-cu.-ft. models Two people are required to the full length on the sides. CAUTION: Make sure to the underside of the floor. A Gently lean the refrigerator back...
... the freezer door front onto open slots on each side of the cabinet. Installation Instructions 9 REPLACING THE LEVELING LEGS (if applicable) (cont.) 29-cu.-ft. models Two people are required to the full length on the sides. CAUTION: Make sure to the underside of the floor. A Gently lean the refrigerator back...
Use and Care Manual
Page 35
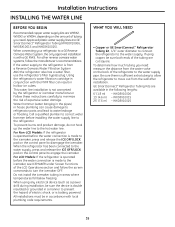
...m) - All installations must be sure both ends of expensive water damage. Approved plastic water supply lines are available in accordance with a GE RVKit. For other reverse osmosis water systems, follow the screen commands to the water supply pipe. If the water supply to water leakage ... water filtration cartridge in areas where temperatures fall below freezing. For Non-LCD Models: If the refrigerator is operated before the water connection is made to the refrigerator. For LCD Models: If the refrigerator is operated before installing the water supply line to the icemaker...
...m) - All installations must be sure both ends of expensive water damage. Approved plastic water supply lines are available in accordance with a GE RVKit. For other reverse osmosis water systems, follow the screen commands to the water supply pipe. If the water supply to water leakage ... water filtration cartridge in areas where temperatures fall below freezing. For Non-LCD Models: If the refrigerator is operated before the water connection is made to the refrigerator. For LCD Models: If the refrigerator is operated before installing the water supply line to the icemaker...
Use and Care Manual
Page 38
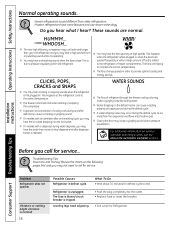
...cause a gurgling sound due to maintain the correct temperatures. Modern refrigerators have more features and use newer technology. I On models with a dispenser, during the defrost cycle as the refrigerator cools to pressure equalizing within the refrigerator. I The freezer control ...will click when starting or stopping the compressor. This is normal) 38 Possible Causes Refrigerator in . I On models with an icemaker, after defrost can cause a cracking or popping sound. Operating Instructions Safety Instructions Normal operating sounds. The fans are...
...cause a gurgling sound due to maintain the correct temperatures. Modern refrigerators have more features and use newer technology. I On models with a dispenser, during the defrost cycle as the refrigerator cools to pressure equalizing within the refrigerator. I The freezer control ...will click when starting or stopping the compressor. This is normal) 38 Possible Causes Refrigerator in . I On models with an icemaker, after defrost can cause a cracking or popping sound. Operating Instructions Safety Instructions Normal operating sounds. The fans are...
Use and Care Manual
Page 39
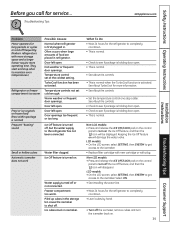
...the icemaker back on the control panel to maintain even temperatures.) Refrigerator or freezer compartment too warm Frost or ice crystals on . Non-LCD models: • Press and release the ICE OFF/LOCK pad on . 39 Troubleshooting Tips Consumer Support Door left open. Ice Off feature is...cold enough. Door openings too frequent or too long. See About TurboCool for long periods or cycles on will damage the water valve. LCD models: • On the LCD screen, select SETTING, then SYSTEM to get access to see if package is activated. Troubleshooting Tips GEAppliances.com ...
...the icemaker back on the control panel to maintain even temperatures.) Refrigerator or freezer compartment too warm Frost or ice crystals on . Non-LCD models: • Press and release the ICE OFF/LOCK pad on . 39 Troubleshooting Tips Consumer Support Door left open. Ice Off feature is...cold enough. Door openings too frequent or too long. See About TurboCool for long periods or cycles on will damage the water valve. LCD models: • On the LCD screen, select SETTING, then SYSTEM to get access to see if package is activated. Troubleshooting Tips GEAppliances.com ...
Use and Care Manual
Page 42
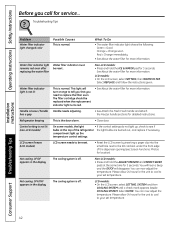
...cool to your set temperature. Please allow 24 hours for service... You can now adjust the temperature. This light will disappear. LCD models: • On the LCD screen, select SETTING, SYSTEM and then COOLING SYSTEM until a check mark appears beside COOLING SYSTEM. ...Troubleshooting Tips Problem Water filter indicator light changed color Possible Causes This is off . LCD models: • On the LCD screen, select SETTING, then WATER FILTER. Refrigerator beeping This is the door alarm. • Close door...
...cool to your set temperature. Please allow 24 hours for service... You can now adjust the temperature. This light will disappear. LCD models: • On the LCD screen, select SETTING, SYSTEM and then COOLING SYSTEM until a check mark appears beside COOLING SYSTEM. ...Troubleshooting Tips Problem Water filter indicator light changed color Possible Causes This is off . LCD models: • On the LCD screen, select SETTING, then WATER FILTER. Refrigerator beeping This is the door alarm. • Close door...
Use and Care Manual
Page 45
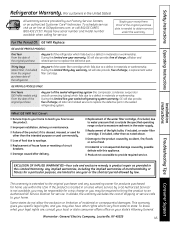
...and related service to use within the USA. This warranty gives you specific legal rights, and you may also have serial number and model number available when calling for home use the product. Staple your home to teach you may be responsible for other than as provided...sealed refrigerating system. Louisville, KY 40225 45 For The Period Of: GE Will Replace: GE and GE PROFILE MODELS: One Year From the date of the original purchase Any part of circuit breakers. GE PROFILE MODELS ONLY: Five Years (GE Profile models only) From the date of the original purchase Any part of ...
...and related service to use within the USA. This warranty gives you specific legal rights, and you may also have serial number and model number available when calling for home use the product. Staple your home to teach you may be responsible for other than as provided...sealed refrigerating system. Louisville, KY 40225 45 For The Period Of: GE Will Replace: GE and GE PROFILE MODELS: One Year From the date of the original purchase Any part of circuit breakers. GE PROFILE MODELS ONLY: Five Years (GE Profile models only) From the date of the original purchase Any part of ...
Use and Care Manual
Page 46
...How Long Warranted (From Date of Sale) Parts Repair or Replace at Mabe's Option Labour Compressor GE Profile: Ten (10) Years GE Profile: Ten (10) Years GE Profile: Five (5) Years GE and All Other GE and All Other GE and All Other Brands: One (1) Year Brands: One (1) Year Brands: One (1) Year ...8226; Owner is product repair as proof of the Refrigerator or from service delays beyond their reasonable control. Please have serial number and model number available when calling for home use , and alteration or defacing of the serial plate cancels all obligations of product as listed in...
...How Long Warranted (From Date of Sale) Parts Repair or Replace at Mabe's Option Labour Compressor GE Profile: Ten (10) Years GE Profile: Ten (10) Years GE Profile: Five (5) Years GE and All Other GE and All Other GE and All Other Brands: One (1) Year Brands: One (1) Year Brands: One (1) Year ...8226; Owner is product repair as proof of the Refrigerator or from service delays beyond their reasonable control. Please have serial number and model number available when calling for home use , and alteration or defacing of the serial plate cancels all obligations of product as listed in...


