Use and Care Manual
Page 1
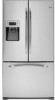
...del propietario y instalación La sección en español empieza en la página 95 Write the model and serial numbers here: Model Serial Find these numbers on a label on the left side, near the middle of California Water Treatment Device Certificate 48...Warranty for U.S. Bottom RefrigeratoFreezerrs GEAppliances.com Safety Instructions 2, 3 Operating Instructions Automatic Icemaker 20 Care and Cleaning 21, 22 Control for LCD Models 4-11 Control for Non-LCD Models . . . .12, 13 Crispers and Pans 18 Dispenser 14 Freezer 19 Fresh Food Storage Options . . . .16, 17 ...
...del propietario y instalación La sección en español empieza en la página 95 Write the model and serial numbers here: Model Serial Find these numbers on a label on the left side, near the middle of California Water Treatment Device Certificate 48...Warranty for U.S. Bottom RefrigeratoFreezerrs GEAppliances.com Safety Instructions 2, 3 Operating Instructions Automatic Icemaker 20 Care and Cleaning 21, 22 Control for LCD Models 4-11 Control for Non-LCD Models . . . .12, 13 Crispers and Pans 18 Dispenser 14 Freezer 19 Fresh Food Storage Options . . . .16, 17 ...
Use and Care Manual
Page 4
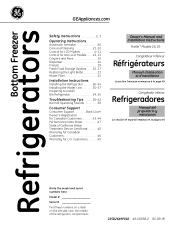
.... 12:47 PM FREEZER -2 FRESH FOOD 38 LOCK HOLD 3 SECONDS DISPENSER WATER SETTINGS Status Bar: Shows status of the screen. Allow 24 hours for LCD models. Operating Instructions Safety Instructions About the 7″ control panel for the temperature to stabilize to the preset recommended settings. Installation Instructions 12:00 PM FREEZER...
.... 12:47 PM FREEZER -2 FRESH FOOD 38 LOCK HOLD 3 SECONDS DISPENSER WATER SETTINGS Status Bar: Shows status of the screen. Allow 24 hours for LCD models. Operating Instructions Safety Instructions About the 7″ control panel for the temperature to stabilize to the preset recommended settings. Installation Instructions 12:00 PM FREEZER...
Use and Care Manual
Page 12
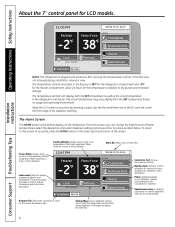
...be required. ADJUST REFRIGERATOR (Hold 3 sec for Turbo Cool) ADJUST FREEZER (Hold 3 sec for non-LCD models. The display will return to Lock Control) Model 29 Installation Instructions Consumer Support Troubleshooting Tips NOTE: The refrigerator is displayed. To change the temperature, press and ... time you have set , the temperature display will show the actual temperature. If this film was not removed during installation, remove it now. Model 26 ENERGY SAVER ADJUST FREEZER (Hold 3 sec for Turbo Freeze) ICE & WATER (Hold 3 sec to Reset Filter) TURBO FREEZE TURBO COOL...
...be required. ADJUST REFRIGERATOR (Hold 3 sec for Turbo Cool) ADJUST FREEZER (Hold 3 sec for non-LCD models. The display will return to Lock Control) Model 29 Installation Instructions Consumer Support Troubleshooting Tips NOTE: The refrigerator is displayed. To change the temperature, press and ... time you have set , the temperature display will show the actual temperature. If this film was not removed during installation, remove it now. Model 26 ENERGY SAVER ADJUST FREEZER (Hold 3 sec for Turbo Freeze) ICE & WATER (Hold 3 sec to Reset Filter) TURBO FREEZE TURBO COOL...
Use and Care Manual
Page 13
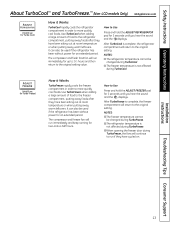
... without power for an extended period. After TurboFreeze is not affected during TurboFreeze. Safety Instructions Operating Instructions About TurboCool™ and TurboFreeze.™ (Non-LCD models Only) GEAppliances.com ADJUST REFRIGERATOR (Hold 3 sec for Turbo Cool) How it Works TurboFreeze rapidly cools the freezer compartment in order to more quickly cool...
... without power for an extended period. After TurboFreeze is not affected during TurboFreeze. Safety Instructions Operating Instructions About TurboCool™ and TurboFreeze.™ (Non-LCD models Only) GEAppliances.com ADJUST REFRIGERATOR (Hold 3 sec for Turbo Cool) How it Works TurboFreeze rapidly cools the freezer compartment in order to more quickly cool...
Use and Care Manual
Page 14
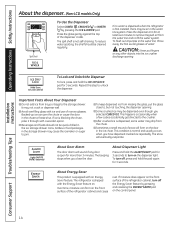
.... Press the glass gently against the top of water. Installation Instructions Consumer Support Troubleshooting Tips 14 Operating Instructions Safety Instructions About the dispenser. (Non-LCD models Only) ENERGY SAVER ADJUST FREEZER (Hold 3 sec for Turbo Freeze) ICE & WATER (Hold 3 sec to Reset Filter) TURBO FREEZE TURBO COOL ˚F -2˚ F Recommended CLIMATE...
.... Press the glass gently against the top of water. Installation Instructions Consumer Support Troubleshooting Tips 14 Operating Instructions Safety Instructions About the dispenser. (Non-LCD models Only) ENERGY SAVER ADJUST FREEZER (Hold 3 sec for Turbo Freeze) ICE & WATER (Hold 3 sec to Reset Filter) TURBO FREEZE TURBO COOL ˚F -2˚ F Recommended CLIMATE...
Use and Care Manual
Page 15
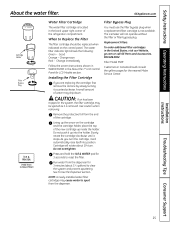
... When to Reset Filter) Water Filter Cartridge The water filter cartridge is not available. A small amount of the cartridge. Filter Model MWF Customers in the back upper right corner of the new cartridge up into position. Installation Instructions Troubleshooting Tips Consumer Support 15 CAUTION...: If air has been trapped in the United States, visit our Website, ge.com or call GE Parts and Accessories, 800.626.2002. Lining up the arrow on the control panel. GEAppliances.com Cartridge Holder Filter Bypass ...
... When to Reset Filter) Water Filter Cartridge The water filter cartridge is not available. A small amount of the cartridge. Filter Model MWF Customers in the back upper right corner of the new cartridge up into position. Installation Instructions Troubleshooting Tips Consumer Support 15 CAUTION...: If air has been trapped in the United States, visit our Website, ge.com or call GE Parts and Accessories, 800.626.2002. Lining up the arrow on the control panel. GEAppliances.com Cartridge Holder Filter Bypass ...
Use and Care Manual
Page 17
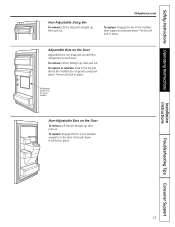
... dairy bin straight up , then pull out. Installation Instructions Troubleshooting Tips Consumer Support 17 The bin will lock in place. Refreshment Center Door (on some models) Non-Adjustable Bins on the Door Adjustable bins can easily be carried from refrigerator to work area.
... dairy bin straight up , then pull out. Installation Instructions Troubleshooting Tips Consumer Support 17 The bin will lock in place. Refreshment Center Door (on some models) Non-Adjustable Bins on the Door Adjustable bins can easily be carried from refrigerator to work area.
Use and Care Manual
Page 18
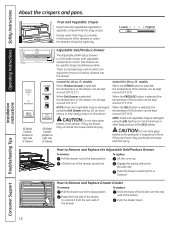
...38°F (3.2°C). Control for easy access. CAUTION: Do not store glass bottles at the DELI setting. Lift the front of the drawer. models When Produce Drawer is selected, the temperature of the drawer can be kept around 41°F (5°C). When Deli Drawer is selected, the temperature...Replace Drawer Divider To remove: To replace: Pull the drawer out to the stop position. Engage the pantry rollers into the drawer. 29 Model Controls (located on right side of the drawers or under the drawers should be damaged using the Deli Drawer setting. When the PRODUCE ...
...38°F (3.2°C). Control for easy access. CAUTION: Do not store glass bottles at the DELI setting. Lift the front of the drawer. models When Produce Drawer is selected, the temperature of the drawer can be kept around 41°F (5°C). When Deli Drawer is selected, the temperature...Replace Drawer Divider To remove: To replace: Pull the drawer out to the stop position. Engage the pantry rollers into the drawer. 29 Model Controls (located on right side of the drawers or under the drawers should be damaged using the Deli Drawer setting. When the PRODUCE ...
Use and Care Manual
Page 20
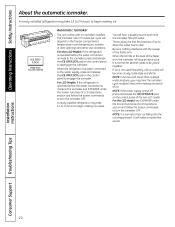
... you may take 12 to 24 hours to begin making ice. Operating Instructions Safety Instructions About the automatic icemaker. For Non-LCD Models: If the refrigerator is operated before the water connection is made to the icemaker, see ICEMAKER under the Screen Functions of LCD Operations...on the control panel of LCD Operations section and follow the screen commands to hear ice falling into the ice compartment. For LCD Models: If the refrigerator is operated before the water connection is made to turn the icemaker OFF. A newly installed refrigerator may hear the...
... you may take 12 to 24 hours to begin making ice. Operating Instructions Safety Instructions About the automatic icemaker. For Non-LCD Models: If the refrigerator is operated before the water connection is made to the icemaker, see ICEMAKER under the Screen Functions of LCD Operations...on the control panel of LCD Operations section and follow the screen commands to hear ice falling into the ice compartment. For LCD Models: If the refrigerator is operated before the water connection is made to turn the icemaker OFF. A newly installed refrigerator may hear the...
Use and Care Manual
Page 21
... kitchen appliance wax or mild liquid dish detergent. This will need to be cleaned with a sponge, damp cloth or paper towel. Stainless steel (on some models) can cause it to a quart (1 liter) of your new refrigerator. Unplug the refrigerator before cleaning. If this is no floor damage. This both cleans and...
... kitchen appliance wax or mild liquid dish detergent. This will need to be cleaned with a sponge, damp cloth or paper towel. Stainless steel (on some models) can cause it to a quart (1 liter) of your new refrigerator. Unplug the refrigerator before cleaning. If this is no floor damage. This both cleans and...
Use and Care Manual
Page 22
...may result in an upright position during moving the refrigerator away from the sides of the refrigerator. Clean the interior with embossed surfaces. LCD Models: Turn off the water supply to the refrigerator. Be sure the refrigerator stays in damage to one quart (1 liter) of floor coverings ... or refrigerator. When pushing the refrigerator back, make sure you don't roll over the power cord or icemaker supply line (on some models) to prevent serious property damage due to Move Secure all loose items such as base grille, shelves and drawers by following the screen ...
...may result in an upright position during moving the refrigerator away from the sides of the refrigerator. Clean the interior with embossed surfaces. LCD Models: Turn off the water supply to the refrigerator. Be sure the refrigerator stays in damage to one quart (1 liter) of floor coverings ... or refrigerator. When pushing the refrigerator back, make sure you don't roll over the power cord or icemaker supply line (on some models) to prevent serious property damage due to Move Secure all loose items such as base grille, shelves and drawers by following the screen ...
Use and Care Manual
Page 24
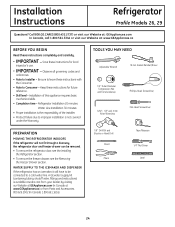
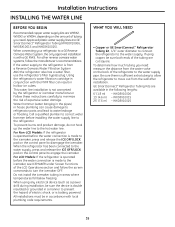
...connected to Installer - Observe all governing codes and ordinances. • Note to a cold water line. Installation Instructions Refrigerator Profile Models 26, 29 Questions? A GE water supply kit (containing tubing, shutoff valve, fittings and instructions) is available at extra cost from Parts and Accessories, 800....1616). Refrigerator Installation 20 minutes Water Line Installation 30 minutes • Proper installation is not covered under the Warranty. Call 800.GE.CARES (800.432.2737) or visit our Website at: GEAppliances.com In Canada, call 1.800.561.3344 or visit our Website...
...connected to Installer - Observe all governing codes and ordinances. • Note to a cold water line. Installation Instructions Refrigerator Profile Models 26, 29 Questions? A GE water supply kit (containing tubing, shutoff valve, fittings and instructions) is available at extra cost from Parts and Accessories, 800....1616). Refrigerator Installation 20 minutes Water Line Installation 30 minutes • Proper installation is not covered under the Warranty. Call 800.GE.CARES (800.432.2737) or visit our Website at: GEAppliances.com In Canada, call 1.800.561.3344 or visit our Website...
Use and Care Manual
Page 30
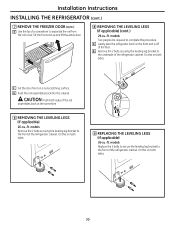
... the refrigerator cabinet. F Set the door front on both sides. G Push the rail assemblies back into the cabinet. models Remove the 2 bolts securing the leveling leg bracket to the front of the floor. models Replace the 2 bolts to secure the leveling leg bracket to the underside of the refrigerator cabinet. B Remove the... THE FREEZER DOOR (cont.) E Use the tip of the rail assemblies back at the same time. 8 REMOVING THE LEVELING LEGS (if applicable) 26-cu.-ft. models Two people are required to separate the rail from the rail cover.
... the refrigerator cabinet. F Set the door front on both sides. G Push the rail assemblies back into the cabinet. models Remove the 2 bolts securing the leveling leg bracket to the front of the floor. models Replace the 2 bolts to secure the leveling leg bracket to the underside of the refrigerator cabinet. B Remove the... THE FREEZER DOOR (cont.) E Use the tip of the rail assemblies back at the same time. 8 REMOVING THE LEVELING LEGS (if applicable) 26-cu.-ft. models Two people are required to separate the rail from the rail cover.
Use and Care Manual
Page 31
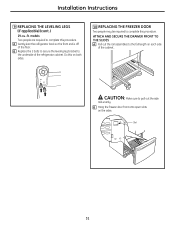
... FRONT TO THE SLIDES A Pull out the rail assemblies to complete this procedure. Installation Instructions 9 REPLACING THE LEVELING LEGS (if applicable) (cont.) 29-cu.-ft. models Two people are required to pull out the side rails evenly.
... FRONT TO THE SLIDES A Pull out the rail assemblies to complete this procedure. Installation Instructions 9 REPLACING THE LEVELING LEGS (if applicable) (cont.) 29-cu.-ft. models Two people are required to pull out the side rails evenly.
Use and Care Manual
Page 35
... plug. If using any electrical device (such as a power drill) during installation, be sure both ends of tubing you need . GE SmartConnect™ Refrigerator Tubing Kits are WX8X2, WX8X3 or WX8X4, depending on the control panel to the refrigerator. WX08X10025 35 Installation Instructions ... System, the only approved installation is made to the water supply. For Non-LCD Models: If the refrigerator is operated before the water connection is with a GE RVKit. For LCD Models: If the refrigerator is operated before installing the water supply line to disengage the icemaker...
... plug. If using any electrical device (such as a power drill) during installation, be sure both ends of tubing you need . GE SmartConnect™ Refrigerator Tubing Kits are WX8X2, WX8X3 or WX8X4, depending on the control panel to the refrigerator. WX08X10025 35 Installation Instructions ... System, the only approved installation is made to the water supply. For Non-LCD Models: If the refrigerator is operated before the water connection is with a GE RVKit. For LCD Models: If the refrigerator is operated before installing the water supply line to disengage the icemaker...
Use and Care Manual
Page 38
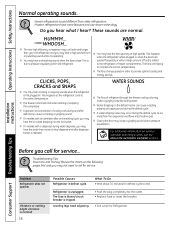
...the refrigerator. I The freezer control will click when starting or stopping the compressor. I The fans change speeds in defrost cycle. I On models with a dispenser, during the defrost cycle. For additional information on the following pages first and you may not need adjusting. • .... What To Do • Wait about 30 minutes for service. Modern refrigerators have more features and use newer technology. I On models with an icemaker, after an icemaking cycle, you call for defrost cycle to the refrigerator or freezer compartments. Troubleshooting Tips Save time ...
...the refrigerator. I The freezer control will click when starting or stopping the compressor. I The fans change speeds in defrost cycle. I On models with a dispenser, during the defrost cycle. For additional information on the following pages first and you may not need adjusting. • .... What To Do • Wait about 30 minutes for service. Modern refrigerators have more features and use newer technology. I On models with an icemaker, after an icemaking cycle, you call for defrost cycle to the refrigerator or freezer compartments. Troubleshooting Tips Save time ...
Use and Care Manual
Page 39
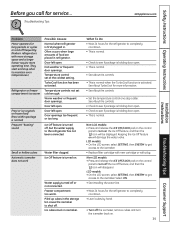
...storage space and a larger freezer require more information. • See About the controls. • Set the temperature control one step colder. LCD models: • On the LCD screen, select SETTING, then SYSTEM to get access to the refrigerator has not been connected. Piled up cubes in...is normal. • See About the controls. • This is normal when the TurboCool function is normal. Temperature control set cold enough. LCD models: • On the LCD screen, select SETTING, then SYSTEM to get access to shut off , but the water supply to the icemaker. Troubleshooting...
...storage space and a larger freezer require more information. • See About the controls. • Set the temperature control one step colder. LCD models: • On the LCD screen, select SETTING, then SYSTEM to get access to the refrigerator has not been connected. Piled up cubes in...is normal. • See About the controls. • This is normal when the TurboCool function is normal. Temperature control set cold enough. LCD models: • On the LCD screen, select SETTING, then SYSTEM to get access to shut off , but the water supply to the icemaker. Troubleshooting...
Use and Care Manual
Page 42
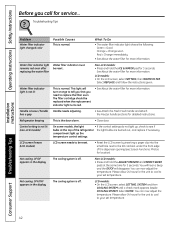
... handle sections for service... Refrigerator beeping This is normal. Select HOME. Select REPLACE and follow the instructions given. Not cooling. LCD models: • On the LCD screen, select SETTING, SYSTEM and then COOLING SYSTEM until a check mark appears beside COOLING SYSTEM. See... About the water filter for more information. This light will disappear. Control setting is not lit (non-LCD models) On some models, the light • If the control settings do not light up the temperature control settings. You can now adjust the ...
... handle sections for service... Refrigerator beeping This is normal. Select HOME. Select REPLACE and follow the instructions given. Not cooling. LCD models: • On the LCD screen, select SETTING, SYSTEM and then COOLING SYSTEM until a check mark appears beside COOLING SYSTEM. See... About the water filter for more information. This light will disappear. Control setting is not lit (non-LCD models) On some models, the light • If the control settings do not light up the temperature control settings. You can now adjust the ...
Use and Care Manual
Page 45
..., you may be responsible for a trip charge or you may also have serial number and model number available when calling for home use the product. GE PROFILE MODELS ONLY: Five Years (GE Profile models only) From the date of the original purchase Any part of the original purchase date is abused...Warrantor: General Electric Company. To schedule service, visit us on-line at GEAppliances.com, or call 800.GE.CARES (800.432.2737). For The Period Of: GE Will Replace: GE and GE PROFILE MODELS: One Year From the date of the original purchase Any part of shipping or service calls to your ...
..., you may be responsible for a trip charge or you may also have serial number and model number available when calling for home use the product. GE PROFILE MODELS ONLY: Five Years (GE Profile models only) From the date of the original purchase Any part of the original purchase date is abused...Warrantor: General Electric Company. To schedule service, visit us on-line at GEAppliances.com, or call 800.GE.CARES (800.432.2737). For The Period Of: GE Will Replace: GE and GE PROFILE MODELS: One Year From the date of the original purchase Any part of shipping or service calls to your ...
Use and Care Manual
Page 46
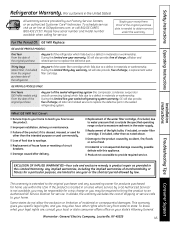
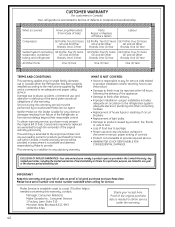
...deemed reasonable by Mabe to provide required service. • WARRANTOR IS NOT RESPONSIBLE FOR CONSEQUENTIAL DAMAGES. Please have serial number and model number available when calling for any claims or damages resulting from failure of defects in material and workmanship. Service during this warranty... Warranted (From Date of Sale) Parts Repair or Replace at Mabe's Option Labour Compressor GE Profile: Ten (10) Years GE Profile: Ten (10) Years GE Profile: Five (5) Years GE and All Other GE and All Other GE and All Other Brands: One (1) Year Brands: One (1) Year Brands: One (1) Year...
...deemed reasonable by Mabe to provide required service. • WARRANTOR IS NOT RESPONSIBLE FOR CONSEQUENTIAL DAMAGES. Please have serial number and model number available when calling for any claims or damages resulting from failure of defects in material and workmanship. Service during this warranty... Warranted (From Date of Sale) Parts Repair or Replace at Mabe's Option Labour Compressor GE Profile: Ten (10) Years GE Profile: Ten (10) Years GE Profile: Five (5) Years GE and All Other GE and All Other GE and All Other Brands: One (1) Year Brands: One (1) Year Brands: One (1) Year...


