Use and Care Manual
Page 32
..., and push down until it into the refrigerator connection, at the back of the refrigerator, as far as possible. B If you are using GE SmartConnect™ tubing, insert the molded end of the tubing into the frame. You may cause leaks. See Installing the Water Line section. A... If you are using the GE SmartConnect™ tubing, the nuts are using copper tubing, insert the end of the tubing into the refrigerator connection, at the back of the refrigerator, and tighten the compression ...
..., and push down until it into the refrigerator connection, at the back of the refrigerator, as far as possible. B If you are using GE SmartConnect™ tubing, insert the molded end of the tubing into the frame. You may cause leaks. See Installing the Water Line section. A... If you are using the GE SmartConnect™ tubing, the nuts are using copper tubing, insert the end of the tubing into the refrigerator connection, at the back of the refrigerator, and tighten the compression ...

Use and Care Manual
Page 33
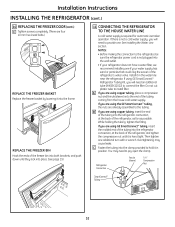
... hinge. The leveling legs also prevent the refrigerator from tipping. A Turn the leveling legs clockwise to raise the refrigerator, counterclockwise to insert depends on leveling the refrigerator. The number of each fastener ring is necessary for any leaks. 13 PLUG IN THE REFRIGERATOR 15 LEVEL THE REFRIGERATOR DOORS Remember a level refrigerator is 0.04″. 33 NOTE: Four...
... hinge. The leveling legs also prevent the refrigerator from tipping. A Turn the leveling legs clockwise to raise the refrigerator, counterclockwise to insert depends on leveling the refrigerator. The number of each fastener ring is necessary for any leaks. 13 PLUG IN THE REFRIGERATOR 15 LEVEL THE REFRIGERATOR DOORS Remember a level refrigerator is 0.04″. 33 NOTE: Four...

Use and Care Manual
Page 37
... tighten compression nut until it to the shutoff valve. Tighten the compression nut securely. NOTE: Do not overtighten or you may cause leaks. Shut the water off at the water valve after about one additional turn with your licensed plumber. 8 FLUSH OUT THE TUBING Turn... the main water supply on and flush out the tubing until the water is clear. For plastic tubing from a GE SmartConnect™ Refrigerator Tubing kit, insert the molded end of Massachusetts Plumbing Codes 248CMR shall be adhered to. Consult with the pipe clamp. Installation Instructions ...
... tighten compression nut until it to the shutoff valve. Tighten the compression nut securely. NOTE: Do not overtighten or you may cause leaks. Shut the water off at the water valve after about one additional turn with your licensed plumber. 8 FLUSH OUT THE TUBING Turn... the main water supply on and flush out the tubing until the water is clear. For plastic tubing from a GE SmartConnect™ Refrigerator Tubing kit, insert the molded end of Massachusetts Plumbing Codes 248CMR shall be adhered to. Consult with the pipe clamp. Installation Instructions ...
Use and Care Manual
Page 41
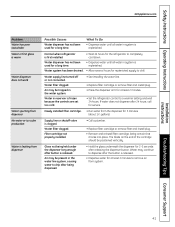
...taste/odor Water in first glass is warm Water dispenser does not work Water spurting from dispenser No water or ice cube production Water is leaking from the dispenser for 3 minutes (about 11⁄ 2 gallons). The blade on the end of the cartridge should be present in ... dispenser arm for at least 2 minutes to a warmer setting and wait 24 hours. Air may be trapped in reservoir is replenished. Normal when refrigerator is released. • Dispense water for replenished supply to completely cool down. Glass not being held under the dispenser long enough after 24 hours,...
...taste/odor Water in first glass is warm Water dispenser does not work Water spurting from dispenser No water or ice cube production Water is leaking from the dispenser for 3 minutes (about 11⁄ 2 gallons). The blade on the end of the cartridge should be present in ... dispenser arm for at least 2 minutes to a warmer setting and wait 24 hours. Air may be trapped in reservoir is replenished. Normal when refrigerator is released. • Dispense water for replenished supply to completely cool down. Glass not being held under the dispenser long enough after 24 hours,...


