Use and Care Manual
Page 1
... 19 Fresh Food Storage Options . . . .16, 17 Replacing the Light Bulbs 23 Water Filter 15 Installation Instructions Installing the Refrigerator 26-34 Installing the Water Line 35-37 Preparing to Install the Refrigerator 24, 25 Troubleshooting Tips . . . . . .38-42 Normal Operating Sounds 38 Consumer Support Consumer Support Back Cover Owner's Registration for ... Water Treatment Device Certificate 48 Warranty for Canadian Customers 46 Warranty for Canadian Customers 43, 44 Performance Data Sheet 47 State of the refrigerator compartment. 225D2649P002 49-60598-2 05-09 JR
... 19 Fresh Food Storage Options . . . .16, 17 Replacing the Light Bulbs 23 Water Filter 15 Installation Instructions Installing the Refrigerator 26-34 Installing the Water Line 35-37 Preparing to Install the Refrigerator 24, 25 Troubleshooting Tips . . . . . .38-42 Normal Operating Sounds 38 Consumer Support Consumer Support Back Cover Owner's Registration for ... Water Treatment Device Certificate 48 Warranty for Canadian Customers 46 Warranty for Canadian Customers 43, 44 Performance Data Sheet 47 State of the refrigerator compartment. 225D2649P002 49-60598-2 05-09 JR
Use and Care Manual
Page 2
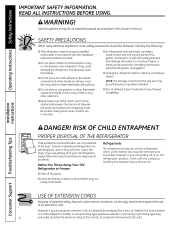
..., including the following: I Do not touch the cold surfaces in accordance with the Installation Instructions before cleaning and making repairs. I This refrigerator must be properly installed and located in the freezer compartment when hands are damp or wet. I Take off the doors. clearances between the... appliance. Do not place fingers or hands on the shelves in this appliance only for "just a few days." Junked or abandoned refrigerators are not problems of potential safety hazards under federal law must use an extension cord, it is used. If you are necessarily small...
..., including the following: I Do not touch the cold surfaces in accordance with the Installation Instructions before cleaning and making repairs. I This refrigerator must be properly installed and located in the freezer compartment when hands are damp or wet. I Take off the doors. clearances between the... appliance. Do not place fingers or hands on the shelves in this appliance only for "just a few days." Junked or abandoned refrigerators are not problems of potential safety hazards under federal law must use an extension cord, it is used. If you are necessarily small...

Use and Care Manual
Page 3
...cord that shows cracks or abrasion damage along its own individual electrical outlet which has a voltage rating that have it is your refrigerator by a qualified electrician to minimize the possibility of this appliance must be careful not to have become frayed or otherwise damaged.... equipped with a 3-prong (grounding) plug which could cause a fire hazard from the wall, be properly grounded. When moving the refrigerator away from overheated wires. For personal safety, this appliance is properly grounded. Repair or replace immediately all power cords that matches the rating...
...cord that shows cracks or abrasion damage along its own individual electrical outlet which has a voltage rating that have it is your refrigerator by a qualified electrician to minimize the possibility of this appliance must be careful not to have become frayed or otherwise damaged.... equipped with a 3-prong (grounding) plug which could cause a fire hazard from the wall, be properly grounded. When moving the refrigerator away from overheated wires. For personal safety, this appliance is properly grounded. Repair or replace immediately all power cords that matches the rating...
Use and Care Manual
Page 4
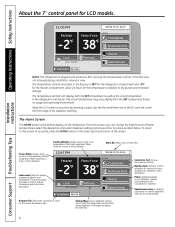
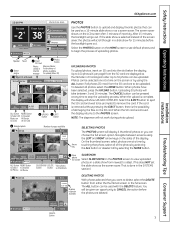
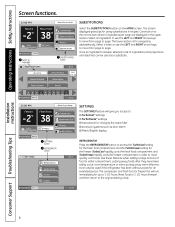
... the display and replace the water filter. 4 Consumer Support Troubleshooting Tips Feature Lock: Hold for the temperature to stabilize to your refrigerator. WATER FILTER: GOOD EXTRAS CONVERSIONS NUTRITION FACTS PHOTOS SUBSTITUTIONS Conversions Tool: Accesses the conversions function. Substitutions Feature: A catalog of water... the screen. If this screen you can display both the SET temperature as well as set temperatures in the refrigerator and freezer. To return to indicate the dispenser and controls have been locked. Nutrition Facts: Find basic nutrition ...
... the display and replace the water filter. 4 Consumer Support Troubleshooting Tips Feature Lock: Hold for the temperature to stabilize to your refrigerator. WATER FILTER: GOOD EXTRAS CONVERSIONS NUTRITION FACTS PHOTOS SUBSTITUTIONS Conversions Tool: Accesses the conversions function. Substitutions Feature: A catalog of water... the screen. If this screen you can display both the SET temperature as well as set temperatures in the refrigerator and freezer. To return to indicate the dispenser and controls have been locked. Nutrition Facts: Find basic nutrition ...

Use and Care Manual
Page 5
... to confirm the selection. NOTE: The DISPENSER button is equipped with a lock feature. LOCK Button Press and Hold for the refrigerator to lock or unlock the dispenser. Each time you adjust the controls, allow 24 hours for 3 seconds to reach the set... 3 SECONDS SETTINGS PHOTOS SUBSTITUTIONS DIWSPEANTESRER WATECRRUSHED ICE CUBED ICE LIGHT DISPENSER Button WATER option chosen Dispenser LIGHT Button DISPENSER: The refrigerator can dispense water, crushed ice or cubed ice through the dispenser. Press SAVE to confirm the selection. Safety Instructions Operating ...
... to confirm the selection. NOTE: The DISPENSER button is equipped with a lock feature. LOCK Button Press and Hold for the refrigerator to lock or unlock the dispenser. Each time you adjust the controls, allow 24 hours for 3 seconds to reach the set... 3 SECONDS SETTINGS PHOTOS SUBSTITUTIONS DIWSPEANTESRER WATECRRUSHED ICE CUBED ICE LIGHT DISPENSER Button WATER option chosen Dispenser LIGHT Button DISPENSER: The refrigerator can dispense water, crushed ice or cubed ice through the dispenser. Press SAVE to confirm the selection. Safety Instructions Operating ...
Use and Care Manual
Page 7
... be uploaded. When the upload is done in a slide show UPLOAD COMPLETE. NOTE: The dispenser will show for upload (Max. 30) PHOTO UPLOAD SECURE DIGITAL REFRIGERATOR AVAILABLE: 7 PHOTOS PAGE 3 0F 10 SELECT ALL NONE 4 /60 selected ALL Button NONE Button to Select All to stop the uploading process. Selected photo PHOTOS...
... be uploaded. When the upload is done in a slide show UPLOAD COMPLETE. NOTE: The dispenser will show for upload (Max. 30) PHOTO UPLOAD SECURE DIGITAL REFRIGERATOR AVAILABLE: 7 PHOTOS PAGE 3 0F 10 SELECT ALL NONE 4 /60 selected ALL Button NONE Button to Select All to stop the uploading process. Selected photo PHOTOS...
Use and Care Manual
Page 8
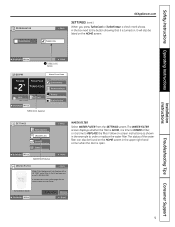
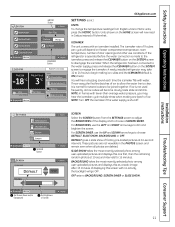
...FOOD 38 EXTRAS CONVERSIONS NUTRITION FACTS LOCK HOLD 3 SECONDS SETTINGS PHOTOS SUBSTITUTIONS DISPENSER WATER SETTINGS Button REFRIGERATOR Button SETTINGS BACK REFRIGERATOR WATER FILTER SYSTEM SCREEN SETTINGS The SETTINGS feature will run immediately for navigating alphabetically. Select an ...TurboCool™ settings I TurboFreeze™ settings I instructions for changing the water filter I Metric/English display REFRIGERATOR Press the REFRIGERATOR button to access the TurboCool setting for the fresh food compartment and the TurboFreeze setting for the freezer. The...
...FOOD 38 EXTRAS CONVERSIONS NUTRITION FACTS LOCK HOLD 3 SECONDS SETTINGS PHOTOS SUBSTITUTIONS DISPENSER WATER SETTINGS Button REFRIGERATOR Button SETTINGS BACK REFRIGERATOR WATER FILTER SYSTEM SCREEN SETTINGS The SETTINGS feature will run immediately for navigating alphabetically. Select an ...TurboCool™ settings I TurboFreeze™ settings I instructions for changing the water filter I Metric/English display REFRIGERATOR Press the REFRIGERATOR button to access the TurboCool setting for the fresh food compartment and the TurboFreeze setting for the freezer. The...
Use and Care Manual
Page 9
...FRESH FOOD TURBO COOL EXTRAS CONVERSIONS NUTRITION FACTS LOCK HOLD 3 SECONDS SETTINGS PHOTOS SUBSTITUTIONS DISPENSER WATER TURBO COOL Selected SETTINGS REFRIGERATOR WATER FILTER SYSTEM SCREEN BACK WATER FILTER Select WATER FILTER from the SETTINGS screen. The WATER FILTER screen displays whether... Follow on . In the US go to ge.com or call 1-800-626-2002. In Canada consult the yellow pages for the nearest Mabe Service Center. Safety Instructions Operating Instructions Installation Instructions REFRIGERATOR TURBO FREEZE BACK TURBO COOL GEAppliances.com SETTINGS ...
...FRESH FOOD TURBO COOL EXTRAS CONVERSIONS NUTRITION FACTS LOCK HOLD 3 SECONDS SETTINGS PHOTOS SUBSTITUTIONS DISPENSER WATER TURBO COOL Selected SETTINGS REFRIGERATOR WATER FILTER SYSTEM SCREEN BACK WATER FILTER Select WATER FILTER from the SETTINGS screen. The WATER FILTER screen displays whether... Follow on . In the US go to ge.com or call 1-800-626-2002. In Canada consult the yellow pages for the nearest Mabe Service Center. Safety Instructions Operating Instructions Installation Instructions REFRIGERATOR TURBO FREEZE BACK TURBO COOL GEAppliances.com SETTINGS ...
Use and Care Manual
Page 10
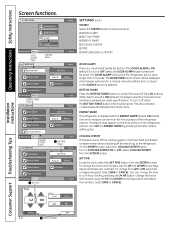
... and below the numbers. Change the hours and minutes using the UP and DOWN arrow keys above and below the numbers. SETTINGS BACK REFRIGERATOR WATER FILTER SYSTEM SCREEN DISPENSER WATER DOOR ALARM Button SYSTEM DOOR ALARM BUTTON TONES SYSTEM Button HOME BACK TIME (SET TIME) UNITS ENGLISH...be gone). Select SAVE or CANCEL. Consumer Support Troubleshooting Tips CANCEL 10 SAVE SAVE or CANCEL BUTTON TONES Press the BUTTON TONES button to the refrigerator. When button sound is ON (default), the beeper sounds a tone each time a button is shipped with the ENERGY SAVER feature ON (check...
... and below the numbers. Change the hours and minutes using the UP and DOWN arrow keys above and below the numbers. SETTINGS BACK REFRIGERATOR WATER FILTER SYSTEM SCREEN DISPENSER WATER DOOR ALARM Button SYSTEM DOOR ALARM BUTTON TONES SYSTEM Button HOME BACK TIME (SET TIME) UNITS ENGLISH...be gone). Select SAVE or CANCEL. Consumer Support Troubleshooting Tips CANCEL 10 SAVE SAVE or CANCEL BUTTON TONES Press the BUTTON TONES button to the refrigerator. When button sound is ON (default), the beeper sounds a tone each time a button is shipped with the ENERGY SAVER feature ON (check...
Use and Care Manual
Page 11
... temperature, number of door openings and other use the LEFT and RIGHT arrow keys to be joined together. SETTINGS DISPENSER WATER REFRIGERATOR WATER FILTER SYSTEM SCREEN SCREEN Button BACK HOME SCREEN SCREEN SAVER DEFAULT BRIGHTNESS BACK ENTER SCREEN Select the SCREEN button from English units...of ice. DISPENSER WATER Set Screen Saver and/or Background Set Brightness of Fahrenheit. ICEMAKER The unit comes with water. If the refrigerator is operated before the water connection is not used frequently, old ice cubes will hear a buzzing sound each time the icemaker fills ...
... temperature, number of door openings and other use the LEFT and RIGHT arrow keys to be joined together. SETTINGS DISPENSER WATER REFRIGERATOR WATER FILTER SYSTEM SCREEN SCREEN Button BACK HOME SCREEN SCREEN SAVER DEFAULT BRIGHTNESS BACK ENTER SCREEN Select the SCREEN button from English units...of ice. DISPENSER WATER Set Screen Saver and/or Background Set Brightness of Fahrenheit. ICEMAKER The unit comes with water. If the refrigerator is operated before the water connection is not used frequently, old ice cubes will hear a buzzing sound each time the icemaker fills ...
Use and Care Manual
Page 12
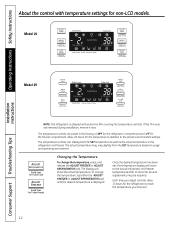
...covering the temperature controls. If this film was not removed during installation, remove it now. The temperature controls are preset in the refrigerator and freezer. ADJUST REFRIGERATOR (Hold 3 sec for Turbo Cool) ADJUST FREEZER (Hold 3 sec for Turbo Cool) ICE OFF/ LOCK (Hold 3 sec to the actual...730; F Recommended CLIMATE KEEPER ˚F 38˚ F Recommended ICE OFF RESET FILTER CUBED CRUSHED WATER ALARM/ LIGHT Light ON/OFF (Hold 3 seconds) ADJUST REFRIGERATOR (Hold 3 sec for Turbo Freeze) Changing the Temperature To change the temperature, tap either the ADJUST FREEZER or ADJUST...
...covering the temperature controls. If this film was not removed during installation, remove it now. The temperature controls are preset in the refrigerator and freezer. ADJUST REFRIGERATOR (Hold 3 sec for Turbo Cool) ADJUST FREEZER (Hold 3 sec for Turbo Cool) ICE OFF/ LOCK (Hold 3 sec to the actual...730; F Recommended CLIMATE KEEPER ˚F 38˚ F Recommended ICE OFF RESET FILTER CUBED CRUSHED WATER ALARM/ LIGHT Light ON/OFF (Hold 3 seconds) ADJUST REFRIGERATOR (Hold 3 sec for Turbo Freeze) Changing the Temperature To change the temperature, tap either the ADJUST FREEZER or ADJUST...
Use and Care Manual
Page 13
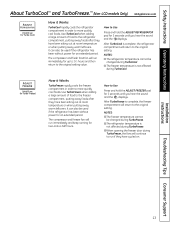
...you hear the sound and the displays. ADJUST FREEZER (Hold 3 sec for Turbo Freeze) How it Works TurboCool rapidly cools the refrigerator compartment in order to more quickly cool foods. After TurboCool is complete, the freezer compartment will return to the original setting. ...Safety Instructions Operating Instructions About TurboCool™ and TurboFreeze.™ (Non-LCD models Only) GEAppliances.com ADJUST REFRIGERATOR (Hold 3 sec for Turbo Cool) How it Works TurboFreeze rapidly cools the freezer compartment in order to more quickly cool foods....
...you hear the sound and the displays. ADJUST FREEZER (Hold 3 sec for Turbo Freeze) How it Works TurboCool rapidly cools the refrigerator compartment in order to more quickly cool foods. After TurboCool is complete, the freezer compartment will return to the original setting. ...Safety Instructions Operating Instructions About TurboCool™ and TurboFreeze.™ (Non-LCD models Only) GEAppliances.com ADJUST REFRIGERATOR (Hold 3 sec for Turbo Cool) How it Works TurboFreeze rapidly cools the freezer compartment in order to more quickly cool foods....
Use and Care Manual
Page 14
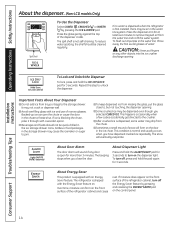
...; F Recommended CLIMATE KEEPER ˚F 38˚ F Recommended ICE OFF RESET FILTER CUBED CRUSHED WATER ALARM/ LIGHT Light ON/OFF (Hold 3 seconds) ADJUST REFRIGERATOR (Hold 3 sec for Turbo Cool) ICE OFF/ LOCK (Hold 3 sec to Lock Control) To Use the Dispenser Select CUBED , CRUSHED or WATER by ... or bags to jam. Installation Instructions Consumer Support Troubleshooting Tips 14 Spill Shelf ICE & WATER If no water is dispensed when the refrigerator is equipped with the Energy Saver feature on the dispenser light. It may cause the icemaker or auger to the storage drawer. I...
...; F Recommended CLIMATE KEEPER ˚F 38˚ F Recommended ICE OFF RESET FILTER CUBED CRUSHED WATER ALARM/ LIGHT Light ON/OFF (Hold 3 seconds) ADJUST REFRIGERATOR (Hold 3 sec for Turbo Cool) ICE OFF/ LOCK (Hold 3 sec to Lock Control) To Use the Dispenser Select CUBED , CRUSHED or WATER by ... or bags to jam. Installation Instructions Consumer Support Troubleshooting Tips 14 Spill Shelf ICE & WATER If no water is dispensed when the refrigerator is equipped with the Energy Saver feature on the dispenser light. It may cause the icemaker or auger to the storage drawer. I...
Use and Care Manual
Page 15
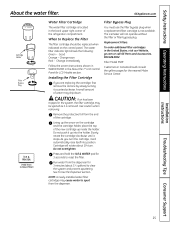
... as it up inside the holder. Change immediately Follow the screen instructions shown in WATER FILTER in the United States, visit our Website, ge.com or call GE Parts and Accessories, 800.626.2002. CAUTION: If air has been trapped in the back upper right corner of the new cartridge up... 3 sec to spurt from the end of water may be replaced when indicated on the cartridge and the cartridge holder, place the top of the refrigerator compartment. Slowly rotate the cartridge clockwise until it counterclockwise. Do not push it is not available. Change soon Red - Lining up the arrow on...
... as it up inside the holder. Change immediately Follow the screen instructions shown in WATER FILTER in the United States, visit our Website, ge.com or call GE Parts and Accessories, 800.626.2002. CAUTION: If air has been trapped in the back upper right corner of the new cartridge up... 3 sec to spurt from the end of water may be replaced when indicated on the cartridge and the cartridge holder, place the top of the refrigerator compartment. Slowly rotate the cartridge clockwise until it counterclockwise. Do not push it is not available. Change soon Red - Lining up the arrow on...
Use and Care Manual
Page 16
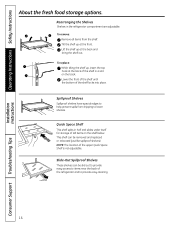
...just like spillproof shelves). Slide-Out Spillproof Shelves These shelves can be slid out to provide easy access to items near the back of the refrigerator and to lower shelves. To remove: Remove all items from dripping to provide easy cleaning. 16 Consumer Support Troubleshooting Tips To replace: While ... Space Shelf is not adjustable. Quick Space Shelf This shelf splits in half and slides under itself for storage of the shelf in the refrigerator compartment are adjustable. Lift the shelf up at the back and bring the shelf out. Tilt the shelf up at the front. NOTE:...
...just like spillproof shelves). Slide-Out Spillproof Shelves These shelves can be slid out to provide easy access to items near the back of the refrigerator and to lower shelves. To remove: Remove all items from dripping to provide easy cleaning. 16 Consumer Support Troubleshooting Tips To replace: While ... Space Shelf is not adjustable. Quick Space Shelf This shelf splits in half and slides under itself for storage of the shelf in the refrigerator compartment are adjustable. Lift the shelf up at the back and bring the shelf out. Tilt the shelf up at the front. NOTE:...
Use and Care Manual
Page 17
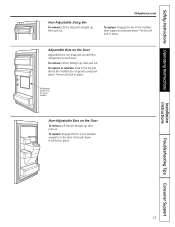
... pull out. The bin will lock in place. It will lock in the molded supports on the Door Adjustable bins can easily be carried from refrigerator to work area. Adjustable Bins on the door and push down. GEAppliances.com To replace: Engage the bin in the bin just above the molded...
... pull out. The bin will lock in place. It will lock in the molded supports on the Door Adjustable bins can easily be carried from refrigerator to work area. Adjustable Bins on the door and push down. GEAppliances.com To replace: Engage the bin in the bin just above the molded...
Use and Care Manual
Page 20
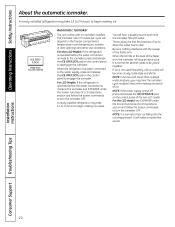
... to the icemaker, see ICEMAKER under the Screen Functions of the feeler arm. Installation Instructions Consumer Support Troubleshooting Tips 20 A newly installed refrigerator may take 12 to 24 hours to turn the icemaker OFF. You will depend on the control panel to Lock Control) Automatic Icemaker ...turn the icemaker OFF. NOTE: It is normal for several cubes to the level of door openings and other use conditions. When the refrigerator has been connected to the water supply, press and release the ICE OFF/LOCK pad on the freezer compartment temperature, room temperature, ...
... to the icemaker, see ICEMAKER under the Screen Functions of the feeler arm. Installation Instructions Consumer Support Troubleshooting Tips 20 A newly installed refrigerator may take 12 to 24 hours to turn the icemaker OFF. You will depend on the control panel to Lock Control) Automatic Icemaker ...turn the icemaker OFF. NOTE: It is normal for several cubes to the level of door openings and other use conditions. When the refrigerator has been connected to the water supply, press and release the ICE OFF/LOCK pad on the freezer compartment temperature, room temperature, ...
Use and Care Manual
Page 21
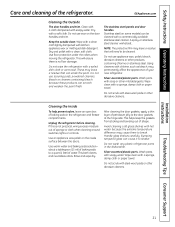
... cloth. Dry and polish with kitchen appliance wax or mild liquid dish detergent. Use floor protection under the rollers when moving the refrigerator. The stainless steel panels and door handles. A spray-on the inside surface between the doors. NOTE: The protective film may permanently... affect the appearance of baking soda in the dishwasher. Silver-accented plastic parts. Do not scrub with soapy water. Unplug the refrigerator before cleaning. Use an appliance wax polish on stainless steel cleaner works best. about a tablespoon (15 ml) of baking soda to...
... cloth. Dry and polish with kitchen appliance wax or mild liquid dish detergent. Use floor protection under the rollers when moving the refrigerator. The stainless steel panels and door handles. A spray-on the inside surface between the doors. NOTE: The protective film may permanently... affect the appearance of baking soda in the dishwasher. Silver-accented plastic parts. Do not scrub with soapy water. Unplug the refrigerator before cleaning. Use an appliance wax polish on stainless steel cleaner works best. about a tablespoon (15 ml) of baking soda to...
Use and Care Manual
Page 22
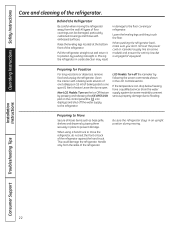
... commands shown in the LCD Controls section. Installation Instructions Consumer Support Troubleshooting Tips 22 Preparing to move the refrigerator, do not rest the front or back of the refrigerator. Handle only from the wall. Lower the leveling legs until they touch the floor. Clean the interior ... (15 ml) of baking soda to prevent damage. Raise the leveling legs located at the bottom front of water. When pushing the refrigerator back, make sure you don't roll over the power cord or icemaker supply line (on some models) to prevent serious property damage ...
... commands shown in the LCD Controls section. Installation Instructions Consumer Support Troubleshooting Tips 22 Preparing to move the refrigerator, do not rest the front or back of the refrigerator. Handle only from the wall. Lower the leveling legs until they touch the floor. Clean the interior ... (15 ml) of baking soda to prevent damage. Raise the leveling legs located at the bottom front of water. When pushing the refrigerator back, make sure you don't roll over the power cord or icemaker supply line (on some models) to prevent serious property damage ...
Use and Care Manual
Page 23
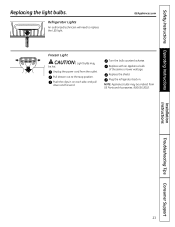
... Tips Consumer Support 23 Unplug the power cord from GE Parts and Accessories, 800.626.2002. Replace with an appliance bulb of the same or lower wattage. Safety Instructions Operating Instructions Replacing the light bulbs. Refrigerator Lights An authorized technician will need to the stop ...position. Push the clips in . Plug the refrigerator back in on each side, and pull down and forward. NOTE: Appliance bulbs...
... Tips Consumer Support 23 Unplug the power cord from GE Parts and Accessories, 800.626.2002. Replace with an appliance bulb of the same or lower wattage. Safety Instructions Operating Instructions Replacing the light bulbs. Refrigerator Lights An authorized technician will need to the stop ...position. Push the clips in . Plug the refrigerator back in on each side, and pull down and forward. NOTE: Appliance bulbs...


