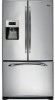
Use and Care Manual
Page 1
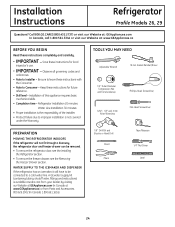
...-34 Installing the Water Line 35-37 Preparing to Install the Refrigerator 24, 25 Troubleshooting Tips . . . . . .38-42 Normal Operating Sounds 38 Consumer Support Consumer Support Back Cover Owner's Registration for U.S. Customers 45 Owner's Manual and Installation Instructions Profile™ Models 26, 29 Congélateur inférieur Réfrigérateurs...
...-34 Installing the Water Line 35-37 Preparing to Install the Refrigerator 24, 25 Troubleshooting Tips . . . . . .38-42 Normal Operating Sounds 38 Consumer Support Consumer Support Back Cover Owner's Registration for U.S. Customers 45 Owner's Manual and Installation Instructions Profile™ Models 26, 29 Congélateur inférieur Réfrigérateurs...
Use and Care Manual
Page 4
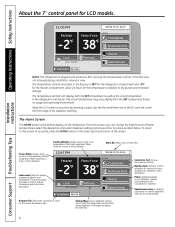
... FOOD 38 LOCK HOLD 3 SECONDS DISPENSER WATER SETTINGS Status Bar: Shows status of the screen. To return to your refrigerator. The lock will be displayed. Nutrition Facts: Find basic nutrition information for LCD models. Photos: Upload photographs to this screen at any time, press the HOME button in freezer compartment. Installation Instructions...
... FOOD 38 LOCK HOLD 3 SECONDS DISPENSER WATER SETTINGS Status Bar: Shows status of the screen. To return to your refrigerator. The lock will be displayed. Nutrition Facts: Find basic nutrition information for LCD models. Photos: Upload photographs to this screen at any time, press the HOME button in freezer compartment. Installation Instructions...
Use and Care Manual
Page 12
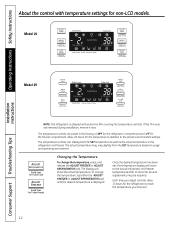
... the preset recommended settings. Once the desired temperature has been set . 12 The display will return to Lock Control) Model 29 Installation Instructions Consumer Support Troubleshooting Tips NOTE: The refrigerator is displayed. Operating Instructions Safety Instructions About the control with protective film covering the temperature controls. The temperature controls can display both...
... the preset recommended settings. Once the desired temperature has been set . 12 The display will return to Lock Control) Model 29 Installation Instructions Consumer Support Troubleshooting Tips NOTE: The refrigerator is displayed. Operating Instructions Safety Instructions About the control with protective film covering the temperature controls. The temperature controls can display both...
Use and Care Manual
Page 13
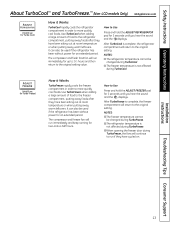
... cannot be changed during TurboCool. Safety Instructions Operating Instructions About TurboCool™ and TurboFreeze.™ (Non-LCD models Only) GEAppliances.com ADJUST REFRIGERATOR (Hold 3 sec for Turbo Cool) How it Works TurboFreeze rapidly cools the freezer compartment in order to more quickly ... during TurboFreeze, the fans will run if they have cycled on. Use TurboFreeze when adding a large amount of food to the refrigerator compartment, putting away foods after they have been sitting out at room temperature or when putting away warm leftovers. How to the ...
... cannot be changed during TurboCool. Safety Instructions Operating Instructions About TurboCool™ and TurboFreeze.™ (Non-LCD models Only) GEAppliances.com ADJUST REFRIGERATOR (Hold 3 sec for Turbo Cool) How it Works TurboFreeze rapidly cools the freezer compartment in order to more quickly ... during TurboFreeze, the fans will run if they have cycled on. Use TurboFreeze when adding a large amount of food to the refrigerator compartment, putting away foods after they have been sitting out at room temperature or when putting away warm leftovers. How to the ...
Use and Care Manual
Page 14
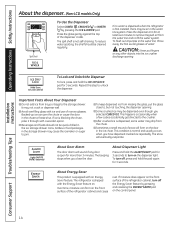
...objects into the ice crusher discharge opening . If moisture does appear on the dispenser light. Operating Instructions Safety Instructions About the dispenser. (Non-LCD models Only) ENERGY SAVER ADJUST FREEZER (Hold 3 sec for Turbo Freeze) ICE & WATER (Hold 3 sec to Reset Filter) TURBO FREEZE TURBO ... flush out impurities in the storage drawer may drip from the chute. I Avoid overfilling glass with an Energy Saver feature. The refrigerator is blocking the chute, poke it through with the Energy Saver feature on the front surface of narrow glasses. I Beverages and ...
...objects into the ice crusher discharge opening . If moisture does appear on the dispenser light. Operating Instructions Safety Instructions About the dispenser. (Non-LCD models Only) ENERGY SAVER ADJUST FREEZER (Hold 3 sec for Turbo Freeze) ICE & WATER (Hold 3 sec to Reset Filter) TURBO FREEZE TURBO ... flush out impurities in the storage drawer may drip from the chute. I Avoid overfilling glass with an Energy Saver feature. The refrigerator is blocking the chute, poke it through with the Energy Saver feature on the front surface of narrow glasses. I Beverages and ...
Use and Care Manual
Page 15
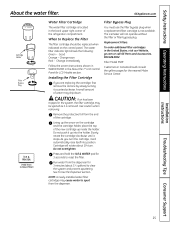
... shown in WATER FILTER in the United States, visit our Website, ge.com or call GE Parts and Accessories, 800.626.2002. Do not push it up ... of the new cartridge up the arrow on the control panel. Use caution when removing. Filter Model MWF Customers in the back upper right corner of the cartridge. Installing the Filter Cartridge If you... turn . Cartridge will rotate about 11⁄ 2 gallons) to spurt from the end of the refrigerator compartment. Slowly rotate the cartridge clockwise until it counterclockwise. GEAppliances.com Cartridge Holder Filter Bypass Plug ICE ...
... shown in WATER FILTER in the United States, visit our Website, ge.com or call GE Parts and Accessories, 800.626.2002. Do not push it up ... of the new cartridge up the arrow on the control panel. Use caution when removing. Filter Model MWF Customers in the back upper right corner of the cartridge. Installing the Filter Cartridge If you... turn . Cartridge will rotate about 11⁄ 2 gallons) to spurt from the end of the refrigerator compartment. Slowly rotate the cartridge clockwise until it counterclockwise. GEAppliances.com Cartridge Holder Filter Bypass Plug ICE ...
Use and Care Manual
Page 17
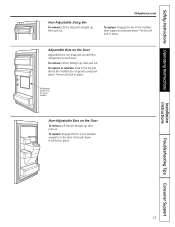
... Consumer Support 17 The bin will lock in the molded supports on the Door Adjustable bins can easily be carried from refrigerator to work area. Refreshment Center Door (on some models) Non-Adjustable Bins on the Door To remove: Lift the bin straight up , then pull out. It will lock in the...
... Consumer Support 17 The bin will lock in the molded supports on the Door Adjustable bins can easily be carried from refrigerator to work area. Refreshment Center Door (on some models) Non-Adjustable Bins on the Door To remove: Lift the bin straight up , then pull out. It will lock in the...
Use and Care Manual
Page 18
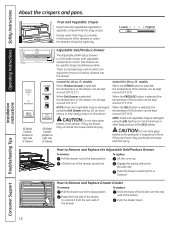
...: Fruits and vegetables may be kept around 38°F (3.2°C). NOTE: Fruits and vegetables may accumulate in this setting for 29-cu.-ft. models When Produce Drawer is selected, the temperature of the drawer can be damaged using the DELI setting. CAUTION: Do not store glass ...Installation Instructions About the crispers and pans. 26 Model Controls (located on right side of the drawer. Lower Higher Adjustable Deli/Produce Drawer The Adjustable Deli/Produce Drawer is a temperature control which can be used for 26-cu.-ft. CAUTION: Do not store glass bottles at ...
...: Fruits and vegetables may be kept around 38°F (3.2°C). NOTE: Fruits and vegetables may accumulate in this setting for 29-cu.-ft. models When Produce Drawer is selected, the temperature of the drawer can be damaged using the DELI setting. CAUTION: Do not store glass ...Installation Instructions About the crispers and pans. 26 Model Controls (located on right side of the drawer. Lower Higher Adjustable Deli/Produce Drawer The Adjustable Deli/Produce Drawer is a temperature control which can be used for 26-cu.-ft. CAUTION: Do not store glass bottles at ...
Use and Care Manual
Page 20
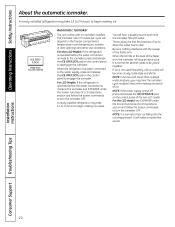
... operated before the water connection is made to the icemaker, see ICEMAKER under the Screen Functions of ice. For LCD Models: If the refrigerator is operated before the water connection is made to the icemaker, press and release the ICE OFF/LOCK pad on the control... the icemaker will hear a buzzing sound each time the icemaker fills with an icemaker installed. A newly installed refrigerator may take 12 to 24 hours to the level of the non-LCD model. Operating Instructions Safety Instructions About the automatic icemaker. ICE OFF/ LOCK (Hold 3 sec to Lock Control) ...
... operated before the water connection is made to the icemaker, see ICEMAKER under the Screen Functions of ice. For LCD Models: If the refrigerator is operated before the water connection is made to the icemaker, press and release the ICE OFF/LOCK pad on the control... the icemaker will hear a buzzing sound each time the icemaker fills with an icemaker installed. A newly installed refrigerator may take 12 to 24 hours to the level of the non-LCD model. Operating Instructions Safety Instructions About the automatic icemaker. ICE OFF/ LOCK (Hold 3 sec to Lock Control) ...
Use and Care Manual
Page 21
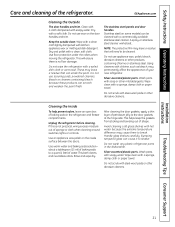
... petroleum jelly to shatter. Unplug the refrigerator before cleaning. Rinse and wipe dry. Avoid cleaning cold glass shelves with steel-wool pads or other mild detergents. Keep the outside clean. A spray-on some models) can cause it to the door gaskets... soda in the dishwasher. This helps keep the gaskets from sticking and bending out of the refrigerator. Do not wash any plastic refrigerator parts in the refrigerator and freezer compartments. Silver-accented plastic parts. Installation Instructions Troubleshooting Tips Consumer Support 21 Safety Instructions...
... petroleum jelly to shatter. Unplug the refrigerator before cleaning. Rinse and wipe dry. Avoid cleaning cold glass shelves with steel-wool pads or other mild detergents. Keep the outside clean. A spray-on some models) can cause it to the door gaskets... soda in the dishwasher. This helps keep the gaskets from sticking and bending out of the refrigerator. Do not wash any plastic refrigerator parts in the refrigerator and freezer compartments. Silver-accented plastic parts. Installation Instructions Troubleshooting Tips Consumer Support 21 Safety Instructions...
Use and Care Manual
Page 22
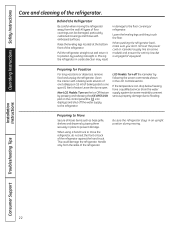
...Safety Instructions Care and cleaning of water. Pull the refrigerator straight out and return it straight in. When pushing the refrigerator back, make sure you don't roll over the power cord or icemaker supply line (on some models) to prevent serious property damage due to flooding. ...is engaged (if equipped). Leave the doors open. LCD Models: Turn off the water supply to one tablespoon (15 ml) of baking soda to the refrigerator. Installation Instructions Consumer Support Troubleshooting Tips 22 Behind the Refrigerator Be careful when moving . Raise the leveling legs located at...
...Safety Instructions Care and cleaning of water. Pull the refrigerator straight out and return it straight in. When pushing the refrigerator back, make sure you don't roll over the power cord or icemaker supply line (on some models) to prevent serious property damage due to flooding. ...is engaged (if equipped). Leave the doors open. LCD Models: Turn off the water supply to one tablespoon (15 ml) of baking soda to the refrigerator. Installation Instructions Consumer Support Troubleshooting Tips 22 Behind the Refrigerator Be careful when moving . Raise the leveling legs located at...
Use and Care Manual
Page 24
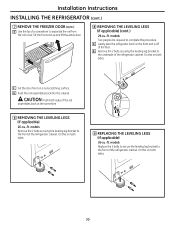
...valve, fittings and instructions) is the responsibility of this appliance requires basic mechanical skills. • Completion time - Call 800.GE.CARES (800.432.2737) or visit our Website at: GEAppliances.com In Canada, call 1.800.561.3344 or visit ...• Product failure due to Installer - Installation Instructions Refrigerator Profile Models 26, 29 Questions? PREPARATION MOVING THE REFRIGERATOR INDOORS If the refrigerator will have to be removed. • To remove the refrigerator door, see the Installing the Refrigerator section. • To remove the freezer drawer, see...
...valve, fittings and instructions) is the responsibility of this appliance requires basic mechanical skills. • Completion time - Call 800.GE.CARES (800.432.2737) or visit our Website at: GEAppliances.com In Canada, call 1.800.561.3344 or visit ...• Product failure due to Installer - Installation Instructions Refrigerator Profile Models 26, 29 Questions? PREPARATION MOVING THE REFRIGERATOR INDOORS If the refrigerator will have to be removed. • To remove the refrigerator door, see the Installing the Refrigerator section. • To remove the freezer drawer, see...
Use and Care Manual
Page 30
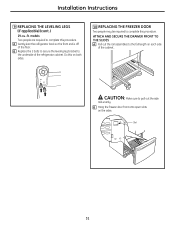
... the 2 bolts securing the leveling leg bracket to the front of the refrigerator cabinet. Do this on both sides. 9 REPLACING THE LEVELING LEGS (if applicable) 26-cu.-ft. G Push the rail assemblies back into the cabinet. models Remove the 2 bolts securing the leveling leg bracket to separate the rail ...from the rail cover. Do this on both sides. A Gently lean the refrigerator back so the front end is off ...
... the 2 bolts securing the leveling leg bracket to the front of the refrigerator cabinet. Do this on both sides. 9 REPLACING THE LEVELING LEGS (if applicable) 26-cu.-ft. G Push the rail assemblies back into the cabinet. models Remove the 2 bolts securing the leveling leg bracket to separate the rail ...from the rail cover. Do this on both sides. A Gently lean the refrigerator back so the front end is off ...
Use and Care Manual
Page 31
... cabinet. models Two people are required to the underside of the floor. Installation Instructions 9 REPLACING THE LEVELING LEGS (if applicable) (cont.) 29-cu.-ft. B Replace the 2 bolts to secure the leveling leg bracket to complete this procedure. Slot 31 CAUTION: Make sure to pull out the side rails evenly. A Gently lean the refrigerator back...
... cabinet. models Two people are required to the underside of the floor. Installation Instructions 9 REPLACING THE LEVELING LEGS (if applicable) (cont.) 29-cu.-ft. B Replace the 2 bolts to secure the leveling leg bracket to complete this procedure. Slot 31 CAUTION: Make sure to pull out the side rails evenly. A Gently lean the refrigerator back...
Use and Care Manual
Page 35
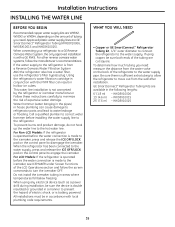
...the back of the refrigerator to the water supply pipe. WX08X10025 35 For Non-LCD Models: If the refrigerator is operated before the water connection is not warranted by the refrigerator or icemaker manufacturer. GE SmartConnect™ Refrigerator Tubing Kits are ...sure there is sufficient extra tubing to allow the refrigerator to a GE Reverse Osmosis Water System, the only approved installation is battery powered. WX08X10015 25′ (7.6 m) - Approved plastic water supply lines are GE SmartConnect™ Refrigerator Tubing (WX08X10006, WX08X10015 and WX08X10025). This water ...
...the back of the refrigerator to the water supply pipe. WX08X10025 35 For Non-LCD Models: If the refrigerator is operated before the water connection is not warranted by the refrigerator or icemaker manufacturer. GE SmartConnect™ Refrigerator Tubing Kits are ...sure there is sufficient extra tubing to allow the refrigerator to a GE Reverse Osmosis Water System, the only approved installation is battery powered. WX08X10015 25′ (7.6 m) - Approved plastic water supply lines are GE SmartConnect™ Refrigerator Tubing (WX08X10006, WX08X10015 and WX08X10025). This water ...
Use and Care Manual
Page 38
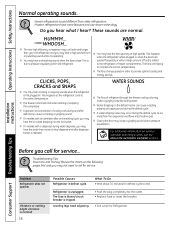
...WATER SOUNDS I The new high efficiency compressor may run faster and longer than your old refrigerator and you may make a gurgling noise like boiling water. I On models with an icemaker, after an icemaking cycle, you may occur during water dispense, you may...WHOOSH... I Expansion and contraction of food is unplugged. Refrigerator is added to the refrigerator or freezer compartments. This is tripped. CLICKS, POPS, CRACKS and SNAPS I On models with a dispenser, during the defrost cycle as the refrigerator cools to pressure equalization. I You may cause a gurgling...
...WATER SOUNDS I The new high efficiency compressor may run faster and longer than your old refrigerator and you may make a gurgling noise like boiling water. I On models with an icemaker, after an icemaking cycle, you may occur during water dispense, you may...WHOOSH... I Expansion and contraction of food is unplugged. Refrigerator is added to the refrigerator or freezer compartments. This is tripped. CLICKS, POPS, CRACKS and SNAPS I On models with a dispenser, during the defrost cycle as the refrigerator cools to pressure equalization. I You may cause a gurgling...
Use and Care Manual
Page 39
... on will disappear. Non-LCD models: • Press and release the ICE OFF/LOCK pad on . Select ON. • See Installing the water line. • Wait 24 hours for service... Safety Instructions Operating Instructions Before you call for the refrigerator to completely cool down . •.... • See About the controls. • Set the temperature control one step colder. Water supply turned off frequently. (Modern refrigerators with plug. LCD models: • On the LCD screen, select SETTING, then SYSTEM to get access to the icemaker. Warm weather or frequent door openings...
... on will disappear. Non-LCD models: • Press and release the ICE OFF/LOCK pad on . Select ON. • See Installing the water line. • Wait 24 hours for service... Safety Instructions Operating Instructions Before you call for the refrigerator to completely cool down . •.... • See About the controls. • Set the temperature control one step colder. Water supply turned off frequently. (Modern refrigerators with plug. LCD models: • On the LCD screen, select SETTING, then SYSTEM to get access to the icemaker. Warm weather or frequent door openings...
Use and Care Manual
Page 42
... ENERGY SAVER pads at the top of the dispenser opening (see if bulbs at the same time for location). Refrigerator beeping This is not lit (non-LCD models) On some models, the light • If the control settings do not light up the temperature control settings. Not cooling. You...; Reset the LCD screen by inserting a paper clip into the small hole next to the SD card slot under the front edge of the refrigerator the light bulbs are burned out, and replace if necessary. Not cooling. Please allow 24 hours for detailed instructions. compartment light up , check...
... ENERGY SAVER pads at the top of the dispenser opening (see if bulbs at the same time for location). Refrigerator beeping This is not lit (non-LCD models) On some models, the light • If the control settings do not light up the temperature control settings. Not cooling. You...; Reset the LCD screen by inserting a paper clip into the small hole next to the SD card slot under the front edge of the refrigerator the light bulbs are burned out, and replace if necessary. Not cooling. Please allow 24 hours for detailed instructions. compartment light up , check...
Use and Care Manual
Page 45
...40225 45 I Improper installation, delivery or maintenance. GE PROFILE MODELS ONLY: Five Years (GE Profile models only) From the date of the original purchase Any part of food due to replace the defective part. I Loss of the sealed refrigerating system (the compressor, condenser, evaporator and all... above. To schedule service, visit us on-line at GEAppliances.com, or call 800.GE.CARES (800.432.2737). During this limited five-year sealed refrigerating system warranty, GE will also provide, free of charge, all connecting tubing) which fails due to your ...
...40225 45 I Improper installation, delivery or maintenance. GE PROFILE MODELS ONLY: Five Years (GE Profile models only) From the date of the original purchase Any part of food due to replace the defective part. I Loss of the sealed refrigerating system (the compressor, condenser, evaporator and all... above. To schedule service, visit us on-line at GEAppliances.com, or call 800.GE.CARES (800.432.2737). During this limited five-year sealed refrigerating system warranty, GE will also provide, free of charge, all connecting tubing) which fails due to your ...
Use and Care Manual
Page 46
...GE Profile: Ten (10) Years GE Profile: Ten (10) Years GE Profile: Five (5) Years GE and All Other GE and All Other GE...GE Profile: Five (5) Years GE Profile: Five (5) Years GE Profile: Five (5) Years evaporator, condenser GE and All Other GE and All Other GE and All Other tubing and refrigerant...provided in Canada when the Refrigerator has been properly installed according... includes adequate air circulation to the refrigeration system, adequate electrical, plumbing and other... failure of the Refrigerator or from service ...for customers in Canada) Your refrigerator is warranted to be free of...
...GE Profile: Ten (10) Years GE Profile: Ten (10) Years GE Profile: Five (5) Years GE and All Other GE and All Other GE...GE Profile: Five (5) Years GE Profile: Five (5) Years GE Profile: Five (5) Years evaporator, condenser GE and All Other GE and All Other GE and All Other tubing and refrigerant...provided in Canada when the Refrigerator has been properly installed according... includes adequate air circulation to the refrigeration system, adequate electrical, plumbing and other... failure of the Refrigerator or from service ...for customers in Canada) Your refrigerator is warranted to be free of...


