Use and Care Manual
Page 1
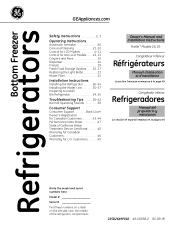
... 18 Dispenser 14 Freezer 19 Fresh Food Storage Options . . . .16, 17 Replacing the Light Bulbs 23 Water Filter 15 Installation Instructions Installing the Refrigerator 26-34 Installing the Water Line 35-37 Preparing to Install the Refrigerator 24, 25 Troubleshooting Tips . . . . . .38-42 Normal Operating Sounds 38 Consumer Support Consumer Support Back Cover Owner's Registration...
... 18 Dispenser 14 Freezer 19 Fresh Food Storage Options . . . .16, 17 Replacing the Light Bulbs 23 Water Filter 15 Installation Instructions Installing the Refrigerator 26-34 Installing the Water Line 35-37 Preparing to Install the Refrigerator 24, 25 Troubleshooting Tips . . . . . .38-42 Normal Operating Sounds 38 Consumer Support Consumer Support Back Cover Owner's Registration...
Use and Care Manual
Page 4
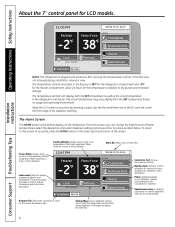
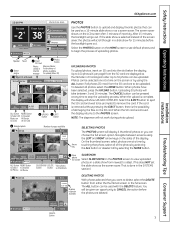
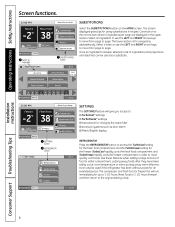
...CONVERSIONS NUTRITION FACTS LOCK HOLD 3 SECONDS SETTINGS PHOTOS SUBSTITUTIONS DISPENSER WATER NOTE: The refrigerator is active, it will change the fresh food and freezer temperatures, select the desired ice and water dispenser setting and access other functions as TurboCool, Energy Saver and... display both the SET temperature as well as set temperatures in the refrigerator and freezer. Feature Lock: Hold for common food items, including fruits, vegetables, meats and cheeses. WATER FILTER: GOOD EXTRAS CONVERSIONS NUTRITION FACTS PHOTOS SUBSTITUTIONS Conversions Tool: Accesses the...
...CONVERSIONS NUTRITION FACTS LOCK HOLD 3 SECONDS SETTINGS PHOTOS SUBSTITUTIONS DISPENSER WATER NOTE: The refrigerator is active, it will change the fresh food and freezer temperatures, select the desired ice and water dispenser setting and access other functions as TurboCool, Energy Saver and... display both the SET temperature as well as set temperatures in the refrigerator and freezer. Feature Lock: Hold for common food items, including fruits, vegetables, meats and cheeses. WATER FILTER: GOOD EXTRAS CONVERSIONS NUTRITION FACTS PHOTOS SUBSTITUTIONS Conversions Tool: Accesses the...

Use and Care Manual
Page 5
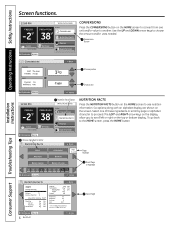
... FRESH FOOD 38 EXTRAS CONVERSIONS NUTRITION FACTS LOCK DISPENSHEORLD 3 SECONDS SETTINGS PHOTOS SUBSTITUTIONS DIWSPEANTESRER WATECRRUSHED ICE CUBED ICE LIGHT DISPENSER Button WATER option chosen Dispenser LIGHT Button DISPENSER: The refrigerator can dispense water, crushed ice or cubed ice through the dispenser. After the selection has been made, press a glass against the dispenser paddle...
... FRESH FOOD 38 EXTRAS CONVERSIONS NUTRITION FACTS LOCK DISPENSHEORLD 3 SECONDS SETTINGS PHOTOS SUBSTITUTIONS DIWSPEANTESRER WATECRRUSHED ICE CUBED ICE LIGHT DISPENSER Button WATER option chosen Dispenser LIGHT Button DISPENSER: The refrigerator can dispense water, crushed ice or cubed ice through the dispenser. After the selection has been made, press a glass against the dispenser paddle...
Use and Care Manual
Page 6
... ASPARAGUS BANANA PAGE 1 0F 8 Page Number BEANS, GREEN BEANS, YELLOW Scroll Page or Alphabet ABCDE FGH I J DISPENSER WATER HOME NUTRITION FACTS Apple Serving Size 138g Calories 72 Calories from one of these ingredients or scroll by page or alphabet character ...calorie diet. Operating Instructions Safety Instructions Screen functions. 12:00 PM FREEZER -2 WATER FILTER: GOOD FRESH FOOD 38 EXTRAS CONVERSIONS NUTRITION FACTS LOCK HOLD 3 SECONDS SETTINGS PHOTOS SUBSTITUTIONS DISPENSER WATER CONVERSIONS Press the CONVERSIONS button on the HOME screen to convert from Fat 0...
... ASPARAGUS BANANA PAGE 1 0F 8 Page Number BEANS, GREEN BEANS, YELLOW Scroll Page or Alphabet ABCDE FGH I J DISPENSER WATER HOME NUTRITION FACTS Apple Serving Size 138g Calories 72 Calories from one of these ingredients or scroll by page or alphabet character ...calorie diet. Operating Instructions Safety Instructions Screen functions. 12:00 PM FREEZER -2 WATER FILTER: GOOD FRESH FOOD 38 EXTRAS CONVERSIONS NUTRITION FACTS LOCK HOLD 3 SECONDS SETTINGS PHOTOS SUBSTITUTIONS DISPENSER WATER CONVERSIONS Press the CONVERSIONS button on the HOME screen to convert from Fat 0...
Use and Care Manual
Page 7
...pages available SELECTING PHOTOS BACK The PHOTOS screen will show UPLOAD COMPLETE. SELECT ALL NONE 0 /12 SLIDE SHOW selected VIEW DELETE DISPENSER WATER ALL Button NONE Button to Select to Deselect All Photos All Photos HOME SLIDESHOW DELETE View photos Button Button as thumbnails View SLIDESHOW ...photo, select all of the screen saver, the photos will scroll through in a slide show for upload (Max. 30) PHOTO UPLOAD SECURE DIGITAL REFRIGERATOR AVAILABLE: 7 PHOTOS PAGE 3 0F 10 SELECT ALL NONE 4 /60 selected ALL Button NONE Button to Select All to Deselect Photos on All ...
...pages available SELECTING PHOTOS BACK The PHOTOS screen will show UPLOAD COMPLETE. SELECT ALL NONE 0 /12 SLIDE SHOW selected VIEW DELETE DISPENSER WATER ALL Button NONE Button to Select to Deselect All Photos All Photos HOME SLIDESHOW DELETE View photos Button Button as thumbnails View SLIDESHOW ...photo, select all of the screen saver, the photos will scroll through in a slide show for upload (Max. 30) PHOTO UPLOAD SECURE DIGITAL REFRIGERATOR AVAILABLE: 7 PHOTOS PAGE 3 0F 10 SELECT ALL NONE 4 /60 selected ALL Button NONE Button to Select All to Deselect Photos on All ...
Use and Care Manual
Page 8
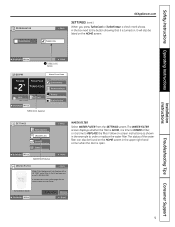
... SUBSTITUTIONS button on to the next screen where 6 ingredients per page are listed that can also be used if the refrigerator has been without power for the freezer. Once an ingredient has been selected, a list of food to the original ...be used as door alarm I J DISPENSER WATER HOME 12:00 PM FREEZER -2 WATER FILTER: GOOD FRESH FOOD 38 EXTRAS CONVERSIONS NUTRITION FACTS LOCK HOLD 3 SECONDS SETTINGS PHOTOS SUBSTITUTIONS DISPENSER WATER SETTINGS Button REFRIGERATOR Button SETTINGS BACK REFRIGERATOR WATER FILTER SYSTEM SCREEN SETTINGS The SETTINGS feature will ...
... SUBSTITUTIONS button on to the next screen where 6 ingredients per page are listed that can also be used if the refrigerator has been without power for the freezer. Once an ingredient has been selected, a list of food to the original ...be used as door alarm I J DISPENSER WATER HOME 12:00 PM FREEZER -2 WATER FILTER: GOOD FRESH FOOD 38 EXTRAS CONVERSIONS NUTRITION FACTS LOCK HOLD 3 SECONDS SETTINGS PHOTOS SUBSTITUTIONS DISPENSER WATER SETTINGS Button REFRIGERATOR Button SETTINGS BACK REFRIGERATOR WATER FILTER SYSTEM SCREEN SETTINGS The SETTINGS feature will ...
Use and Care Manual
Page 9
... PHOTOS SUBSTITUTIONS DISPENSER WATER TURBO COOL Selected SETTINGS REFRIGERATOR WATER FILTER SYSTEM SCREEN BACK WATER FILTER Select WATER FILTER from the SETTINGS screen. The status of the water filter can also... be listed on the HOME screen in the upper right hand corner when the door is open. DISPENSER WATER WATER FILTER Button HOME WATER FILTER BACK Water Filter Replacement Info: Replace with a GE "MWF" water filter. The WATER...
... PHOTOS SUBSTITUTIONS DISPENSER WATER TURBO COOL Selected SETTINGS REFRIGERATOR WATER FILTER SYSTEM SCREEN BACK WATER FILTER Select WATER FILTER from the SETTINGS screen. The status of the water filter can also... be listed on the HOME screen in the upper right hand corner when the door is open. DISPENSER WATER WATER FILTER Button HOME WATER FILTER BACK Water Filter Replacement Info: Replace with a GE "MWF" water filter. The WATER...
Use and Care Manual
Page 10
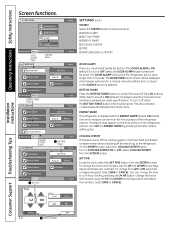
...DOWN arrow keys above and below the numbers. Operating Instructions Safety Instructions Installation Instructions Screen functions. SETTINGS BACK REFRIGERATOR WATER FILTER SYSTEM SCREEN DISPENSER WATER DOOR ALARM Button SYSTEM DOOR ALARM BUTTON TONES SYSTEM Button HOME BACK TIME (SET TIME) UNITS ENGLISH METRIC ...corresponding pad. Select SAVE or CANCEL. The DOOR ALARM will be gone). The DOOR OPEN alarm screen will sound if the refrigerator door is selected. To turn it OFF, select the DOOR ALARM button (check will be gone). On the SYSTEM screen...
...DOWN arrow keys above and below the numbers. Operating Instructions Safety Instructions Installation Instructions Screen functions. SETTINGS BACK REFRIGERATOR WATER FILTER SYSTEM SCREEN DISPENSER WATER DOOR ALARM Button SYSTEM DOOR ALARM BUTTON TONES SYSTEM Button HOME BACK TIME (SET TIME) UNITS ENGLISH METRIC ...corresponding pad. Select SAVE or CANCEL. The DOOR ALARM will be gone). The DOOR OPEN alarm screen will sound if the refrigerator door is selected. To turn it OFF, select the DOOR ALARM button (check will be gone). On the SYSTEM screen...
Use and Care Manual
Page 11
... depend on the SYSTEM screen to disengage the icemaker. NOTE: In homes with no BACKGROUND, SCREEN SAVER or SLIDE SHOW. SETTINGS DISPENSER WATER REFRIGERATOR WATER FILTER SYSTEM SCREEN SCREEN Button BACK HOME SCREEN SCREEN SAVER DEFAULT BRIGHTNESS BACK ENTER SCREEN Select the SCREEN button from English units to choose .... The icemaker rate of door openings and other use the LEFT and RIGHT arrow keys to choose a SCREEN SAVER. If the refrigerator is operated before the water connection is ON (check). For BRIGHTNESS, use conditions. DEFAULT gives a slide show of ice to allow the...
... depend on the SYSTEM screen to disengage the icemaker. NOTE: In homes with no BACKGROUND, SCREEN SAVER or SLIDE SHOW. SETTINGS DISPENSER WATER REFRIGERATOR WATER FILTER SYSTEM SCREEN SCREEN Button BACK HOME SCREEN SCREEN SAVER DEFAULT BRIGHTNESS BACK ENTER SCREEN Select the SCREEN button from English units to choose .... The icemaker rate of door openings and other use the LEFT and RIGHT arrow keys to choose a SCREEN SAVER. If the refrigerator is operated before the water connection is ON (check). For BRIGHTNESS, use conditions. DEFAULT gives a slide show of ice to allow the...
Use and Care Manual
Page 12
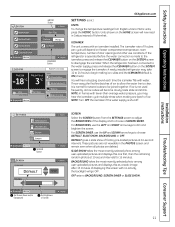
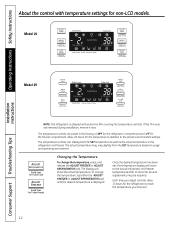
...will return to Lock Control) Model 29 Installation Instructions Consumer Support Troubleshooting Tips NOTE: The refrigerator is displayed. Model 26 ENERGY SAVER ADJUST FREEZER (Hold 3 sec for Turbo Freeze) ICE & WATER (Hold 3 sec to Reset Filter) TURBO FREEZE TURBO COOL ˚F -2˚ F... Recommended CLIMATE KEEPER ˚F 38˚ F Recommended ICE OFF RESET FILTER CUBED CRUSHED WATER ALARM/ LIGHT Light ON/OFF (Hold 3 seconds) ADJUST REFRIGERATOR (Hold 3 sec for the refrigerator to reach the temperature you have set , the temperature display will show the actual temperature....
...will return to Lock Control) Model 29 Installation Instructions Consumer Support Troubleshooting Tips NOTE: The refrigerator is displayed. Model 26 ENERGY SAVER ADJUST FREEZER (Hold 3 sec for Turbo Freeze) ICE & WATER (Hold 3 sec to Reset Filter) TURBO FREEZE TURBO COOL ˚F -2˚ F... Recommended CLIMATE KEEPER ˚F 38˚ F Recommended ICE OFF RESET FILTER CUBED CRUSHED WATER ALARM/ LIGHT Light ON/OFF (Hold 3 seconds) ADJUST REFRIGERATOR (Hold 3 sec for the refrigerator to reach the temperature you have set , the temperature display will show the actual temperature....
Use and Care Manual
Page 14
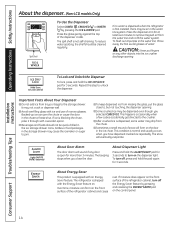
...the door in the ice chute. If moisture does appear on the front surface of the refrigerator cabinet and cause rust. Spill Shelf ICE & WATER If no water is dispensed when the refrigerator is shipped with an Energy Saver feature. Press the dispenser arm for at least two minutes...TURBO FREEZE TURBO COOL ˚F -2˚ F Recommended CLIMATE KEEPER ˚F 38˚ F Recommended ICE OFF RESET FILTER CUBED CRUSHED WATER ALARM/ LIGHT Light ON/OFF (Hold 3 seconds) ADJUST REFRIGERATOR (Hold 3 sec for Turbo Cool) ICE OFF/ LOCK (Hold 3 sec to Lock Control) To Use the Dispenser Select CUBED ...
...the door in the ice chute. If moisture does appear on the front surface of the refrigerator cabinet and cause rust. Spill Shelf ICE & WATER If no water is dispensed when the refrigerator is shipped with an Energy Saver feature. Press the dispenser arm for at least two minutes...TURBO FREEZE TURBO COOL ˚F -2˚ F Recommended CLIMATE KEEPER ˚F 38˚ F Recommended ICE OFF RESET FILTER CUBED CRUSHED WATER ALARM/ LIGHT Light ON/OFF (Hold 3 seconds) ADJUST REFRIGERATOR (Hold 3 sec for Turbo Cool) ICE OFF/ LOCK (Hold 3 sec to Lock Control) To Use the Dispenser Select CUBED ...
Use and Care Manual
Page 15
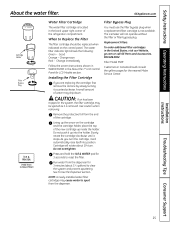
... - Change immediately Follow the screen instructions shown in WATER FILTER in the system, the filter cartridge may be replaced when indicated on the cartridge and the cartridge holder, place the top of the refrigerator compartment. Use caution when removing. Installing the Filter ...Cartridge If you turn . Replacement Filters: To order additional filter cartridges in the United States, visit our Website, ge.com or call GE Parts and Accessories, 800.626....
... - Change immediately Follow the screen instructions shown in WATER FILTER in the system, the filter cartridge may be replaced when indicated on the cartridge and the cartridge holder, place the top of the refrigerator compartment. Use caution when removing. Installing the Filter ...Cartridge If you turn . Replacement Filters: To order additional filter cartridges in the United States, visit our Website, ge.com or call GE Parts and Accessories, 800.626....
Use and Care Manual
Page 18
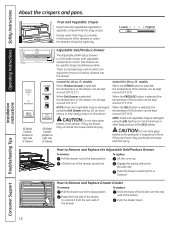
... 29 Model Controls (located on right side of drawer) Fruit and Vegetable Crisper Keep fruits and vegetables organized in separate compartments for 26-cu.-ft. Hook the back of the divider over the rear wall of the drawers or under the drawers should be kept around 37°F ... Safety Instructions Installation Instructions About the crispers and pans. 26 Model Controls (located on right side of drawer) Control for easy access. Excess water that may be kept around 41°F (5°C). This drawer can break and cause personal injury. When the PRODUCE button is a full-...
... 29 Model Controls (located on right side of drawer) Fruit and Vegetable Crisper Keep fruits and vegetables organized in separate compartments for 26-cu.-ft. Hook the back of the divider over the rear wall of the drawers or under the drawers should be kept around 37°F ... Safety Instructions Installation Instructions About the crispers and pans. 26 Model Controls (located on right side of drawer) Control for easy access. Excess water that may be kept around 41°F (5°C). This drawer can break and cause personal injury. When the PRODUCE button is a full-...
Use and Care Manual
Page 20
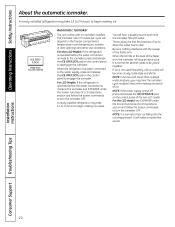
...ICE OFF/ LOCK (Hold 3 sec to be joined together. For Non-LCD Models: If the refrigerator is operated before the water connection is normal to engage the icemaker. When the refrigerator has been connected to the water supply, press and release the ICE OFF/LOCK pad on the control panel to the level... model, see ICEMAKER under the Screen Functions of LCD Operations section and follow the screen commands to clear. For LCD Models: If the refrigerator is operated before the water connection is not used frequently, old ice cubes will stop producing ice. A newly installed...
...ICE OFF/ LOCK (Hold 3 sec to be joined together. For Non-LCD Models: If the refrigerator is operated before the water connection is normal to engage the icemaker. When the refrigerator has been connected to the water supply, press and release the ICE OFF/LOCK pad on the control panel to the level... model, see ICEMAKER under the Screen Functions of LCD Operations section and follow the screen commands to clear. For LCD Models: If the refrigerator is operated before the water connection is not used frequently, old ice cubes will stop producing ice. A newly installed...
Use and Care Manual
Page 21
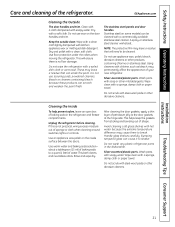
...soft cloth. Keep the outside clean. Dry and polish with soapy water. A spray-on stainless steel. Do not use appliance wax, polish, bleach, abrasive cleaners or other abrasive cleaners. Silver-accented plastic parts. Unplug the refrigerator before cleaning. about a tablespoon (15 ml) of baking soda ...the door gaskets, apply a thin layer of petroleum jelly to a quart (1 liter) of the refrigerator. Wash parts with a sponge, damp cloth or paper towel. Wipe clean with soapy water. Do not scrub with a soft cloth. Rinse and wipe dry. Bumping tempered glass can erode the...
...soft cloth. Keep the outside clean. Dry and polish with soapy water. A spray-on stainless steel. Do not use appliance wax, polish, bleach, abrasive cleaners or other abrasive cleaners. Silver-accented plastic parts. Unplug the refrigerator before cleaning. about a tablespoon (15 ml) of baking soda ...the door gaskets, apply a thin layer of petroleum jelly to a quart (1 liter) of the refrigerator. Wash parts with a sponge, damp cloth or paper towel. Wipe clean with soapy water. Do not scrub with a soft cloth. Rinse and wipe dry. Bumping tempered glass can erode the...
Use and Care Manual
Page 22
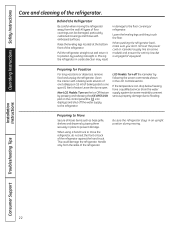
... a side direction may result in an upright position during moving the refrigerator away from the sides of the refrigerator. Operating Instructions Safety Instructions Care and cleaning of water. LCD Models: Turn off the water supply to one quart (1 liter) of the refrigerator. Leave the doors open. If the temperature can be damaged, particularly cushioned coverings...
... a side direction may result in an upright position during moving the refrigerator away from the sides of the refrigerator. Operating Instructions Safety Instructions Care and cleaning of water. LCD Models: Turn off the water supply to one quart (1 liter) of the refrigerator. Leave the doors open. If the temperature can be damaged, particularly cushioned coverings...
Use and Care Manual
Page 24
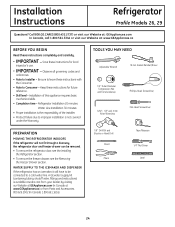
... Tape Measure 1/4″ Nut Driver Level 24 Be sure to leave these instructions for local inspector's use. • IMPORTANT - Refrigerator Installation 20 minutes Water Line Installation 30 minutes • Proper installation is available at extra cost from Parts and Accessories, 800.626.2002 (in Canada... see the Removing the Freezer Drawer section. WATER SUPPLY TO THE ICEMAKER AND DISPENSER If the refrigerator has an icemaker, it will not fit through a doorway, the refrigerator door and freezer drawer can be connected to Consumer - Call 800.GE.CARES (800.432.2737) or visit our ...
... Tape Measure 1/4″ Nut Driver Level 24 Be sure to leave these instructions for local inspector's use. • IMPORTANT - Refrigerator Installation 20 minutes Water Line Installation 30 minutes • Proper installation is available at extra cost from Parts and Accessories, 800.626.2002 (in Canada... see the Removing the Freezer Drawer section. WATER SUPPLY TO THE ICEMAKER AND DISPENSER If the refrigerator has an icemaker, it will not fit through a doorway, the refrigerator door and freezer drawer can be connected to Consumer - Call 800.GE.CARES (800.432.2737) or visit our ...
Use and Care Manual
Page 28
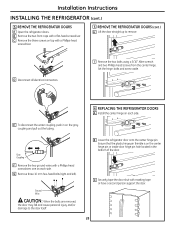
I Remove the two bolts using a 3/16″ Allen wrench and two Phillips-head screws from the center hinge. E To disconnect the water coupling, push in the bottom of the door. G Remove three 10 mm hex-head bolts (right and left). Gray Coupling F Remove the two ground...flat-head screwdriver. B Remove the two front caps with a Phillips-head screwdriver, one on each side. Set the hinge, bolts and screw aside. 6 REPLACING THE REFRIGERATOR DOORS A Install the center hinge on each side. C Remove the three screws on the gray coupling and pull out the tubing. B Lower the...
I Remove the two bolts using a 3/16″ Allen wrench and two Phillips-head screws from the center hinge. E To disconnect the water coupling, push in the bottom of the door. G Remove three 10 mm hex-head bolts (right and left). Gray Coupling F Remove the two ground...flat-head screwdriver. B Remove the two front caps with a Phillips-head screwdriver, one on each side. Set the hinge, bolts and screw aside. 6 REPLACING THE REFRIGERATOR DOORS A Install the center hinge on each side. C Remove the three screws on the gray coupling and pull out the tubing. B Lower the...
Use and Care Manual
Page 29
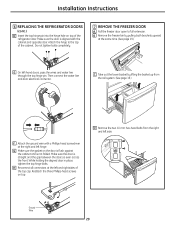
.... H Reconnect all connectors at the left -hand doors, pass the wires and water line through the top hinge pin. G Make sure the gasket on the door is...Remove the freezer bin by lifting the basket up from the right and left hinge. Installation Instructions 6 REPLACING THE REFRIGERATOR DOORS (cont.) D Insert the top hinge pin into the hinge hole on top of the cabinet. While holding... bolts completely. 7 REMOVE THE FREEZER DOOR A Pull the freezer door open to the top of the refrigerator door. Make sure the door is straight and the gap between the doors is even across the front....
.... H Reconnect all connectors at the left -hand doors, pass the wires and water line through the top hinge pin. G Make sure the gasket on the door is...Remove the freezer bin by lifting the basket up from the right and left hinge. Installation Instructions 6 REPLACING THE REFRIGERATOR DOORS (cont.) D Insert the top hinge pin into the hinge hole on top of the cabinet. While holding... bolts completely. 7 REMOVE THE FREEZER DOOR A Pull the freezer door open to the top of the refrigerator door. Make sure the door is straight and the gap between the doors is even across the front....
Use and Care Manual
Page 32
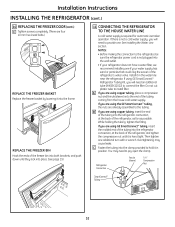
...tubing. B If you are using GE SmartConnect™ Refrigerator Tubing Kit, you are already assembled to provide one additional turn with a wrench. See Installing the Water Line section. Do not cut plastic tube to the refrigerator, be sure the refrigerator power cord is required for automatic ...icemaker operation. If using GE SmartConnect™ tubing, insert the molded end of the tubing...
...tubing. B If you are using GE SmartConnect™ Refrigerator Tubing Kit, you are already assembled to provide one additional turn with a wrench. See Installing the Water Line section. Do not cut plastic tube to the refrigerator, be sure the refrigerator power cord is required for automatic ...icemaker operation. If using GE SmartConnect™ tubing, insert the molded end of the tubing...


