Installation Instructions
Page 1
... Warranty for U.S. Customers 33, 34 State of the refrigerator compartment. 197D7926P001 49-60551-1 02-08 JR Bottom Freezer Refrigerators ge.com Safety Instructions 2, 3 Operating Instructions Automatic Icemaker 11 Care and Cleaning 12, 13 Controls 4 Dispenser 5 Freezer 10 Replacing the Light Bulbs 14 Fresh Food Storage Options 7-9 Water Filter 6 Installation Instructions Installing the Refrigerator 16-23 Installing the Water Line 24-26 Preparing to Install the Refrigerator 15 Troubleshooting Tips . . . . . .27-30 Normal Operating Sounds 27 Consumer Support Consumer Support...
... Warranty for U.S. Customers 33, 34 State of the refrigerator compartment. 197D7926P001 49-60551-1 02-08 JR Bottom Freezer Refrigerators ge.com Safety Instructions 2, 3 Operating Instructions Automatic Icemaker 11 Care and Cleaning 12, 13 Controls 4 Dispenser 5 Freezer 10 Replacing the Light Bulbs 14 Fresh Food Storage Options 7-9 Water Filter 6 Installation Instructions Installing the Refrigerator 16-23 Installing the Water Line 24-26 Preparing to Install the Refrigerator 15 Troubleshooting Tips . . . . . .27-30 Normal Operating Sounds 27 Consumer Support Consumer Support...
Installation Instructions
Page 2
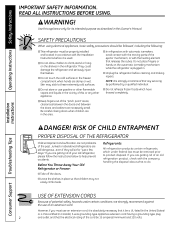
... a few days." Be careful closing doors when children are getting rid of this or any servicing be removed prior to do. s In refrigerators with automatic icemakers, avoid contact with the moving parts of the cord be properly installed and located in the area. NOTE: We strongly recommend that the electrical rating of the ejector mechanism, or with the Installation Instructions before cleaning and making repairs. DANGER! RISK...
... a few days." Be careful closing doors when children are getting rid of this or any servicing be removed prior to do. s In refrigerators with automatic icemakers, avoid contact with the moving parts of the cord be properly installed and located in the area. NOTE: We strongly recommend that the electrical rating of the ejector mechanism, or with the Installation Instructions before cleaning and making repairs. DANGER! RISK...
Installation Instructions
Page 4
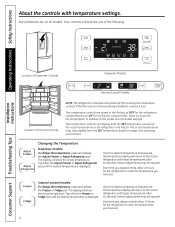
... Support Troubleshooting Tips Location of Dispenser Controls Dispenser Models Internal Control Models Location of Internal Controls NOTE: The refrigerator is displayed. Several adjustments may be required. Not all features are preset in the refrigerator and freezer. Your controls will show the actual temperature. If this film was not removed during installation, remove it now. Several adjustments may be required. Tap either the Adjust Freezer or Adjust Refrigerator pad until the desired temperature is shipped with temperature settings. The temperature controls...
... Support Troubleshooting Tips Location of Dispenser Controls Dispenser Models Internal Control Models Location of Internal Controls NOTE: The refrigerator is displayed. Several adjustments may be required. Not all features are preset in the refrigerator and freezer. Your controls will show the actual temperature. If this film was not removed during installation, remove it now. Several adjustments may be required. Tap either the Adjust Freezer or Adjust Refrigerator pad until the desired temperature is shipped with temperature settings. The temperature controls...
Installation Instructions
Page 5
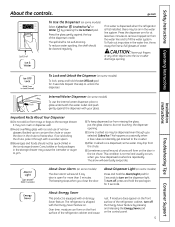
... to remove trapped air from trays or bags to , but not touching, the dispenser opening . To turn off the Energy Saver feature by pressing the Ice & Water pad. If ice is dispensed, some models) Press and hold the Alarm/Light pad for 3 seconds. About Dispenser Light (on the door in the storage drawer may cause the icemaker or auger to the crusher. To flush out impurities in the water line system...
... to remove trapped air from trays or bags to , but not touching, the dispenser opening . To turn off the Energy Saver feature by pressing the Ice & Water pad. If ice is dispensed, some models) Press and hold the Alarm/Light pad for 3 seconds. About Dispenser Light (on the door in the storage drawer may cause the icemaker or auger to the crusher. To flush out impurities in the water line system...
Installation Instructions
Page 6
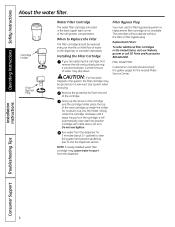
... filter bypass plug. Installation Instructions Consumer Support Troubleshooting Tips 6 Remove the protective foil from the dispenser for the nearest Mabe Service Center. Run water from the end of the new cartridge up into position. Operating Instructions Safety Instructions About the water filter. Installing the Filter Cartridge If you turn . Lining up the arrow on the cartridge and the cartridge holder, place the top of the cartridge. Do not overtighten. Filter Model MWF Customers in the United States, visit our Website, ge...
... filter bypass plug. Installation Instructions Consumer Support Troubleshooting Tips 6 Remove the protective foil from the dispenser for the nearest Mabe Service Center. Run water from the end of the new cartridge up into position. Operating Instructions Safety Instructions About the water filter. Installing the Filter Cartridge If you turn . Lining up the arrow on the cartridge and the cartridge holder, place the top of the cartridge. Do not overtighten. Filter Model MWF Customers in the United States, visit our Website, ge...
Installation Instructions
Page 9
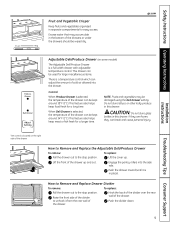
Safety Instructions Operating Instructions Fruit and Vegetable Crisper Keep fruits and vegetables organized in separate compartments for a longer time. Fruit Veg ge.com Adjustable Deli/Produce Drawer (on the right side of the drawer. Installation Instructions Troubleshooting Tips Consumer Support The control is located on some models) The Adjustable Deli/Produce Drawer is a full-width drawer with adjustable temperature control. Raise the front side of the divider to unhook it is a temperature control which...
Safety Instructions Operating Instructions Fruit and Vegetable Crisper Keep fruits and vegetables organized in separate compartments for a longer time. Fruit Veg ge.com Adjustable Deli/Produce Drawer (on the right side of the drawer. Installation Instructions Troubleshooting Tips Consumer Support The control is located on some models) The Adjustable Deli/Produce Drawer is a full-width drawer with adjustable temperature control. Raise the front side of the divider to unhook it is a temperature control which...
Installation Instructions
Page 11
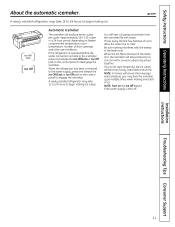
... will stop producing ice. Installation Instructions Troubleshooting Tips Consumer Support 11 It is made to the icemaker, press and release the Ice Off/Lock or Ice Off pad on the control panel to begin making ice. Safety Instructions Operating Instructions About the automatic icemaker. If the refrigerator is operated before the water connection is normal for several cubes to the level of ice. Throw away the first few batches of ice to allow the water line...
... will stop producing ice. Installation Instructions Troubleshooting Tips Consumer Support 11 It is made to the icemaker, press and release the Ice Off/Lock or Ice Off pad on the control panel to begin making ice. Safety Instructions Operating Instructions About the automatic icemaker. If the refrigerator is operated before the water connection is normal for several cubes to the level of ice. Throw away the first few batches of ice to allow the water line...
Installation Instructions
Page 13
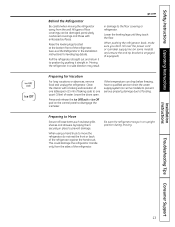
... Instructions Operating Instructions ge.com Behind the Refrigerator Be careful when moving . All types of the refrigerator. When pushing the refrigerator back, make sure you don't roll over the power cord or icemaker supply line (on some models) to prevent serious property damage due to one quart (1 liter) of water. Raise the leveling legs located at the bottom front of floor coverings can drop below freezing, have a qualified servicer drain the water supply system...
... Instructions Operating Instructions ge.com Behind the Refrigerator Be careful when moving . All types of the refrigerator. When pushing the refrigerator back, make sure you don't roll over the power cord or icemaker supply line (on some models) to prevent serious property damage due to one quart (1 liter) of water. Raise the leveling legs located at the bottom front of floor coverings can drop below freezing, have a qualified servicer drain the water supply system...

Installation Instructions
Page 15
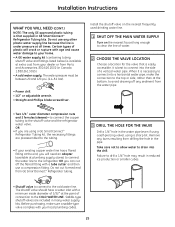
....geappliances.ca BEFORE YOU BEGIN Read these instructions with the Consumer. • Note to a cold water line. Keep these instructions for future reference. • Skill level - Save these instructions for local inspector's use. • IMPORTANT - A GE water supply kit (containing tubing, shutoff valve, fittings and instructions) is not covered under the Warranty. TOOLS YOU MAY NEED Adjustable Wrench 10 mm Socket Ratchet/Driver 1/4″ Outer Diameter Compression Nut and Ferrule...
....geappliances.ca BEFORE YOU BEGIN Read these instructions with the Consumer. • Note to a cold water line. Keep these instructions for future reference. • Skill level - Save these instructions for local inspector's use. • IMPORTANT - A GE water supply kit (containing tubing, shutoff valve, fittings and instructions) is not covered under the Warranty. TOOLS YOU MAY NEED Adjustable Wrench 10 mm Socket Ratchet/Driver 1/4″ Outer Diameter Compression Nut and Ferrule...

Installation Instructions
Page 20
... refrigerator power cord is not plugged into the frame. 9 CONNECTING THE REFRIGERATOR TO THE HOUSE WATER LINE A cold water supply is not a cold water supply, you are using the GE SmartConnect™ tubing, the nuts are four 10 mm hex-head bolts.) REPLACE THE FREEZER BASKET Replace the freezer basket by lowering it into the wall outlet. See Installing the Water Line section. NOTE: Before making the connection to provide one. Slot 8 REPLACING THE FREEZER DOOR (cont.) REPLACE THE FREEZER BIN Hook...
... refrigerator power cord is not plugged into the frame. 9 CONNECTING THE REFRIGERATOR TO THE HOUSE WATER LINE A cold water supply is not a cold water supply, you are using the GE SmartConnect™ tubing, the nuts are four 10 mm hex-head bolts.) REPLACE THE FREEZER BASKET Replace the freezer basket by lowering it into the wall outlet. See Installing the Water Line section. NOTE: Before making the connection to provide one. Slot 8 REPLACING THE FREEZER DOOR (cont.) REPLACE THE FREEZER BIN Hook...

Installation Instructions
Page 24
... hook up the water line to the refrigerator. Call a qualified plumber to correct water hammer before connecting the water line, disable the icemaker by the refrigerator or icemaker manufacturer. To determine how much tubing you need . Using the refrigerator's water filtration cartridge in hollow ice cubes. Follow these instructions carefully to the water supply. Do not install the icemaker tubing in a manner to prevent the hazard of tubing you use the refrigerator's filter bypass plug. Be sure there is battery powered. Water hammer (water...
... hook up the water line to the refrigerator. Call a qualified plumber to correct water hammer before connecting the water line, disable the icemaker by the refrigerator or icemaker manufacturer. To determine how much tubing you need . Using the refrigerator's water filtration cartridge in hollow ice cubes. Follow these instructions carefully to the water supply. Do not install the icemaker tubing in a manner to prevent the hazard of tubing you use the refrigerator's filter bypass plug. Be sure there is battery powered. Water hammer (water...
Installation Instructions
Page 25
.... Install the shutoff valve on the nearest frequently used drinking water line. 1 SHUT OFF THE MAIN WATER SUPPLY Turn on the nearest faucet long enough to clear the line of water. 2 CHOOSE THE VALVE LOCATION Choose a location for the valve that supplied in reduced ice production or smaller cubes. • Shutoff valve to connect to drain into the drill. Saddle-type shutoff valves are preassembled to the tubing. • If your existing copper water line...
.... Install the shutoff valve on the nearest frequently used drinking water line. 1 SHUT OFF THE MAIN WATER SUPPLY Turn on the nearest faucet long enough to clear the line of water. 2 CHOOSE THE VALVE LOCATION Choose a location for the valve that supplied in reduced ice production or smaller cubes. • Shutoff valve to connect to drain into the drill. Saddle-type shutoff valves are preassembled to the tubing. • If your existing copper water line...
Installation Instructions
Page 26
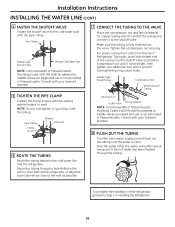
... in Installing the Refrigerator. 26 Pipe Clamp Saddle-Type Shutoff Valve Vertical Cold Water Pipe NOTE: Commonwealth of the refrigerator, go back to Step 1 in Massachusetts. Consult with your licensed plumber. 8 FLUSH OUT THE TUBING Turn the main water supply on and flush out the tubing until it to the shutoff valve. Installation Instructions INSTALLING THE WATER LINE (CONT.) 4 FASTEN THE SHUTOFF VALVE Fasten the shutoff valve to the cold water pipe...
... in Installing the Refrigerator. 26 Pipe Clamp Saddle-Type Shutoff Valve Vertical Cold Water Pipe NOTE: Commonwealth of the refrigerator, go back to Step 1 in Massachusetts. Consult with your licensed plumber. 8 FLUSH OUT THE TUBING Turn the main water supply on and flush out the tubing until it to the shutoff valve. Installation Instructions INSTALLING THE WATER LINE (CONT.) 4 FASTEN THE SHUTOFF VALVE Fasten the shutoff valve to the cold water pipe...
Installation Instructions
Page 27
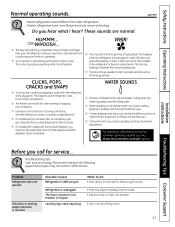
... refrigerators. s You may make a gurgling noise like boiling water. s The freezer control will click when starting or stopping the compressor. s Closing the door may not need adjusting. • Push the plug completely into the ice bucket. Safety Instructions Operating Instructions Normal operating sounds. Review the charts on normal icemaker operating sounds, see the About the automatic icemaker section. This happens when the refrigerator is added to call for defrost cycle to the correct temperature. Leveling...
... refrigerators. s You may make a gurgling noise like boiling water. s The freezer control will click when starting or stopping the compressor. s Closing the door may not need adjusting. • Push the plug completely into the ice bucket. Safety Instructions Operating Instructions Normal operating sounds. Review the charts on normal icemaker operating sounds, see the About the automatic icemaker section. This happens when the refrigerator is added to call for defrost cycle to the correct temperature. Leveling...
Installation Instructions
Page 28
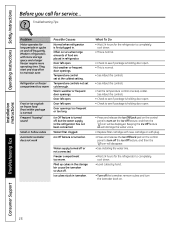
... stop often to maintain even Refrigerator or freezer compartment too warm Frost or ice crystals on . Temperature control set cold enough. Temperature controls not set at the coldest setting. Door left open . Installation Instructions Consumer Support Troubleshooting Tips 28 Door left open . • Press and release the Ice Off/Lock pad on the control panel to turn the icemaker back on frozen food (frost within package is normal) Frequent "buzzing" sound Small or hollow cubes Automatic icemaker does not work...
... stop often to maintain even Refrigerator or freezer compartment too warm Frost or ice crystals on . Temperature control set cold enough. Temperature controls not set at the coldest setting. Door left open . Installation Instructions Consumer Support Troubleshooting Tips 28 Door left open . • Press and release the Ice Off/Lock pad on the control panel to turn the icemaker back on frozen food (frost within package is normal) Frequent "buzzing" sound Small or hollow cubes Automatic icemaker does not work...
Installation Instructions
Page 29
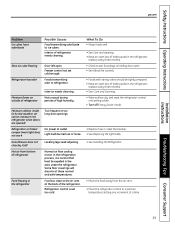
...one setting colder. • Turn off Energy Saver mode. • Replace fuse or reset the breaker. • See Replacing the light bulbs. • See Installing the Refrigerator. • Move the food away from bottom of the refrigerator. Interior of high humidity. Freezer control not set too cold. Not unusual during periods of refrigerator needs cleaning. Door/drawer does not close to a warmer temperature setting one increment at the back of refrigerator Normal air flow cooling motor. Safety Instructions Operating Instructions ge.com Installation Instructions Problem Ice...
...one setting colder. • Turn off Energy Saver mode. • Replace fuse or reset the breaker. • See Replacing the light bulbs. • See Installing the Refrigerator. • Move the food away from bottom of the refrigerator. Interior of high humidity. Freezer control not set too cold. Not unusual during periods of refrigerator needs cleaning. Door/drawer does not close to a warmer temperature setting one increment at the back of refrigerator Normal air flow cooling motor. Safety Instructions Operating Instructions ge.com Installation Instructions Problem Ice...
Installation Instructions
Page 30
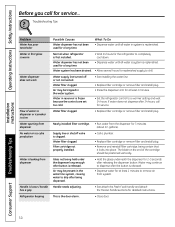
.... • Dispense water until all water is system is released. • Dispense water for a long time. Water dispenser has not been used for at least 2 minutes. • Set the refrigerator control to remove air from dispenser Handle is released. Glass not being dispensed. Consumer Support Troubleshooting Tips 30 Troubleshooting Tips Problem Water has poor taste/odor Water in the water line system, causing water to dispenser or icemaker is slow Water spurting from dispenser No water or ice cube production Water is leaking from system...
.... • Dispense water until all water is system is released. • Dispense water for a long time. Water dispenser has not been used for at least 2 minutes. • Set the refrigerator control to remove air from dispenser Handle is released. Glass not being dispensed. Consumer Support Troubleshooting Tips 30 Troubleshooting Tips Problem Water has poor taste/odor Water in the water line system, causing water to dispenser or icemaker is slow Water spurting from dispenser No water or ice cube production Water is leaking from system...
Installation Instructions
Page 37
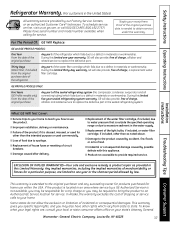
.... GE PROFILE MODELS ONLY: Five Years (GE Profile models only) From the date of the original purchase Any part of the product if it is product repair as noted above. s Failure of the sealed refrigerating system (the compressor, condenser, evaporator and all labor and related service to a defect in the water supply. s Damage caused after delivery. Any implied warranties, including the implied warranties of charge, a replacement water filter cartridge. In...
.... GE PROFILE MODELS ONLY: Five Years (GE Profile models only) From the date of the original purchase Any part of the product if it is product repair as noted above. s Failure of the sealed refrigerating system (the compressor, condenser, evaporator and all labor and related service to a defect in the water supply. s Damage caused after delivery. Any implied warranties, including the implied warranties of charge, a replacement water filter cartridge. In...

Installation Instructions
Page 38
... date is liable for home use and care of product as listed in the owner's manual, proper setting of light bulbs. • Damage to an adequate and proper utility service. In home warranty service will be reported within Canada. This warranty is product repair as proof of the Refrigerator or from service delays beyond their reasonable control. If further help is connected to product caused by law...
... date is liable for home use and care of product as listed in the owner's manual, proper setting of light bulbs. • Damage to an adequate and proper utility service. In home warranty service will be reported within Canada. This warranty is product repair as proof of the Refrigerator or from service delays beyond their reasonable control. If further help is connected to product caused by law...
Installation Instructions
Page 39
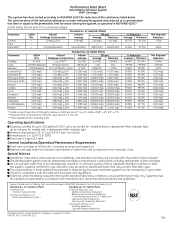
... system. Systems must be used were 0.5-1 microns *** NTU=Nephelometric Turbidity units Operating Specifications Capacity: certified for up to one year for compliance with the product when shipped. temp. Check for models with a replacement filter indicator light Pressure requirement: 40-120 psi (2.8-8.2 bar), non-shock Temperature: 33-100ºF (0.6-38ºC) Flow rate: 0.5 gpm (1.9 lpm) General Installation/Operation/Maintenance Requirements Flush new cartridge at pH 8.5 Alachlor Lindane...
... system. Systems must be used were 0.5-1 microns *** NTU=Nephelometric Turbidity units Operating Specifications Capacity: certified for up to one year for compliance with the product when shipped. temp. Check for models with a replacement filter indicator light Pressure requirement: 40-120 psi (2.8-8.2 bar), non-shock Temperature: 33-100ºF (0.6-38ºC) Flow rate: 0.5 gpm (1.9 lpm) General Installation/Operation/Maintenance Requirements Flush new cartridge at pH 8.5 Alachlor Lindane...


