
Owners Manual
Page 1
... Care and Cleaning 12-13 Controls 4-5 Crispers and Pans 9 Freezer 10 Replacing the Light Bulbs 14 Shelves and Bins 7, 8 Water Dispenser 11 Water Filter 6 Installation Instructions Installing the Anti-Tip Floor Bracket 18-19 Installing the Refrigerator 20-24 Installing the Water Line 33-35 Preparing to Install the Refrigerator 17 Removing and Replacing the Freezer Drawer 25, 26 Reversing the Door Swing (Single Door Refrigerator Models only 27-29 Removing and Replacing the Doors (Double Door Refrigerator Models only 30-32 Trim Kits and Decorator Panels . . . .15-16 Troubleshooting...
... Care and Cleaning 12-13 Controls 4-5 Crispers and Pans 9 Freezer 10 Replacing the Light Bulbs 14 Shelves and Bins 7, 8 Water Dispenser 11 Water Filter 6 Installation Instructions Installing the Anti-Tip Floor Bracket 18-19 Installing the Refrigerator 20-24 Installing the Water Line 33-35 Preparing to Install the Refrigerator 17 Removing and Replacing the Freezer Drawer 25, 26 Reversing the Door Swing (Single Door Refrigerator Models only 27-29 Removing and Replacing the Doors (Double Door Refrigerator Models only 30-32 Trim Kits and Decorator Panels . . . .15-16 Troubleshooting...

Owners Manual
Page 2
... refrigeration product, check with the company handling the disposal about what to these extremely cold surfaces. Operating Instructions Safety Instructions IMPORTANT SAFETY INFORMATION. READ ALL INSTRUCTIONS BEFORE USING. I Leave the shelves in this or any servicing be properly installed and located in the refrigerator. I Setting either or both controls to 0 (off the doors. USE OF EXTENSION CORDS Because of your old refrigerator, please follow the instructions below to the light...
... refrigeration product, check with the company handling the disposal about what to these extremely cold surfaces. Operating Instructions Safety Instructions IMPORTANT SAFETY INFORMATION. READ ALL INSTRUCTIONS BEFORE USING. I Leave the shelves in this or any servicing be properly installed and located in the refrigerator. I Setting either or both controls to 0 (off the doors. USE OF EXTENSION CORDS Because of your old refrigerator, please follow the instructions below to the light...

Owners Manual
Page 4
...: Opening the door displays the actual temperature. To turn the cooling system off electrical power to the actual 4 refrigerator and freezer temperatures after 5 seconds. Once the desired temperature has been set . Changing the Temperature For Controls-on-the-Door Models: To change the temperature, tap either or both controls to OFF stops cooling in both the freezer and refrigerator compartments, but does not shut off electrical power to the preset recommended settings. To turn the unit back on some models) Installation Instructions Consumer Support Troubleshooting...
...: Opening the door displays the actual temperature. To turn the cooling system off electrical power to the actual 4 refrigerator and freezer temperatures after 5 seconds. Once the desired temperature has been set . Changing the Temperature For Controls-on-the-Door Models: To change the temperature, tap either or both controls to OFF stops cooling in both the freezer and refrigerator compartments, but does not shut off electrical power to the preset recommended settings. To turn the unit back on some models) Installation Instructions Consumer Support Troubleshooting...

Owners Manual
Page 6
... a replacement indicator light for the water filter cartridge on the temperature display. See To Use the Dispenser section. Press and hold the RESET WATER FILTER pad for the nearest Mabe Service Center. This light will not operate without the filter or filter bypass plug. DO NOT pull down . Remove the protective foil from the dispenser for better flow from the dispenser. Installation Instructions Consumer Support Troubleshooting Tips 6 Use caution when removing. NOTE: A newly-installed water filter cartridge may drip down on the cartridge. The icemaker will turn...
... a replacement indicator light for the water filter cartridge on the temperature display. See To Use the Dispenser section. Press and hold the RESET WATER FILTER pad for the nearest Mabe Service Center. This light will not operate without the filter or filter bypass plug. DO NOT pull down . Remove the protective foil from the dispenser for better flow from the dispenser. Installation Instructions Consumer Support Troubleshooting Tips 6 Use caution when removing. NOTE: A newly-installed water filter cartridge may drip down on the cartridge. The icemaker will turn...

Owners Manual
Page 9
.... Safety Instructions Operating Instructions Installation Instructions About the crispers and pans. Swing Locks Lift the lid to Remove and Replace the Deli Pan To remove: Remove the fruit and vegetable drawers. Replace the fruit and vegetable drawers. Slide the control all the way to the HIGH setting to provide lower humidity levels recommended for the coldest temperature. How to access the 4 swing locks. Pull the drawer out to the left for...
.... Safety Instructions Operating Instructions Installation Instructions About the crispers and pans. Swing Locks Lift the lid to Remove and Replace the Deli Pan To remove: Remove the fruit and vegetable drawers. Replace the fruit and vegetable drawers. Slide the control all the way to the HIGH setting to provide lower humidity levels recommended for the coldest temperature. How to access the 4 swing locks. Pull the drawer out to the left for...

Owners Manual
Page 11
... lock the dispenser and control panel. NOTE: Set the power switch to the icemaker, set the power switch in the O (off . The spill shelf is not used frequently, old ice cubes will produce seven cubes per cycle- The indicator light will sound if either door is purged from the water line and to 15°F (-10°C). If no water is dispensed when the refrigerator is located on some models) Press the glass gently...
... lock the dispenser and control panel. NOTE: Set the power switch to the icemaker, set the power switch in the O (off . The spill shelf is not used frequently, old ice cubes will produce seven cubes per cycle- The indicator light will sound if either door is purged from the water line and to 15°F (-10°C). If no water is dispensed when the refrigerator is located on some models) Press the glass gently...

Owners Manual
Page 17
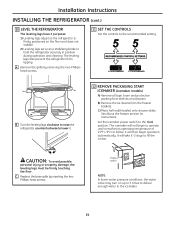
... Reversing the Door Swing section. • To remove the freezer drawer, see the Removing the Freezer Drawer section. Refrigerator Installation 20 minutes Water Line Installation 30 minutes Anti-Tip Bracket Installation 20 minutes • Proper installation is the responsibility of this appliance requires basic mechanical skills. • Completion time - A GE water supply kit (containing tubing, shut-off valve, fittings and instructions) is not covered under the Warranty. Keep these instructions completely and carefully. • IMPORTANT - Call 800.GE.CARES...
... Reversing the Door Swing section. • To remove the freezer drawer, see the Removing the Freezer Drawer section. Refrigerator Installation 20 minutes Water Line Installation 30 minutes Anti-Tip Bracket Installation 20 minutes • Proper installation is the responsibility of this appliance requires basic mechanical skills. • Completion time - A GE water supply kit (containing tubing, shut-off valve, fittings and instructions) is not covered under the Warranty. Keep these instructions completely and carefully. • IMPORTANT - Call 800.GE.CARES...

Owners Manual
Page 20
... the door is not plugged into the installation location. Refer to Steps 1 through 3 of the door during top cap reinstallation. Standard Depth Counter Depth Models Models Sides 1/8″ (3 mm) 1/8″ (3 mm) Top 1″ (25 mm) 1″ (25 mm) Back 1″ (25 mm) 1/2″ (13 mm) REMOVE TOP CAP (cont.) (on the top of the refrigerator's water valve. Top Hinge B 1 CONNECTING THE REFRIGERATOR TO THE HOUSE WATER LINE (icemaker and dispenser models) A cold water supply is...
... the door is not plugged into the installation location. Refer to Steps 1 through 3 of the door during top cap reinstallation. Standard Depth Counter Depth Models Models Sides 1/8″ (3 mm) 1/8″ (3 mm) Top 1″ (25 mm) 1″ (25 mm) Back 1″ (25 mm) 1/2″ (13 mm) REMOVE TOP CAP (cont.) (on the top of the refrigerator's water valve. Top Hinge B 1 CONNECTING THE REFRIGERATOR TO THE HOUSE WATER LINE (icemaker and dispenser models) A cold water supply is...

Owners Manual
Page 21
... with your refrigerator. Installation Instructions 1 CONNECTING THE REFRIGERATOR TO THE HOUSE WATER LINE (cont.) A If you are using GE SmartConnect™ tubing, insert the molded end of the tubing into the refrigerator connection, at the back of the refrigerator, and tighten the compression nut until it . 21 Overtightening may need to its final location. Icemaker-Ready models Tubing Clamp 1/4″ Copper Tubing 1/4″ Compression Nut Ferrule (sleeve) Refrigerator Connection SmartConnect™ Tubing Icemaker-Installed Models Refrigerator Connection Ferrule...
... with your refrigerator. Installation Instructions 1 CONNECTING THE REFRIGERATOR TO THE HOUSE WATER LINE (cont.) A If you are using GE SmartConnect™ tubing, insert the molded end of the tubing into the refrigerator connection, at the back of the refrigerator, and tighten the compression nut until it . 21 Overtightening may need to its final location. Icemaker-Ready models Tubing Clamp 1/4″ Copper Tubing 1/4″ Compression Nut Ferrule (sleeve) Refrigerator Connection SmartConnect™ Tubing Icemaker-Installed Models Refrigerator Connection Ferrule...
Owners Manual
Page 24
... the ice bin. C Replace the base grille by removing the two Phillipshead screws. 11 SET THE CONTROLS Set the controls to the icemaker. 24 C) Place half width basket onto drawer slides. The icemaker will then begin to the I (on) position. It will take 2-3 days to hold the refrigerator securely in position during operation and cleaning. The leveling legs also prevent the refrigerator from tipping. Set the icemaker power switch to operate...
... the ice bin. C Replace the base grille by removing the two Phillipshead screws. 11 SET THE CONTROLS Set the controls to the icemaker. 24 C) Place half width basket onto drawer slides. The icemaker will then begin to the I (on) position. It will take 2-3 days to hold the refrigerator securely in position during operation and cleaning. The leveling legs also prevent the refrigerator from tipping. Set the icemaker power switch to operate...

Owners Manual
Page 33
... a water filter, use your refrigerator to the refrigerator is with local plumbing code requirements. WX08X10015 25′ (7.6 m) - Installation Instructions INSTALLING THE WATER LINE (ICEMAKER MODELS) BEFORE YOU BEGIN Recommended copper water supply kits are WX8X2, WX8X3 or WX8X4, depending on the back of expensive water damage. When connecting your refrigerator before installing the water supply line to move out from the wall after installation. If the water supply to a GE Reverse Osmosis Water System, the only approved installation is from the water valve...
... a water filter, use your refrigerator to the refrigerator is with local plumbing code requirements. WX08X10015 25′ (7.6 m) - Installation Instructions INSTALLING THE WATER LINE (ICEMAKER MODELS) BEFORE YOU BEGIN Recommended copper water supply kits are WX8X2, WX8X3 or WX8X4, depending on the back of expensive water damage. When connecting your refrigerator before installing the water supply line to move out from the wall after installation. If the water supply to a GE Reverse Osmosis Water System, the only approved installation is from the water valve...

Owners Manual
Page 35
... THE TUBING Route the tubing between the cold water line and the refrigerator. Saddle valves are illegal and use is clear. Route the tubing through the tubing. For plastic tubing from a GE SmartConnect™ Refrigerator Tubing kit, insert the molded end of the tubing and connect it is not permitted in Installing the Refrigerator. 35 Overtightening may crush the tubing. Saddle-Type Shut-Off Valve Compression Nut SmartConnect™ Tubing Packing Nut Outlet Valve Ferrule...
... THE TUBING Route the tubing between the cold water line and the refrigerator. Saddle valves are illegal and use is clear. Route the tubing through the tubing. For plastic tubing from a GE SmartConnect™ Refrigerator Tubing kit, insert the molded end of the tubing and connect it is not permitted in Installing the Refrigerator. 35 Overtightening may crush the tubing. Saddle-Type Shut-Off Valve Compression Nut SmartConnect™ Tubing Packing Nut Outlet Valve Ferrule...

Owners Manual
Page 36
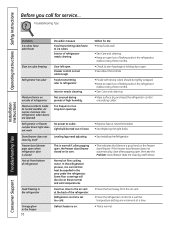
... the evaporator and flows into the outlet. • Replace fuse or reset the breaker. • See Level the Refrigerator. Do you call for service... WHOOSH... I The fans change speeds in defrost cycle. This happens when the refrigerator is first plugged in . The fans are normal. I The new high efficiency compressor may run faster and longer than your old refrigerator and you may make a gurgling noise like boiling water. This...
... the evaporator and flows into the outlet. • Replace fuse or reset the breaker. • See Level the Refrigerator. Do you call for service... WHOOSH... I The fans change speeds in defrost cycle. This happens when the refrigerator is first plugged in . The fans are normal. I The new high efficiency compressor may run faster and longer than your old refrigerator and you may make a gurgling noise like boiling water. This...

Owners Manual
Page 37
... completely cool down . Ice cubes stuck in icemaker. (Green power light on icemaker blinking.) •Turn off the icemaker, remove cubes and turn green when the freezer light switch is pressed in the I (on some models) does not work Possible Causes Normal when refrigerator is activated. Temperature controls not set at the coldest setting. Water supply turned off . •Level cubes by hand. Temperature control set cold enough. Icemaker power switch is closed . Keeping it in or when the freezer door is holding door open. •...
... completely cool down . Ice cubes stuck in icemaker. (Green power light on icemaker blinking.) •Turn off the icemaker, remove cubes and turn green when the freezer light switch is pressed in the I (on some models) does not work Possible Causes Normal when refrigerator is activated. Temperature controls not set at the coldest setting. Water supply turned off . •Level cubes by hand. Temperature control set cold enough. Icemaker power switch is closed . Keeping it in or when the freezer door is holding door open. •...
Owners Manual
Page 38
... soda in the refrigerator; Light bulb burned out or loose. If the freezer door/drawer does not automatically close to the air vent at a time. • This is on outside of refrigerator Not unusual during periods of refrigerator needs cleaning. Consumer Support Troubleshooting Tips Interior of high humidity. Freezer control not set too cold. Slow ice cube freezing Refrigerator has odor Door left open box of the refrigerator. Freezer door/drawer pops open . • See About the controls. • Foods with...
... soda in the refrigerator; Light bulb burned out or loose. If the freezer door/drawer does not automatically close to the air vent at a time. • This is on outside of refrigerator Not unusual during periods of refrigerator needs cleaning. Consumer Support Troubleshooting Tips Interior of high humidity. Freezer control not set too cold. Slow ice cube freezing Refrigerator has odor Door left open box of the refrigerator. Freezer door/drawer pops open . • See About the controls. • Foods with...

Owners Manual
Page 39
... control to a warmer setting and wait 24 hours. Water filter clogged. Water dispenser has not been used for service. Water filter clogged. Filter cartridge not properly installed. •Call a plumber. •Replace filter cartridge or remove filter and install plug. • Remove and reinstall filter cartridge, being held under the dispenser long enough after 24 hours, call for a long time. Water may be positioned vertically. Water supply line turned off valve is replenished. Supply line or shut-off or not connected. Installation Instructions Troubleshooting...
... control to a warmer setting and wait 24 hours. Water filter clogged. Water dispenser has not been used for service. Water filter clogged. Filter cartridge not properly installed. •Call a plumber. •Replace filter cartridge or remove filter and install plug. • Remove and reinstall filter cartridge, being held under the dispenser long enough after 24 hours, call for a long time. Water may be positioned vertically. Water supply line turned off valve is replenished. Supply line or shut-off or not connected. Installation Instructions Troubleshooting...

Owners Manual
Page 40
Troubleshooting Tips Problem My display is showing Possible Causes What To Do TurboCool function is not lit On some models, the light •If the control settings do not light up the temperature control settings. Refrigerator beeping This is normal. changed color • See About the water filter for more information. Water filter indicator light is not lit This is the door alarm. •Close door. The filter cartridge should be reset. Control setting is activated. • See...
Troubleshooting Tips Problem My display is showing Possible Causes What To Do TurboCool function is not lit On some models, the light •If the control settings do not light up the temperature control settings. Refrigerator beeping This is normal. changed color • See About the water filter for more information. Water filter indicator light is not lit This is the door alarm. •Close door. The filter cartridge should be reset. Control setting is activated. • See...
Owners Manual
Page 41
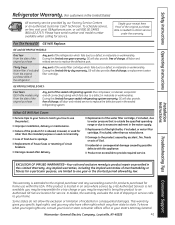
... Authorized GE Service location for service. Safety Instructions Operating Instructions Refrigerator Warranty. (For customers in an area where service by a GE Authorized Servicer is not available, you may be responsible for a trip charge or you may also have serial number and model number available when calling for home use the product. Thirty Days (Water filter, if included) From the original purchase date of the refrigerator Any part of incidental or consequential damages. Installation Instructions Troubleshooting...
... Authorized GE Service location for service. Safety Instructions Operating Instructions Refrigerator Warranty. (For customers in an area where service by a GE Authorized Servicer is not available, you may be responsible for a trip charge or you may also have serial number and model number available when calling for home use the product. Thirty Days (Water filter, if included) From the original purchase date of the refrigerator Any part of incidental or consequential damages. Installation Instructions Troubleshooting...

Owners Manual
Page 42
... Inc., Consumer Service 1 Factory Lane, Suite 310 Moncton, New Brunswick E1C 9M3 1.800.561.3344 Staple your bill of sale as listed in the owner's manual, proper setting of defects in material and workmanship. Any implied warranties, including the implied warranties of Sale) Parts Repair or Replace at Mabe's Option Labour Compressor GE Profile: Ten (10) Years GE Profile: Ten (10) Years GE Profile: Five (5) Years GE and All...
... Inc., Consumer Service 1 Factory Lane, Suite 310 Moncton, New Brunswick E1C 9M3 1.800.561.3344 Staple your bill of sale as listed in the owner's manual, proper setting of defects in material and workmanship. Any implied warranties, including the implied warranties of Sale) Parts Repair or Replace at Mabe's Option Labour Compressor GE Profile: Ten (10) Years GE Profile: Ten (10) Years GE Profile: Five (5) Years GE and All...
Owners Manual
Page 43
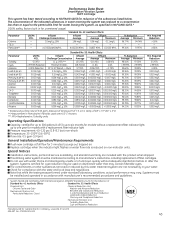
... 43 Performance Data Sheet SmartWater Filtration System MWF Cartridge This system has been tested according to purge out trapped air. pressure of 7.5 ± 0.5; temp. up to manufacturer's instructions, including replacement of unknown quality without a replacement filter indicator light; Special Notices Installation instructions, parts and service availability, and standard warranty are not necessarily in your water. Replace cartridge when the indicator light flashes or water flow rate is microbiologically unsafe or of filter cartridges. Check for compliance...
... 43 Performance Data Sheet SmartWater Filtration System MWF Cartridge This system has been tested according to purge out trapped air. pressure of 7.5 ± 0.5; temp. up to manufacturer's instructions, including replacement of unknown quality without a replacement filter indicator light; Special Notices Installation instructions, parts and service availability, and standard warranty are not necessarily in your water. Replace cartridge when the indicator light flashes or water flow rate is microbiologically unsafe or of filter cartridges. Check for compliance...


