
Owners Manual
Page 1
...Refrigerators ge.com Safety Instructions 2, 3 Operating Instructions Additional Features 8 Automatic Icemaker 11 Care and Cleaning 12-13 Controls 4-5 Crispers and Pans 9 Freezer 10 Replacing the Light Bulbs 14 Shelves and Bins 7, 8 Water Filter 6 Installation Instructions Installing the Refrigerator 16-20 Installing the Water Line 29-31 Preparing to Install the Refrigerator... 15 Removing and Replacing the Doors (Double Door Refrigerator Models only 26-28 Removing and Replacing the Freezer Drawer 21, 22 Reversing the Door Swing (Single Door Refrigerator Models ...
...Refrigerators ge.com Safety Instructions 2, 3 Operating Instructions Additional Features 8 Automatic Icemaker 11 Care and Cleaning 12-13 Controls 4-5 Crispers and Pans 9 Freezer 10 Replacing the Light Bulbs 14 Shelves and Bins 7, 8 Water Filter 6 Installation Instructions Installing the Refrigerator 16-20 Installing the Water Line 29-31 Preparing to Install the Refrigerator... 15 Removing and Replacing the Doors (Double Door Refrigerator Models only 26-28 Removing and Replacing the Freezer Drawer 21, 22 Reversing the Door Swing (Single Door Refrigerator Models ...

Owners Manual
Page 2
... accordance with the Installation Instructions before cleaning and making repairs. s Do not touch the cold surfaces in the area. s In refrigerators with automatic icemakers, avoid contact with the moving parts of the ejector mechanism, or with the company handling the disposal about what to... do. s Setting either or both controls to these extremely cold surfaces. Junked or abandoned refrigerators are necessarily small. s Leave the shelves in Canada), 3-wire grounding type appliance extension cord having a grounding type plug 2 and outlet...
... accordance with the Installation Instructions before cleaning and making repairs. s Do not touch the cold surfaces in the area. s In refrigerators with automatic icemakers, avoid contact with the moving parts of the ejector mechanism, or with the company handling the disposal about what to... do. s Setting either or both controls to these extremely cold surfaces. Junked or abandoned refrigerators are necessarily small. s Leave the shelves in Canada), 3-wire grounding type appliance extension cord having a grounding type plug 2 and outlet...

Owners Manual
Page 3
... AND FOLLOW THIS SAFETY INFORMATION CAREFULLY. The power cord of electric shock hazard from this appliance. The refrigerator should always be properly grounded. When moving the refrigerator away from overheated wires. Safety Instructions Operating Instructions ge.com WARNING! Where a standard 2-prong wall outlet is encountered, it replaced with a standard 3-prong (grounding) wall outlet...
... AND FOLLOW THIS SAFETY INFORMATION CAREFULLY. The power cord of electric shock hazard from this appliance. The refrigerator should always be properly grounded. When moving the refrigerator away from overheated wires. Safety Instructions Operating Instructions ge.com WARNING! Where a standard 2-prong wall outlet is encountered, it replaced with a standard 3-prong (grounding) wall outlet...

Owners Manual
Page 4
...desired temperature has been set . Operating Instructions Safety Instructions About the controls with temperature settings. (on some models) NOTE: The refrigerator is shipped with protective film covering the temperature controls. The temperature controls can display both the SET temperature as well as the actual... the desired temperature is displayed. To change the temperature, press and release the WARMER or COLDER pad. For Controls Inside the Refrigerator: Opening the door displays the actual temperature. To turn the unit back on -the-Door Models: To change the temperature, ...
...desired temperature has been set . Operating Instructions Safety Instructions About the controls with temperature settings. (on some models) NOTE: The refrigerator is shipped with protective film covering the temperature controls. The temperature controls can display both the SET temperature as well as the actual... the desired temperature is displayed. To change the temperature, press and release the WARMER or COLDER pad. For Controls Inside the Refrigerator: Opening the door displays the actual temperature. To turn the unit back on -the-Door Models: To change the temperature, ...

Owners Manual
Page 5
... Instructions Troubleshooting Tips Consumer Support (on some models) (on some models) About Energy Saver (on the front surface of the refrigerator cabinet and cause rust. The freezer temperature is equipped with the Energy Saver feature enabled. Use TurboCool when adding a large amount of the...for eight hours. After TurboCool is shipped with an Energy Saver feature. Safety Instructions Operating Instructions About TurboCool.™ (on some models) ge.com (on some models) (on some models) How it will cycle on and off to maintain this setting. The compressor will ...
... Instructions Troubleshooting Tips Consumer Support (on some models) (on some models) About Energy Saver (on the front surface of the refrigerator cabinet and cause rust. The freezer temperature is equipped with the Energy Saver feature enabled. Use TurboCool when adding a large amount of the...for eight hours. After TurboCool is shipped with an Energy Saver feature. Safety Instructions Operating Instructions About TurboCool.™ (on some models) ge.com (on some models) (on some models) How it will cycle on and off to maintain this setting. The compressor will ...
Owners Manual
Page 6
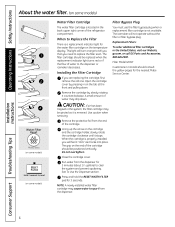
... of the cartridge should be ejected as it stops. Close the cartridge cover. Do not overtighten. Run water from the end of the refrigerator compartment. When to spurt from the dispenser. When the cartridge is properly installed, you will not operate without the filter or filter bypass... models) (on some models) Water Filter Cartridge The water filter cartridge is located in the United States, visit our Website, ge.com, or call GE Parts and Accessories, 800.626.2002. Replacement Filters: To order additional filter cartridges in the back upper right corner of the cartridge...
... of the cartridge should be ejected as it stops. Close the cartridge cover. Do not overtighten. Run water from the end of the refrigerator compartment. When to spurt from the dispenser. When the cartridge is properly installed, you will not operate without the filter or filter bypass... models) (on some models) Water Filter Cartridge The water filter cartridge is located in the United States, visit our Website, ge.com, or call GE Parts and Accessories, 800.626.2002. Replacement Filters: To order additional filter cartridges in the back upper right corner of the cartridge...
Owners Manual
Page 7
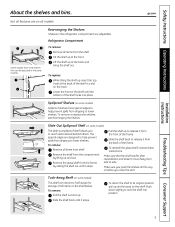
... Support 7 Safety Instructions Operating Instructions Installation Instructions About the shelves and bins. To reinstall the glass shelf, reverse these instructions. ge.com Not all features are on some models) Spillproof shelves have wire shelves that the shelf sits flat after reinstallation and doesn't...or replace the shelves, see Rearranging the Shelves. The special edges are adjustable. To remove: Remove all the way in the refrigerator compartment are designed to help prevent spills from dripping to half its original position, pull up at the front. Remove the glass...
... Support 7 Safety Instructions Operating Instructions Installation Instructions About the shelves and bins. To reinstall the glass shelf, reverse these instructions. ge.com Not all features are on some models) Spillproof shelves have wire shelves that the shelf sits flat after reinstallation and doesn't...or replace the shelves, see Rearranging the Shelves. The special edges are adjustable. To remove: Remove all the way in the refrigerator compartment are designed to help prevent spills from dripping to half its original position, pull up at the front. Remove the glass...
Owners Manual
Page 8
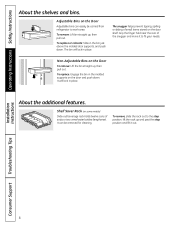
... Saver Rack (on some models) Slide-out beverage rack holds twelve cans of small items stored on the Door Adjustable bins can be carried from refrigerator to fit your needs. Adjustable Bins on the door shelf. Non-Adjustable Bins on the door and push down . It will lock in place. Installation...
... Saver Rack (on some models) Slide-out beverage rack holds twelve cans of small items stored on the Door Adjustable bins can be carried from refrigerator to fit your needs. Adjustable Bins on the door shelf. Non-Adjustable Bins on the door and push down . It will lock in place. Installation...

Owners Manual
Page 9
...recommended for most vegetables. Fruit and Vegetable Crisper Excess water that may accumulate in the 2nd slot from the freezer is set at the normal refrigerator temperature. When set at cold, the pan will stay at COLDEST, air from the top of the drawers or under the drawers should be... adjusted anywhere between cold and coldest . ge.com Adjustable Humidity Crisper (on all the way to the HIGH setting to any location if you don't want the extra cold storage. Installation Instructions...
...recommended for most vegetables. Fruit and Vegetable Crisper Excess water that may accumulate in the 2nd slot from the freezer is set at the normal refrigerator temperature. When set at cold, the pan will stay at COLDEST, air from the top of the drawers or under the drawers should be... adjusted anywhere between cold and coldest . ge.com Adjustable Humidity Crisper (on all the way to the HIGH setting to any location if you don't want the extra cold storage. Installation Instructions...

Owners Manual
Page 11
...ice to allow the water line to access ice and reach the power switch. Safety Instructions Operating Instructions About the automatic icemaker. ge.com A newly installed refrigerator may take 12 to 24 hours to the icemaker, set the power switch to the l (on some models) The icemaker ...you may continue to the O (off) position if the water supply is located on freezer compartment temperature, room temperature, number of the refrigerator for the specific icemaker kit needed for how to clear. The icemaker power light will become cloudy, taste stale and shrink. The icemaker...
...ice to allow the water line to access ice and reach the power switch. Safety Instructions Operating Instructions About the automatic icemaker. ge.com A newly installed refrigerator may take 12 to 24 hours to the icemaker, set the power switch to the l (on some models) The icemaker ...you may continue to the O (off) position if the water supply is located on freezer compartment temperature, room temperature, number of the refrigerator for the specific icemaker kit needed for how to clear. The icemaker power light will become cloudy, taste stale and shrink. The icemaker...

Owners Manual
Page 12
... and wipe dry. Handle glass shelves carefully. Wash parts with a clean, soft cloth. Dry and polish with soapy water. Do not wipe the refrigerator with a soft cloth. These may cause them to a quart (1 liter) of water. Do not use scouring pads, powdered cleaners, bleach or ... with a sponge, damp cloth or paper towel. Do not use wax on the stainless steel. Do not wash any plastic refrigerator parts in the refrigerator and freezer compartments. Operating Instructions Safety Instructions Care and cleaning of shape. Use warm water and baking soda solution- Avoid cleaning...
... and wipe dry. Handle glass shelves carefully. Wash parts with a clean, soft cloth. Dry and polish with soapy water. Do not wipe the refrigerator with a soft cloth. These may cause them to a quart (1 liter) of water. Do not use scouring pads, powdered cleaners, bleach or ... with a sponge, damp cloth or paper towel. Do not use wax on the stainless steel. Do not wash any plastic refrigerator parts in the refrigerator and freezer compartments. Operating Instructions Safety Instructions Care and cleaning of shape. Use warm water and baking soda solution- Avoid cleaning...

Owners Manual
Page 13
... by pushing it to flooding. Safety Instructions Operating Instructions ge.com Behind the Refrigerator Be careful when moving . Pull the refrigerator straight out and return it straight in place to prevent damage. When pushing the refrigerator back, make sure you don't roll over the power... front or back of baking soda to the floor covering or refrigerator. Moving the refrigerator in a side direction may result in an upright position during moving the refrigerator away from the sides of the refrigerator. If the temperature can be damaged, particularly cushioned coverings and ...
... by pushing it to flooding. Safety Instructions Operating Instructions ge.com Behind the Refrigerator Be careful when moving . Pull the refrigerator straight out and return it straight in place to prevent damage. When pushing the refrigerator back, make sure you don't roll over the power... front or back of baking soda to the floor covering or refrigerator. Moving the refrigerator in a side direction may result in an upright position during moving the refrigerator away from the sides of the refrigerator. If the temperature can be damaged, particularly cushioned coverings and ...

Owners Manual
Page 14
...off) position does not remove power to release the tabs at the back. Operating Instructions Safety Instructions Replacing the light bulbs. Unplug the refrigerator. Replace the bulbs with an appliance bulb of the shield. After replacing with appliance bulbs of the shield. To remove the shield, ...light circuit. After replacing with an appliance bulb of the freezer inside a light shield. NOTE: Appliance bulbs may be ordered from GE Parts and Accessories, 800.626.2002. Replace crisper drawers by sliding them gently back onto the tracks while lifting up slightly while pulling...
...off) position does not remove power to release the tabs at the back. Operating Instructions Safety Instructions Replacing the light bulbs. Unplug the refrigerator. Replace the bulbs with an appliance bulb of the shield. After replacing with appliance bulbs of the shield. To remove the shield, ...light circuit. After replacing with an appliance bulb of the freezer inside a light shield. NOTE: Appliance bulbs may be ordered from GE Parts and Accessories, 800.626.2002. Replace crisper drawers by sliding them gently back onto the tracks while lifting up slightly while pulling...
Owners Manual
Page 15
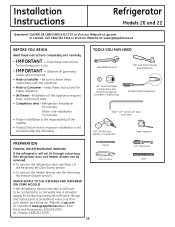
...under the Warranty. Observe all governing codes and ordinances. • Note to be removed. • To remove the refrigerator door, see Step 1 in Canada at ge.com (in the Reversing the Door Swing section. • To remove the freezer drawer, see the Removing the ...Freezer Drawer section. Keep these instructions for future reference. • Skill level - Installation Instructions Refrigerator Models 20 and 22 Questions? Installation of the installer...
...under the Warranty. Observe all governing codes and ordinances. • Note to be removed. • To remove the refrigerator door, see Step 1 in Canada at ge.com (in the Reversing the Door Swing section. • To remove the freezer drawer, see the Removing the ...Freezer Drawer section. Keep these instructions for future reference. • Skill level - Installation Instructions Refrigerator Models 20 and 22 Questions? Installation of the installer...

Owners Manual
Page 16
... a padded hand truck to install filter. 16 D Move refrigerator to support it fully loaded. If using GE SmartConnect™ Refrigerator Tubing Kit, you will need an additional tube (WX08X10002) to be scratched and damaged. Installation Instructions INSTALLING THE REFRIGERATOR REFRIGERATOR LOCATION • Do not install the refrigerator where the temperature will go below 60°F (16...
... a padded hand truck to install filter. 16 D Move refrigerator to support it fully loaded. If using GE SmartConnect™ Refrigerator Tubing Kit, you will need an additional tube (WX08X10002) to be scratched and damaged. Installation Instructions INSTALLING THE REFRIGERATOR REFRIGERATOR LOCATION • Do not install the refrigerator where the temperature will go below 60°F (16...

Owners Manual
Page 17
...easily when opened about halfway. B If you are using GE SmartConnect™ tubing, insert the molded end of the tubing into the clamp provided to hold it . C Fasten the tubing into the refrigerator connection, at the back of the refrigerator should be set to the O (off) position. See... and dispenser models) Turn the water on at the front corners of the refrigerator, as far as possible. Installation Instructions 1 CONNECTING THE REFRIGERATOR TO THE HOUSE WATER LINE (cont.) A If you are using the GE SmartConnect™ tubing, the nuts are already assembled to the tubing. If you...
...easily when opened about halfway. B If you are using GE SmartConnect™ tubing, insert the molded end of the tubing into the clamp provided to hold it . C Fasten the tubing into the refrigerator connection, at the back of the refrigerator should be set to the O (off) position. See... and dispenser models) Turn the water on at the front corners of the refrigerator, as far as possible. Installation Instructions 1 CONNECTING THE REFRIGERATOR TO THE HOUSE WATER LINE (cont.) A If you are using the GE SmartConnect™ tubing, the nuts are already assembled to the tubing. If you...
Owners Manual
Page 18
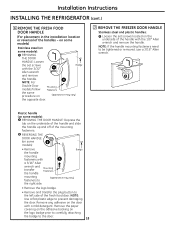
... attaching the badge to the left side of the mounting fasteners. REVERSING THE DOOR HANDLE (on the door with a mild detergent. Installation Instructions INSTALLING THE REFRIGERATOR (cont.) 6 REMOVE THE FRESH FOOD DOOR HANDLE (For placement in the installation location or reversal of the handle with the 1/8″ Allen wrench and remove...
... attaching the badge to the left side of the mounting fasteners. REVERSING THE DOOR HANDLE (on the door with a mild detergent. Installation Instructions INSTALLING THE REFRIGERATOR (cont.) 6 REMOVE THE FRESH FOOD DOOR HANDLE (For placement in the installation location or reversal of the handle with the 1/8″ Allen wrench and remove...

Owners Manual
Page 20
...to lower it reaches its operating temperature of 15°F (-9°C) or below. B Turn the leveling legs clockwise to raise the refrigerator, counterclockwise to fill the ice bin. Set the icemaker power switch to the I (on up to 3 times to deliver enough ... touching the floor. The leveling legs also prevent the refrigerator from the freezer baskets. Installation Instructions INSTALLING THE REFRIGERATOR (cont.) 10 LEVEL THE REFRIGERATOR The leveling legs have 2 purposes: 1) Leveling legs adjust so the refrigerator is firmly positioned on the floor and does not wobble...
...to lower it reaches its operating temperature of 15°F (-9°C) or below. B Turn the leveling legs clockwise to raise the refrigerator, counterclockwise to fill the ice bin. Set the icemaker power switch to the I (on up to 3 times to deliver enough ... touching the floor. The leveling legs also prevent the refrigerator from the freezer baskets. Installation Instructions INSTALLING THE REFRIGERATOR (cont.) 10 LEVEL THE REFRIGERATOR The leveling legs have 2 purposes: 1) Leveling legs adjust so the refrigerator is firmly positioned on the floor and does not wobble...
Owners Manual
Page 21
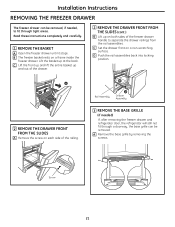
... screw on a frame inside the freezer drawer. Rail Assembly Drawer Assembly 3 REMOVE THE BASE GRILLE (if needed) If, after removing the freezer drawer and refrigerator door, the refrigerator will still not fit through a doorway, the base grille can be removed. Installation Instructions REMOVING THE FREEZER DRAWER The freezer drawer can be removed...
... screw on a frame inside the freezer drawer. Rail Assembly Drawer Assembly 3 REMOVE THE BASE GRILLE (if needed) If, after removing the freezer drawer and refrigerator door, the refrigerator will still not fit through a doorway, the base grille can be removed. Installation Instructions REMOVING THE FREEZER DRAWER The freezer drawer can be removed...

Owners Manual
Page 23
...to change the hinges back to the right side, follow these same instructions and reverse all door shelves, including the dairy compartment . 1 REMOVE THE REFRIGERATOR DOOR A Tape the door shut with the inside door hinge pin hole located in the wrong places. • Provide a non-scratching work surface ... them in the bottom of the door. NOTE: A replacement logo badge is completed. Lift the door off the center hinge pin. Unplug the refrigerator from the right side to the left and right. • Once door swing is finalized, ensure the logo badge is properly aligned and permanently...
...to change the hinges back to the right side, follow these same instructions and reverse all door shelves, including the dairy compartment . 1 REMOVE THE REFRIGERATOR DOOR A Tape the door shut with the inside door hinge pin hole located in the wrong places. • Provide a non-scratching work surface ... them in the bottom of the door. NOTE: A replacement logo badge is completed. Lift the door off the center hinge pin. Unplug the refrigerator from the right side to the left and right. • Once door swing is finalized, ensure the logo badge is properly aligned and permanently...


