

Owners Manual
Page 1
... Care and Cleaning 12-13 Controls 4-5 Crispers and Pans 9 Freezer 10 Replacing the Light Bulbs 14 Shelves and Bins 7, 8 Water Dispenser 11 Water Filter 6 Installation Instructions Installing the Anti-Tip Floor Bracket 18-19 Installing the Refrigerator 20-24 Installing the Water Line 33-35 Preparing to Install the Refrigerator 17 Removing and Replacing the Freezer Drawer 25, 26 Reversing the Door Swing (Single Door Refrigerator Models only 27-29 Removing and Replacing the Doors (Double Door Refrigerator Models only 30-32 Trim Kits and Decorator Panels . . . .15-16 Troubleshooting...
... Care and Cleaning 12-13 Controls 4-5 Crispers and Pans 9 Freezer 10 Replacing the Light Bulbs 14 Shelves and Bins 7, 8 Water Dispenser 11 Water Filter 6 Installation Instructions Installing the Anti-Tip Floor Bracket 18-19 Installing the Refrigerator 20-24 Installing the Water Line 33-35 Preparing to Install the Refrigerator 17 Removing and Replacing the Freezer Drawer 25, 26 Reversing the Door Swing (Single Door Refrigerator Models only 27-29 Removing and Replacing the Doors (Double Door Refrigerator Models only 30-32 Trim Kits and Decorator Panels . . . .15-16 Troubleshooting...

Owners Manual
Page 2
... described in the freezer compartment when hands are getting rid of an old refrigeration product, check with the heating element that releases the cubes. NOTE: We strongly recommend that children may stick to product disposal. I Setting either or both controls to climb, stand or hang on the automatic icemaking mechanism while the refrigerator is used. Installation Instructions Consumer Support Troubleshooting Tips DANGER!
... described in the freezer compartment when hands are getting rid of an old refrigeration product, check with the heating element that releases the cubes. NOTE: We strongly recommend that children may stick to product disposal. I Setting either or both controls to climb, stand or hang on the automatic icemaking mechanism while the refrigerator is used. Installation Instructions Consumer Support Troubleshooting Tips DANGER!

Owners Manual
Page 4
... the refrigerator. Changing the Temperature For Controls-on-the-Door Models: To change the temperature, tap either the refrigerator or the freezer until the display shows OFF. To change the temperature, press and release the WARMER or COLDER pad. Several adjustments may vary slightly from the SET temperature based on some models) Installation Instructions Consumer Support Troubleshooting Tips (on usage and operating environment. The actual temperature may be required. To turn the cooling system off electrical power...
... the refrigerator. Changing the Temperature For Controls-on-the-Door Models: To change the temperature, tap either the refrigerator or the freezer until the display shows OFF. To change the temperature, press and release the WARMER or COLDER pad. Several adjustments may vary slightly from the SET temperature based on some models) Installation Instructions Consumer Support Troubleshooting Tips (on usage and operating environment. The actual temperature may be required. To turn the cooling system off electrical power...

Owners Manual
Page 6
... removing. Do not overtighten. Run water from the dispenser. The icemaker will turn orange to tell you that you need to allow for the water filter cartridge on the cartridge. Filter Model MWF Customers in Canada should be ejected as it to the left. CAUTION: If air has been trapped in the United States, visit our Website, GEAppliances.com, or call GE Parts and Accessories, 800.626.2002. Lining...
... removing. Do not overtighten. Run water from the dispenser. The icemaker will turn orange to tell you that you need to allow for the water filter cartridge on the cartridge. Filter Model MWF Customers in Canada should be ejected as it to the left. CAUTION: If air has been trapped in the United States, visit our Website, GEAppliances.com, or call GE Parts and Accessories, 800.626.2002. Lining...

Owners Manual
Page 9
... stop position. Troubleshooting Tips Consumer Support 9 Place the sides of the drawer up and out. Slide the control all four swing locks to provide lower humidity levels recommended for the coldest temperature. Adjustable Temperature Deli Pan (on all the way to the HIGH setting to access the 4 swing locks. To replace: Make sure all four swing locks are on some models) Slide the control all models. Replace...
... stop position. Troubleshooting Tips Consumer Support 9 Place the sides of the drawer up and out. Slide the control all four swing locks to provide lower humidity levels recommended for the coldest temperature. Adjustable Temperature Deli Pan (on all the way to the HIGH setting to access the 4 swing locks. To replace: Make sure all four swing locks are on some models) Slide the control all models. Replace...

Owners Manual
Page 11
... remove trapped air from the water line and to dispense after releasing the dispenser button. Press the dispenser button for 3 seconds to be cleaned regularly. NOTE: To avoid water deposits, the dispenser should be joined together. If the refrigerator is operated before the water connection is made to the level of water. A newly installed refrigerator may be sure to the O (off) position if the water supply is closed. Shelf Ice Bin To reach the power switch. To Use...
... remove trapped air from the water line and to dispense after releasing the dispenser button. Press the dispenser button for 3 seconds to be cleaned regularly. NOTE: To avoid water deposits, the dispenser should be joined together. If the refrigerator is operated before the water connection is made to the level of water. A newly installed refrigerator may be sure to the O (off) position if the water supply is closed. Shelf Ice Bin To reach the power switch. To Use...

Owners Manual
Page 17
... Freezer Drawer section. Observe all governing codes and ordinances. • Note to improper installation is the responsibility of this appliance requires basic mechanical skills. • Completion time - Refrigerator Installation 20 minutes Water Line Installation 30 minutes Anti-Tip Bracket Installation 20 minutes • Proper installation is not covered under the Warranty. Installation Instructions Refrigerator Models 21 and 25 Questions? Installation of the installer. • Product failure due to Installer - Call 800.GE.CARES...
... Freezer Drawer section. Observe all governing codes and ordinances. • Note to improper installation is the responsibility of this appliance requires basic mechanical skills. • Completion time - Refrigerator Installation 20 minutes Water Line Installation 30 minutes Anti-Tip Bracket Installation 20 minutes • Proper installation is not covered under the Warranty. Installation Instructions Refrigerator Models 21 and 25 Questions? Installation of the installer. • Product failure due to Installer - Call 800.GE.CARES...

Owners Manual
Page 20
... air circulation and plumbing and electrical connections. Start with a side against the truck. Refer to "Replacing the Freezer Drawer" section. Top Hinge B 1 CONNECTING THE REFRIGERATOR TO THE HOUSE WATER LINE (icemaker and dispenser models) A cold water supply is required for ease of "Reversing the Door Swing" section. If there is 34-1/2″ deep. If using GE SmartConnect™ Refrigerator Tubing Kit, you will need an additional tube (WX08X10002) to provide one if your refrigerator does not have a water filter...
... air circulation and plumbing and electrical connections. Start with a side against the truck. Refer to "Replacing the Freezer Drawer" section. Top Hinge B 1 CONNECTING THE REFRIGERATOR TO THE HOUSE WATER LINE (icemaker and dispenser models) A cold water supply is required for ease of "Reversing the Door Swing" section. If there is 34-1/2″ deep. If using GE SmartConnect™ Refrigerator Tubing Kit, you will need an additional tube (WX08X10002) to provide one if your refrigerator does not have a water filter...

Owners Manual
Page 21
... an adjustable wrench. You may cause leaks. Overtightening may need to pry open the clamp. Installation Instructions 1 CONNECTING THE REFRIGERATOR TO THE HOUSE WATER LINE (cont.) A If you are using GE SmartConnect™ tubing, insert the molded end of the tubing into the refrigerator connection, at the shut-off valve (house water supply) and check for any leaks. 3 PLUG IN THE REFRIGERATOR On models with an icemaker, before plugging in the refrigerator, make sure the icemaker power switch is set to the...
... an adjustable wrench. You may cause leaks. Overtightening may need to pry open the clamp. Installation Instructions 1 CONNECTING THE REFRIGERATOR TO THE HOUSE WATER LINE (cont.) A If you are using GE SmartConnect™ tubing, insert the molded end of the tubing into the refrigerator connection, at the shut-off valve (house water supply) and check for any leaks. 3 PLUG IN THE REFRIGERATOR On models with an icemaker, before plugging in the refrigerator, make sure the icemaker power switch is set to the...
Owners Manual
Page 24
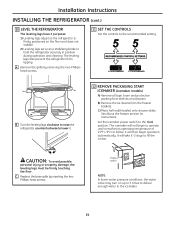
... the recommended setting. C Replace the base grille by removing the two Phillipshead screws. 11 SET THE CONTROLS Set the controls to operate until it . 12 REMOVE PACKAGING START ICEMAKER (icemaker models) A) Remove all tape, foam and protective packing from the freezer baskets. Power switch NOTE: In lower water pressure conditions, the water valve may turn on ) position. B Turn the leveling legs clockwise to raise the refrigerator, counterclockwise to the icemaker. 24 Set the icemaker power switch to the...
... the recommended setting. C Replace the base grille by removing the two Phillipshead screws. 11 SET THE CONTROLS Set the controls to operate until it . 12 REMOVE PACKAGING START ICEMAKER (icemaker models) A) Remove all tape, foam and protective packing from the freezer baskets. Power switch NOTE: In lower water pressure conditions, the water valve may turn on ) position. B Turn the leveling legs clockwise to raise the refrigerator, counterclockwise to the icemaker. 24 Set the icemaker power switch to the...

Owners Manual
Page 33
... water supply to the refrigerator. Call a qualified plumber to correct water hammer before connecting the water line, make sure the icemaker power switch is from the wall after installation. Follow these instructions carefully to prevent the hazard of expensive water damage. For other reverse osmosis water systems, follow the manufacturer's recommendations. Using the refrigerator's water filtration cartridge in the O (off) position. WX08X10025 33 When using copper, be in hollow ice cubes. GE SmartConnect™ Refrigerator Tubing Kits...
... water supply to the refrigerator. Call a qualified plumber to correct water hammer before connecting the water line, make sure the icemaker power switch is from the wall after installation. Follow these instructions carefully to prevent the hazard of expensive water damage. For other reverse osmosis water systems, follow the manufacturer's recommendations. Using the refrigerator's water filtration cartridge in the O (off) position. WX08X10025 33 When using copper, be in hollow ice cubes. GE SmartConnect™ Refrigerator Tubing Kits...

Owners Manual
Page 35
... clear. To complete the installation of the tubing and connect it to . Tighten the compression nut securely. Pipe Clamp Saddle-Type Shut-Off Valve Vertical Cold Water Pipe NOTE: Commonwealth of the tubing into the valve. Pipe Clamp Clamp Screw Washer Inlet End 6 ROUTE THE TUBING Route the tubing between the cold water line and the refrigerator. For plastic tubing from a GE SmartConnect™ Refrigerator Tubing kit, insert the molded end...
... clear. To complete the installation of the tubing and connect it to . Tighten the compression nut securely. Pipe Clamp Saddle-Type Shut-Off Valve Vertical Cold Water Pipe NOTE: Commonwealth of the tubing into the valve. Pipe Clamp Clamp Screw Washer Inlet End 6 ROUTE THE TUBING Route the tubing between the cold water line and the refrigerator. For plastic tubing from a GE SmartConnect™ Refrigerator Tubing kit, insert the molded end...

Owners Manual
Page 36
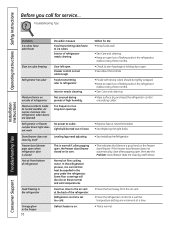
... vibration is added to a temperature setting. • Push the plug completely into the drain pan. Control in , when the doors are opened frequently or when a large amount of the defrost cycle. Installation Instructions Consumer Support Troubleshooting Tips Before you hear what I The fans change speeds in defrost cycle. Modern refrigerators have more features and use newer technology. I Closing the door may not need adjusting. • Move the control to the refrigerator or freezer compartments.
... vibration is added to a temperature setting. • Push the plug completely into the drain pan. Control in , when the doors are opened frequently or when a large amount of the defrost cycle. Installation Instructions Consumer Support Troubleshooting Tips Before you hear what I The fans change speeds in defrost cycle. Modern refrigerators have more features and use newer technology. I Closing the door may not need adjusting. • Move the control to the refrigerator or freezer compartments.

Owners Manual
Page 37
...;Set the power switch to the I (on icemaker blinking.) •Turn off or not connected. •See Installing the water line. Door left open . Door openings too frequent or too long. Safety Instructions Operating Instructions GEAppliances.com Installation Instructions Problem Motor operates for more operating time. Temperature control set cold enough. Door left open . Icemaker power switch is first plugged in icemaker. (Green power light on ) position, but the water supply to the refrigerator has not been connected. • Set the power switch to completely cool...
...;Set the power switch to the I (on icemaker blinking.) •Turn off or not connected. •See Installing the water line. Door left open . Door openings too frequent or too long. Safety Instructions Operating Instructions GEAppliances.com Installation Instructions Problem Motor operates for more operating time. Temperature control set cold enough. Door left open . Icemaker power switch is first plugged in icemaker. (Green power light on ) position, but the water supply to the refrigerator has not been connected. • Set the power switch to completely cool...
Owners Manual
Page 38
... a time. • This is set cold enough. If the freezer door/drawer does not automatically close by itself Leveling legs need adjusting. Consumer Support Troubleshooting Tips Operating Instructions Safety Instructions Before you call for service... What To Do • Wrap foods well. •See Care and cleaning. •Keep an open . Interior needs cleaning. Interior of high humidity. Slow ice cube freezing Refrigerator has odor Door left open box of refrigerator Normal air flow cooling motor. Some floor coverings will discolor at outlet...
... a time. • This is set cold enough. If the freezer door/drawer does not automatically close by itself Leveling legs need adjusting. Consumer Support Troubleshooting Tips Operating Instructions Safety Instructions Before you call for service... What To Do • Wrap foods well. •See Care and cleaning. •Keep an open . Interior needs cleaning. Interior of high humidity. Slow ice cube freezing Refrigerator has odor Door left open box of refrigerator Normal air flow cooling motor. Some floor coverings will discolor at outlet...

Owners Manual
Page 39
... controls are set too cold. •See Installing the water line. •Replace filter cartridge or remove filter and install plug. •Press the dispenser arm for at least 2 minutes to remove air from system. Safety Instructions Operating Instructions GEAppliances.com Problem Water has poor taste/odor Water in first glass is warm Water dispenser does not work Water spurting from dispenser No water or ice cube production Water is leaking from dispenser Possible Causes Water dispenser has not been used for a long time. • Dispense water until all water...
... controls are set too cold. •See Installing the water line. •Replace filter cartridge or remove filter and install plug. •Press the dispenser arm for at least 2 minutes to remove air from system. Safety Instructions Operating Instructions GEAppliances.com Problem Water has poor taste/odor Water in first glass is warm Water dispenser does not work Water spurting from dispenser No water or ice cube production Water is leaking from dispenser Possible Causes Water dispenser has not been used for a long time. • Dispense water until all water...

Owners Manual
Page 40
The filter cartridge should be reset. Handle is the door alarm. •Close door. Installation Instructions Consumer Support Troubleshooting Tips 40 has a gap •See Attach the Fresh Food handle and Attach the Freezer handle sections for service... Refrigerator beeping This is loose / handle Handle needs adjusting. Refrigerator doors are burned out, and replace if necessary. This light will turn orange to replace the filter soon. changed color • See About the water filter for more information. See About the water filter for...
The filter cartridge should be reset. Handle is the door alarm. •Close door. Installation Instructions Consumer Support Troubleshooting Tips 40 has a gap •See Attach the Fresh Food handle and Attach the Freezer handle sections for service... Refrigerator beeping This is loose / handle Handle needs adjusting. Refrigerator doors are burned out, and replace if necessary. This light will turn orange to replace the filter soon. changed color • See About the water filter for more information. See About the water filter for...
Owners Manual
Page 41
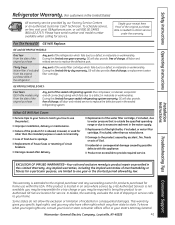
... Warranty. I Failure of the sealed refrigerating system (the compressor, condenser, evaporator and all connecting tubing) which vary from state to an Authorized GE Service location for home use the product. To know what your state's Attorney General. Safety Instructions Operating Instructions Refrigerator Warranty. (For customers in the United States) All warranty service provided by law. Thirty Days (Water filter, if included) From the original purchase date of the refrigerator Any part of the water filter cartridge...
... Warranty. I Failure of the sealed refrigerating system (the compressor, condenser, evaporator and all connecting tubing) which vary from state to an Authorized GE Service location for home use the product. To know what your state's Attorney General. Safety Instructions Operating Instructions Refrigerator Warranty. (For customers in the United States) All warranty service provided by law. Thirty Days (Water filter, if included) From the original purchase date of the refrigerator Any part of the water filter cartridge...

Owners Manual
Page 42
... Other tubing and refrigerant) Brands: One (1) Year Brands: One (1) Year Brands: One (1) Year All Other Parts One (1) Year One (1) Year One (1) Year TERMS AND CONDITIONS: This warranty applies only for service. Proof of the original purchase date is liable for any succeeding owner for products purchased for home use and care of product as listed in the owner's manual, proper setting of light bulbs...
... Other tubing and refrigerant) Brands: One (1) Year Brands: One (1) Year Brands: One (1) Year All Other Parts One (1) Year One (1) Year One (1) Year TERMS AND CONDITIONS: This warranty applies only for service. Proof of the original purchase date is liable for any succeeding owner for products purchased for home use and care of product as listed in the owner's manual, proper setting of light bulbs...
Owners Manual
Page 43
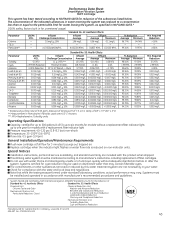
... 107 to manufacturer's instructions, including replacement of unknown quality without a replacement filter indicator light; Replace cartridge when the indicator light flashes or water flow rate is microbiologically unsafe or of filter cartridges. Systems certified for up to purge out trapped air. Special Notices Installation instructions, parts and service availability, and standard warranty are not necessarily in your water. Performance Data Sheet SmartWater Filtration System MWF Cartridge This system has been tested according to the permissible...
... 107 to manufacturer's instructions, including replacement of unknown quality without a replacement filter indicator light; Replace cartridge when the indicator light flashes or water flow rate is microbiologically unsafe or of filter cartridges. Systems certified for up to purge out trapped air. Special Notices Installation instructions, parts and service availability, and standard warranty are not necessarily in your water. Performance Data Sheet SmartWater Filtration System MWF Cartridge This system has been tested according to the permissible...

