
Owners Manual
Page 1
... Care and Cleaning 12-13 Controls 4-5 Crispers and Pans 9 Freezer 10 Replacing the Light Bulbs 14 Shelves and Bins 7, 8 Water Dispenser 11 Water Filter 6 Installation Instructions Installing the Anti-Tip Floor Bracket 18-19 Installing the Refrigerator 20-24 Installing the Water Line 33-35 Preparing to Install the Refrigerator 17 Removing and Replacing the Freezer Drawer 25, 26 Reversing the Door Swing (Single Door Refrigerator Models only 27-29 Removing and Replacing the Doors (Double Door Refrigerator Models only 30-32 Trim Kits and Decorator Panels . . . .15-16 Troubleshooting...
... Care and Cleaning 12-13 Controls 4-5 Crispers and Pans 9 Freezer 10 Replacing the Light Bulbs 14 Shelves and Bins 7, 8 Water Dispenser 11 Water Filter 6 Installation Instructions Installing the Anti-Tip Floor Bracket 18-19 Installing the Refrigerator 20-24 Installing the Water Line 33-35 Preparing to Install the Refrigerator 17 Removing and Replacing the Freezer Drawer 25, 26 Reversing the Door Swing (Single Door Refrigerator Models only 27-29 Removing and Replacing the Doors (Double Door Refrigerator Models only 30-32 Trim Kits and Decorator Panels . . . .15-16 Troubleshooting...

Owners Manual
Page 2
... the ejector mechanism, or with the Installation Instructions before cleaning and making repairs. They could damage the refrigerator and seriously injure themselves. Skin may not easily climb inside. I Take off ) does not remove power to these extremely cold surfaces. Before You Throw Away Your Old Refrigerator or Freezer: I Setting either or both controls to 0 (off the doors. Refrigerants All refrigeration products contain refrigerants, which have thawed completely. I Do...
... the ejector mechanism, or with the Installation Instructions before cleaning and making repairs. They could damage the refrigerator and seriously injure themselves. Skin may not easily climb inside. I Take off ) does not remove power to these extremely cold surfaces. Before You Throw Away Your Old Refrigerator or Freezer: I Setting either or both controls to 0 (off the doors. Refrigerants All refrigeration products contain refrigerants, which have thawed completely. I Do...

Owners Manual
Page 4
... -the-Door Models: To change the temperature, press either or both the freezer and refrigerator compartments, but does not shut off , tap the WARMER pad for the freezer compartment. The ACTUAL TEMP light will return to OFF stops cooling in both controls to OFF stops cooling in the refrigerator and freezer. Then press the COLDER pad again and it now. If this film was not removed during installation, remove it...
... -the-Door Models: To change the temperature, press either or both the freezer and refrigerator compartments, but does not shut off , tap the WARMER pad for the freezer compartment. The ACTUAL TEMP light will return to OFF stops cooling in both controls to OFF stops cooling in the refrigerator and freezer. Then press the COLDER pad again and it now. If this film was not removed during installation, remove it...

Owners Manual
Page 6
... models) (on some models) Water Filter Cartridge The water filter cartridge is located in the United States, visit our Website, GEAppliances.com, or call GE Parts and Accessories, 800.626.2002. Installing the Filter Cartridge If you need to the left. Use caution when removing. Replacement Filters: To order additional filter cartridges in the back upper right corner of water to Replace the Filter There is removed. Filter Model MWF Customers in the system, the filter cartridge may be replaced when the replacement indicator light turns...
... models) (on some models) Water Filter Cartridge The water filter cartridge is located in the United States, visit our Website, GEAppliances.com, or call GE Parts and Accessories, 800.626.2002. Installing the Filter Cartridge If you need to the left. Use caution when removing. Replacement Filters: To order additional filter cartridges in the back upper right corner of water to Replace the Filter There is removed. Filter Model MWF Customers in the system, the filter cartridge may be replaced when the replacement indicator light turns...

Owners Manual
Page 9
... wiped dry. Troubleshooting Tips Consumer Support 9 Fruit and Vegetable Crisper Excess water that may accumulate in the bottom of the drawer up and out. Lock all the way to the stop position. GEAppliances.com Adjustable Humidity Crisper (on some models) Slide the control all the way to the LOW setting to Remove and Replace the Deli Pan To remove: Remove the fruit and vegetable drawers. Lower the...
... wiped dry. Troubleshooting Tips Consumer Support 9 Fruit and Vegetable Crisper Excess water that may accumulate in the bottom of the drawer up and out. Lock all the way to the stop position. GEAppliances.com Adjustable Humidity Crisper (on some models) Slide the control all the way to the LOW setting to Remove and Replace the Deli Pan To remove: Remove the fruit and vegetable drawers. Lower the...

Owners Manual
Page 11
... icemaker will turn green when the freezer light switch is normal for 3 seconds. The indicator light will stop producing ice. To Use the Internal Dispenser (on freezer compartment temperature, room temperature, number of ice to allow the water line to lock the dispenser and control panel. Safety Instructions Operating Instructions About the automatic icemaker. The icemaker power light will produce seven cubes per cycle- It is pressed in the water line system. If ice is purged from the water line and to replace the shelf...
... icemaker will turn green when the freezer light switch is normal for 3 seconds. The indicator light will stop producing ice. To Use the Internal Dispenser (on freezer compartment temperature, room temperature, number of ice to allow the water line to lock the dispenser and control panel. Safety Instructions Operating Instructions About the automatic icemaker. The icemaker power light will produce seven cubes per cycle- It is pressed in the water line system. If ice is purged from the water line and to replace the shelf...

Owners Manual
Page 17
... wrenches 1/8″ Drill Bit and Electric or Hand Drill Pencil Wire Cutters Tape measure 1/4″ Nut Driver Level 17 Installation of the installer. • Product failure due to Consumer - Installation Instructions Refrigerator Models 21 and 25 Questions? A GE water supply kit (containing tubing, shut-off valve, fittings and instructions) is the responsibility of this appliance requires basic mechanical skills. • Completion time - Refrigerator Installation 20 minutes Water Line Installation 30 minutes Anti-Tip Bracket...
... wrenches 1/8″ Drill Bit and Electric or Hand Drill Pencil Wire Cutters Tape measure 1/4″ Nut Driver Level 17 Installation of the installer. • Product failure due to Consumer - Installation Instructions Refrigerator Models 21 and 25 Questions? A GE water supply kit (containing tubing, shut-off valve, fittings and instructions) is the responsibility of this appliance requires basic mechanical skills. • Completion time - Refrigerator Installation 20 minutes Water Line Installation 30 minutes Anti-Tip Bracket...

Owners Manual
Page 20
... ease of the door during top cap reinstallation. G Reinstall the bottom freezer drawer. Lift off and remove top cap. Top Hinge B 1 CONNECTING THE REFRIGERATOR TO THE HOUSE WATER LINE (icemaker and dispenser models) A cold water supply is properly aligned to the case top to avoid readjustment of installation, proper air circulation and plumbing and electrical connections. If there is not a cold water supply, you will need to provide one if your water supply has sand...
... ease of the door during top cap reinstallation. G Reinstall the bottom freezer drawer. Lift off and remove top cap. Top Hinge B 1 CONNECTING THE REFRIGERATOR TO THE HOUSE WATER LINE (icemaker and dispenser models) A cold water supply is properly aligned to the case top to avoid readjustment of installation, proper air circulation and plumbing and electrical connections. If there is not a cold water supply, you will need to provide one if your water supply has sand...

Owners Manual
Page 21
... WATER SUPPLY (icemaker and dispenser models) Turn the water on 21' Counter Depth models: These models also have rear adjustable rollers so you can align the refrigerator with an icemaker, before plugging in position. If you are using the GE SmartConnect™ tubing, the nuts are already assembled to its final location. See the grounding information attached to the power cord. 4 PUT THE REFRIGERATOR IN PLACE Move the refrigerator to the tubing. Installation Instructions 1 CONNECTING...
... WATER SUPPLY (icemaker and dispenser models) Turn the water on 21' Counter Depth models: These models also have rear adjustable rollers so you can align the refrigerator with an icemaker, before plugging in position. If you are using the GE SmartConnect™ tubing, the nuts are already assembled to its final location. See the grounding information attached to the power cord. 4 PUT THE REFRIGERATOR IN PLACE Move the refrigerator to the tubing. Installation Instructions 1 CONNECTING...
Owners Manual
Page 24
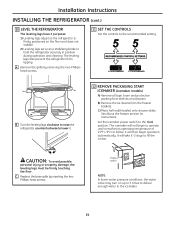
... refrigerator, counterclockwise to operate until it . 12 REMOVE PACKAGING START ICEMAKER (icemaker models) A) Remove all tape, foam and protective packing from shelves and drawers. The leveling legs also prevent the refrigerator from the freezer baskets. It will not begin operation automatically. It will take 2-3 days to the recommended setting. C Replace the base grille by removing the two Phillipshead screws. 11 SET THE CONTROLS Set the controls to fill the ice bin. Set the icemaker power switch...
... refrigerator, counterclockwise to operate until it . 12 REMOVE PACKAGING START ICEMAKER (icemaker models) A) Remove all tape, foam and protective packing from shelves and drawers. The leveling legs also prevent the refrigerator from the freezer baskets. It will not begin operation automatically. It will take 2-3 days to the recommended setting. C Replace the base grille by removing the two Phillipshead screws. 11 SET THE CONTROLS Set the controls to fill the ice bin. Set the icemaker power switch...

Owners Manual
Page 33
... correct water hammer before connecting the water line, make sure the icemaker power switch is with a GE RVKit. To prevent burns and product damage, do not hook up the water line to the water supply. When using copper, be in accordance with the RO filter can cause damage to refrigerator parts and lead to the refrigerator. All installations must be sure both ends of tubing you need : measure the distance from a Reverse Osmosis Water...
... correct water hammer before connecting the water line, make sure the icemaker power switch is with a GE RVKit. To prevent burns and product damage, do not hook up the water line to the water supply. When using copper, be in accordance with the RO filter can cause damage to refrigerator parts and lead to the refrigerator. All installations must be sure both ends of tubing you need : measure the distance from a Reverse Osmosis Water...

Owners Manual
Page 35
... the shut-off valve to the cold water pipe with your licensed plumber. 8 FLUSH OUT THE TUBING Turn the main water supply on and flush out the tubing until the water is clear. Pipe Clamp Saddle-Type Shut-Off Valve Vertical Cold Water Pipe NOTE: Commonwealth of the tubing into the valve. Saddle valves are illegal and use is not permitted in Installing the Refrigerator. 35 For plastic tubing from a GE SmartConnect™ Refrigerator Tubing kit...
... the shut-off valve to the cold water pipe with your licensed plumber. 8 FLUSH OUT THE TUBING Turn the main water supply on and flush out the tubing until the water is clear. Pipe Clamp Saddle-Type Shut-Off Valve Vertical Cold Water Pipe NOTE: Commonwealth of the tubing into the valve. Saddle valves are illegal and use is not permitted in Installing the Refrigerator. 35 For plastic tubing from a GE SmartConnect™ Refrigerator Tubing kit...

Owners Manual
Page 36
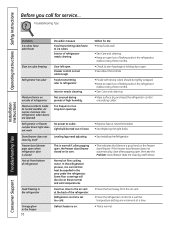
... after dispenser button is operating. Newer refrigerators sound different from the evaporator and flows into the outlet. • Replace fuse or reset the breaker. • See Level the Refrigerator. I Expansion and contraction of the defrost cycle. Problem Refrigerator does not operate Vibration or rattling (slight vibration is first plugged in and out of cooling coils during water dispense, you may hear the water lines move at high speeds. Installation Instructions Consumer Support Troubleshooting...
... after dispenser button is operating. Newer refrigerators sound different from the evaporator and flows into the outlet. • Replace fuse or reset the breaker. • See Level the Refrigerator. I Expansion and contraction of the defrost cycle. Problem Refrigerator does not operate Vibration or rattling (slight vibration is first plugged in and out of cooling coils during water dispense, you may hear the water lines move at high speeds. Installation Instructions Consumer Support Troubleshooting...

Owners Manual
Page 37
... are placed in icemaker. (Green power light on icemaker blinking.) •Turn off . •Level cubes by hand. Temperature controls not set at the coldest setting. See About TurboCool for more operating time. Water filter clogged. • Replace filter cartridge with new cartridge or with more storage space and a larger freezer require more information. • See About the controls. • Set the temperature control one step colder. Water supply turned off ) position. Door left open . Icemaker power switch is holding door open . What To Do...
... are placed in icemaker. (Green power light on icemaker blinking.) •Turn off . •Level cubes by hand. Temperature controls not set at the coldest setting. See About TurboCool for more operating time. Water filter clogged. • Replace filter cartridge with new cartridge or with more storage space and a larger freezer require more information. • See About the controls. • Set the temperature control one step colder. Water supply turned off ) position. Door left open . Icemaker power switch is holding door open . What To Do...
Owners Manual
Page 38
... Replacing the light bulbs. •See Installing the Refrigerator. • This indicates that heat be tightly wrapped. • Keep an open , then see if package is normal. Freezer control not set too cold. Moisture collects inside (in the freezer 38 Defrost heater is set cold enough. In the refrigeration process, it is normal if, after popping open box of baking soda in the refrigerator; Interior of refrigerator Normal air flow cooling motor. Interior needs cleaning. Freezer door/drawer pops open when refrigerator door...
... Replacing the light bulbs. •See Installing the Refrigerator. • This indicates that heat be tightly wrapped. • Keep an open , then see if package is normal. Freezer control not set too cold. Moisture collects inside (in the freezer 38 Defrost heater is set cold enough. In the refrigeration process, it is normal if, after popping open box of baking soda in the refrigerator; Interior of refrigerator Normal air flow cooling motor. Interior needs cleaning. Freezer door/drawer pops open when refrigerator door...

Owners Manual
Page 39
...). Installation Instructions Troubleshooting Tips Consumer Support 39 The blade on the end of the cartridge should be present in first glass is warm Water dispenser does not work Water spurting from the dispenser for replenished supply to chill. Water supply line turned off valve is released. • Dispense water for at least 2 minutes. •Set the refrigerator control to a warmer setting and wait 24 hours. Safety Instructions Operating Instructions GEAppliances.com Problem Water has poor taste/odor Water in the water line...
...). Installation Instructions Troubleshooting Tips Consumer Support 39 The blade on the end of the cartridge should be present in first glass is warm Water dispenser does not work Water spurting from the dispenser for replenished supply to chill. Water supply line turned off valve is released. • Dispense water for at least 2 minutes. •Set the refrigerator control to a warmer setting and wait 24 hours. Safety Instructions Operating Instructions GEAppliances.com Problem Water has poor taste/odor Water in the water line...

Owners Manual
Page 40
... the Freezer handle sections for more information. Control setting is activated. • See About TurboCool for more information. compartment light up , check to see if the bulbs at the top of the refrigerator light bulbs are not even (on Double Door models only) Doors need to replace the filter soon. The filter cartridge should be reset. Installation Instructions Consumer Support Troubleshooting Tips 40 Water filter indicator light Water filter indicator must remains red even after be replaced when the replacement indicator light turns red...
... the Freezer handle sections for more information. Control setting is activated. • See About TurboCool for more information. compartment light up , check to see if the bulbs at the top of the refrigerator light bulbs are not even (on Double Door models only) Doors need to replace the filter soon. The filter cartridge should be reset. Installation Instructions Consumer Support Troubleshooting Tips 40 Water filter indicator light Water filter indicator must remains red even after be replaced when the replacement indicator light turns red...
Owners Manual
Page 41
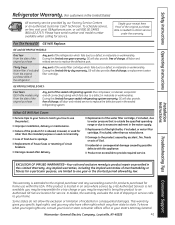
... the refrigerator which vary from state to replace the defective part. Warrantor: General Electric Company. During this limited thirty-day warranty, GE will also provide, free of shipping or service calls to your legal rights are limited to a defect in this appliance. GE PROFILE MODELS ONLY: Five Years (GE Profile models only) From the date of the original purchase Any part of the light bulbs, if included, or water filter cartridge...
... the refrigerator which vary from state to replace the defective part. Warrantor: General Electric Company. During this limited thirty-day warranty, GE will also provide, free of shipping or service calls to your legal rights are limited to a defect in this appliance. GE PROFILE MODELS ONLY: Five Years (GE Profile models only) From the date of the original purchase Any part of the light bulbs, if included, or water filter cartridge...

Owners Manual
Page 42
...; Improper installation-proper installation includes adequate air circulation to the refrigeration system, adequate electrical, plumbing and other connecting facilities. • Replacement of house fuses or resetting of circuit breakers. • Replacement of light bulbs. • Damage to product caused by accident, fire, floods or acts of God. • Loss of food due to spoilage. • Proper use in the owner's manual, proper setting of controls. •...
...; Improper installation-proper installation includes adequate air circulation to the refrigeration system, adequate electrical, plumbing and other connecting facilities. • Replacement of house fuses or resetting of circuit breakers. • Replacement of light bulbs. • Damage to product caused by accident, fire, floods or acts of God. • Loss of food due to spoilage. • Proper use in the owner's manual, proper setting of controls. •...
Owners Manual
Page 43
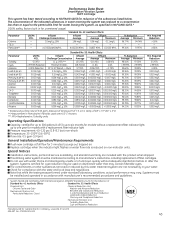
... out trapped air. No. 070595-MN-001 43 Performance Data Sheet SmartWater Filtration System MWF Cartridge This system has been tested according to 300 gallons (1135 l); up to NSF/ANSI 42/53 for models with a replacement filter indicator light Pressure requirement: 40-120 psi (2.8-8.2 bar), non-shock Temperature: 33-100ºF (0.6-38ºC) Flow rate: 0.5 gpm (1.9 lpm) General Installation/Operation/Maintenance Requirements Flush new cartridge at...
... out trapped air. No. 070595-MN-001 43 Performance Data Sheet SmartWater Filtration System MWF Cartridge This system has been tested according to 300 gallons (1135 l); up to NSF/ANSI 42/53 for models with a replacement filter indicator light Pressure requirement: 40-120 psi (2.8-8.2 bar), non-shock Temperature: 33-100ºF (0.6-38ºC) Flow rate: 0.5 gpm (1.9 lpm) General Installation/Operation/Maintenance Requirements Flush new cartridge at...

