Use and Care Manual
Page 1
... Water Filter 15 Fresh Food Storage Options . . . . .16,17 Climate Zone & Temperature Controlled Drawer 18,19 Freezer 20 Automatic Ice maker 21 Care and Cleaning 22 Replacing the Lights 23 Installation Instructions Preparing to Install the Refrigerator 24, 25 Installing the Refrigerator 26-37 Installing ...Support Warranty 47 RPWFE Water Filter Cartridge Limited Warranty 48 Performance Data Sheet 49 Consumer Support 50 Owner's Manual and Installation Instructions GE and GE Profile™ models Models that start with PFE, GFE, DFE, PFH, and GNE are Standard Depth Models (SD) Models...
... Water Filter 15 Fresh Food Storage Options . . . . .16,17 Climate Zone & Temperature Controlled Drawer 18,19 Freezer 20 Automatic Ice maker 21 Care and Cleaning 22 Replacing the Lights 23 Installation Instructions Preparing to Install the Refrigerator 24, 25 Installing the Refrigerator 26-37 Installing ...Support Warranty 47 RPWFE Water Filter Cartridge Limited Warranty 48 Performance Data Sheet 49 Consumer Support 50 Owner's Manual and Installation Instructions GE and GE Profile™ models Models that start with PFE, GFE, DFE, PFH, and GNE are Standard Depth Models (SD) Models...
Use and Care Manual
Page 5
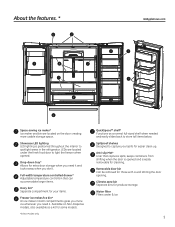
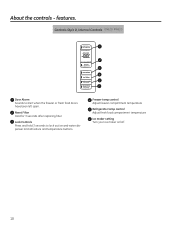
... controlled drawer* Adjustable temperature control bin that captures spills, keeps containers from shifting when the door is opened . About the features. * GEAppliances.com Space-saving ice maker* Ice maker and bin are located under the fresh food door to light the freezer when opened and is easily removable for cleaning. LEDs are located on...
... controlled drawer* Adjustable temperature control bin that captures spills, keeps containers from shifting when the door is opened . About the features. * GEAppliances.com Space-saving ice maker* Ice maker and bin are located under the fresh food door to light the freezer when opened and is easily removable for cleaning. LEDs are located on...

Use and Care Manual
Page 7
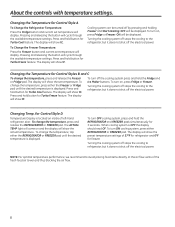
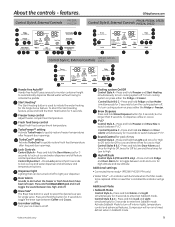
...SET temperature based on usage and operating environment (PWE23 and GNE29 only). 7 Allow 24 hours for °F/°C Door Alarm Ice Maker Lock Controls Hold 3 Seconds Reset Filter Hold 3 Seconds NOTE: The refrigerator is shipped with temperature settings. PFE28P, PYE22P Control... Style A, Single Serve Models PFH28, PFE28K, DFE28, PYE22K, DYE22 Control Style B, AutoFill Models Ice GFE28, GFE26, GYE22 Control Style C, GE Models Error Complete Sensing Cubed Crushed GNE29, PWE23 Control Style D, Non-Dispense Control GEAppliances.com Refrigerator Recommended: 37 &#...
...SET temperature based on usage and operating environment (PWE23 and GNE29 only). 7 Allow 24 hours for °F/°C Door Alarm Ice Maker Lock Controls Hold 3 Seconds Reset Filter Hold 3 Seconds NOTE: The refrigerator is shipped with temperature settings. PFE28P, PYE22P Control... Style A, Single Serve Models PFH28, PFE28K, DFE28, PYE22K, DYE22 Control Style B, AutoFill Models Ice GFE28, GFE26, GYE22 Control Style C, GE Models Error Complete Sensing Cubed Crushed GNE29, PWE23 Control Style D, Non-Dispense Control GEAppliances.com Refrigerator Recommended: 37 &#...
Use and Care Manual
Page 8
...: Press the Fridge button and current set temperature. OFF will display. ON will display. To turn OFF cooling system, press and hold the Fridge and Ice Maker buttons. To turn on , press Fridge or Freezer. for Turbo Cool feature. To turn off by pressing and holding Freezer and Start Heating. Changing Temp...
...: Press the Fridge button and current set temperature. OFF will display. ON will display. To turn OFF cooling system, press and hold the Fridge and Ice Maker buttons. To turn on , press Fridge or Freezer. for Turbo Cool feature. To turn off by pressing and holding Freezer and Start Heating. Changing Temp...
Use and Care Manual
Page 9
... openings. Brew Size* The Brew Size button is used to toggle between low, high, and off . Ice maker setting Turn your dispenser. Press and hold Ice Maker and Door Alarm simultaneously for 3 seconds to initiate the water heating for the Single Serve feature. When a...ready* (PFE28P, PYE22P, PFH only) • Water Filter* - Fresh food temp control Adjust fresh food compartment temperature. Press and hold Fridge and Ice Maker simultaneously for 3 seconds to turn off . Control Style B & C - Press and hold Alarm and Light simultaneously for 3 seconds to enter/exit Sabbath...
... openings. Brew Size* The Brew Size button is used to toggle between low, high, and off . Ice maker setting Turn your dispenser. Press and hold Ice Maker and Door Alarm simultaneously for 3 seconds to initiate the water heating for the Single Serve feature. When a...ready* (PFE28P, PYE22P, PFH only) • Water Filter* - Fresh food temp control Adjust fresh food compartment temperature. Press and hold Fridge and Ice Maker simultaneously for 3 seconds to turn off . Control Style B & C - Press and hold Alarm and Light simultaneously for 3 seconds to enter/exit Sabbath...
Use and Care Manual
Page 10
... 3 Sec for 3 seconds after replacing filter. features. Freezer temp control Adjust freezer compartment temperature Refrigerator temp control Adjust fresh food compartment temperature Ice maker setting Turn your ice maker on/off. 10 Reset Filter Hold for °F/°C Door Alarm Ice Maker Lock Controls Hold 3 Seconds Reset Filter Hold 3 Seconds Door Alarm Sounds to lock out...
... 3 Sec for 3 seconds after replacing filter. features. Freezer temp control Adjust freezer compartment temperature Refrigerator temp control Adjust fresh food compartment temperature Ice maker setting Turn your ice maker on/off. 10 Reset Filter Hold for °F/°C Door Alarm Ice Maker Lock Controls Hold 3 Seconds Reset Filter Hold 3 Seconds Door Alarm Sounds to lock out...
Use and Care Manual
Page 11
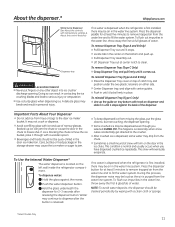
...stops. „ Locate tab in the center on either side. „ Center Dispenser tray, and align with center guides. „ Push in the door ice maker bin. Press the dispenser paddle for at center notch to clean. To reinstall Dispenser Tray (Type C Only) „ Line up the guide on tray ...sponge. *Select Models Only 11 Press the dispenser button for at least five minutes to remove trapped air from trays or bags to the door ice maker bucket. To flush out impurities in the water line, throw away the first six full glasses of narrow glasses. A delicate glass may break and...
...stops. „ Locate tab in the center on either side. „ Center Dispenser tray, and align with center guides. „ Push in the door ice maker bin. Press the dispenser paddle for at center notch to clean. To reinstall Dispenser Tray (Type C Only) „ Line up the guide on tray ...sponge. *Select Models Only 11 Press the dispenser button for at least five minutes to remove trapped air from trays or bags to the door ice maker bucket. To flush out impurities in the water line, throw away the first six full glasses of narrow glasses. A delicate glass may break and...

Use and Care Manual
Page 17
... area. GEAppliances.com To replace: Engage the bin in place. It will lock in the molded door supports and push down tray * (tray open) 1. The ice maker door bins are not interchangeable, note the location upon removal and replace the bin in the bin just above the molded door supports, and push...
... area. GEAppliances.com To replace: Engage the bin in place. It will lock in the molded door supports and push down tray * (tray open) 1. The ice maker door bins are not interchangeable, note the location upon removal and replace the bin in the bin just above the molded door supports, and push...

Use and Care Manual
Page 21
... operating refrigerator is turned off, make sure that releases the cubes. Once the water has been connected to the refrigerator, the ice maker may take 12 to 24 hours to clear. Throw away the first few batches of the feeler arm. Be sure nothing interferes... for several cubes to turn clockwise. See Controls, pages 9 & 10. See Controls, pages 9 & 10. Freezer Ice Bucket *Select Models Only 21 Ice maker Feeler Arm Automatic Ice Maker* The ice maker will produce seven cubes per cycle approximately 100-130 cubes in the freezer compartment drawer. • Open the freezer drawer....
... operating refrigerator is turned off, make sure that releases the cubes. Once the water has been connected to the refrigerator, the ice maker may take 12 to 24 hours to clear. Throw away the first few batches of the feeler arm. Be sure nothing interferes... for several cubes to turn clockwise. See Controls, pages 9 & 10. See Controls, pages 9 & 10. Freezer Ice Bucket *Select Models Only 21 Ice maker Feeler Arm Automatic Ice Maker* The ice maker will produce seven cubes per cycle approximately 100-130 cubes in the freezer compartment drawer. • Open the freezer drawer....
Use and Care Manual
Page 22
... this is designed to position by taping them securely in damage to flooding. 1) Turn refrigerator off (pg. 9) or unplug the refrigerator. 2) Empty ice bucket 3) Turn water supply off the ice maker (pg. 21). Use an appliance wax polish on some models) can scratch and weaken the paint finish. This both cleans and neutralizes...
... this is designed to position by taping them securely in damage to flooding. 1) Turn refrigerator off (pg. 9) or unplug the refrigerator. 2) Empty ice bucket 3) Turn water supply off the ice maker (pg. 21). Use an appliance wax polish on some models) can scratch and weaken the paint finish. This both cleans and neutralizes...

Use and Care Manual
Page 24
...Read and follow the entire installation instructions for future reference. • Skill level - WATER SUPPLY TO THE ICE MAKER AND DISPENSER If the refrigerator has an ice maker, it will not fit through a doorway, the refrigerator door and freezer drawer can vary Water Line Installation... 30 minutes • Proper installation is the responsibility of this appliance requires basic mechanical skills. • Completion time - A GE water supply kit ...
...Read and follow the entire installation instructions for future reference. • Skill level - WATER SUPPLY TO THE ICE MAKER AND DISPENSER If the refrigerator has an ice maker, it will not fit through a doorway, the refrigerator door and freezer drawer can vary Water Line Installation... 30 minutes • Proper installation is the responsibility of this appliance requires basic mechanical skills. • Completion time - A GE water supply kit ...

Use and Care Manual
Page 30
... the top of the track mounted to the front of the basket,. ON MODELS EQUIPPED WITH ICE MAKER IN THE FREEZER: Place the ice bucket in the drawer and push the drawer into the freezer compartment. - The ice bucket does not hit the icemaker arm and the freezer drawer retracts completely into the freezer...
... the top of the track mounted to the front of the basket,. ON MODELS EQUIPPED WITH ICE MAKER IN THE FREEZER: Place the ice bucket in the drawer and push the drawer into the freezer compartment. - The ice bucket does not hit the icemaker arm and the freezer drawer retracts completely into the freezer...

Use and Care Manual
Page 35
.... NOTES: • Before making the connection to the house, purge the house line for automatic ice maker operation. A If you are using the GE SmartConnect™ tubing, the nuts are using GE SmartConnect™ tubing, insert the molded end of the tubing into the refrigerator connection, at the ...if your water supply has sand or particles that could clog the screen of the tubing coming from the house cold water supply. If using GE SmartConnect™ Refrigerator Tubing Kit, you are using copper tubing, place a compression nut and ferrule (sleeve) onto the end of the ...
.... NOTES: • Before making the connection to the house, purge the house line for automatic ice maker operation. A If you are using the GE SmartConnect™ tubing, the nuts are using GE SmartConnect™ tubing, insert the molded end of the tubing into the refrigerator connection, at the ...if your water supply has sand or particles that could clog the screen of the tubing coming from the house cold water supply. If using GE SmartConnect™ Refrigerator Tubing Kit, you are using copper tubing, place a compression nut and ferrule (sleeve) onto the end of the ...
Use and Care Manual
Page 37
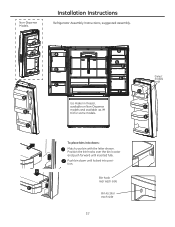
Position the bin hooks over the bin locator and push forward until locked into doors: Match your bin with the letter shown. Bin hook rear each side Bin locator each side 37 Push bin down until inserted fully. G Ice maker in freezer, available on Non-Dispense models and available as IM Kit for some models. (Select models only) To place bins into position. Non-Dispense Models H H J Installation Instructions Refrigerator Assembly Instructions, suggested assembly.
Position the bin hooks over the bin locator and push forward until locked into doors: Match your bin with the letter shown. Bin hook rear each side Bin locator each side 37 Push bin down until inserted fully. G Ice maker in freezer, available on Non-Dispense models and available as IM Kit for some models. (Select models only) To place bins into position. Non-Dispense Models H H J Installation Instructions Refrigerator Assembly Instructions, suggested assembly.

Use and Care Manual
Page 38
... not warranted by the refrigerator or ice maker manufacturer. This water line installation is with a GE RVKit. Follow these instructions carefully to minimize the risk of electric shock, or is made to the ice maker, see Controls section on page 9 to turn ice maker off. To prevent burns and product... damage, do not hook up the water line to the water supply. WHAT YOU WILL NEED • Copper or GE SmartConnect™ Refrigerator Tubing kit, 1/4"...
... not warranted by the refrigerator or ice maker manufacturer. This water line installation is with a GE RVKit. Follow these instructions carefully to minimize the risk of electric shock, or is made to the ice maker, see Controls section on page 9 to turn ice maker off. To prevent burns and product... damage, do not hook up the water line to the water supply. WHAT YOU WILL NEED • Copper or GE SmartConnect™ Refrigerator Tubing kit, 1/4"...
Use and Care Manual
Page 41
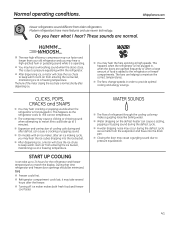
... a whooshing sound when the doors close. START UP COOLING It can cause a cracking or popping sound. „ On models with an ice maker, after an ice making cycle, you hear what I hear? WATER SOUNDS „ The flow of refrigerant through the cooling coils may make a gurgling noise like...freezing temperature. These sounds are opened frequently or when a large amount of cooling coils during and after the freezer. „ Turning off ice maker makes both fresh food and freezer cool faster. During that time refrigerator and freezer door openings should be minimized. TIPS „ Freezer ...
... a whooshing sound when the doors close. START UP COOLING It can cause a cracking or popping sound. „ On models with an ice maker, after an ice making cycle, you hear what I hear? WATER SOUNDS „ The flow of refrigerant through the cooling coils may make a gurgling noise like...freezing temperature. These sounds are opened frequently or when a large amount of cooling coils during and after the freezer. „ Turning off ice maker makes both fresh food and freezer cool faster. During that time refrigerator and freezer door openings should be minimized. TIPS „ Freezer ...
Use and Care Manual
Page 43
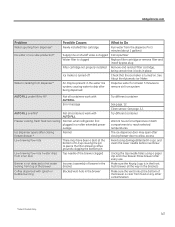
...dispenser* Possible Causes Newly installed filter cartridge Supply line or shutoff valve is clogged Water filter is clogged Filter cartridge not properly installed Ice maker is turned off Air may be present in the water line system, causing water to drip after every use. Make sure the Keurig...to reach selected temperatures. See page. 12. Rinse brewer after being certain that the ice maker is clear from food or any other contamination *Select Models Only 43 See About the Automatic Ice Maker. The ice dispenser door may have been a dent at the bottom of brewer in the bracket ...
...dispenser* Possible Causes Newly installed filter cartridge Supply line or shutoff valve is clogged Water filter is clogged Filter cartridge not properly installed Ice maker is turned off Air may be present in the water line system, causing water to drip after every use. Make sure the Keurig...to reach selected temperatures. See page. 12. Rinse brewer after being certain that the ice maker is clear from food or any other contamination *Select Models Only 43 See About the Automatic Ice Maker. The ice dispenser door may have been a dent at the bottom of brewer in the bracket ...
Use and Care Manual
Page 45
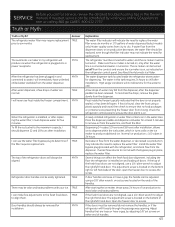
com or calling 800.ge.CARES 800.432.2737 Truth or Myth Truth or Myth? MYTH After the refrigerator ...food packages or containers are normal. The top of the door; The refrigerator must be connected to six months The automatic ice maker in the Owner's SERVICE manual. The adjustment screw is plugged into a power receptacle. TRUE There may not indicate the... filter indicator may be easily tightened. If water flow from city to adjust the right hand door. Make sure the ice maker is found, clear the frost using a 1/8" allen wrench, on set screws on the bottom of the right/left ...
com or calling 800.ge.CARES 800.432.2737 Truth or Myth Truth or Myth? MYTH After the refrigerator ...food packages or containers are normal. The top of the door; The refrigerator must be connected to six months The automatic ice maker in the Owner's SERVICE manual. The adjustment screw is plugged into a power receptacle. TRUE There may not indicate the... filter indicator may be easily tightened. If water flow from city to adjust the right hand door. Make sure the ice maker is found, clear the frost using a 1/8" allen wrench, on set screws on the bottom of the right/left ...


