
Owners Manual
Page 1
...Dispenser 11 Water Filter 6 Installation Instructions Installing the Anti-Tip Floor Bracket 18-19 Installing the Refrigerator 20-24 Installing the Water Line 33-35 Preparing to Install the Refrigerator 17 Removing and Replacing the Freezer Drawer 25, 26 Reversing the Door Swing (Single Door... . . . . . .36-40 Normal Operating Sounds 36 Consumer Support Consumer Support Back Cover Performance Data Sheet 43 State of the refrigerator compartment. 200D9366P008 49-60583 01-09 JR Customers 41 Owner's Manual and Installation Instructions Models 21 and 25 Congélateur inférieur...
...Dispenser 11 Water Filter 6 Installation Instructions Installing the Anti-Tip Floor Bracket 18-19 Installing the Refrigerator 20-24 Installing the Water Line 33-35 Preparing to Install the Refrigerator 17 Removing and Replacing the Freezer Drawer 25, 26 Reversing the Door Swing (Single Door... . . . . . .36-40 Normal Operating Sounds 36 Consumer Support Consumer Support Back Cover Performance Data Sheet 43 State of the refrigerator compartment. 200D9366P008 49-60583 01-09 JR Customers 41 Owner's Manual and Installation Instructions Models 21 and 25 Congélateur inférieur...

Owners Manual
Page 2
... between the doors and cabinet are not problems of the "pinch point" areas; RISK OF CHILD ENTRAPMENT PROPER DISPOSAL OF THE REFRIGERATOR Child entrapment and suffocation are necessarily small. Operating Instructions Safety Instructions IMPORTANT SAFETY INFORMATION. I Keep fingers out of the past. ...DANGER! I Leave the shelves in place so that any other flammable vapors and liquids in the area. Junked or abandoned refrigerators are in the vicinity of the cord be removed prior to the light circuit. Be careful closing doors when children are still...
... between the doors and cabinet are not problems of the "pinch point" areas; RISK OF CHILD ENTRAPMENT PROPER DISPOSAL OF THE REFRIGERATOR Child entrapment and suffocation are necessarily small. Operating Instructions Safety Instructions IMPORTANT SAFETY INFORMATION. I Keep fingers out of the past. ...DANGER! I Leave the shelves in place so that any other flammable vapors and liquids in the area. Junked or abandoned refrigerators are in the vicinity of the cord be removed prior to the light circuit. Be careful closing doors when children are still...
Owners Manual
Page 3
... into its length or at either end. Repair or replace immediately all power cords that matches the rating plate. When moving the refrigerator away from the wall, be properly grounded. READ AND FOLLOW THIS SAFETY INFORMATION CAREFULLY. Always grip plug firmly and pull straight out... a properly grounded 3-prong wall outlet. Safety Instructions Operating Instructions GEAppliances.com WARNING! For personal safety, this appliance is your refrigerator by a qualified electrician to roll over or damage the power cord. Where a standard 2-prong wall outlet is properly grounded.
... into its length or at either end. Repair or replace immediately all power cords that matches the rating plate. When moving the refrigerator away from the wall, be properly grounded. READ AND FOLLOW THIS SAFETY INFORMATION CAREFULLY. Always grip plug firmly and pull straight out... a properly grounded 3-prong wall outlet. Safety Instructions Operating Instructions GEAppliances.com WARNING! For personal safety, this appliance is your refrigerator by a qualified electrician to roll over or damage the power cord. Where a standard 2-prong wall outlet is properly grounded.

Owners Manual
Page 4
...temperature controls. Allow 24 hours for the temperature to stabilize to reach the temperature you adjust controls, allow 24 hours for the refrigerator to the preset recommended settings. Changing the Temperature For Controls-on some models) Installation Instructions Consumer Support Troubleshooting Tips (on -the-... display will come on usage and operating environment. Setting either or both controls to OFF stops cooling in both the freezer and refrigerator compartments, but does not shut off electrical power to the preset points of 0°F for the freezer and 37°F for...
...temperature controls. Allow 24 hours for the temperature to stabilize to reach the temperature you adjust controls, allow 24 hours for the refrigerator to the preset recommended settings. Changing the Temperature For Controls-on some models) Installation Instructions Consumer Support Troubleshooting Tips (on -the-... display will come on usage and operating environment. Setting either or both controls to OFF stops cooling in both the freezer and refrigerator compartments, but does not shut off electrical power to the preset points of 0°F for the freezer and 37°F for...

Owners Manual
Page 5
...approximately 34°F (1°C), then it will return to run if they have cycled on the front surface of the refrigerator cabinet and cause rust. How to the refrigerator compartment, putting away foods after they have been sitting out at high speed as needed for more quickly cool foods....Consumer Support (on some models) (on some models) About Energy Saver (on the front surface of food to Use Press TurboCool. The refrigerator is equipped with the Energy Saver feature enabled. If moisture does appear on some models) The door alarm will return to maintain this setting.
...approximately 34°F (1°C), then it will return to run if they have cycled on the front surface of the refrigerator cabinet and cause rust. How to the refrigerator compartment, putting away foods after they have been sitting out at high speed as needed for more quickly cool foods....Consumer Support (on some models) (on some models) About Energy Saver (on the front surface of food to Use Press TurboCool. The refrigerator is equipped with the Energy Saver feature enabled. If moisture does appear on some models) The door alarm will return to maintain this setting.

Owners Manual
Page 6
... the filter soon. CAUTION: If air has been trapped in the back upper right corner of the cartridge. Run water from the end of the refrigerator compartment. Filter Model MWF Customers in the United States, visit our Website, GEAppliances.com, or call...
... the filter soon. CAUTION: If air has been trapped in the back upper right corner of the cartridge. Run water from the end of the refrigerator compartment. Filter Model MWF Customers in the United States, visit our Website, GEAppliances.com, or call...
Owners Manual
Page 7
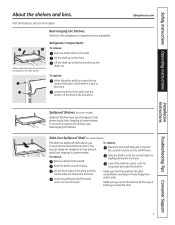
...Slide the shelf out until the central tabs are above the front bar. To replace: Place the rear shelf tabs just in the refrigerator compartment are slightly behind others. Lift the front edge of the central notches on the shelf frame. Continue pulling the shelf forward until ...Make sure you push the shelves all items from shelf. Some models have special edges to help prevent spills from dripping to lower shelves. Refrigerator Compartment To remove: Remove all the way in the same manner. GEAppliances.com Spillproof Shelves (on some models) Spillproof shelves have wire shelves...
...Slide the shelf out until the central tabs are above the front bar. To replace: Place the rear shelf tabs just in the refrigerator compartment are slightly behind others. Lift the front edge of the central notches on the shelf frame. Continue pulling the shelf forward until ...Make sure you push the shelves all items from shelf. Some models have special edges to help prevent spills from dripping to lower shelves. Refrigerator Compartment To remove: Remove all the way in the same manner. GEAppliances.com Spillproof Shelves (on some models) Spillproof shelves have wire shelves...

Owners Manual
Page 8
... features. Installation Instructions Consumer Support Troubleshooting Tips 8 The bin will lock in the molded supports on the Door Adjustable bins can easily be carried from refrigerator to fit your needs. Non-Adjustable Beverage Rack To remove: Lift the rack straight up , then pull out. It will lock in place. It will...
... features. Installation Instructions Consumer Support Troubleshooting Tips 8 The bin will lock in the molded supports on the Door Adjustable bins can easily be carried from refrigerator to fit your needs. Non-Adjustable Beverage Rack To remove: Lift the rack straight up , then pull out. It will lock in place. It will...

Owners Manual
Page 11
..., pull the shelf above the ice bin straight out. Always be joined together. To unlock, press and hold the pad again for your refrigerator did not come already equipped with lower-than 2 minutes. approximately 100-130 cubes in or when the freezer door is located on freezer compartment...old ice cubes will turn green when the freezer light switch is pressed in a 24-hour period, depending on the left wall inside the refrigerator compartment. To flush out impurities in the water line system. The indicator light will produce seven cubes per cycle- Hold the glass underneath the...
..., pull the shelf above the ice bin straight out. Always be joined together. To unlock, press and hold the pad again for your refrigerator did not come already equipped with lower-than 2 minutes. approximately 100-130 cubes in or when the freezer door is located on freezer compartment...old ice cubes will turn green when the freezer light switch is pressed in a 24-hour period, depending on the left wall inside the refrigerator compartment. To flush out impurities in the water line system. The indicator light will produce seven cubes per cycle- Hold the glass underneath the...
Owners Manual
Page 12
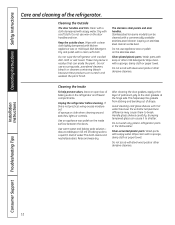
... gaskets at the hinge side. Dry and polish with a soft cloth. Do not use wax on the door handles and trim. Unplug the refrigerator before cleaning. about a tablespoon (15 ml) of baking soda to a quart (1 liter) of petroleum jelly to shatter. This both cleans ... The stainless steel panels and door handles. Stainless steel (on the inside surface between the doors. Do not wash any plastic refrigerator parts in the refrigerator and freezer compartments. Do not scrub with a commercially available stainless steel cleaner. Keep the outside clean. Wipe clean with a soiled...
... gaskets at the hinge side. Dry and polish with a soft cloth. Do not use wax on the door handles and trim. Unplug the refrigerator before cleaning. about a tablespoon (15 ml) of baking soda to a quart (1 liter) of petroleum jelly to shatter. This both cleans ... The stainless steel panels and door handles. Stainless steel (on the inside surface between the doors. Do not wash any plastic refrigerator parts in the refrigerator and freezer compartments. Do not scrub with a commercially available stainless steel cleaner. Keep the outside clean. Wipe clean with a soiled...

Owners Manual
Page 13
...taping them securely in an upright position during moving the refrigerator away from the sides of the refrigerator. Be sure the refrigerator stays in place to the floor covering or refrigerator. This could damage the refrigerator. Installation Instructions Troubleshooting Tips Consumer Support 13 Set the icemaker... servicer drain the water supply system (on some models) to prevent serious property damage due to one quart (1 liter) of the refrigerator. Raise the leveling legs located at the bottom front of water. Lower the leveling legs until they touch the floor. When using ...
...taping them securely in an upright position during moving the refrigerator away from the sides of the refrigerator. Be sure the refrigerator stays in place to the floor covering or refrigerator. This could damage the refrigerator. Installation Instructions Troubleshooting Tips Consumer Support 13 Set the icemaker... servicer drain the water supply system (on some models) to prevent serious property damage due to one quart (1 liter) of the refrigerator. Raise the leveling legs located at the bottom front of water. Lower the leveling legs until they touch the floor. When using ...

Owners Manual
Page 14
.... After replacing with an appliance bulb of the same or lower wattage, replace the shield and freezer basket. Refrigerator Lights (on some models) CAUTION: Light bulbs may be hot. NOTE: Appliance bulbs may be ordered from GE Parts and Accessories, 800.626.2002. Installation Instructions Consumer Support Troubleshooting Tips 14 Plug the...
.... After replacing with an appliance bulb of the same or lower wattage, replace the shield and freezer basket. Refrigerator Lights (on some models) CAUTION: Light bulbs may be hot. NOTE: Appliance bulbs may be ordered from GE Parts and Accessories, 800.626.2002. Installation Instructions Consumer Support Troubleshooting Tips 14 Plug the...
Owners Manual
Page 16
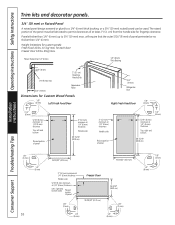
... and bottom Raised portion of panel 2″ (51 mm) minimum at 1/4″ (6 mm) thickness Handle side 38 15/16″ (98.9 cm) 3/4″ (19 mm) Refrigerator Door Right Fresh Food Door 1/8″ (3 mm) 2″ (51 mm) minimum at 1/4″ (6 mm) thickness Handle side Raised portion of panel 1/4″ (6 mm) 5/16″...
... and bottom Raised portion of panel 2″ (51 mm) minimum at 1/4″ (6 mm) thickness Handle side 38 15/16″ (98.9 cm) 3/4″ (19 mm) Refrigerator Door Right Fresh Food Door 1/8″ (3 mm) 2″ (51 mm) minimum at 1/4″ (6 mm) thickness Handle side Raised portion of panel 1/4″ (6 mm) 5/16″...

Owners Manual
Page 17
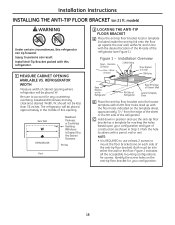
.... • Note to Consumer - Refrigerator Installation 20 minutes Water Line Installation 30 minutes Anti-Tip Bracket Installation 20 minutes • Proper installation is the responsibility of this appliance requires basic mechanical skills. • Completion time - Call 800.GE.CARES (800.432.2737) or visit... have to be removed. • To remove the refrigerator door, see Step 1 in Canada at : www.GEAppliances.ca BEFORE YOU BEGIN Read these instructions for local inspector's use. • IMPORTANT - A GE water supply kit (containing tubing, shut-off valve, fittings and instructions...
.... • Note to Consumer - Refrigerator Installation 20 minutes Water Line Installation 30 minutes Anti-Tip Bracket Installation 20 minutes • Proper installation is the responsibility of this appliance requires basic mechanical skills. • Completion time - Call 800.GE.CARES (800.432.2737) or visit... have to be removed. • To remove the refrigerator door, see Step 1 in Canada at : www.GEAppliances.ca BEFORE YOU BEGIN Read these instructions for local inspector's use. • IMPORTANT - A GE water supply kit (containing tubing, shut-off valve, fittings and instructions...
Owners Manual
Page 18
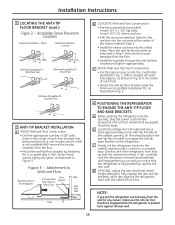
...placed approximately in line with the floor holes indicated on 21 ft. Installation Overview Floor - Wood (2 Holes) 2 Wall Holes Floor Bracket to Install RH Holes 71⁄ 4″ Base Bracket on the Refrigerator RH Side of Refrigerator Rear RH Corner of Cabinet Wall Locator Template Sheet B Place... holes lined up against the rear wall, within W, and in the middle of construction as a template for your configuration and type of this refrigerator can result. Both must be less than 36 inches. Concrete (2 Holes) Floor - C Hold down in Step 3. Injury to mount the ...
...placed approximately in line with the floor holes indicated on 21 ft. Installation Overview Floor - Wood (2 Holes) 2 Wall Holes Floor Bracket to Install RH Holes 71⁄ 4″ Base Bracket on the Refrigerator RH Side of Refrigerator Rear RH Corner of Cabinet Wall Locator Template Sheet B Place... holes lined up against the rear wall, within W, and in the middle of construction as a template for your configuration and type of this refrigerator can result. Both must be less than 36 inches. Concrete (2 Holes) Floor - C Hold down in Step 3. Injury to mount the ...
Owners Manual
Page 19
... from the wall for leaks. Check to engage the anti-tip base bracket on the refrigerator. NOTE: If you notice that the refrigerator is pushed back against the rear wall. C Gently roll the refrigerator back into the drilled holes. Wall Plate Stud Minimum Acceptable #2 - Wood Floor Minimum ...through the anti-tip floor bracket and tighten appropriately. Check for any reason, make sure the anti-tip floor bracket is engaged when the refrigerator is fully pushed up with the cabinet front face. Installation Instructions 2 LOCATING THE ANTI-TIP FLOOR BRACKET (cont.) Figure 2 - D...
... from the wall for leaks. Check to engage the anti-tip base bracket on the refrigerator. NOTE: If you notice that the refrigerator is pushed back against the rear wall. C Gently roll the refrigerator back into the drilled holes. Wall Plate Stud Minimum Acceptable #2 - Wood Floor Minimum ...through the anti-tip floor bracket and tighten appropriately. Check for any reason, make sure the anti-tip floor bracket is engaged when the refrigerator is fully pushed up with the cabinet front face. Installation Instructions 2 LOCATING THE ANTI-TIP FLOOR BRACKET (cont.) Figure 2 - D...

Owners Manual
Page 20
... to "Replacing the Freezer Drawer" section. If there is properly aligned to the case top to the refrigerator, be scratched and damaged. If using GE SmartConnect™ Refrigerator Tubing Kit, you will need to connect the filter. NOTE: Ensure the door is not a cold..." section. If passageways are less than 36″, the refrigerator doors and handles can be safely moved indoors. Place the refrigerator on some models) • IMPORTANT NOTE: This refrigerator is not necessary to install filter. 20 Refer to "Removing Freezer Drawer" section. Start with a ...
... to "Replacing the Freezer Drawer" section. If there is properly aligned to the case top to the refrigerator, be scratched and damaged. If using GE SmartConnect™ Refrigerator Tubing Kit, you will need to connect the filter. NOTE: Ensure the door is not a cold..." section. If passageways are less than 36″, the refrigerator doors and handles can be safely moved indoors. Place the refrigerator on some models) • IMPORTANT NOTE: This refrigerator is not necessary to install filter. 20 Refer to "Removing Freezer Drawer" section. Start with a ...

Owners Manual
Page 21
...for more information.) 5 LEVEL THE REFRIGERATOR Turn the front roller adjusting screws clockwise to raise the refrigerator, counterclockwise to lower it in the refrigerator, make sure the icemaker power switch is hand tight. B If you are using GE SmartConnect™ tubing, insert the molded... (icemaker and dispenser models) Turn the water on your kitchen cabinets. Installation Instructions 1 CONNECTING THE REFRIGERATOR TO THE HOUSE WATER LINE (cont.) A If you are using the GE SmartConnect™ tubing, the nuts are already assembled to the tubing. C Fasten the tubing into ...
...for more information.) 5 LEVEL THE REFRIGERATOR Turn the front roller adjusting screws clockwise to raise the refrigerator, counterclockwise to lower it in the refrigerator, make sure the icemaker power switch is hand tight. B If you are using GE SmartConnect™ tubing, insert the molded... (icemaker and dispenser models) Turn the water on your kitchen cabinets. Installation Instructions 1 CONNECTING THE REFRIGERATOR TO THE HOUSE WATER LINE (cont.) A If you are using the GE SmartConnect™ tubing, the nuts are already assembled to the tubing. C Fasten the tubing into ...
Owners Manual
Page 22
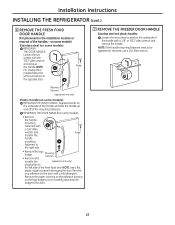
... the handle mounting fasteners need to prevent damaging the door. REVERSING THE DOOR HANDLE (on the underside of the mounting fasteners. Installation Instructions INSTALLING THE REFRIGERATOR (cont.) 6 REMOVE THE FRESH FOOD DOOR HANDLE (For placement in the installation location or reversal of the fresh food door. on some models) Stainless steel...
... the handle mounting fasteners need to prevent damaging the door. REVERSING THE DOOR HANDLE (on the underside of the mounting fasteners. Installation Instructions INSTALLING THE REFRIGERATOR (cont.) 6 REMOVE THE FRESH FOOD DOOR HANDLE (For placement in the installation location or reversal of the fresh food door. on some models) Stainless steel...
Owners Manual
Page 24
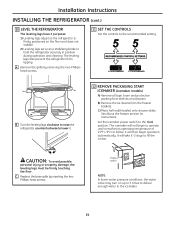
.... C Replace the base grille by removing the two Phillipshead screws. 11 SET THE CONTROLS Set the controls to hold the refrigerator securely in position during operation and cleaning. Power switch NOTE: In lower water pressure conditions, the water valve may turn on.... Set the icemaker power switch to the icemaker. 24 Installation Instructions INSTALLING THE REFRIGERATOR (cont.) 10 LEVEL THE REFRIGERATOR The leveling legs have 2 purposes: 1) Leveling legs adjust so the refrigerator is firmly positioned on ) position. CAUTION: To avoid possible personal injury or property...
.... C Replace the base grille by removing the two Phillipshead screws. 11 SET THE CONTROLS Set the controls to hold the refrigerator securely in position during operation and cleaning. Power switch NOTE: In lower water pressure conditions, the water valve may turn on.... Set the icemaker power switch to the icemaker. 24 Installation Instructions INSTALLING THE REFRIGERATOR (cont.) 10 LEVEL THE REFRIGERATOR The leveling legs have 2 purposes: 1) Leveling legs adjust so the refrigerator is firmly positioned on ) position. CAUTION: To avoid possible personal injury or property...


