
Owners Manual
Page 1
... Care and Cleaning 12-13 Controls 4-5 Crispers and Pans 9 Freezer 10 Replacing the Light Bulbs 14 Shelves and Bins 7, 8 Water Dispenser 11 Water Filter 6 Installation Instructions Installing the Anti-Tip Floor Bracket 18-19 Installing the Refrigerator 20-24 Installing the Water Line 33-35 Preparing to Install the Refrigerator 17 Removing and Replacing the Freezer Drawer 25, 26 Reversing the Door Swing (Single Door Refrigerator Models only 27-29 Removing and Replacing the Doors (Double Door Refrigerator Models only 30-32 Trim Kits and Decorator Panels . . . .15-16 Troubleshooting...
... Care and Cleaning 12-13 Controls 4-5 Crispers and Pans 9 Freezer 10 Replacing the Light Bulbs 14 Shelves and Bins 7, 8 Water Dispenser 11 Water Filter 6 Installation Instructions Installing the Anti-Tip Floor Bracket 18-19 Installing the Refrigerator 20-24 Installing the Water Line 33-35 Preparing to Install the Refrigerator 17 Removing and Replacing the Freezer Drawer 25, 26 Reversing the Door Swing (Single Door Refrigerator Models only 27-29 Removing and Replacing the Doors (Double Door Refrigerator Models only 30-32 Trim Kits and Decorator Panels . . . .15-16 Troubleshooting...

Owners Manual
Page 2
... Installation Instructions before cleaning and making repairs. clearances between the doors and between the doors and cabinet are not problems of your old refrigerator, please follow the instructions below to the light circuit. I Take off ) does not remove power to help prevent accidents. However, if you are in the refrigerator. Use this Owner's Manual. Do not place fingers or hands on the shelves in the area. Be careful closing doors...
... Installation Instructions before cleaning and making repairs. clearances between the doors and between the doors and cabinet are not problems of your old refrigerator, please follow the instructions below to the light circuit. I Take off ) does not remove power to help prevent accidents. However, if you are in the refrigerator. Use this Owner's Manual. Do not place fingers or hands on the shelves in the area. Be careful closing doors...

Owners Manual
Page 4
... it now. Several adjustments may vary slightly from the SET temperature based on some models) Installation Instructions Consumer Support Troubleshooting Tips (on usage and operating environment. To turn the cooling system off electrical power to the preset points of 0°F for the freezer and 37°F for the freezer compartment. For Controls Inside the Refrigerator: Opening the door displays the actual temperature. To turn the unit back on -the-Door Models: To change the temperature, press and...
... it now. Several adjustments may vary slightly from the SET temperature based on some models) Installation Instructions Consumer Support Troubleshooting Tips (on usage and operating environment. To turn the cooling system off electrical power to the preset points of 0°F for the freezer and 37°F for the freezer compartment. For Controls Inside the Refrigerator: Opening the door displays the actual temperature. To turn the unit back on -the-Door Models: To change the temperature, press and...

Owners Manual
Page 6
This light will turn orange to tell you that you need to the left. Installing the Filter Cartridge If you will not operate without the filter or filter bypass plug. Use caution when removing. Fill the replacement cartridge with water from the tap to the dispenser or icemaker decreases. Filter Model MWF Customers in Canada should be ejected as it stops. The filter cartridge should consult the yellow pages for the water filter cartridge on some models) (on the temperature display. Lining up...
This light will turn orange to tell you that you need to the left. Installing the Filter Cartridge If you will not operate without the filter or filter bypass plug. Use caution when removing. Fill the replacement cartridge with water from the tap to the dispenser or icemaker decreases. Filter Model MWF Customers in Canada should be ejected as it stops. The filter cartridge should consult the yellow pages for the water filter cartridge on some models) (on the temperature display. Lining up...

Owners Manual
Page 9
... Instructions Operating Instructions Installation Instructions About the crispers and pans. GEAppliances.com Adjustable Humidity Crisper (on some models) Slide the control all the way to the HIGH setting to provide lower humidity levels recommended for most vegetables. Adjustable Temperature Deli Pan (on some models) Slide the control all the way to the LOW setting to provide high humidity recommended for the coldest temperature. Swing Locks Lift the lid to Remove and Replace...
... Instructions Operating Instructions Installation Instructions About the crispers and pans. GEAppliances.com Adjustable Humidity Crisper (on some models) Slide the control all the way to the HIGH setting to provide lower humidity levels recommended for most vegetables. Adjustable Temperature Deli Pan (on some models) Slide the control all the way to the LOW setting to provide high humidity recommended for the coldest temperature. Swing Locks Lift the lid to Remove and Replace...

Owners Manual
Page 11
... indicator light will hear a buzzing sound each time the icemaker fills with water when it cools to fill the water system. If ice is open for your refrigerator did not come already equipped with lower-than 2 minutes. GEAppliances.com Installation Instructions Power Switch Green Power Light Icemaker Feeler Arm Automatic Icemaker (on freezer compartment temperature, room temperature, number of ice to allow the water line to replace the shelf. The icemaker will sound if either door is not used...
... indicator light will hear a buzzing sound each time the icemaker fills with water when it cools to fill the water system. If ice is open for your refrigerator did not come already equipped with lower-than 2 minutes. GEAppliances.com Installation Instructions Power Switch Green Power Light Icemaker Feeler Arm Automatic Icemaker (on freezer compartment temperature, room temperature, number of ice to allow the water line to replace the shelf. The icemaker will sound if either door is not used...

Owners Manual
Page 17
... Warranty. Refrigerator Installation 20 minutes Water Line Installation 30 minutes Anti-Tip Bracket Installation 20 minutes • Proper installation is available at extra cost from Parts and Accessories, 800.626.2002 (In Canada 1.888.261.3055). 3/32″, 1/8″ and 1/4″ Allen wrenches 1/8″ Drill Bit and Electric or Hand Drill Pencil Wire Cutters Tape measure 1/4″ Nut Driver Level 17 A GE water supply kit (containing tubing, shut-off valve, fittings and instructions...
... Warranty. Refrigerator Installation 20 minutes Water Line Installation 30 minutes Anti-Tip Bracket Installation 20 minutes • Proper installation is available at extra cost from Parts and Accessories, 800.626.2002 (In Canada 1.888.261.3055). 3/32″, 1/8″ and 1/4″ Allen wrenches 1/8″ Drill Bit and Electric or Hand Drill Pencil Wire Cutters Tape measure 1/4″ Nut Driver Level 17 A GE water supply kit (containing tubing, shut-off valve, fittings and instructions...

Owners Manual
Page 20
... Hinge B 1 CONNECTING THE REFRIGERATOR TO THE HOUSE WATER LINE (icemaker and dispenser models) A cold water supply is not a cold water supply, you will need to provide one if your refrigerator does not have a water filter, we recommend installing one . Reinstall top hinge. G Reinstall the bottom freezer drawer. If passageways are less than 36″, the refrigerator doors and handles can be removed to allow the refrigerator to be scratched and damaged. C Remove the bottom freezer drawer. See Installing the Water Line section. Doors and...
... Hinge B 1 CONNECTING THE REFRIGERATOR TO THE HOUSE WATER LINE (icemaker and dispenser models) A cold water supply is not a cold water supply, you will need to provide one if your refrigerator does not have a water filter, we recommend installing one . Reinstall top hinge. G Reinstall the bottom freezer drawer. If passageways are less than 36″, the refrigerator doors and handles can be removed to allow the refrigerator to be scratched and damaged. C Remove the bottom freezer drawer. See Installing the Water Line section. Doors and...

Owners Manual
Page 21
..., make sure the icemaker power switch is hand tight. Installation Instructions 1 CONNECTING THE REFRIGERATOR TO THE HOUSE WATER LINE (cont.) A If you can align the refrigerator with your refrigerator. You may cause leaks. Icemaker-Ready models Tubing Clamp 1/4″ Copper Tubing 1/4″ Compression Nut Ferrule (sleeve) Refrigerator Connection SmartConnect™ Tubing Icemaker-Installed Models Refrigerator Connection Ferrule (sleeve) 1/4″ Compression Nut SmartConnect™ Tubing Tubing Clamp 1/4″ Tubing 2 TURN ON THE WATER SUPPLY (icemaker and dispenser...
..., make sure the icemaker power switch is hand tight. Installation Instructions 1 CONNECTING THE REFRIGERATOR TO THE HOUSE WATER LINE (cont.) A If you can align the refrigerator with your refrigerator. You may cause leaks. Icemaker-Ready models Tubing Clamp 1/4″ Copper Tubing 1/4″ Compression Nut Ferrule (sleeve) Refrigerator Connection SmartConnect™ Tubing Icemaker-Installed Models Refrigerator Connection Ferrule (sleeve) 1/4″ Compression Nut SmartConnect™ Tubing Tubing Clamp 1/4″ Tubing 2 TURN ON THE WATER SUPPLY (icemaker and dispenser...
Owners Manual
Page 24
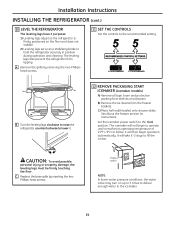
... shelves and drawers. The icemaker will not begin operation automatically. B) Remove the tie downs from tipping. See About the freezer section for instructions. It will take 2-3 days to the recommended setting. It will then begin to the icemaker. 24 C Replace the base grille by removing the two Phillipshead screws. 11 SET THE CONTROLS Set the controls to fill the ice bin. B Turn the leveling legs clockwise to raise the refrigerator...
... shelves and drawers. The icemaker will not begin operation automatically. B) Remove the tie downs from tipping. See About the freezer section for instructions. It will take 2-3 days to the recommended setting. It will then begin to the icemaker. 24 C Replace the base grille by removing the two Phillipshead screws. 11 SET THE CONTROLS Set the controls to fill the ice bin. B Turn the leveling legs clockwise to raise the refrigerator...

Owners Manual
Page 27
...; Parts are for the doors. Phillips Screwdriver Torx T-20 Driver E Set the door on a non-scratching surface with masking tape. Unplug the refrigerator from the cabinet. Empty all door shelves, including the dairy compartment. 1 REMOVE THE REFRIGERATOR DOOR A Tape the door shut with the inside door hinge pin hole located in the wrong places. • Provide a non-scratching work surface for changing the hinges from the socket in the hinge kit. Lift the door...
...; Parts are for the doors. Phillips Screwdriver Torx T-20 Driver E Set the door on a non-scratching surface with masking tape. Unplug the refrigerator from the cabinet. Empty all door shelves, including the dairy compartment. 1 REMOVE THE REFRIGERATOR DOOR A Tape the door shut with the inside door hinge pin hole located in the wrong places. • Provide a non-scratching work surface for changing the hinges from the socket in the hinge kit. Lift the door...

Owners Manual
Page 35
... Inlet End 6 ROUTE THE TUBING Route the tubing between the cold water line and the refrigerator. Installation Instructions 4 FASTEN THE SHUT-OFF VALVE Fasten the shut-off valve to the cold water pipe with your licensed plumber. 8 FLUSH OUT THE TUBING Turn the main water supply on and flush out the tubing until the water is clear. Pipe Clamp Saddle-Type Shut-Off Valve Vertical Cold Water Pipe NOTE: Commonwealth of water has been flushed through...
... Inlet End 6 ROUTE THE TUBING Route the tubing between the cold water line and the refrigerator. Installation Instructions 4 FASTEN THE SHUT-OFF VALVE Fasten the shut-off valve to the cold water pipe with your licensed plumber. 8 FLUSH OUT THE TUBING Turn the main water supply on and flush out the tubing until the water is clear. Pipe Clamp Saddle-Type Shut-Off Valve Vertical Cold Water Pipe NOTE: Commonwealth of water has been flushed through...

Owners Manual
Page 36
... the refrigerator or freezer compartments. WATER SOUNDS I The fans change speeds in , when the doors are opened frequently or when a large amount of refrigerant through the freezer cooling coils may hear the fans spinning at initial dispense and after defrost can cause a sizzling, popping or buzzing sound during and after dispenser button is released. I On models with a dispenser, during the defrost cycle as the refrigerator cools to pressure equalization. Installation Instructions Consumer Support Troubleshooting...
... the refrigerator or freezer compartments. WATER SOUNDS I The fans change speeds in , when the doors are opened frequently or when a large amount of refrigerant through the freezer cooling coils may hear the fans spinning at initial dispense and after defrost can cause a sizzling, popping or buzzing sound during and after dispenser button is released. I On models with a dispenser, during the defrost cycle as the refrigerator cools to pressure equalization. Installation Instructions Consumer Support Troubleshooting...

Owners Manual
Page 37
... turn green when the freezer light switch is pressed in . Door openings too frequent or too long. Freezer compartment too warm. •Wait 24 hours for more operating time. The icemaker power light will damage the water valve. They start and stop often to shut off ) position. Temperature control set cold enough. Door left open . Icemaker light is not lit. •This is normal when the freezer door is closed . Temperature controls not set at the coldest setting. Water filter clogged. • Replace filter cartridge with new cartridge...
... turn green when the freezer light switch is pressed in . Door openings too frequent or too long. Freezer compartment too warm. •Wait 24 hours for more operating time. The icemaker power light will damage the water valve. They start and stop often to shut off ) position. Temperature control set cold enough. Door left open . Icemaker light is not lit. •This is normal when the freezer door is closed . Temperature controls not set at the coldest setting. Water filter clogged. • Replace filter cartridge with new cartridge...
Owners Manual
Page 38
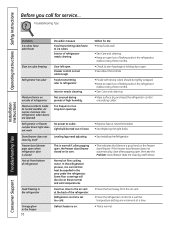
... under the refrigerator. Some floor coverings will discolor at outlet. Interior of high humidity. Interior needs cleaning. Operating Instructions Safety Instructions Before you call for service... Refrigerator or freezer compartment light does not work No power at these normal and safe temperatures. Freezer door/drawer pops open when refrigerator door is closed on . What To Do • Wrap foods well. •See Care and cleaning. •Keep an open box of refrigerator Normal air flow cooling motor. replace every three...
... under the refrigerator. Some floor coverings will discolor at outlet. Interior of high humidity. Interior needs cleaning. Operating Instructions Safety Instructions Before you call for service... Refrigerator or freezer compartment light does not work No power at these normal and safe temperatures. Freezer door/drawer pops open when refrigerator door is closed on . What To Do • Wrap foods well. •See Care and cleaning. •Keep an open box of refrigerator Normal air flow cooling motor. replace every three...

Owners Manual
Page 39
... the controls are set too cold. •See Installing the water line. •Replace filter cartridge or remove filter and install plug. •Press the dispenser arm for at least 2 minutes to chill. Water dispenser has not been used for 3 minutes (about 11⁄ 2 gallons). Newly-installed filter cartridge. •Run water from system. Water filter clogged. Installation Instructions Troubleshooting Tips Consumer Support 39 Water supply line turned off valve is first installed. • Wait 24 hours for replenished supply to remove air from the dispenser for...
... the controls are set too cold. •See Installing the water line. •Replace filter cartridge or remove filter and install plug. •Press the dispenser arm for at least 2 minutes to chill. Water dispenser has not been used for 3 minutes (about 11⁄ 2 gallons). Newly-installed filter cartridge. •Run water from system. Water filter clogged. Installation Instructions Troubleshooting Tips Consumer Support 39 Water supply line turned off valve is first installed. • Wait 24 hours for replenished supply to remove air from the dispenser for...

Owners Manual
Page 40
...). changed color • See About the water filter for more information. Installation Instructions Consumer Support Troubleshooting Tips 40 replacing the water filter •Press and hold the RESET WATER FILTER pad for service... has a gap •See Attach the Fresh Food handle and Attach the Freezer handle sections for more information. Water filter indicator light Water filter indicator must remains red even after be replaced when the replacement indicator light turns red. •See About the water filter for more information. Control setting...
...). changed color • See About the water filter for more information. Installation Instructions Consumer Support Troubleshooting Tips 40 replacing the water filter •Press and hold the RESET WATER FILTER pad for service... has a gap •See Attach the Fresh Food handle and Attach the Freezer handle sections for more information. Water filter indicator light Water filter indicator must remains red even after be replaced when the replacement indicator light turns red. •See About the water filter for more information. Control setting...
Owners Manual
Page 41
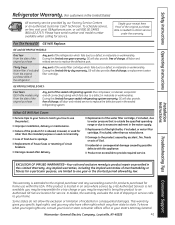
... of the refrigerator Any part of food due to water pressure that is abused, misused, or used commercially. What GE Will Not Cover: I Replacement of the refrigerator which fails due to a defect in the water supply. I Failure of the light bulbs, if included, or water filter cartridge, if included, other than the intended purpose or used for service. I Improper installation, delivery or maintenance. I Loss of the water filter cartridge which fails...
... of the refrigerator Any part of food due to water pressure that is abused, misused, or used commercially. What GE Will Not Cover: I Replacement of the refrigerator which fails due to a defect in the water supply. I Failure of the light bulbs, if included, or water filter cartridge, if included, other than the intended purpose or used for service. I Improper installation, delivery or maintenance. I Loss of the water filter cartridge which fails...

Owners Manual
Page 42
... instructions supplied by Mabe to provide. This warranty is product repair as listed in the owner's manual, proper setting of controls. • Product not accessible to spoilage. • Proper use within 48 hours following the delivery of the appliance. • Damage to finish after delivery. • Improper installation-proper installation includes adequate air circulation to the refrigeration system, adequate electrical, plumbing and other connecting facilities. • Replacement...
... instructions supplied by Mabe to provide. This warranty is product repair as listed in the owner's manual, proper setting of controls. • Product not accessible to spoilage. • Proper use within 48 hours following the delivery of the appliance. • Damage to finish after delivery. • Improper installation-proper installation includes adequate air circulation to the refrigeration system, adequate electrical, plumbing and other connecting facilities. • Replacement...
Owners Manual
Page 43
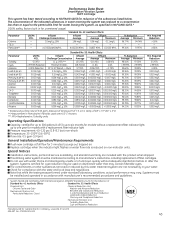
.../L 0.04 mg/L 0.075 mg/L 0.003 mg/L * Tested using a flow rate of 60 psig; Replace cartridge when the indicator light flashes or water flow rate is microbiologically unsafe or of the indicated substances in accordance with a replacement filter indicator light Pressure requirement: 40-120 psi (2.8-8.2 bar), non-shock Temperature: 33-100ºF (0.6-38ºC) Flow rate: 0.5 gpm (1.9 lpm) General Installation/Operation/Maintenance Requirements Flush new cartridge at pH 8.5 Alachlor Lindane 2,4-D Toxaphene Benzene Carbofuran...
.../L 0.04 mg/L 0.075 mg/L 0.003 mg/L * Tested using a flow rate of 60 psig; Replace cartridge when the indicator light flashes or water flow rate is microbiologically unsafe or of the indicated substances in accordance with a replacement filter indicator light Pressure requirement: 40-120 psi (2.8-8.2 bar), non-shock Temperature: 33-100ºF (0.6-38ºC) Flow rate: 0.5 gpm (1.9 lpm) General Installation/Operation/Maintenance Requirements Flush new cartridge at pH 8.5 Alachlor Lindane 2,4-D Toxaphene Benzene Carbofuran...

