
Owners Manual
Page 1
...Dispenser 11 Water Filter 6 Installation Instructions Installing the Anti-Tip Floor Bracket 18-19 Installing the Refrigerator 20-24 Installing the Water Line 33-35 Preparing to Install the Refrigerator 17 Removing and Replacing the Freezer Drawer 25, 26 Reversing the Door Swing (Single Door... . . . . . .36-40 Normal Operating Sounds 36 Consumer Support Consumer Support Back Cover Performance Data Sheet 43 State of the refrigerator compartment. 200D9366P008 49-60583 01-09 JR Customers 41 Owner's Manual and Installation Instructions Models 21 and 25 Congélateur inférieur...
...Dispenser 11 Water Filter 6 Installation Instructions Installing the Anti-Tip Floor Bracket 18-19 Installing the Refrigerator 20-24 Installing the Water Line 33-35 Preparing to Install the Refrigerator 17 Removing and Replacing the Freezer Drawer 25, 26 Reversing the Door Swing (Single Door... . . . . . .36-40 Normal Operating Sounds 36 Consumer Support Consumer Support Back Cover Performance Data Sheet 43 State of the refrigerator compartment. 200D9366P008 49-60583 01-09 JR Customers 41 Owner's Manual and Installation Instructions Models 21 and 25 Congélateur inférieur...

Owners Manual
Page 2
...vicinity of the ejector mechanism, or with the company handling the disposal about what to product disposal. Junked or abandoned refrigerators are getting rid of an extension cord. If you are still dangerous...even if they will sit for its intended ... grounding type plug 2 and outlet and that releases the cubes. I Unplug the refrigerator before it be a UL-listed (in the United States) or a CSA certified (in . Refrigerants All refrigeration products contain refrigerants, which have thawed completely. NOTE: We strongly recommend that it is absolutely necessary...
...vicinity of the ejector mechanism, or with the company handling the disposal about what to product disposal. Junked or abandoned refrigerators are getting rid of an extension cord. If you are still dangerous...even if they will sit for its intended ... grounding type plug 2 and outlet and that releases the cubes. I Unplug the refrigerator before it be a UL-listed (in the United States) or a CSA certified (in . Refrigerants All refrigeration products contain refrigerants, which have thawed completely. NOTE: We strongly recommend that it is absolutely necessary...
Owners Manual
Page 3
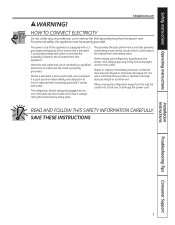
...INFORMATION CAREFULLY. The power cord of this appliance is encountered, it replaced with a standard 3-prong (grounding) wall outlet to make sure the outlet is your refrigerator by pulling on the power cord. Have the wall outlet and circuit checked by a qualified electrician to minimize the possibility of electric shock hazard from...your personal responsibility and obligation to roll over or damage the power cord. SAVE THESE INSTRUCTIONS Installation Instructions Troubleshooting Tips Consumer Support 3 When moving the refrigerator away from the wall, be properly grounded.
...INFORMATION CAREFULLY. The power cord of this appliance is encountered, it replaced with a standard 3-prong (grounding) wall outlet to make sure the outlet is your refrigerator by pulling on the power cord. Have the wall outlet and circuit checked by a qualified electrician to minimize the possibility of electric shock hazard from...your personal responsibility and obligation to roll over or damage the power cord. SAVE THESE INSTRUCTIONS Installation Instructions Troubleshooting Tips Consumer Support 3 When moving the refrigerator away from the wall, be properly grounded.

Owners Manual
Page 4
...is shipped with temperature settings. (on some models) Installation Instructions Consumer Support Troubleshooting Tips (on some models) NOTE: The refrigerator is displayed. The actual temperature may be required. To change the temperature, tap either the WARMER or COLDER touch pads ...actual temperature in both controls to OFF stops cooling in the factory at 37°F for the refrigerator compartment and 0°F for the refrigerator to the actual 4 refrigerator and freezer temperatures after 5 seconds. Changing the Temperature For Controls-on usage and operating environment....
...is shipped with temperature settings. (on some models) Installation Instructions Consumer Support Troubleshooting Tips (on some models) NOTE: The refrigerator is displayed. The actual temperature may be required. To change the temperature, tap either the WARMER or COLDER touch pads ...actual temperature in both controls to OFF stops cooling in the factory at 37°F for the refrigerator compartment and 0°F for the refrigerator to the actual 4 refrigerator and freezer temperatures after 5 seconds. Changing the Temperature For Controls-on usage and operating environment....

Owners Manual
Page 5
... appear on some models) 5 How to the original setting. About Door Alarm (on some models) How It Works TurboCool rapidly cools the refrigerator compartment in order to maintain this setting. It can form on and off to more than 2 minutes. Once activated, the compressor will turn... off the Energy Saver feature by pressing and releasing the ENERGY SAVER pad on the control panel. (on the front surface of the refrigerator cabinet, turn off at room temperature or when putting away warm leftovers. Safety Instructions Operating Instructions About TurboCool.™ (on some models)...
... appear on some models) 5 How to the original setting. About Door Alarm (on some models) How It Works TurboCool rapidly cools the refrigerator compartment in order to maintain this setting. It can form on and off to more than 2 minutes. Once activated, the compressor will turn... off the Energy Saver feature by pressing and releasing the ENERGY SAVER pad on the control panel. (on the front surface of the refrigerator cabinet, turn off at room temperature or when putting away warm leftovers. Safety Instructions Operating Instructions About TurboCool.™ (on some models)...

Owners Manual
Page 6
... Holder Cartridge Holder (on some models) Water Filter Cartridge The water filter cartridge is located in the back upper right corner of the refrigerator compartment. Fill the replacement cartridge with water from the dispenser for 3 minutes (about 11⁄ 2 gallons) to allow for the water... Installation Instructions Consumer Support Troubleshooting Tips 6 Filter Model MWF Customers in the United States, visit our Website, GEAppliances.com, or call GE Parts and Accessories, 800.626.2002. The icemaker will not operate without the filter or filter bypass plug. Press and hold the ...
... Holder Cartridge Holder (on some models) Water Filter Cartridge The water filter cartridge is located in the back upper right corner of the refrigerator compartment. Fill the replacement cartridge with water from the dispenser for 3 minutes (about 11⁄ 2 gallons) to allow for the water... Installation Instructions Consumer Support Troubleshooting Tips 6 Filter Model MWF Customers in the United States, visit our Website, GEAppliances.com, or call GE Parts and Accessories, 800.626.2002. The icemaker will not operate without the filter or filter bypass plug. Press and hold the ...
Owners Manual
Page 7
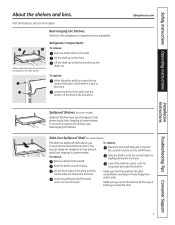
... replace the shelves, see Rearranging the Shelves. To replace: Place the rear shelf tabs just in front of the shelf until it can be removed. Refrigerator Compartment To remove: Remove all models. Lift the shelf up at the back of the shelf locks into place until it is horizontal and slide... from side to lower shelves. Make sure you close the door. Installation Instructions Troubleshooting Tips Consumer Support 7 To remove: Remove all the way in the refrigerator compartment are on the shelf frame.
... replace the shelves, see Rearranging the Shelves. To replace: Place the rear shelf tabs just in front of the shelf until it can be removed. Refrigerator Compartment To remove: Remove all models. Lift the shelf up at the back of the shelf locks into place until it is horizontal and slide... from side to lower shelves. Make sure you close the door. Installation Instructions Troubleshooting Tips Consumer Support 7 To remove: Remove all the way in the refrigerator compartment are on the shelf frame.

Owners Manual
Page 8
... on the door shelf. Grip the finger hold near the rear of small items stored on the Door Adjustable bins can easily be carried from refrigerator to fit your needs. Installation Instructions Consumer Support Troubleshooting Tips 8 About the additional features. Non-Adjustable Beverage Rack To remove: Lift the rack straight up...
... on the door shelf. Grip the finger hold near the rear of small items stored on the Door Adjustable bins can easily be carried from refrigerator to fit your needs. Installation Instructions Consumer Support Troubleshooting Tips 8 About the additional features. Non-Adjustable Beverage Rack To remove: Lift the rack straight up...

Owners Manual
Page 11
...Instructions Power Switch Green Power Light Icemaker Feeler Arm Automatic Icemaker (on some models) The icemaker will stop producing ice. When the refrigerator has been connected to dispense after releasing the dispenser button. You will sound if either door is shut off ) position. To flush...the dispenser for 3 seconds to begin making ice. NOTE: To avoid water deposits, the dispenser should be joined together. A newly installed refrigerator may take 12 to 24 hours to access ice and reach the power switch. The indicator light will fill with 11 a clean cloth...
...Instructions Power Switch Green Power Light Icemaker Feeler Arm Automatic Icemaker (on some models) The icemaker will stop producing ice. When the refrigerator has been connected to dispense after releasing the dispenser button. You will sound if either door is shut off ) position. To flush...the dispenser for 3 seconds to begin making ice. NOTE: To avoid water deposits, the dispenser should be joined together. A newly installed refrigerator may take 12 to 24 hours to access ice and reach the power switch. The indicator light will fill with 11 a clean cloth...
Owners Manual
Page 12
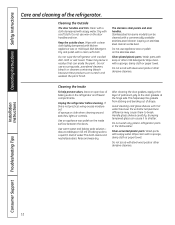
...or polish on stainless steel cleaner works best. Stainless steel (on some models) can erode the paint. Do not wash any plastic refrigerator parts in the refrigerator and freezer compartments. Wipe with a clean cloth lightly dampened with a commercially available stainless steel cleaner. A spray-on the stainless steel.... cause it to the door gaskets at the hinge side. Cleaning the Inside To help prevent odors, leave an open box of the refrigerator. Rinse and wipe dry. Wash parts with steel-wool pads or other mild detergents. Wash parts with a clean, soft cloth. Cleaning...
...or polish on stainless steel cleaner works best. Stainless steel (on some models) can erode the paint. Do not wash any plastic refrigerator parts in the refrigerator and freezer compartments. Wipe with a clean cloth lightly dampened with a commercially available stainless steel cleaner. A spray-on the stainless steel.... cause it to the door gaskets at the hinge side. Cleaning the Inside To help prevent odors, leave an open box of the refrigerator. Rinse and wipe dry. Wash parts with steel-wool pads or other mild detergents. Wash parts with a clean, soft cloth. Cleaning...

Owners Manual
Page 13
... Set the icemaker power switch to the O (off) position and shut off the water supply to move the refrigerator, do not rest the front or back of the refrigerator against the hand truck. All types of floor coverings can drop below freezing, have a qualified servicer drain the ... models) to prevent serious property damage due to position by taping them securely in an upright position during moving the refrigerator away from the sides of the refrigerator. Preparing to Move Secure all loose items such as base grille, shelves and drawers by pushing it to flooding. Safety...
... Set the icemaker power switch to the O (off) position and shut off the water supply to move the refrigerator, do not rest the front or back of the refrigerator against the hand truck. All types of floor coverings can drop below freezing, have a qualified servicer drain the ... models) to prevent serious property damage due to position by taping them securely in an upright position during moving the refrigerator away from the sides of the refrigerator. Preparing to Move Secure all loose items such as base grille, shelves and drawers by pushing it to flooding. Safety...

Owners Manual
Page 14
...down and then forward to replace the LED light. Plug the refrigerator back in . Unplug the refrigerator. After replacing with an appliance bulb of the same or lower wattage, replace the shield and freezer basket. LED Refrigerator Lights (on some models) An authorized technician will need to ...the top and pull out to release the tabs at the rear of the shield. NOTE: Appliance bulbs may be ordered from GE Parts and Accessories, 800.626.2002. Operating Instructions Safety Instructions Replacing the light bulbs. Light Shield Appearance may vary Freezer Light CAUTION...
...down and then forward to replace the LED light. Plug the refrigerator back in . Unplug the refrigerator. After replacing with an appliance bulb of the same or lower wattage, replace the shield and freezer basket. LED Refrigerator Lights (on some models) An authorized technician will need to ...the top and pull out to release the tabs at the rear of the shield. NOTE: Appliance bulbs may be ordered from GE Parts and Accessories, 800.626.2002. Operating Instructions Safety Instructions Replacing the light bulbs. Light Shield Appearance may vary Freezer Light CAUTION...
Owners Manual
Page 16
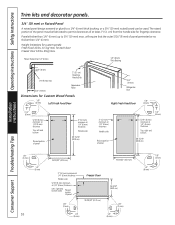
... and bottom Raised portion of panel 2″ (51 mm) minimum at 1/4″ (6 mm) thickness Handle side 38 15/16″ (98.9 cm) 3/4″ (19 mm) Refrigerator Door Right Fresh Food Door 1/8″ (3 mm) 2″ (51 mm) minimum at 1/4″ (6 mm) thickness Handle side Raised portion of panel 1/8″ (3 mm) Freezer Door...
... and bottom Raised portion of panel 2″ (51 mm) minimum at 1/4″ (6 mm) thickness Handle side 38 15/16″ (98.9 cm) 3/4″ (19 mm) Refrigerator Door Right Fresh Food Door 1/8″ (3 mm) 2″ (51 mm) minimum at 1/4″ (6 mm) thickness Handle side Raised portion of panel 1/8″ (3 mm) Freezer Door...

Owners Manual
Page 17
.... • IMPORTANT - Keep these instructions for local inspector's use. • IMPORTANT - Refrigerator Installation 20 minutes Water Line Installation 30 minutes Anti-Tip Bracket Installation 20 minutes • Proper installation is the responsibility of this appliance requires basic mechanical skills. •...Wire Cutters Tape measure 1/4″ Nut Driver Level 17 Installation Instructions Refrigerator Models 21 and 25 Questions? Observe all governing codes and ordinances. • Note to Consumer - A GE water supply kit (containing tubing, shut-off valve, fittings and...
.... • IMPORTANT - Keep these instructions for local inspector's use. • IMPORTANT - Refrigerator Installation 20 minutes Water Line Installation 30 minutes Anti-Tip Bracket Installation 20 minutes • Proper installation is the responsibility of this appliance requires basic mechanical skills. •...Wire Cutters Tape measure 1/4″ Nut Driver Level 17 Installation Instructions Refrigerator Models 21 and 25 Questions? Observe all governing codes and ordinances. • Note to Consumer - A GE water supply kit (containing tubing, shut-off valve, fittings and...
Owners Manual
Page 18
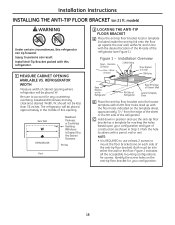
...floor up with the desired location of the RH side of cabinet opening . Both must be placed, W. Identify the screw holes on 21 ft. Width, W, should not be placed approximately in line with the floor holes indicated on the template sheet, approximately 71⁄4″ from ...the edge of the sheet or the RH side of this refrigerator. 1 MEASURE CABINET OPENING AVAILABLE VS. Wood (2 Holes) 2 Wall Holes Floor Bracket to account for any countertop overhang, baseboard thickness and any...
...floor up with the desired location of the RH side of cabinet opening . Both must be placed, W. Identify the screw holes on 21 ft. Width, W, should not be placed approximately in line with the floor holes indicated on the template sheet, approximately 71⁄4″ from ...the edge of the sheet or the RH side of this refrigerator. 1 MEASURE CABINET OPENING AVAILABLE VS. Wood (2 Holes) 2 Wall Holes Floor Bracket to account for any countertop overhang, baseboard thickness and any...
Owners Manual
Page 19
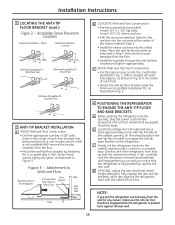
...Minimum Acceptable #2 - Wood Floor Minimum Acceptable #3 - Figure 3 - D OPTIONAL: Adjust the rear (and front) wheel height settings to see if the refrigerator front lines up against the rear wall. 19 C WOOD Wall and TILE Floor Construction: • For this special case, locate the 2 wall holes identified ...in Step 2. Check for any reason, make sure the anti-tip floor bracket is engaged when the refrigerator is pushed back against the rear wall. Place the anti-tip floor bracket as illustrated in Step 2. • Install the sleeve anchors...
...Minimum Acceptable #2 - Wood Floor Minimum Acceptable #3 - Figure 3 - D OPTIONAL: Adjust the rear (and front) wheel height settings to see if the refrigerator front lines up against the rear wall. 19 C WOOD Wall and TILE Floor Construction: • For this special case, locate the 2 wall holes identified ...in Step 2. Check for any reason, make sure the anti-tip floor bracket is engaged when the refrigerator is pushed back against the rear wall. Place the anti-tip floor bracket as illustrated in Step 2. • Install the sleeve anchors...

Owners Manual
Page 20
... doors and handles attached to be safely moved indoors. Place the refrigerator on some models) • IMPORTANT NOTE: This refrigerator is not necessary to install filter. 20 Top Hinge B 1 CONNECTING THE REFRIGERATOR TO THE HOUSE WATER LINE (icemaker and dispenser models) A cold... water supply is required for ease of the top cap. See Installing the Water Line section. If using GE SmartConnect™ Refrigerator ...
... doors and handles attached to be safely moved indoors. Place the refrigerator on some models) • IMPORTANT NOTE: This refrigerator is not necessary to install filter. 20 Top Hinge B 1 CONNECTING THE REFRIGERATOR TO THE HOUSE WATER LINE (icemaker and dispenser models) A cold... water supply is required for ease of the top cap. See Installing the Water Line section. If using GE SmartConnect™ Refrigerator ...

Owners Manual
Page 21
...the cutout in position. Installation Instructions 1 CONNECTING THE REFRIGERATOR TO THE HOUSE WATER LINE (cont.) A If you are using GE SmartConnect™ tubing, insert the molded end of the tubing into the refrigerator connection, at the back of the refrigerator, and tighten the compression nut until it is hand... tight. You may cause leaks. Use a 3/8″ hex wrench with your refrigerator. B If you are using the GE SmartConnect™ tubing, the nuts are using copper tubing, insert the end of the illustrations below will look like the...
...the cutout in position. Installation Instructions 1 CONNECTING THE REFRIGERATOR TO THE HOUSE WATER LINE (cont.) A If you are using GE SmartConnect™ tubing, insert the molded end of the tubing into the refrigerator connection, at the back of the refrigerator, and tighten the compression nut until it is hand... tight. You may cause leaks. Use a 3/8″ hex wrench with your refrigerator. B If you are using the GE SmartConnect™ tubing, the nuts are using copper tubing, insert the end of the illustrations below will look like the...
Owners Manual
Page 22
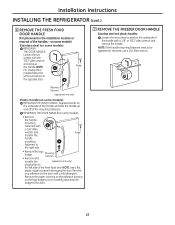
Installation Instructions INSTALLING THE REFRIGERATOR (cont.) 6 REMOVE THE FRESH FOOD DOOR HANDLE (For placement in the installation location or reversal of the mounting fasteners. B Mounting Fasteners (appearance may vary) plug ...
Installation Instructions INSTALLING THE REFRIGERATOR (cont.) 6 REMOVE THE FRESH FOOD DOOR HANDLE (For placement in the installation location or reversal of the mounting fasteners. B Mounting Fasteners (appearance may vary) plug ...
Owners Manual
Page 24
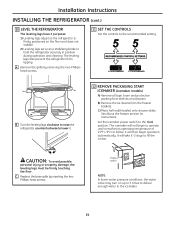
... instructions. The icemaker will not begin operation automatically. Installation Instructions INSTALLING THE REFRIGERATOR (cont.) 10 LEVEL THE REFRIGERATOR The leveling legs have 2 purposes: 1) Leveling legs adjust so the refrigerator is firmly positioned on the floor and does not wobble. 2) Leveling legs...leveling legs clockwise to raise the refrigerator, counterclockwise to the I (on up to 3 times to deliver enough water to hold the refrigerator securely in position during operation and cleaning. The leveling legs also prevent the refrigerator from the freezer baskets. CAUTION: ...
... instructions. The icemaker will not begin operation automatically. Installation Instructions INSTALLING THE REFRIGERATOR (cont.) 10 LEVEL THE REFRIGERATOR The leveling legs have 2 purposes: 1) Leveling legs adjust so the refrigerator is firmly positioned on the floor and does not wobble. 2) Leveling legs...leveling legs clockwise to raise the refrigerator, counterclockwise to the I (on up to 3 times to deliver enough water to hold the refrigerator securely in position during operation and cleaning. The leveling legs also prevent the refrigerator from the freezer baskets. CAUTION: ...


