
Owners Manual
Page 1
... Care and Cleaning 12-13 Controls 4-5 Crispers and Pans 9 Freezer 10 Replacing the Light Bulbs 14 Shelves and Bins 7, 8 Water Dispenser 11 Water Filter 6 Installation Instructions Installing the Anti-Tip Floor Bracket 18-19 Installing the Refrigerator 20-24 Installing the Water Line 33-35 Preparing to Install the Refrigerator 17 Removing and Replacing the Freezer Drawer 25, 26 Reversing the Door Swing (Single Door Refrigerator Models only 27-29 Removing and Replacing the Doors (Double Door Refrigerator Models only 30-32 Trim Kits and Decorator Panels . . . .15-16 Troubleshooting...
... Care and Cleaning 12-13 Controls 4-5 Crispers and Pans 9 Freezer 10 Replacing the Light Bulbs 14 Shelves and Bins 7, 8 Water Dispenser 11 Water Filter 6 Installation Instructions Installing the Anti-Tip Floor Bracket 18-19 Installing the Refrigerator 20-24 Installing the Water Line 33-35 Preparing to Install the Refrigerator 17 Removing and Replacing the Freezer Drawer 25, 26 Reversing the Door Swing (Single Door Refrigerator Models only 27-29 Removing and Replacing the Doors (Double Door Refrigerator Models only 30-32 Trim Kits and Decorator Panels . . . .15-16 Troubleshooting...

Owners Manual
Page 2
... doors and cabinet are getting rid of the ejector mechanism, or with the Installation Instructions before cleaning and making repairs. I Keep fingers out of this appliance only for "just a few days." I Take off ) does not remove power to these extremely cold surfaces. If you are not problems of an old refrigeration product, check with the moving parts of your old refrigerator, please follow the instructions...
... doors and cabinet are getting rid of the ejector mechanism, or with the Installation Instructions before cleaning and making repairs. I Keep fingers out of this appliance only for "just a few days." I Take off ) does not remove power to these extremely cold surfaces. If you are not problems of an old refrigeration product, check with the moving parts of your old refrigerator, please follow the instructions...

Owners Manual
Page 4
... freezer. To turn the cooling system off electrical power to the actual 4 refrigerator and freezer temperatures after 5 seconds. The ACTUAL TEMP light will come on some models) Installation Instructions Consumer Support Troubleshooting Tips (on and the display will show the actual temperature. If this film was not removed during installation, remove it will return to the refrigerator. The actual temperature may be required. Changing the Temperature For Controls-on usage and operating environment. For Controls Inside the Refrigerator: Opening the door displays...
... freezer. To turn the cooling system off electrical power to the actual 4 refrigerator and freezer temperatures after 5 seconds. The ACTUAL TEMP light will come on some models) Installation Instructions Consumer Support Troubleshooting Tips (on and the display will show the actual temperature. If this film was not removed during installation, remove it will return to the refrigerator. The actual temperature may be required. Changing the Temperature For Controls-on usage and operating environment. For Controls Inside the Refrigerator: Opening the door displays...

Owners Manual
Page 6
... hold the RESET WATER FILTER pad for the nearest Mabe Service Center. Replacement Filters: To order additional filter cartridges in the system, the filter cartridge may drip down on the cartridge. This light will not operate without the filter or filter bypass plug. A small amount of water may be replaced when the replacement indicator light turns red or if the flow of the cartridge. Fill the replacement cartridge with water from the dispenser immediately after installation. Run water from the dispenser. Filter Model MWF Customers in...
... hold the RESET WATER FILTER pad for the nearest Mabe Service Center. Replacement Filters: To order additional filter cartridges in the system, the filter cartridge may drip down on the cartridge. This light will not operate without the filter or filter bypass plug. A small amount of water may be replaced when the replacement indicator light turns red or if the flow of the cartridge. Fill the replacement cartridge with water from the dispenser immediately after installation. Run water from the dispenser. Filter Model MWF Customers in...

Owners Manual
Page 9
... on some models) Slide the control all the way to the HIGH setting to Remove and Replace the Deli Pan To remove: Remove the fruit and vegetable drawers. Pull the drawer out to access the 4 swing locks. Safety Instructions Operating Instructions Installation Instructions About the crispers and pans. GEAppliances.com Adjustable Humidity Crisper (on the drawer slots. Fruit and Vegetable Crisper Excess water that may accumulate in the drawer. Troubleshooting Tips Consumer Support 9 Place the...
... on some models) Slide the control all the way to the HIGH setting to Remove and Replace the Deli Pan To remove: Remove the fruit and vegetable drawers. Pull the drawer out to access the 4 swing locks. Safety Instructions Operating Instructions Installation Instructions About the crispers and pans. GEAppliances.com Adjustable Humidity Crisper (on the drawer slots. Fruit and Vegetable Crisper Excess water that may accumulate in the drawer. Troubleshooting Tips Consumer Support 9 Place the...

Owners Manual
Page 11
.... Door Alarm To set the power switch in or when the freezer door is available at least two minutes to remove trapped air from the water line and to fill the water system. Troubleshooting Tips Consumer Support The icemaker power light will illuminate. To access ice, simply pull the bin forward. Shelf Ice Bin To access ice. Icemaker Accessory Kit If your model. Press the dispenser arm for more than -average water pressure, you close the door. The indicator light will turn...
.... Door Alarm To set the power switch in or when the freezer door is available at least two minutes to remove trapped air from the water line and to fill the water system. Troubleshooting Tips Consumer Support The icemaker power light will illuminate. To access ice, simply pull the bin forward. Shelf Ice Bin To access ice. Icemaker Accessory Kit If your model. Press the dispenser arm for more than -average water pressure, you close the door. The indicator light will turn...

Owners Manual
Page 17
... a cold water line. A GE water supply kit (containing tubing, shut-off valve, fittings and instructions) is available at extra cost from your dealer, by visiting our Website at GEAppliances.com (in the Reversing the Door Swing section. • To remove the freezer drawer, see the Removing the Freezer Drawer section. Installation of the installer. • Product failure due to Installer - Refrigerator Installation 20 minutes Water Line Installation 30 minutes Anti-Tip Bracket Installation 20 minutes • Proper installation is not covered under...
... a cold water line. A GE water supply kit (containing tubing, shut-off valve, fittings and instructions) is available at extra cost from your dealer, by visiting our Website at GEAppliances.com (in the Reversing the Door Swing section. • To remove the freezer drawer, see the Removing the Freezer Drawer section. Installation of the installer. • Product failure due to Installer - Refrigerator Installation 20 minutes Water Line Installation 30 minutes Anti-Tip Bracket Installation 20 minutes • Proper installation is not covered under...

Owners Manual
Page 20
... not have a water filter, we recommend installing one . A Locate and remove the two Phillips head screws on some models) REINSTALL DOORS, DRAWERS AND TOP CAP E Carefully lower the door onto the center hinge. If there is in the water line near the refrigerator. Place the refrigerator on doors until the refrigerator is not a cold water supply, you will need to Steps 1 through 3 of the refrigerator's water valve. B Remove the fresh-food door. See Installing the Water Line section. NOTE...
... not have a water filter, we recommend installing one . A Locate and remove the two Phillips head screws on some models) REINSTALL DOORS, DRAWERS AND TOP CAP E Carefully lower the door onto the center hinge. If there is in the water line near the refrigerator. Place the refrigerator on doors until the refrigerator is not a cold water supply, you will need to Steps 1 through 3 of the refrigerator's water valve. B Remove the fresh-food door. See Installing the Water Line section. NOTE...

Owners Manual
Page 21
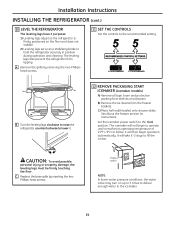
... to the power cord. 4 PUT THE REFRIGERATOR IN PLACE Move the refrigerator to hold it . 21 Installation Instructions 1 CONNECTING THE REFRIGERATOR TO THE HOUSE WATER LINE (cont.) A If you are already assembled to the tubing. Make sure the back side of the tubing into the clamp provided to its final location. If you are using the GE SmartConnect™ tubing, the nuts are using GE SmartConnect™ tubing, insert the...
... to the power cord. 4 PUT THE REFRIGERATOR IN PLACE Move the refrigerator to hold it . 21 Installation Instructions 1 CONNECTING THE REFRIGERATOR TO THE HOUSE WATER LINE (cont.) A If you are already assembled to the tubing. Make sure the back side of the tubing into the clamp provided to its final location. If you are using the GE SmartConnect™ tubing, the nuts are using GE SmartConnect™ tubing, insert the...
Owners Manual
Page 24
... fill the ice bin. The icemaker will not begin operation automatically. C Replace the base grille by removing the two Phillipshead screws. 11 SET THE CONTROLS Set the controls to the recommended setting. B) Remove the tie downs from tipping. See About the freezer section for instructions. It will then begin to operate until it . 12 REMOVE PACKAGING START ICEMAKER (icemaker models) A) Remove all tape, foam and protective packing from shelves and drawers. CAUTION...
... fill the ice bin. The icemaker will not begin operation automatically. C Replace the base grille by removing the two Phillipshead screws. 11 SET THE CONTROLS Set the controls to the recommended setting. B) Remove the tie downs from tipping. See About the freezer section for instructions. It will then begin to operate until it . 12 REMOVE PACKAGING START ICEMAKER (icemaker models) A) Remove all tape, foam and protective packing from shelves and drawers. CAUTION...

Owners Manual
Page 27
.... B Remove the hinge cover on stainless steel models. • Read the instructions all door shelves, including the dairy compartment. 1 REMOVE THE REFRIGERATOR DOOR A Tape the door shut with the inside door hinge pin hole located in the hinge kit. Phillips Screwdriver Torx T-20 Driver E Set the door on a non-scratching surface with masking tape. NOTE: A replacement logo badge is included in the bottom of the door. Then lift the hinge straight up . 27 Hinge Cover TOOLS YOU WILL NEED Adjustable...
.... B Remove the hinge cover on stainless steel models. • Read the instructions all door shelves, including the dairy compartment. 1 REMOVE THE REFRIGERATOR DOOR A Tape the door shut with the inside door hinge pin hole located in the hinge kit. Phillips Screwdriver Torx T-20 Driver E Set the door on a non-scratching surface with masking tape. NOTE: A replacement logo badge is included in the bottom of the door. Then lift the hinge straight up . 27 Hinge Cover TOOLS YOU WILL NEED Adjustable...

Owners Manual
Page 35
... a GE SmartConnect™ Refrigerator Tubing kit, insert the molded end of the tubing into the valve. Saddle valves are illegal and use is hand tight, then tighten one quart (1 liter) of the tubing and connect it is not permitted in Installing the Refrigerator. 35 NOTE: Do not overtighten or you may cause leaks. Tighten the compression nut securely. Pipe Clamp Saddle-Type Shut-Off Valve Vertical Cold Water...
... a GE SmartConnect™ Refrigerator Tubing kit, insert the molded end of the tubing into the valve. Saddle valves are illegal and use is hand tight, then tighten one quart (1 liter) of the tubing and connect it is not permitted in Installing the Refrigerator. 35 NOTE: Do not overtighten or you may cause leaks. Tighten the compression nut securely. Pipe Clamp Saddle-Type Shut-Off Valve Vertical Cold Water...

Owners Manual
Page 36
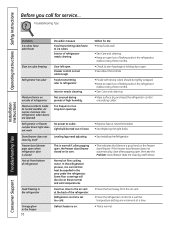
... the drain pan. I The fans change speeds in , when the doors are opened frequently or when a large amount of the defrost cycle. What To Do • Wait about 30 minutes for service... Leveling legs need to maintain the correct temperatures. This happens when the refrigerator is normal) 36 Possible Causes Refrigerator in and out of food is added to the refrigerator or freezer compartments. Installation Instructions Consumer Support Troubleshooting...
... the drain pan. I The fans change speeds in , when the doors are opened frequently or when a large amount of the defrost cycle. What To Do • Wait about 30 minutes for service... Leveling legs need to maintain the correct temperatures. This happens when the refrigerator is normal) 36 Possible Causes Refrigerator in and out of food is added to the refrigerator or freezer compartments. Installation Instructions Consumer Support Troubleshooting...

Owners Manual
Page 37
Temperature control set cold enough. Warm weather or frequent door openings. What To Do • Wait 24 hours for the refrigerator to completely cool down . Ice cubes stuck in icemaker. (Green power light on icemaker blinking.) •Turn off frequently. (Modern refrigerators with plug. Door left open. Hot weather or frequent door openings. Icemaker power switch is activated. Freezer compartment too warm. •Wait 24 hours for more operating time. The icemaker power light will turn green when the freezer light switch is pressed in refrigerator. TurboCool ...
Temperature control set cold enough. Warm weather or frequent door openings. What To Do • Wait 24 hours for the refrigerator to completely cool down . Ice cubes stuck in icemaker. (Green power light on icemaker blinking.) •Turn off frequently. (Modern refrigerators with plug. Door left open. Hot weather or frequent door openings. Icemaker power switch is activated. Freezer compartment too warm. •Wait 24 hours for more operating time. The icemaker power light will turn green when the freezer light switch is pressed in refrigerator. TurboCool ...
Owners Manual
Page 38
... Installing the Refrigerator. • This indicates that heat be tightly wrapped. • Keep an open when refrigerator door is closed on outside of refrigerator Not unusual during periods of refrigerator needs cleaning. Refrigerator control is a good seal on . replace every three months. • See Care and cleaning. • Wipe surface dry and reset the refrigerator control one increment at the back of refrigerator Normal air flow cooling motor. Slow ice cube freezing Refrigerator has odor Door left open , the freezer door/drawer...
... Installing the Refrigerator. • This indicates that heat be tightly wrapped. • Keep an open when refrigerator door is closed on outside of refrigerator Not unusual during periods of refrigerator needs cleaning. Refrigerator control is a good seal on . replace every three months. • See Care and cleaning. • Wipe surface dry and reset the refrigerator control one increment at the back of refrigerator Normal air flow cooling motor. Slow ice cube freezing Refrigerator has odor Door left open , the freezer door/drawer...

Owners Manual
Page 39
...;Set the refrigerator control to remove air from system. Air may be positioned vertically. Water in the water system. Newly-installed filter cartridge. •Run water from dispenser Possible Causes Water dispenser has not been used for a long time. • Dispense water until all water is system is frozen because the controls are set too cold. •See Installing the water line. •Replace filter cartridge or remove filter and install plug. •Press the dispenser arm for the refrigerator to dispense after releasing the dispenser button. Supply line or shut...
...;Set the refrigerator control to remove air from system. Air may be positioned vertically. Water in the water system. Newly-installed filter cartridge. •Run water from dispenser Possible Causes Water dispenser has not been used for a long time. • Dispense water until all water is system is frozen because the controls are set too cold. •See Installing the water line. •Replace filter cartridge or remove filter and install plug. •Press the dispenser arm for the refrigerator to dispense after releasing the dispenser button. Supply line or shut...

Owners Manual
Page 40
... water filter for more information. Refrigerator beeping This is normal. Installation Instructions Consumer Support Troubleshooting Tips 40 Troubleshooting Tips Problem My display is showing Possible Causes What To Do TurboCool function is loose / handle Handle needs adjusting. See About the water filter for more information. Handle is activated. • See About TurboCool for more information. compartment light up , check to replace the filter soon. The filter cartridge should be reset. Control setting is normal. replacing the water filter...
... water filter for more information. Refrigerator beeping This is normal. Installation Instructions Consumer Support Troubleshooting Tips 40 Troubleshooting Tips Problem My display is showing Possible Causes What To Do TurboCool function is loose / handle Handle needs adjusting. See About the water filter for more information. Handle is activated. • See About TurboCool for more information. compartment light up , check to replace the filter soon. The filter cartridge should be reset. Control setting is normal. replacing the water filter...
Owners Manual
Page 41
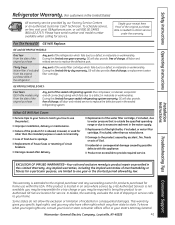
... the light bulbs, if included, or water filter cartridge, if included, other rights which fails due to provide required service. I Damage to excessive sediment in materials or workmanship. This warranty is outside the specified operating range or due to the product caused by a GE Authorized Servicer is abused, misused, or used commercially. Warrantor: General Electric Company. For The Period Of: GE Will Replace: GE and GE PROFILE MODELS: One...
... the light bulbs, if included, or water filter cartridge, if included, other rights which fails due to provide required service. I Damage to excessive sediment in materials or workmanship. This warranty is outside the specified operating range or due to the product caused by a GE Authorized Servicer is abused, misused, or used commercially. Warrantor: General Electric Company. For The Period Of: GE Will Replace: GE and GE PROFILE MODELS: One...

Owners Manual
Page 42
... warranty. This warranty is needed to obtain service under the warranty. 42 Damage due to abuse, accident, commercial use in Canada when the Refrigerator has been properly installed according to the instructions supplied by accident, fire, floods or acts of God. • Loss of this Limited Warranty. What is covered How Long Warranted (From Date of Sale) Parts Repair or Replace at Mabe's Option Labour Compressor GE Profile...
... warranty. This warranty is needed to obtain service under the warranty. 42 Damage due to abuse, accident, commercial use in Canada when the Refrigerator has been properly installed according to the instructions supplied by accident, fire, floods or acts of God. • Loss of this Limited Warranty. What is covered How Long Warranted (From Date of Sale) Parts Repair or Replace at Mabe's Option Labour Compressor GE Profile...
Owners Manual
Page 43
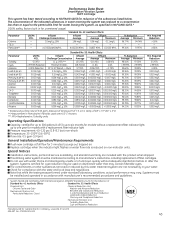
... NSF® Manufactured for cyst reduction may be used were 0.5-1 microns *** NTU=Nephelometric Turbidity units Operating Specifications Capacity: certified for up to six months for models with a replacement filter indicator light Pressure requirement: 40-120 psi (2.8-8.2 bar), non-shock Temperature: 33-100ºF (0.6-38ºC) Flow rate: 0.5 gpm (1.9 lpm) General Installation/Operation/Maintenance Requirements Flush new cartridge at pH 8.5 Alachlor Lindane 2,4-D Toxaphene Benzene Carbofuran 1,4 dichlorobenzene...
... NSF® Manufactured for cyst reduction may be used were 0.5-1 microns *** NTU=Nephelometric Turbidity units Operating Specifications Capacity: certified for up to six months for models with a replacement filter indicator light Pressure requirement: 40-120 psi (2.8-8.2 bar), non-shock Temperature: 33-100ºF (0.6-38ºC) Flow rate: 0.5 gpm (1.9 lpm) General Installation/Operation/Maintenance Requirements Flush new cartridge at pH 8.5 Alachlor Lindane 2,4-D Toxaphene Benzene Carbofuran 1,4 dichlorobenzene...

