
Quick Specs
Page 1
... Steel PEB7227SLSS Stainless Steel Slate Stainless Steel Slate TRIM KIT JX7227BLTS JX7230BLTS JX7227SLSS JX7227ELES JX7230SLSS JX7230ELES SIZE 27" 30" 27" 27" 30" 30" Z MAX. receptacle in installation of...GE Profile™ Series 2.2 Cu. approved for installing unit described. NOTE: 120V, 60-cycle, grounded power receptacle location optional on all sides Accessory Trim Kits Z Max Height Trim Kits 30" 29 3/4" 19" JX2130SLSS 27" 26 7/8" 19" JX2127SLSS For answers to 25 5/8" A C B TKriimt Base Pan 16 3/4" ± 1/8" 22" min. Before installing, consult installation instructions...
... Steel PEB7227SLSS Stainless Steel Slate Stainless Steel Slate TRIM KIT JX7227BLTS JX7230BLTS JX7227SLSS JX7227ELES JX7230SLSS JX7230ELES SIZE 27" 30" 27" 27" 30" 30" Z MAX. receptacle in installation of...GE Profile™ Series 2.2 Cu. approved for installing unit described. NOTE: 120V, 60-cycle, grounded power receptacle location optional on all sides Accessory Trim Kits Z Max Height Trim Kits 30" 29 3/4" 19" JX2130SLSS 27" 26 7/8" 19" JX2127SLSS For answers to 25 5/8" A C B TKriimt Base Pan 16 3/4" ± 1/8" 22" min. Before installing, consult installation instructions...

Installation Instructions
Page 1
... to any single electric wall oven. tipped Screws 24 (19 required for installation) 6 (4 required for installation alone or above any range, cooktop, gas oven, or other microwave. Keep these instructions completely and carefully. • IMPORTANT - Observe all governing codes and ordinances.... • Note to the service panel. When the service disconnecting means cannot be plugged into a properly grounded 3-hole, 120 volt receptacle as a tag, to Installer - Call GE ...
... to any single electric wall oven. tipped Screws 24 (19 required for installation) 6 (4 required for installation alone or above any range, cooktop, gas oven, or other microwave. Keep these instructions completely and carefully. • IMPORTANT - Observe all governing codes and ordinances.... • Note to the service panel. When the service disconnecting means cannot be plugged into a properly grounded 3-hole, 120 volt receptacle as a tag, to Installer - Call GE ...
Installation Instructions
Page 2
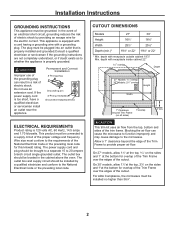
... an escape wire for overlap of the Trim Frame over the edges of the cutout. depth with a grounding plug. Installation Instructions GROUNDING INSTRUCTIONS This appliance must be installed no higher than 361»4". 2 The outlet box should be located in a risk of the cutout. On 27"... If the power supply cord is 120 volts AC, 60 Hertz, 14.5 amps and 1.70 kilowatts. Permanent and Correct Installation 3-Prong plug Grounding pin 3-Prong receptacle Grounded receptacle box ELECTRICAL REQUIREMENTS Product rating is too short, have a qualified electrician or serviceman...
... an escape wire for overlap of the Trim Frame over the edges of the cutout. depth with a grounding plug. Installation Instructions GROUNDING INSTRUCTIONS This appliance must be installed no higher than 361»4". 2 The outlet box should be located in a risk of the cutout. On 27"... If the power supply cord is 120 volts AC, 60 Hertz, 14.5 amps and 1.70 kilowatts. Permanent and Correct Installation 3-Prong plug Grounding pin 3-Prong receptacle Grounded receptacle box ELECTRICAL REQUIREMENTS Product rating is too short, have a qualified electrician or serviceman...
Installation Instructions
Page 3
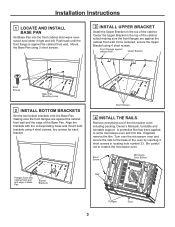
Installation Instructions 1 LOCATE AND INSTALL BASE PAN Set Base Pan into the front cabinet microwave oven cutout and center it right and left. Once centered, secure the Upper Bracket using 3 short screws. 3 INSTALL UPPER BRACKET Install the Upper Bracket on the top of Base Pan Bottom Brackets Flanges Door 3 ... bracket. Mount the Base Pan using 4 short screws. A protective film has been applied to scratch the microwave oven. Short Screws 4 INSTALL THE RAILS Remove everything out of the oven by inserting 4 short screws in the top of the Base Pan. Align the brackets with ...
Installation Instructions 1 LOCATE AND INSTALL BASE PAN Set Base Pan into the front cabinet microwave oven cutout and center it right and left. Once centered, secure the Upper Bracket using 3 short screws. 3 INSTALL UPPER BRACKET Install the Upper Bracket on the top of Base Pan Bottom Brackets Flanges Door 3 ... bracket. Mount the Base Pan using 4 short screws. A protective film has been applied to scratch the microwave oven. Short Screws 4 INSTALL THE RAILS Remove everything out of the oven by inserting 4 short screws in the top of the Base Pan. Align the brackets with ...
Installation Instructions
Page 4
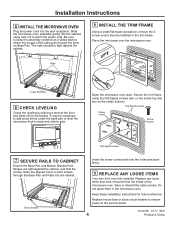
... Rails into the holes and push firmly. 9 REPLACE ANY LOOSE ITEMS Your trim kit is now fully installed. Place the trim frame over the microwave oven. Keep these installation instructions for future reference. Rails Lower Brackets 6 CHECK LEVELING Check the leveling by placing a level at the ... microwave oven door. Drive 4 short screws through the slots on the inside of the microwave. Save or discard the extra screws. Installation Instructions 5 INSTALL THE MICROWAVE OVEN Plug the power cord into the cabinet, using four flat-tipped screws (two on the inside top and two on...
... Rails into the holes and push firmly. 9 REPLACE ANY LOOSE ITEMS Your trim kit is now fully installed. Place the trim frame over the microwave oven. Keep these installation instructions for future reference. Rails Lower Brackets 6 CHECK LEVELING Check the leveling by placing a level at the ... microwave oven door. Drive 4 short screws through the slots on the inside of the microwave. Save or discard the extra screws. Installation Instructions 5 INSTALL THE MICROWAVE OVEN Plug the power cord into the cabinet, using four flat-tipped screws (two on the inside top and two on...
Use and Care Manual
Page 3
... containers before using electrical appliances, basic safety precautions should be grounded. Do not use this appliance only in accordance with the provided installation instructions. „ This appliance must be removed from the microwave. Do not overcook food. If materials inside the oven while cooking. ...a burn is not intended for laboratory or industrial use. „ This appliance should not be serviced only by qualified service personnel. INSTALLATION „ Install or locate this product near a swimming pool, or in a similar location. „ Do not mount over edge of table or...
... containers before using electrical appliances, basic safety precautions should be grounded. Do not use this appliance only in accordance with the provided installation instructions. „ This appliance must be removed from the microwave. Do not overcook food. If materials inside the oven while cooking. ...a burn is not intended for laboratory or industrial use. „ This appliance should not be serviced only by qualified service personnel. INSTALLATION „ Install or locate this product near a swimming pool, or in a similar location. „ Do not mount over edge of table or...

Use and Care Manual
Page 5
...proper ground exists before use an extension cord. This appliance is properly grounded. Consult a qualified electrician or service technician if the GROUNDING INSTRUCTIONS are shielded from interference from the power cord. If the power cord is too short, have it replaced with the safety interlocks....tripping of circuit breaker. The plug must be plugged into its own electrical outlet to have a qualified electrician or service technician install an outlet near the appliance. NOTICE: PACEMAKERS Most pacemakers are not completely understood, or if doubt exists as to consult their ...
...proper ground exists before use an extension cord. This appliance is properly grounded. Consult a qualified electrician or service technician if the GROUNDING INSTRUCTIONS are shielded from interference from the power cord. If the power cord is too short, have it replaced with the safety interlocks....tripping of circuit breaker. The plug must be plugged into its own electrical outlet to have a qualified electrician or service technician install an outlet near the appliance. NOTICE: PACEMAKERS Most pacemakers are not completely understood, or if doubt exists as to consult their ...

Use and Care Manual
Page 21
... period. What GE Appliances Will Not Cover: • Customer instructions. Any implied warranties, including the implied warranties of merchantability or fitness for a particular purpose, are limited to Make a Warranty Claim: Call GE Appliances at GEAPPLIANCES.com • Improper installation, delivery or ...caused after delivery. Proof of the original purchase GE Appliances Will Choose to Repair or Replace: Any product which fails due to state. This owner's manual provides information regarding operating instructions and user controls. EXCLUSION OF IMPLIED WARRANTIES Your ...
... period. What GE Appliances Will Not Cover: • Customer instructions. Any implied warranties, including the implied warranties of merchantability or fitness for a particular purpose, are limited to Make a Warranty Claim: Call GE Appliances at GEAPPLIANCES.com • Improper installation, delivery or ...caused after delivery. Proof of the original purchase GE Appliances Will Choose to Repair or Replace: Any product which fails due to state. This owner's manual provides information regarding operating instructions and user controls. EXCLUSION OF IMPLIED WARRANTIES Your ...

