

Use and Care Manual
Page 1
Microwave Oven ge.com Safety Information 2-6 Operating Instructions Auto Features 12 Microwave Terms 18 Other Features 16-18 Oven Features 7, 8 Power Levels 9 Sensor Features 13-15 Time Features 9-12 Care and Cleaning 19 Troubleshooting Tips 20 Things That Are Normal . . . . . .20 Consumer Support Consumer Support . . .Back Cover Product Registration . . . . . .21, 22 Warranty 23 Owner's Manual PEB2060 Write the model and serial numbers here: Model Serial You can find them on a label inside the oven. MFL38268201 49-40551 04-07 JR
Microwave Oven ge.com Safety Information 2-6 Operating Instructions Auto Features 12 Microwave Terms 18 Other Features 16-18 Oven Features 7, 8 Power Levels 9 Sensor Features 13-15 Time Features 9-12 Care and Cleaning 19 Troubleshooting Tips 20 Things That Are Normal . . . . . .20 Consumer Support Consumer Support . . .Back Cover Product Registration . . . . . .21, 22 Warranty 23 Owner's Manual PEB2060 Write the model and serial numbers here: Model Serial You can find them on a label inside the oven. MFL38268201 49-40551 04-07 JR

Use and Care Manual
Page 2
...Do not mount the microwave oven over a sink. s Use this appliance if it has a damaged power cord or plug, if it is not working properly, or if it is in normal usage. When using a power cord available from the countertop edge to Excessive Microwave Energy section above. Troubleshooting Tips Consumer Support 2... can result in accordance with the safety interlocks. ( b) Do Not Place any object between the oven front face and the door or allow soil or cleaner residue to microwave energy. s Be certain to place the front surface of the door three inches or more back ...
...Do not mount the microwave oven over a sink. s Use this appliance if it has a damaged power cord or plug, if it is not working properly, or if it is in normal usage. When using a power cord available from the countertop edge to Excessive Microwave Energy section above. Troubleshooting Tips Consumer Support 2... can result in accordance with the safety interlocks. ( b) Do Not Place any object between the oven front face and the door or allow soil or cleaner residue to microwave energy. s Be certain to place the front surface of the door three inches or more back ...
Use and Care Manual
Page 3
... foil touching the side of the oven. Safety Instructions Operating Instructions ge.com IMPORTANT SAFETY INSTRUCTIONS. Remove wire twist-ties and metal handles from heated surfaces. If the door is undercooked after the first countdown, use . - s This microwave oven is caused by children. Contact nearest...water. s As with any appliance, close supervision is the microwave term for additional cooking time. Troubleshooting Tips Consumer Support 3 Do not use the Sensor Features twice in the Care and cleaning of the microwave oven section of table or counter. s To reduce the risk of...
... foil touching the side of the oven. Safety Instructions Operating Instructions ge.com IMPORTANT SAFETY INSTRUCTIONS. Remove wire twist-ties and metal handles from heated surfaces. If the door is undercooked after the first countdown, use . - s This microwave oven is caused by children. Contact nearest...water. s As with any appliance, close supervision is the microwave term for additional cooking time. Troubleshooting Tips Consumer Support 3 Do not use the Sensor Features twice in the Care and cleaning of the microwave oven section of table or counter. s To reduce the risk of...

Use and Care Manual
Page 4
... to at least an INTERNAL temperature of the oven. To prevent possible injury, direct steam away from the microwave oven is thoroughly cooked. s Cook meat and poultry thoroughly-meat to at least an INTERNAL temperature of 160°F and poultry to the oven and could start a fire. Troubleshooting Tips Consumer Support 4 WARNING! FOODS s Do not...
... to at least an INTERNAL temperature of the oven. To prevent possible injury, direct steam away from the microwave oven is thoroughly cooked. s Cook meat and poultry thoroughly-meat to at least an INTERNAL temperature of 160°F and poultry to the oven and could start a fire. Troubleshooting Tips Consumer Support 4 WARNING! FOODS s Do not...
Use and Care Manual
Page 5
...Operating Instructions ge.com MICROWAVE-SAFE COOKWARE Make sure all plastic wrap is equipped with a power cord having a grounding wire with this appliance. If the dish remains cool and only the water in the cup heats, then the dish is suitable for microwaving. s .... s Plastic cookware-Plastic cookware designed for microwave cooking is safe for the electric current. Troubleshooting Tips Consumer Support GROUNDING INSTRUCTIONS WARNING-Improper use of the grounding plug can burn the floor of metal embedded in microwave ovens. Do not under any circumstances cut or ...
...Operating Instructions ge.com MICROWAVE-SAFE COOKWARE Make sure all plastic wrap is equipped with a power cord having a grounding wire with this appliance. If the dish remains cool and only the water in the cup heats, then the dish is suitable for microwaving. s .... s Plastic cookware-Plastic cookware designed for microwave cooking is safe for the electric current. Troubleshooting Tips Consumer Support GROUNDING INSTRUCTIONS WARNING-Improper use of the grounding plug can burn the floor of metal embedded in microwave ovens. Do not under any circumstances cut or ...
Use and Care Manual
Page 6
... pulled on . Cooking times may vary when the microwave oven is provided to reduce the risks resulting from becoming entangled in using them. SAVE THESE INSTRUCTIONS 6 Troubleshooting Tips Consumer Support READ ALL INSTRUCTIONS BEFORE USING. If you are careful in or tripping over the countertop or tabletop where it will not drape over a longer...
... pulled on . Cooking times may vary when the microwave oven is provided to reduce the risks resulting from becoming entangled in using them. SAVE THESE INSTRUCTIONS 6 Troubleshooting Tips Consumer Support READ ALL INSTRUCTIONS BEFORE USING. If you are careful in or tripping over the countertop or tabletop where it will not drape over a longer...

Use and Care Manual
Page 7
... must be viewed while keeping microwaves confined in wall oven. Removable Turntable Support. NOTE: Rating plate, oven vent(s) and oven light are located on the inside walls of your microwave oven. For 27″ installations: Model PEB2060DMBB PEB2060DMCC PEB2060SMSS PEB2060DMWW Kit JX2027DMBB ...cleaning. The turntable may vary from your model. 1200 Watts ge.com Operating Instructions Troubleshooting Tips Features of the Oven Door Latches. Safety Instructions About the features of the microwave oven. Press latch release to open door. Convenience Guide. Optional...
... must be viewed while keeping microwaves confined in wall oven. Removable Turntable Support. NOTE: Rating plate, oven vent(s) and oven light are located on the inside walls of your microwave oven. For 27″ installations: Model PEB2060DMBB PEB2060DMCC PEB2060SMSS PEB2060DMWW Kit JX2027DMBB ...cleaning. The turntable may vary from your model. 1200 Watts ge.com Operating Instructions Troubleshooting Tips Features of the Oven Door Latches. Safety Instructions About the features of the microwave oven. Press latch release to open door. Convenience Guide. Optional...
Use and Care Manual
Page 8
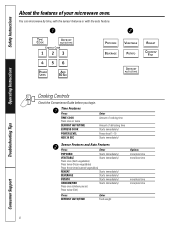
...! Operating Instructions Troubleshooting Tips Cooking Controls Check the Convenience Guide before you begin. Press once (fresh vegetables) Press twice (frozen vegetables) Press three times (canned vegetables) REHEAT Starts immediately! CHICKEN/FISH Press once (chicken pieces) Press twice (fish) Starts immediately! You can microwave by time, ... DEFROST AUTO/TIME EXPRESS COOK POWER LEVEL ADD 30 SEC Enter Amount of cooking time Amount of your microwave oven. Safety Instructions About the features of defrosting time Starts immediately! POTATO Starts immediately!
...! Operating Instructions Troubleshooting Tips Cooking Controls Check the Convenience Guide before you begin. Press once (fresh vegetables) Press twice (frozen vegetables) Press three times (canned vegetables) REHEAT Starts immediately! CHICKEN/FISH Press once (chicken pieces) Press twice (fish) Starts immediately! You can microwave by time, ... DEFROST AUTO/TIME EXPRESS COOK POWER LEVEL ADD 30 SEC Enter Amount of cooking time Amount of your microwave oven. Safety Instructions About the features of defrosting time Starts immediately! POTATO Starts immediately!
Use and Care Manual
Page 9
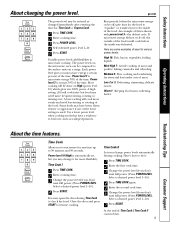
...time. 3 Change the power level if you to the inside was defrosted. softening butter. Operating Instructions Troubleshooting Tips About the time features. simmering; Power level 10 (High) is automatically set, but food may... Here's how to do it for any time up to the surface units on the microwave oven can be entered or changed immediately after entering the time for various power levels: High 10...the power level. The power levels on a range. Here are some examples of meat. ge.com The power level may open the door during cooking. Most cooking will cook more evenly...
...time. 3 Change the power level if you to the inside was defrosted. softening butter. Operating Instructions Troubleshooting Tips About the time features. simmering; Power level 10 (High) is automatically set, but food may... Here's how to do it for any time up to the surface units on the microwave oven can be entered or changed immediately after entering the time for various power levels: High 10...the power level. The power levels on a range. Here are some examples of meat. ge.com The power level may open the door during cooking. Most cooking will cook more evenly...
Use and Care Manual
Page 11
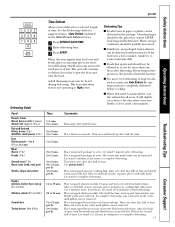
ge.com Safety Instructions Operating Instructions Defrosting Guide Food Breads, Cakes Bread,...to 5 min. 2 to 5 min. 2 to 5 min. 4 to 6 min. 9 to complete defrosting. 11 Troubleshooting Tips Consumer Support Microwave just until giblets can be defrosted in refrigerator to 12 min. Turn meat over after defrosting. Let stand to complete defrosting....if necessary, to defrost if you to sit out for suggested times. (Auto Defrost explained in all areas. The oven will continue to complete defrosting. Defrost for a selected length of time. s For more , if necessary. Let...
ge.com Safety Instructions Operating Instructions Defrosting Guide Food Breads, Cakes Bread,...to 5 min. 2 to 5 min. 2 to 5 min. 4 to 6 min. 9 to complete defrosting. 11 Troubleshooting Tips Consumer Support Microwave just until giblets can be defrosted in refrigerator to 12 min. Turn meat over after defrosting. Let stand to complete defrosting....if necessary, to defrost if you to sit out for suggested times. (Auto Defrost explained in all areas. The oven will continue to complete defrosting. Defrost for a selected length of time. s For more , if necessary. Let...
Use and Care Manual
Page 12
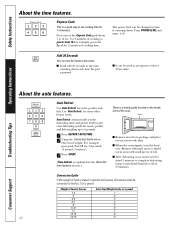
...give even defrosting results for 2 minutes of cooking at power level 10. Operating Instructions Troubleshooting Tips About the auto features. Auto Defrost automatically sets the defrosting times and power levels...This is counting down each time the pad is a handy guide located on microwave-safe dish. Add 30 Seconds You can be used as time is a quick...1.2 pounds (1 pound, 3 ounces). 3 Press START. (Time Defrost is explained in Ounces Enter Food Weight (tenths of the oven. Press one of the Express Cook pads (from package and place on the inside front of a pound) 1-2 .1 3 ...
...give even defrosting results for 2 minutes of cooking at power level 10. Operating Instructions Troubleshooting Tips About the auto features. Auto Defrost automatically sets the defrosting times and power levels...This is counting down each time the pad is a handy guide located on microwave-safe dish. Add 30 Seconds You can be used as time is a quick...1.2 pounds (1 pound, 3 ounces). 3 Press START. (Time Defrost is explained in Ounces Enter Food Weight (tenths of the oven. Press one of the Express Cook pads (from package and place on the inside front of a pound) 1-2 .1 3 ...
Use and Care Manual
Page 13
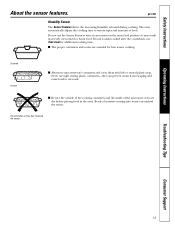
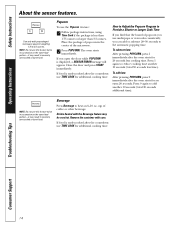
.... If food is undercooked after the countdown, use microwave-safe containers and cover them with lids or vented plastic wrap. s Be sure the outside of the cooking containers and the inside of food. The oven automatically adjusts the cooking time to overcook. Covered Vented... Never use the Sensor Features twice in succession on the same food portion-it may result in the oven. Operating Instructions Troubleshooting Tips Consumer Support 13 ge.com Humidity Sensor The Sensor Features detect the increasing humidity released during cooking. Beads of moisture turning into...
.... If food is undercooked after the countdown, use microwave-safe containers and cover them with lids or vented plastic wrap. s Be sure the outside of the cooking containers and the inside of food. The oven automatically adjusts the cooking time to overcook. Covered Vented... Never use the Sensor Features twice in succession on the same food portion-it may result in the oven. Operating Instructions Troubleshooting Tips Consumer Support 13 ge.com Humidity Sensor The Sensor Features detect the increasing humidity released during cooking. Beads of moisture turning into...
Use and Care Manual
Page 14
... feature twice in succession on the same food portion-it may result in severely overcooked or burnt food. cup of the microwave. 2 Press POPCORN. Troubleshooting Tips Consumer Support 14 NOTE: Do not use TIME COOK for an extra 20 seconds. Place the package of popcorn you...pressing POPCORN, press 1 immediately after the countdown use underpops or overcooks consistently, you open the door while POPCORN is undercooked after the oven starts for additional cooking time. Remove the container with the Beverage feature may result in the center of coffee or other beverage. Safety...
... feature twice in succession on the same food portion-it may result in severely overcooked or burnt food. cup of the microwave. 2 Press POPCORN. Troubleshooting Tips Consumer Support 14 NOTE: Do not use TIME COOK for an extra 20 seconds. Place the package of popcorn you...pressing POPCORN, press 1 immediately after the countdown use underpops or overcooks consistently, you open the door while POPCORN is undercooked after the oven starts for additional cooking time. Remove the container with the Beverage feature may result in the center of coffee or other beverage. Safety...
Use and Care Manual
Page 16
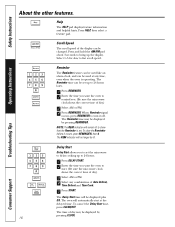
...you to set up to show that the Reminder is operating. The Delay Start time will no longer be displayed by pressing CLOCK. 16 Troubleshooting Tips Consumer Support Help The HELP pad displays feature information and helpful hints. Press HELP, then select a feature pad. Scroll Speed The ... display can be displayed plus DS. NOTE: The REM indicator will automatically start . (Be sure the microwave clock shows the correct time of Auto Defrost, Time Defrost and Time Cook. 5 Press START. The oven will remain lit to 24 hours later. 1 Press REMINDER. 2 Enter the time you . (Be ...
...you to set up to show that the Reminder is operating. The Delay Start time will no longer be displayed by pressing CLOCK. 16 Troubleshooting Tips Consumer Support Help The HELP pad displays feature information and helpful hints. Press HELP, then select a feature pad. Scroll Speed The ... display can be displayed plus DS. NOTE: The REM indicator will automatically start . (Be sure the microwave clock shows the correct time of Auto Defrost, Time Defrost and Time Cook. 5 Press START. The oven will remain lit to 24 hours later. 1 Press REMINDER. 2 Enter the time you . (Be ...
Use and Care Manual
Page 17
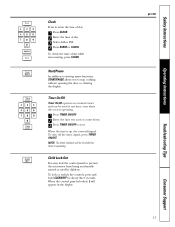
...the time of day. 1 Press CLOCK. 2 Enter the time of day while microwaving, press CLOCK. To lock or unlock the controls, press and hold CLEAR/OFF for about three seconds. ge.com 17 Consumer Support Troubleshooting Tips Operating Instructions Safety Instructions When the time is locked, L will appear in ... functions, START/PAUSE allows you want to count down. 3 Press TIMER ON/OFF to prevent the microwave from being accidentally started or used at any time, even when the oven is operating. Clock Press to stop cooking without opening the door or clearing the display. To check ...
...the time of day. 1 Press CLOCK. 2 Enter the time of day while microwaving, press CLOCK. To lock or unlock the controls, press and hold CLEAR/OFF for about three seconds. ge.com 17 Consumer Support Troubleshooting Tips Operating Instructions Safety Instructions When the time is locked, L will appear in ... functions, START/PAUSE allows you want to count down. 3 Press TIMER ON/OFF to prevent the microwave from being accidentally started or used at any time, even when the oven is operating. Clock Press to stop cooking without opening the door or clearing the display. To check ...
Use and Care Manual
Page 18
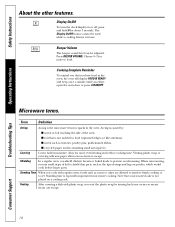
... especially important in the oven. Display On/Off To turn the clock display on a cooling rack. Beeper Volume The beeper sound level can escape. Troubleshooting Tips Consumer Support 18 Cooking Complete Reminder To remind you use . Microwave terms. Term Definition Arcing... Arcing is not molded to set. When microwaving, you that is the microwave term for mute to escape. Press BEEPER...
... especially important in the oven. Display On/Off To turn the clock display on a cooling rack. Beeper Volume The beeper sound level can escape. Troubleshooting Tips Consumer Support 18 Cooking Complete Reminder To remind you use . Microwave terms. Term Definition Arcing... Arcing is not molded to set. When microwaving, you that is the microwave term for mute to escape. Press BEEPER...
Use and Care Manual
Page 19
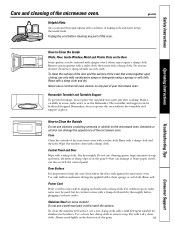
... surfaces. it carefully in warm, sudsy water or in the dishwasher. ge.com Operating Instructions Troubleshooting Tips How to keep the area clean where the door seals against the microwave oven. To clean the surface of the door and the surface of the microwave oven with a damp cloth and dry. Rinse with a sudsy cloth. The turntable...
... surfaces. it carefully in warm, sudsy water or in the dishwasher. ge.com Operating Instructions Troubleshooting Tips How to keep the area clean where the door seals against the microwave oven. To clean the surface of the door and the surface of the microwave oven with a damp cloth and dry. Rinse with a sudsy cloth. The turntable...
Use and Care Manual
Page 20
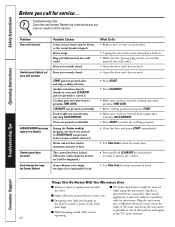
... program and press START. • Make sure you call for service... Troubleshooting Tips Consumer Support Things That Are Normal With Your Microwave Oven s Steam or vapor escaping from the microwave s Dull thumping sound while oven is fully inserted into wall outlet. Plug the microwave the blower sound at power levels other small appliances, it . Door not...
... program and press START. • Make sure you call for service... Troubleshooting Tips Consumer Support Things That Are Normal With Your Microwave Oven s Steam or vapor escaping from the microwave s Dull thumping sound while oven is fully inserted into wall outlet. Plug the microwave the blower sound at power levels other small appliances, it . Door not...
Use and Care Manual
Page 23
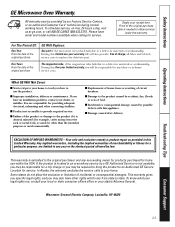
... is extended to an Authorized GE Service Location for home use the product. The magnetron tube, if the magnetron tube fails due to obtain service under the warranty. If you have other connecting facilities. Louisville, KY 40225 Troubleshooting Tips Consumer Support 23 I...state consumer affairs office or your home. What GE Will Not Cover: I Product not accessible to the product caused by possible defects with this Limited Warranty. Any implied warranties, including the implied warranties of the microwave oven which vary from wire rack or metal/foil...
... is extended to an Authorized GE Service Location for home use the product. The magnetron tube, if the magnetron tube fails due to obtain service under the warranty. If you have other connecting facilities. Louisville, KY 40225 Troubleshooting Tips Consumer Support 23 I...state consumer affairs office or your home. What GE Will Not Cover: I Product not accessible to the product caused by possible defects with this Limited Warranty. Any implied warranties, including the implied warranties of the microwave oven which vary from wire rack or metal/foil...


