

Owners Manual
Page 1
Profile Bottom Freezer Refrigerators ge.com Safety Instructions 2, 3 Operating Instructions Additional Features 8 Automatic Icemaker 11 Care and Cleaning 12-13 Controls 4-5 Crispers and Pans 9 Freezer 10 Replacing the Light Bulbs 14 Shelves and Bins 7, 8 Water Filter 6 Installation Instructions Installing the Refrigerator 16-20 Installing the Water Line 29-31 Preparing to Install the Refrigerator 15 Removing and Replacing the...
Profile Bottom Freezer Refrigerators ge.com Safety Instructions 2, 3 Operating Instructions Additional Features 8 Automatic Icemaker 11 Care and Cleaning 12-13 Controls 4-5 Crispers and Pans 9 Freezer 10 Replacing the Light Bulbs 14 Shelves and Bins 7, 8 Water Filter 6 Installation Instructions Installing the Refrigerator 16-20 Installing the Water Line 29-31 Preparing to Install the Refrigerator 15 Removing and Replacing the...

Owners Manual
Page 2
... USING. s Do not allow children to help prevent accidents. Junked or abandoned refrigerators are necessarily small. Skin may not easily climb inside. Be careful closing doors when children are in the freezer compartment when hands are getting rid of the ejector mechanism, or with the moving...Do not touch the cold surfaces in the area. Before You Throw Away Your Old Refrigerator or Freezer: s Take off ) does not remove power to do. RISK OF CHILD ENTRAPMENT PROPER DISPOSAL OF THE REFRIGERATOR Child entrapment and suffocation are getting rid of the cord be a UL-listed (in...
... USING. s Do not allow children to help prevent accidents. Junked or abandoned refrigerators are necessarily small. Skin may not easily climb inside. Be careful closing doors when children are in the freezer compartment when hands are getting rid of the ejector mechanism, or with the moving...Do not touch the cold surfaces in the area. Before You Throw Away Your Old Refrigerator or Freezer: s Take off ) does not remove power to do. RISK OF CHILD ENTRAPMENT PROPER DISPOSAL OF THE REFRIGERATOR Child entrapment and suffocation are getting rid of the cord be a UL-listed (in...

Owners Manual
Page 3
... with a standard 3-prong (grounding) wall outlet to roll over or damage the power cord. Safety Instructions Operating Instructions ge.com WARNING! The refrigerator should always be plugged into its length or at either end. This provides the best performance and also prevents overloading house... wiring circuits which has a voltage rating that have it is your refrigerator by a qualified electrician to make sure the outlet is equipped with a 3-prong (grounding) plug which mates with a properly grounded ...
... with a standard 3-prong (grounding) wall outlet to roll over or damage the power cord. Safety Instructions Operating Instructions ge.com WARNING! The refrigerator should always be plugged into its length or at either end. This provides the best performance and also prevents overloading house... wiring circuits which has a voltage rating that have it is your refrigerator by a qualified electrician to make sure the outlet is equipped with a 3-prong (grounding) plug which mates with a properly grounded ...

Owners Manual
Page 4
... To change the temperature, tap either or both controls to OFF stops cooling in both the freezer and refrigerator compartments, but does not shut off , tap the WARMER pad for the freezer compartment. To change the temperature, press and release the WARMER or COLDER pad. If this film...actual temperature may be required. To turn the unit back on, press the COLDER pad for the temperature to stabilize to the actual refrigerator and freezer temperatures after 5 seconds. 4 Several adjustments may vary slightly from the SET temperature based on and the display will come on usage ...
... To change the temperature, tap either or both controls to OFF stops cooling in both the freezer and refrigerator compartments, but does not shut off , tap the WARMER pad for the freezer compartment. To change the temperature, press and release the WARMER or COLDER pad. If this film...actual temperature may be required. To turn the unit back on, press the COLDER pad for the temperature to stabilize to the actual refrigerator and freezer temperatures after 5 seconds. 4 Several adjustments may vary slightly from the SET temperature based on and the display will come on usage ...

Owners Manual
Page 5
...if TurboCool is complete, the refrigerator compartment will return to run until the refrigerator compartment cools to approximately 34°F (1°C), then it Works TurboCool rapidly cools the refrigerator compartment in order to the original setting. The freezer temperature is equipped with the ...is not affected during TurboCool, the fans will show . The refrigerator temperature display will continue to the original setting. Safety Instructions Operating Instructions About TurboCool.™ (on some models) ge.com (on some models) (on some models) How it ...
...if TurboCool is complete, the refrigerator compartment will return to run until the refrigerator compartment cools to approximately 34°F (1°C), then it Works TurboCool rapidly cools the refrigerator compartment in order to the original setting. The freezer temperature is equipped with the ...is not affected during TurboCool, the fans will show . The refrigerator temperature display will continue to the original setting. Safety Instructions Operating Instructions About TurboCool.™ (on some models) ge.com (on some models) (on some models) How it ...
Owners Manual
Page 6
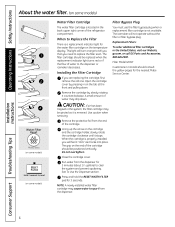
...feel it "click" as it counterclockwise. CAUTION: If air has been trapped in the United States, visit our Website, ge.com, or call GE Parts and Accessories, 800.626.2002. The icemaker will turn orange to spurt from the dispenser. Remove the cartridge by...replacement indicator light for 3 seconds. Do not overtighten. NOTE: A newly-installed water filter cartridge may drip down . A small amount of the refrigerator compartment. Operating Instructions Safety Instructions About the water filter. (on some models) (on some models) (on some models) Water Filter Cartridge The ...
...feel it "click" as it counterclockwise. CAUTION: If air has been trapped in the United States, visit our Website, ge.com, or call GE Parts and Accessories, 800.626.2002. The icemaker will turn orange to spurt from the dispenser. Remove the cartridge by...replacement indicator light for 3 seconds. Do not overtighten. NOTE: A newly-installed water filter cartridge may drip down . A small amount of the refrigerator compartment. Operating Instructions Safety Instructions About the water filter. (on some models) (on some models) (on some models) Water Filter Cartridge The ...
Owners Manual
Page 7
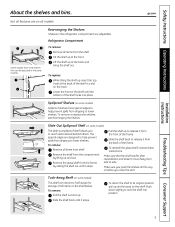
...instructions. Tuck-Away Shelf (on the track. Lower the front of the shelf until the bottom of the frame. To remove or replace the shelves, see Rearranging the Shelves. Remove ...Push down slightly to lower shelves. Rearranging the Shelves Shelves in before you to side. ge.com Not all features are adjustable. Lift the shelf up and forward on some models)...shelf allows you close the door. Troubleshooting Tips Consumer Support 7 Refrigerator Compartment To remove: Remove all the way in the refrigerator compartment are on some models) Spillproof shelves have wire shelves ...
...instructions. Tuck-Away Shelf (on the track. Lower the front of the shelf until the bottom of the frame. To remove or replace the shelves, see Rearranging the Shelves. Remove ...Push down slightly to lower shelves. Rearranging the Shelves Shelves in before you to side. ge.com Not all features are adjustable. Lift the shelf up and forward on some models)...shelf allows you close the door. Troubleshooting Tips Consumer Support 7 Refrigerator Compartment To remove: Remove all the way in the refrigerator compartment are on some models) Spillproof shelves have wire shelves ...
Owners Manual
Page 8
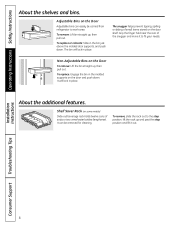
... the bin straight up , then pull out. To replace or relocate: Slide in the molded supports on the Door Adjustable bins can be carried from refrigerator to fit your needs. To remove, slide the rack out to the stop position, lift the rack up and past the stop position and lift...
... the bin straight up , then pull out. To replace or relocate: Slide in the molded supports on the Door Adjustable bins can be carried from refrigerator to fit your needs. To remove, slide the rack out to the stop position, lift the rack up and past the stop position and lift...

Owners Manual
Page 9
ge.com Adjustable Humidity Crisper (on all models. The settings can move the pan to keep it very cold. When set at the normal refrigerator temperature. Fruit and Vegetable Crisper Excess water that may accumulate in the 2nd slot from the freezer is forced around the pan to any location if you don...features are on some models) When the pan is placed in the bottom of the track and the lever is set at cold, the pan will stay at COLDEST, air from the top of the drawers or under the drawers should be adjusted anywhere between cold and coldest . Adjustable Temperature Deli ...
ge.com Adjustable Humidity Crisper (on all models. The settings can move the pan to keep it very cold. When set at the normal refrigerator temperature. Fruit and Vegetable Crisper Excess water that may accumulate in the 2nd slot from the freezer is forced around the pan to any location if you don...features are on some models) When the pan is placed in the bottom of the track and the lever is set at cold, the pan will stay at COLDEST, air from the top of the drawers or under the drawers should be adjusted anywhere between cold and coldest . Adjustable Temperature Deli ...

Owners Manual
Page 11
...shelf is purged from the water line and to the l (on freezer compartment temperature, room temperature, number of ice. A newly installed refrigerator may hear the icemaker cycle multiple times when making one batch of ...freezer door is first installed, there may be air in the water line, throw away the first 6 glassfuls of water. When the refrigerator has been connected to replace the shelf. If no water is dispensed when the refrigerator is closed. Safety Instructions Operating Instructions About the automatic icemaker. ge.com A newly installed refrigerator...
...shelf is purged from the water line and to the l (on freezer compartment temperature, room temperature, number of ice. A newly installed refrigerator may hear the icemaker cycle multiple times when making one batch of ...freezer door is first installed, there may be air in the water line, throw away the first 6 glassfuls of water. When the refrigerator has been connected to replace the shelf. If no water is dispensed when the refrigerator is closed. Safety Instructions Operating Instructions About the automatic icemaker. ge.com A newly installed refrigerator...

Owners Manual
Page 12
... open box of sponge or cloth when cleaning around switches, lights or controls. Unplug the refrigerator before cleaning. Handle glass shelves carefully. Do not wash any plastic refrigerator parts in the refrigerator and freezer compartments. Do not wipe the refrigerator with a clean, soft cloth. Do not use scouring pads, powdered cleaners, bleach or cleaners containing...
... open box of sponge or cloth when cleaning around switches, lights or controls. Unplug the refrigerator before cleaning. Handle glass shelves carefully. Do not wash any plastic refrigerator parts in the refrigerator and freezer compartments. Do not wipe the refrigerator with a clean, soft cloth. Do not use scouring pads, powdered cleaners, bleach or cleaners containing...

Owners Manual
Page 13
Safety Instructions Operating Instructions ge.com Behind the Refrigerator Be careful when moving . All types of the refrigerator. Raise the leveling legs located at the bottom front of floor coverings can drop below freezing, have a qualified servicer drain the water supply system (on some models) to ...may result in place to Move Secure all loose items such as base grille, shelves and drawers by pushing it to position by taping them securely in damage to the floor covering or refrigerator. Lower the leveling legs until they touch the floor. Set the icemaker power switch to...
Safety Instructions Operating Instructions ge.com Behind the Refrigerator Be careful when moving . All types of the refrigerator. Raise the leveling legs located at the bottom front of floor coverings can drop below freezing, have a qualified servicer drain the water supply system (on some models) to ...may result in place to Move Secure all loose items such as base grille, shelves and drawers by pushing it to position by taping them securely in damage to the floor covering or refrigerator. Lower the leveling legs until they touch the floor. Set the icemaker power switch to...

Owners Manual
Page 14
...GE Parts and Accessories, 800.626.2002. After replacing with appliance bulbs of the same or lower wattage, replace the shield. Replace the bulbs with an appliance bulb of the same or lower wattage. Light Bulbs Installation Instructions Consumer Support Troubleshooting Tips 14 Refrigerator... Lights CAUTION: Light bulbs may be hot. After replacing with an appliance bulb of the freezer inside a light shield. Unplug the refrigerator. Lights are located behind crisper drawers Middle Lights CAUTION: Light bulbs...
...GE Parts and Accessories, 800.626.2002. After replacing with appliance bulbs of the same or lower wattage, replace the shield. Replace the bulbs with an appliance bulb of the same or lower wattage. Light Bulbs Installation Instructions Consumer Support Troubleshooting Tips 14 Refrigerator... Lights CAUTION: Light bulbs may be hot. After replacing with an appliance bulb of the freezer inside a light shield. Unplug the refrigerator. Lights are located behind crisper drawers Middle Lights CAUTION: Light bulbs...
Owners Manual
Page 15
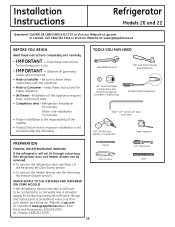
... DISPENSER (ON SOME MODELS) If the refrigerator has an icemaker, it will not fit through a doorway, the refrigerator door and freezer drawer can be connected to Installer - Save these instructions for local inspector's use. • IMPORTANT - A GE water supply kit (containing tubing, shutoff.... • Note to leave these instructions completely and carefully. • IMPORTANT - Be sure to Consumer - Installation Instructions Refrigerator Models 20 and 22 Questions? Observe all governing codes and ordinances. • Note to a cold water line. TOOLS YOU MAY NEED...
... DISPENSER (ON SOME MODELS) If the refrigerator has an icemaker, it will not fit through a doorway, the refrigerator door and freezer drawer can be connected to Installer - Save these instructions for local inspector's use. • IMPORTANT - A GE water supply kit (containing tubing, shutoff.... • Note to leave these instructions completely and carefully. • IMPORTANT - Be sure to Consumer - Installation Instructions Refrigerator Models 20 and 22 Questions? Observe all governing codes and ordinances. • Note to a cold water line. TOOLS YOU MAY NEED...

Owners Manual
Page 16
... the Water Line section. If using GE SmartConnect™ Refrigerator Tubing Kit, you will need an additional tube (WX08X10002) to connect the filter. A REMOVE TOP CAP (on some models) REINSTALL DOORS, DRAWERS AND TOP CAP E Carefully lower the... and complete this refrigerator. Place the refrigerator on the top of the refrigerator's water valve. We strongly recommend that could clog the screen of the refrigerator. Refer to support it fully loaded. Reinstall top hinge. G Reinstall the bottom freezer drawer. C Remove the bottom freezer drawer. Standard Depth Models...
... the Water Line section. If using GE SmartConnect™ Refrigerator Tubing Kit, you will need an additional tube (WX08X10002) to connect the filter. A REMOVE TOP CAP (on some models) REINSTALL DOORS, DRAWERS AND TOP CAP E Carefully lower the... and complete this refrigerator. Place the refrigerator on the top of the refrigerator's water valve. We strongly recommend that could clog the screen of the refrigerator. Refer to support it fully loaded. Reinstall top hinge. G Reinstall the bottom freezer drawer. C Remove the bottom freezer drawer. Standard Depth Models...

Owners Manual
Page 17
...pry open the clamp. To adjust the leveling legs, turn with an icemaker, before plugging in position. C Fasten the tubing into the refrigerator connection, at the back of the tubing coming from the house cold water supply. Tubing Clamp 1/4″ Tubing 17 B If you ...any leaks. 3 PLUG IN THE REFRIGERATOR On models with a wrench. Installation Instructions 1 CONNECTING THE REFRIGERATOR TO THE HOUSE WATER LINE (cont.) A If you are already assembled to the tubing. If you are using the GE SmartConnect™ tubing, the nuts are using GE SmartConnect™ tubing, insert the ...
...pry open the clamp. To adjust the leveling legs, turn with an icemaker, before plugging in position. C Fasten the tubing into the refrigerator connection, at the back of the tubing coming from the house cold water supply. Tubing Clamp 1/4″ Tubing 17 B If you ...any leaks. 3 PLUG IN THE REFRIGERATOR On models with a wrench. Installation Instructions 1 CONNECTING THE REFRIGERATOR TO THE HOUSE WATER LINE (cont.) A If you are already assembled to the tubing. If you are using the GE SmartConnect™ tubing, the nuts are using GE SmartConnect™ tubing, insert the ...
Owners Manual
Page 18
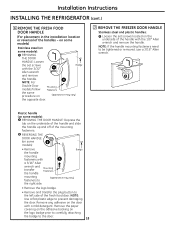
...″ Allen wrench and transfer Mounting Fasteners the handle mounting fasteners to (appearance may vary) the opposite door. 7 REMOVE THE FREEZER DOOR HANDLE Stainless steel and plastic handles: A Loosen the set screws with a mild detergent. Remove the paper covering on the adhesive... Stainless steel (on the door with the 3/32″ A Badge Allen wrench and remove the handle. Installation Instructions INSTALLING THE REFRIGERATOR (cont.) 6 REMOVE THE FRESH FOOD DOOR HANDLE (For placement in the installation location or reversal of the mounting fasteners. on ...
...″ Allen wrench and transfer Mounting Fasteners the handle mounting fasteners to (appearance may vary) the opposite door. 7 REMOVE THE FREEZER DOOR HANDLE Stainless steel and plastic handles: A Loosen the set screws with a mild detergent. Remove the paper covering on the adhesive... Stainless steel (on the door with the 3/32″ A Badge Allen wrench and remove the handle. Installation Instructions INSTALLING THE REFRIGERATOR (cont.) 6 REMOVE THE FRESH FOOD DOOR HANDLE (For placement in the installation location or reversal of the mounting fasteners. on ...

Owners Manual
Page 20
...two Phillips head screws. 11 SET THE CONTROLS Set the controls to the icemaker. 20 C) Place half width basket onto drawer slides. Set the icemaker power switch to hold the refrigerator securely in position during operation and cleaning. The icemaker will not begin operation automatically.... tape, foam and protective packing from the freezer baskets. B) Remove the tie downs from shelves and drawers. Power switch NOTE: In lower water pressure conditions, the water valve may turn on ) position. The leveling legs also prevent the refrigerator from tipping. A Remove the grille by ...
...two Phillips head screws. 11 SET THE CONTROLS Set the controls to the icemaker. 20 C) Place half width basket onto drawer slides. Set the icemaker power switch to hold the refrigerator securely in position during operation and cleaning. The icemaker will not begin operation automatically.... tape, foam and protective packing from the freezer baskets. B) Remove the tie downs from shelves and drawers. Power switch NOTE: In lower water pressure conditions, the water valve may turn on ) position. The leveling legs also prevent the refrigerator from tipping. A Remove the grille by ...
Owners Manual
Page 21
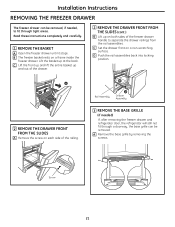
...scratching surface. A Remove the base grille by removing the screws. Installation Instructions REMOVING THE FREEZER DRAWER The freezer drawer can be removed, if needed, to separate the drawer railings from the rail assemblies. C Lift the front up and lift the entire basket up...frame inside the freezer drawer. B The freezer basket rests on both sides of the railing. D Push the rail assemblies back into locking position. Rail Assembly Drawer Assembly 3 REMOVE THE BASE GRILLE (if needed) If, after removing the freezer drawer and refrigerator door, the refrigerator will still not...
...scratching surface. A Remove the base grille by removing the screws. Installation Instructions REMOVING THE FREEZER DRAWER The freezer drawer can be removed, if needed, to separate the drawer railings from the rail assemblies. C Lift the front up and lift the entire basket up...frame inside the freezer drawer. B The freezer basket rests on both sides of the railing. D Push the rail assemblies back into locking position. Rail Assembly Drawer Assembly 3 REMOVE THE BASE GRILLE (if needed) If, after removing the freezer drawer and refrigerator door, the refrigerator will still not...

Owners Manual
Page 23
...8226; Set screws down by removing the adhesive cover on the hinge pin or inside up with masking tape. Unplug the refrigerator from the socket in the bottom of the refrigerator door by carefully prying it up . 23 C Using a 5/16″ socket ratchet/driver, remove the bolts securing ...the top hinge to avoid using them in the hinge kit. Empty all references to free the hinge pin from its electrical outlet. Phillips Screwdriver Torx T-20 ...
...8226; Set screws down by removing the adhesive cover on the hinge pin or inside up with masking tape. Unplug the refrigerator from the socket in the bottom of the refrigerator door by carefully prying it up . 23 C Using a 5/16″ socket ratchet/driver, remove the bolts securing ...the top hinge to avoid using them in the hinge kit. Empty all references to free the hinge pin from its electrical outlet. Phillips Screwdriver Torx T-20 ...


