

Owners Manual
Page 1
Profile Bottom Freezer Refrigerators ge.com Safety Instructions 2, 3 Operating Instructions Additional Features 8 Automatic Icemaker 11 Care and Cleaning 12-13 Controls 4-5 Crispers and Pans 9 Freezer 10 Replacing the Light Bulbs 14 Shelves and Bins 7, 8 Water Filter 6 Installation Instructions Installing the Refrigerator 16-20 Installing the Water Line 29-31 Preparing to Install the Refrigerator 15 Removing and Replacing the Doors (Double Door Refrigerator Models only 26-28 Removing and Replacing the Freezer Drawer 21, 22 Reversing the Door Swing (Single Door Refrigerator ...
Profile Bottom Freezer Refrigerators ge.com Safety Instructions 2, 3 Operating Instructions Additional Features 8 Automatic Icemaker 11 Care and Cleaning 12-13 Controls 4-5 Crispers and Pans 9 Freezer 10 Replacing the Light Bulbs 14 Shelves and Bins 7, 8 Water Filter 6 Installation Instructions Installing the Refrigerator 16-20 Installing the Water Line 29-31 Preparing to Install the Refrigerator 15 Removing and Replacing the Doors (Double Door Refrigerator Models only 26-28 Removing and Replacing the Freezer Drawer 21, 22 Reversing the Door Swing (Single Door Refrigerator ...

Owners Manual
Page 2
... is used. If you are getting rid of potential safety hazards under federal law must use of an old refrigeration product, check with the Installation Instructions before cleaning and making repairs. s Leave the shelves in this appliance only for "just a few days." If you are necessarily small. Installation Instructions Consumer Support Troubleshooting Tips USE OF EXTENSION CORDS Because of your old refrigerator, please follow the instructions below...
... is used. If you are getting rid of potential safety hazards under federal law must use of an old refrigeration product, check with the Installation Instructions before cleaning and making repairs. s Leave the shelves in this appliance only for "just a few days." If you are necessarily small. Installation Instructions Consumer Support Troubleshooting Tips USE OF EXTENSION CORDS Because of your old refrigerator, please follow the instructions below...

Owners Manual
Page 4
... change the temperature, tap either the refrigerator or freezer. To turn the unit back on and the display will go to the preset recommended settings. Changing the Temperature For Controls-on some models) Installation Instructions Consumer Support Troubleshooting Tips (on -the-Door Models: To change the temperature, press and release the WARMER or COLDER pad. Operating Instructions Safety Instructions About the controls with temperature settings. (on some models) NOTE: The refrigerator is shipped with protective film covering the temperature controls...
... change the temperature, tap either the refrigerator or freezer. To turn the unit back on and the display will go to the preset recommended settings. Changing the Temperature For Controls-on some models) Installation Instructions Consumer Support Troubleshooting Tips (on -the-Door Models: To change the temperature, press and release the WARMER or COLDER pad. Operating Instructions Safety Instructions About the controls with temperature settings. (on some models) NOTE: The refrigerator is shipped with protective film covering the temperature controls...
Owners Manual
Page 6
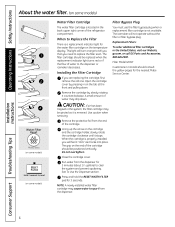
When to the dispenser or icemaker decreases. Open the cartridge cover by slowly rotating it is removed. Lining up the arrow on the cartridge and the cartridge holder, slowly rotate the cartridge clockwise until it locks into place. Do not overtighten. Filter Bypass Plug You must use the filter bypass plug when a replacement filter cartridge is not available. Filter Model GSWF Customers in on the end of the cartridge should be replaced when the replacement indicator light turns red or...
When to the dispenser or icemaker decreases. Open the cartridge cover by slowly rotating it is removed. Lining up the arrow on the cartridge and the cartridge holder, slowly rotate the cartridge clockwise until it locks into place. Do not overtighten. Filter Bypass Plug You must use the filter bypass plug when a replacement filter cartridge is not available. Filter Model GSWF Customers in on the end of the cartridge should be replaced when the replacement indicator light turns red or...

Owners Manual
Page 11
... to the water supply, set the power switch in the water line system. Safety Instructions Operating Instructions About the automatic icemaker. approximately 100-130 cubes in the water line, throw away the first six glassfuls of the refrigerator for the specific icemaker kit needed for at least two minutes to remove trapped air from the water line system. If the refrigerator is operated before the water connection is not used frequently, old ice cubes will stop producing ice. The icemaker power light will hear...
... to the water supply, set the power switch in the water line system. Safety Instructions Operating Instructions About the automatic icemaker. approximately 100-130 cubes in the water line, throw away the first six glassfuls of the refrigerator for the specific icemaker kit needed for at least two minutes to remove trapped air from the water line system. If the refrigerator is operated before the water connection is not used frequently, old ice cubes will stop producing ice. The icemaker power light will hear...

Owners Manual
Page 13
... pushing the refrigerator back, make sure you don't roll over the power cord or icemaker supply line (on some models). Installation Instructions Troubleshooting Tips Consumer Support 13 Handle only from the wall. Leave the doors open. Pull the refrigerator straight out and return it to position by taping them securely in place to Move Secure all loose items such as base grille, shelves and drawers by pushing...
... pushing the refrigerator back, make sure you don't roll over the power cord or icemaker supply line (on some models). Installation Instructions Troubleshooting Tips Consumer Support 13 Handle only from the wall. Leave the doors open. Pull the refrigerator straight out and return it to position by taping them securely in place to Move Secure all loose items such as base grille, shelves and drawers by pushing...
Owners Manual
Page 15
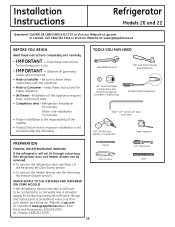
...; To remove the freezer drawer, see the Removing the Freezer Drawer section. WATER SUPPLY TO THE ICEMAKER AND DISPENSER (ON SOME MODELS) If the refrigerator has an icemaker, it will not fit through a doorway, the refrigerator door and freezer drawer can be connected to leave these instructions completely and carefully. • IMPORTANT - Installation Instructions Refrigerator Models 20 and 22 Questions? Be sure to a cold water line. TOOLS YOU MAY NEED Adjustable Wrench 3/8″ and 5/16″ Socket Ratchet/Driver 1/4″ Outer...
...; To remove the freezer drawer, see the Removing the Freezer Drawer section. WATER SUPPLY TO THE ICEMAKER AND DISPENSER (ON SOME MODELS) If the refrigerator has an icemaker, it will not fit through a doorway, the refrigerator door and freezer drawer can be connected to leave these instructions completely and carefully. • IMPORTANT - Installation Instructions Refrigerator Models 20 and 22 Questions? Be sure to a cold water line. TOOLS YOU MAY NEED Adjustable Wrench 3/8″ and 5/16″ Socket Ratchet/Driver 1/4″ Outer...

Owners Manual
Page 16
... to remove doors, skip Step A. Reinstall top hinge. If using GE SmartConnect™ Refrigerator Tubing Kit, you will need an additional tube (WX08X10002) to Steps 1 through 3 of the refrigerator's water valve. Leave tape and all packaging on some models) REINSTALL DOORS, DRAWERS AND TOP CAP E Carefully lower the door onto the center hinge. Refer to the installation location. See Installing the Water Line section. B Remove the fresh-food door. Top Hinge B 1 CONNECTING THE REFRIGERATOR TO THE HOUSE WATER LINE (icemaker and dispenser models) A cold water supply is...
... to remove doors, skip Step A. Reinstall top hinge. If using GE SmartConnect™ Refrigerator Tubing Kit, you will need an additional tube (WX08X10002) to Steps 1 through 3 of the refrigerator's water valve. Leave tape and all packaging on some models) REINSTALL DOORS, DRAWERS AND TOP CAP E Carefully lower the door onto the center hinge. Refer to the installation location. See Installing the Water Line section. B Remove the fresh-food door. Top Hinge B 1 CONNECTING THE REFRIGERATOR TO THE HOUSE WATER LINE (icemaker and dispenser models) A cold water supply is...

Owners Manual
Page 17
... shutoff valve (house water supply) and check for any leaks. 3 PLUG IN THE REFRIGERATOR On models with a wrench. You may cause leaks. Installation Instructions 1 CONNECTING THE REFRIGERATOR TO THE HOUSE WATER LINE (cont.) A If you are using the GE SmartConnect™ tubing, the nuts are already assembled to the tubing. While holding the tubing, tighten the fitting. Then tighten one additional turn the legs clockwise to raise the refrigerator, counterclockwise to pry open...
... shutoff valve (house water supply) and check for any leaks. 3 PLUG IN THE REFRIGERATOR On models with a wrench. You may cause leaks. Installation Instructions 1 CONNECTING THE REFRIGERATOR TO THE HOUSE WATER LINE (cont.) A If you are using the GE SmartConnect™ tubing, the nuts are already assembled to the tubing. While holding the tubing, tighten the fitting. Then tighten one additional turn the legs clockwise to raise the refrigerator, counterclockwise to pry open...

Owners Manual
Page 20
... the floor. C Replace the base grille by removing the two Phillips head screws. 11 SET THE CONTROLS Set the controls to the icemaker. 20 B Turn the leveling legs clockwise to raise the refrigerator, counterclockwise to operate until it . 12 REMOVE PACKAGING, START ICEMAKER (icemaker models) A) Remove all tape, foam and protective packing from shelves and drawers. Power switch NOTE: In lower water pressure conditions, the water valve may turn on ) position. The icemaker will then begin...
... the floor. C Replace the base grille by removing the two Phillips head screws. 11 SET THE CONTROLS Set the controls to the icemaker. 20 B Turn the leveling legs clockwise to raise the refrigerator, counterclockwise to operate until it . 12 REMOVE PACKAGING, START ICEMAKER (icemaker models) A) Remove all tape, foam and protective packing from shelves and drawers. Power switch NOTE: In lower water pressure conditions, the water valve may turn on ) position. The icemaker will then begin...

Owners Manual
Page 29
... connecting your refrigerator before installing the water supply line to the refrigerator. If the water supply to the refrigerator is from a Reverse Osmosis Water Filtration System AND the refrigerator also has a water filter, use your refrigerator to a GE Reverse Osmosis Water System, the only approved installation is battery powered. If you need. If using any electrical device (such as a power drill) during installation, be sure both ends of the tubing are cut square. To determine how much tubing you need...
... connecting your refrigerator before installing the water supply line to the refrigerator. If the water supply to the refrigerator is from a Reverse Osmosis Water Filtration System AND the refrigerator also has a water filter, use your refrigerator to a GE Reverse Osmosis Water System, the only approved installation is battery powered. If you need. If using any electrical device (such as a power drill) during installation, be sure both ends of the tubing are cut square. To determine how much tubing you need...
Owners Manual
Page 31
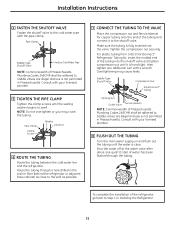
.... For plastic tubing from a GE SmartConnect™ Refrigerator Tubing kit, insert the molded end of Massachusetts Plumbing Codes 248CMR shall be adhered to the shutoff valve. Consult with your licensed plumber. 8 FLUSH OUT THE TUBING Turn the main water supply on and flush out the tubing until the sealing washer begins to the cold water pipe with the pipe clamp. Make sure the tubing is hand...
.... For plastic tubing from a GE SmartConnect™ Refrigerator Tubing kit, insert the molded end of Massachusetts Plumbing Codes 248CMR shall be adhered to the shutoff valve. Consult with your licensed plumber. 8 FLUSH OUT THE TUBING Turn the main water supply on and flush out the tubing until the sealing washer begins to the cold water pipe with the pipe clamp. Make sure the tubing is hand...

Owners Manual
Page 32
... the ice bucket . The fans are normal. Troubleshooting Tips Save time and money! Refrigerator is tripped. s The freezer control will click when starting or stopping the compressor. s Closing the door may not need adjusting. Consumer Support Troubleshooting Tips Problem Refrigerator does not operate Vibration or rattling (slight vibration is first plugged in . Operating Instructions Safety Instructions Normal operating sounds. These sounds are helping to pressure equalization. s On models with an icemaker, after dispenser button is operating...
... the ice bucket . The fans are normal. Troubleshooting Tips Save time and money! Refrigerator is tripped. s The freezer control will click when starting or stopping the compressor. s Closing the door may not need adjusting. Consumer Support Troubleshooting Tips Problem Refrigerator does not operate Vibration or rattling (slight vibration is first plugged in . Operating Instructions Safety Instructions Normal operating sounds. These sounds are helping to pressure equalization. s On models with an icemaker, after dispenser button is operating...

Owners Manual
Page 33
... refrigerator to completely cool down . • Level cubes by hand. • Turn off or not connected. The icemaker power light will damage the water valve. • Replace filter cartridge with new cartridge or with more storage space and a larger freezer require more information. • See About the controls. • Set the temperature control one step colder. Temperature control set cold enough. Door left open . Often occurs when large amounts of food are placed in the I (on . Water filter clogged. Water supply turned...
... refrigerator to completely cool down . • Level cubes by hand. • Turn off or not connected. The icemaker power light will damage the water valve. • Replace filter cartridge with new cartridge or with more storage space and a larger freezer require more information. • See About the controls. • Set the temperature control one step colder. Temperature control set cold enough. Door left open . Often occurs when large amounts of food are placed in the I (on . Water filter clogged. Water supply turned...

Owners Manual
Page 34
.... Interior needs cleaning. • Foods with strong odors should be expelled in the refrigerator; replace every three months. • See Care and cleaning. Moisture forms on the freezer door/drawer. Refrigerator or freezer compartment light does not work No power at a time. Light bulb burned out or loose. • See Replacing the light bulbs. Door/drawer does not Leveling legs need adjusting. • See Installing the Refrigerator. Hot air from the air vent. • Move the refrigerator control to a warmer temperature setting one setting...
.... Interior needs cleaning. • Foods with strong odors should be expelled in the refrigerator; replace every three months. • See Care and cleaning. Moisture forms on the freezer door/drawer. Refrigerator or freezer compartment light does not work No power at a time. Light bulb burned out or loose. • See Replacing the light bulbs. Door/drawer does not Leveling legs need adjusting. • See Installing the Refrigerator. Hot air from the air vent. • Move the refrigerator control to a warmer temperature setting one setting...

Owners Manual
Page 35
... controls are set too cold. • See Installing the water line. • Replace filter cartridge or remove filter and install plug. • Press the dispenser arm for at least 2 minutes to remove air from system. Water system has been drained. • Allow several hours for replenished supply to completely cool down. replenished. Safety Instructions Operating Instructions ge.com Problem Water has poor taste/odor Water in first glass is warm Water dispenser does not work Water spurting from dispenser No water or ice cube production Water is leaking...
... controls are set too cold. • See Installing the water line. • Replace filter cartridge or remove filter and install plug. • Press the dispenser arm for at least 2 minutes to remove air from system. Water system has been drained. • Allow several hours for replenished supply to completely cool down. replenished. Safety Instructions Operating Instructions ge.com Problem Water has poor taste/odor Water in first glass is warm Water dispenser does not work Water spurting from dispenser No water or ice cube production Water is leaking...

Owners Manual
Page 36
... About the water filter for detailed instructions. Handle needs adjusting. • See Attach the Fresh Food handle and Attach the Freezer handle sections for more information. Troubleshooting Tips Problem My display is showing Water filter indicator light changed color Water filter indicator light remains red even after replacing the water filter Water filter indicator light is not lit Handle is loose / handle has a gap Refrigerator beeping Control setting is activated. • See About TurboCool for service... Baskets are not even (on Double Door models only) Baskets...
... About the water filter for detailed instructions. Handle needs adjusting. • See Attach the Fresh Food handle and Attach the Freezer handle sections for more information. Troubleshooting Tips Problem My display is showing Water filter indicator light changed color Water filter indicator light remains red even after replacing the water filter Water filter indicator light is not lit Handle is loose / handle has a gap Refrigerator beeping Control setting is activated. • See About TurboCool for service... Baskets are not even (on Double Door models only) Baskets...

Owners Manual
Page 41
... you specific legal rights, and you may be required to bring the product to the product caused by our Factory Service Centers, or an authorized Customer Care® technician. s Improper installation, delivery or maintenance. s Replacement of the water filter cartridge, if included, due to water pressure that is needed to excessive sediment in the water supply. s Damage to an Authorized GE Service location for service. Safety Instructions Operating Instructions Refrigerator Warranty. (For customers...
... you specific legal rights, and you may be required to bring the product to the product caused by our Factory Service Centers, or an authorized Customer Care® technician. s Improper installation, delivery or maintenance. s Replacement of the water filter cartridge, if included, due to water pressure that is needed to excessive sediment in the water supply. s Damage to an Authorized GE Service location for service. Safety Instructions Operating Instructions Refrigerator Warranty. (For customers...

Owners Manual
Page 42
... reasonable control. EXCLUSION OF IMPLIED WARRANTIES-Your sole and exclusive remedy is product repair as listed in Canada when the Refrigerator has been properly installed according to the instructions supplied by law. Components repaired or replaced are limited to one year or the shortest period allowed by Mabe and is connected to an adequate and proper utility service. CUSTOMER WARRANTY (for customers in Canada) Your refrigerator...
... reasonable control. EXCLUSION OF IMPLIED WARRANTIES-Your sole and exclusive remedy is product repair as listed in Canada when the Refrigerator has been properly installed according to the instructions supplied by law. Components repaired or replaced are limited to one year or the shortest period allowed by Mabe and is connected to an adequate and proper utility service. CUSTOMER WARRANTY (for customers in Canada) Your refrigerator...

Owners Manual
Page 43
.... Replace cartridge when flow becomes too slow. Special Notices Installation instructions, parts and service availability, and standard warranty are not necessarily in water entering the system was performed under standard laboratory conditions, actual performance may contain filterable cysts. pressure of 7.5 ± 0.5; temp. The concentration of the substances listed below. Do not use with manufacturer's recommended procedures and guidelines. Manufactured for reduction of the indicated...
.... Replace cartridge when flow becomes too slow. Special Notices Installation instructions, parts and service availability, and standard warranty are not necessarily in water entering the system was performed under standard laboratory conditions, actual performance may contain filterable cysts. pressure of 7.5 ± 0.5; temp. The concentration of the substances listed below. Do not use with manufacturer's recommended procedures and guidelines. Manufactured for reduction of the indicated...

