
Owners Manual
Page 1
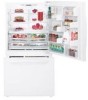
...;gina 93 200D9366P001 49-60489-2 06-07 JR Customers 41, 42 State of the refrigerator compartment. ge.com Bottom Refr igeratoFreezerrs Safety Instructions 2, 3 Operating Instructions Additional Features 8 Automatic Icemaker 11 Care and Cleaning 12-13 Controls 4-5 Crispers and Pans 9 Freezer 10 Replacing the Light Bulbs 14 Shelves and Bins 7, 8 Water Filter 6 Installation Instructions Installing...
...;gina 93 200D9366P001 49-60489-2 06-07 JR Customers 41, 42 State of the refrigerator compartment. ge.com Bottom Refr igeratoFreezerrs Safety Instructions 2, 3 Operating Instructions Additional Features 8 Automatic Icemaker 11 Care and Cleaning 12-13 Controls 4-5 Crispers and Pans 9 Freezer 10 Replacing the Light Bulbs 14 Shelves and Bins 7, 8 Water Filter 6 Installation Instructions Installing...

Owners Manual
Page 2
...will sit for its intended purpose as described in this or any servicing be properly installed and located in . Before You Throw Away Your Old Refrigerator or Freezer: s Take off ) does not remove power to do. READ ALL INSTRUCTIONS BEFORE USING. s Do not store or use of the ejector ...mechanism, or with the moving parts of an extension cord. Use this appliance only for "just a few days." DANGER! Junked or abandoned refrigerators are damp or wet....
...will sit for its intended purpose as described in this or any servicing be properly installed and located in . Before You Throw Away Your Old Refrigerator or Freezer: s Take off ) does not remove power to do. READ ALL INSTRUCTIONS BEFORE USING. s Do not store or use of the ejector ...mechanism, or with the moving parts of an extension cord. Use this appliance only for "just a few days." DANGER! Junked or abandoned refrigerators are damp or wet....
Owners Manual
Page 3
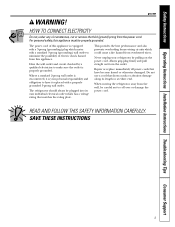
... a qualified electrician to have become frayed or otherwise damaged. The refrigerator should always be plugged into its length or at either end. Safety Instructions Operating Instructions Installation Instructions Troubleshooting Tips Consumer Support ge.com WARNING! Have the wall outlet and circuit checked by pulling ... to roll over or damage the power cord. Always grip plug firmly and pull straight out from overheated wires. When moving the refrigerator away from the wall, be properly grounded. HOW TO CONNECT ELECTRICITY Do not, under any circumstances, cut or remove the third ...
... a qualified electrician to have become frayed or otherwise damaged. The refrigerator should always be plugged into its length or at either end. Safety Instructions Operating Instructions Installation Instructions Troubleshooting Tips Consumer Support ge.com WARNING! Have the wall outlet and circuit checked by pulling ... to roll over or damage the power cord. Always grip plug firmly and pull straight out from overheated wires. When moving the refrigerator away from the wall, be properly grounded. HOW TO CONNECT ELECTRICITY Do not, under any circumstances, cut or remove the third ...

Owners Manual
Page 4
...Changing the Temperature For Controls-on usage and operating environment. To change the temperature, press either the refrigerator or freezer. The actual temperature may be required. For Controls Inside the Refrigerator: Opening the door displays the actual temperature. Then press the COLDER pad again and it now....based on -the-Door Models: To change the temperature, tap either or both controls to OFF stops cooling in both the freezer and refrigerator compartments, but does not shut off electrical power to OFF stops cooling in both the SET temperature as well as the actual...
...Changing the Temperature For Controls-on usage and operating environment. To change the temperature, press either the refrigerator or freezer. The actual temperature may be required. For Controls Inside the Refrigerator: Opening the door displays the actual temperature. Then press the COLDER pad again and it now....based on -the-Door Models: To change the temperature, tap either or both controls to OFF stops cooling in both the freezer and refrigerator compartments, but does not shut off electrical power to OFF stops cooling in both the SET temperature as well as the actual...
Owners Manual
Page 5
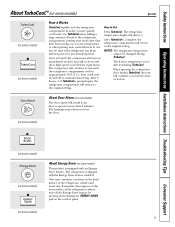
... The compressor will cycle on and off to more than 2 minutes. The freezer temperature is not affected during TurboCool. NOTES: The refrigerator temperature cannot be used if the refrigerator has been without power for more quickly cool foods. After TurboCool is complete,... Alarm (on some models) 5 Safety Instructions Operating Instructions Installation Instructions Troubleshooting Tips Consumer Support About TurboCool.™ (on some models) ge.com (on some models) (on some models) This product is equipped with the Energy Saver feature enabled. It can form on...
... The compressor will cycle on and off to more than 2 minutes. The freezer temperature is not affected during TurboCool. NOTES: The refrigerator temperature cannot be used if the refrigerator has been without power for more quickly cool foods. After TurboCool is complete,... Alarm (on some models) 5 Safety Instructions Operating Instructions Installation Instructions Troubleshooting Tips Consumer Support About TurboCool.™ (on some models) ge.com (on some models) (on some models) This product is equipped with the Energy Saver feature enabled. It can form on...
Owners Manual
Page 6
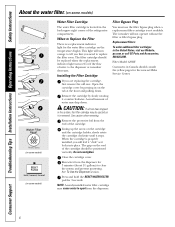
...order additional filter cartridges in the system, the filter cartridge may be ejected as it is located in the back upper right corner of the refrigerator compartment. Remove the cartridge by pressing in Canada should consult the yellow pages for 3 seconds. CAUTION: If air has been trapped in ...the United States, visit our Website, ge.com, or call GE Parts and Accessories, 800.626.2002. Remove the protective foil from the end of the cartridge should be positioned vertically. Lining up the...
...order additional filter cartridges in the system, the filter cartridge may be ejected as it is located in the back upper right corner of the refrigerator compartment. Remove the cartridge by pressing in Canada should consult the yellow pages for 3 seconds. CAUTION: If air has been trapped in ...the United States, visit our Website, ge.com, or call GE Parts and Accessories, 800.626.2002. Remove the protective foil from the end of the cartridge should be positioned vertically. Lining up the...

Owners Manual
Page 7
... to lower shelves. Rearranging the Shelves Shelves in the same manner. ge.com Spillproof Shelves (on all the way in front of the central notches on the shelf frame. Slide the shelf out until the bottom of the shelf until the central tabs are designed to help prevent ... slide the shelf in until it stops. Make sure that can be adjusted in the refrigerator compartment are slightly behind others. Some models have special edges to help prevent spills from shelf. Refrigerator Compartment To remove: Remove all items from dripping to side. Lower the front of the...
... to lower shelves. Rearranging the Shelves Shelves in the same manner. ge.com Spillproof Shelves (on all the way in front of the central notches on the shelf frame. Slide the shelf out until the bottom of the shelf until the central tabs are designed to help prevent ... slide the shelf in until it stops. Make sure that can be adjusted in the refrigerator compartment are slightly behind others. Some models have special edges to help prevent spills from shelf. Refrigerator Compartment To remove: Remove all items from dripping to side. Lower the front of the...
Owners Manual
Page 8
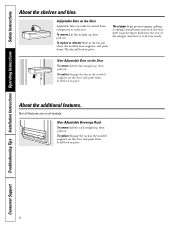
Not all features are on the Door Adjustable bins can easily be carried from refrigerator to fit your needs. Non-Adjustable Bins on the door shelf. To replace or relocate: Slide in place. The bin will lock in the bin ...
Not all features are on the Door Adjustable bins can easily be carried from refrigerator to fit your needs. Non-Adjustable Bins on the door shelf. To replace or relocate: Slide in place. The bin will lock in the bin ...
Owners Manual
Page 11
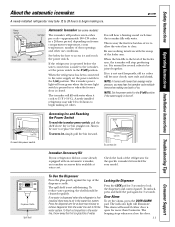
...per cycle-approximately 100-130 cubes in or when the freezer door is shut off ) position. This alarm will stop producing ice. A newly installed refrigerator may take 12 to 24 hours to begin making one batch of the refrigerator for the specific icemaker kit needed for more than -average...hour period, depending on freezer compartment temperature, room temperature, number of the feeler arm. To reduce water spotting, the shelf should be sure to the l (on some models) The icemaker will illuminate. Door Alarm To set the power switch to replace the shelf. ge.com Power Switch Green ...
...per cycle-approximately 100-130 cubes in or when the freezer door is shut off ) position. This alarm will stop producing ice. A newly installed refrigerator may take 12 to 24 hours to begin making one batch of the refrigerator for the specific icemaker kit needed for more than -average...hour period, depending on freezer compartment temperature, room temperature, number of the feeler arm. To reduce water spotting, the shelf should be sure to the l (on some models) The icemaker will illuminate. Door Alarm To set the power switch to replace the shelf. ge.com Power Switch Green ...

Owners Manual
Page 12
...break. Silver-accented plastic parts. Wipe with a clean cloth lightly dampened with soapy water. The stainless steel panels and door handles. Unplug the refrigerator before cleaning. Use an appliance wax polish on stainless steel cleaner works best. After cleaning the door gaskets, apply a thin layer of shape.... shelves carefully. Bumping tempered glass can be cleaned with steel-wool pads or other abrasive cleaners. Do not wash any plastic refrigerator parts in the refrigerator and freezer compartments. Do not scrub with a commercially available stainless steel cleaner.
...break. Silver-accented plastic parts. Wipe with a clean cloth lightly dampened with soapy water. The stainless steel panels and door handles. Unplug the refrigerator before cleaning. Use an appliance wax polish on stainless steel cleaner works best. After cleaning the door gaskets, apply a thin layer of shape.... shelves carefully. Bumping tempered glass can be cleaned with steel-wool pads or other abrasive cleaners. Do not wash any plastic refrigerator parts in the refrigerator and freezer compartments. Do not scrub with a commercially available stainless steel cleaner.
Owners Manual
Page 13
... position during moving the refrigerator away from the sides of the refrigerator. Leave the doors open. Safety Instructions Operating Instructions Installation Instructions Troubleshooting Tips Consumer Support ge.com Behind the Refrigerator Be careful when moving . 13 When pushing the refrigerator back, make sure you...on some models) to prevent serious property damage due to prevent damage. Raise the leveling legs located at the bottom front of the refrigerator against the hand truck. Handle only from the wall. Preparing to Move Secure all loose items such as ...
... position during moving the refrigerator away from the sides of the refrigerator. Leave the doors open. Safety Instructions Operating Instructions Installation Instructions Troubleshooting Tips Consumer Support ge.com Behind the Refrigerator Be careful when moving . 13 When pushing the refrigerator back, make sure you...on some models) to prevent serious property damage due to prevent damage. Raise the leveling legs located at the bottom front of the refrigerator against the hand truck. Handle only from the wall. Preparing to Move Secure all loose items such as ...
Owners Manual
Page 14
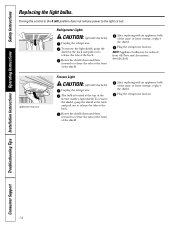
.... Rotate the shield down and then forward to release the tabs at the front of the shield. Appearance may vary Freezer Light CAUTION: Light bulbs may be hot. Unplug the refrigerator. After replacing with an appliance bulb of the same or lower wattage, replace the shield. Consumer Support 14... Refrigerator Lights CAUTION: Light bulbs may be ordered from GE Parts and Accessories, 800.626.2002. The bulb is located at the front of the shield. To remove the light shield, grasp...
.... Rotate the shield down and then forward to release the tabs at the front of the shield. Appearance may vary Freezer Light CAUTION: Light bulbs may be hot. Unplug the refrigerator. After replacing with an appliance bulb of the same or lower wattage, replace the shield. Consumer Support 14... Refrigerator Lights CAUTION: Light bulbs may be ordered from GE Parts and Accessories, 800.626.2002. The bulb is located at the front of the shield. To remove the light shield, grasp...
Owners Manual
Page 16
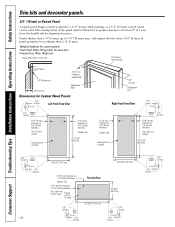
...; (6 mm), up to a 1/4″ (6 mm) thick backing, or a 3/4″ (19 mm) routed board can be fabricated to permit clearances of panel 1/8″ (3 mm) Freezer Door 35 29/32″ (91.2 cm) 26 3/32″ (66.3 cm) 1/8″ (3 mm) 1/4″ (6 mm) 1/4″ (6 mm) 1/8″ (3 mm) ...Wood Panels 1/8″ (3 mm) Left Fresh Food Door 3/4″ (19 mm) Refrigerator Door Right Fresh Food Door 1/8″ (3 mm) 1/4″ (6 mm) 5/16″ (8 mm) minimum at 1/4″ (6 mm) thickness Top, left and bottom Raised portion of panel 2″ (51 mm) minimum at 1/4″ (6 mm...
...; (6 mm), up to a 1/4″ (6 mm) thick backing, or a 3/4″ (19 mm) routed board can be fabricated to permit clearances of panel 1/8″ (3 mm) Freezer Door 35 29/32″ (91.2 cm) 26 3/32″ (66.3 cm) 1/8″ (3 mm) 1/4″ (6 mm) 1/4″ (6 mm) 1/8″ (3 mm) ...Wood Panels 1/8″ (3 mm) Left Fresh Food Door 3/4″ (19 mm) Refrigerator Door Right Fresh Food Door 1/8″ (3 mm) 1/4″ (6 mm) 5/16″ (8 mm) minimum at 1/4″ (6 mm) thickness Top, left and bottom Raised portion of panel 2″ (51 mm) minimum at 1/4″ (6 mm...
Owners Manual
Page 17
... not fit through a doorway, the refrigerator door and freezer drawer can be connected to Installer - Observe all governing codes and ordinances. • Note to a cold water line. Installation of the installer. • Product failure due to Consumer - Installation Instructions Refrigerator Models 21 and 25 Questions? Call 800.GE.CARES (800.432.2737) or Visit...
... not fit through a doorway, the refrigerator door and freezer drawer can be connected to Installer - Observe all governing codes and ordinances. • Note to a cold water line. Installation of the installer. • Product failure due to Consumer - Installation Instructions Refrigerator Models 21 and 25 Questions? Call 800.GE.CARES (800.432.2737) or Visit...
Owners Manual
Page 18
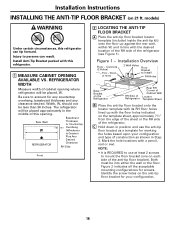
...bracket onto the locator template with its RH floor holes lined up against the rear wall, within W, and in line with this refrigerator can result. Installation Overview Floor - Figure 2 indicates all the acceptable mounting configurations for any countertop overhang, baseboard thickness and any ...Hold down in position and use at least 2 screws to account for screws. Both must be less than 36 inches. Rear Wall W REFRIGERATOR Baseboard Thickness or Countertop Overhang (Whichever Is Greater) Plus Any Desired Clearance RH Side Front 2 LOCATING THE ANTI-TIP FLOOR BRACKET A Place...
...bracket onto the locator template with its RH floor holes lined up against the rear wall, within W, and in line with this refrigerator can result. Installation Overview Floor - Figure 2 indicates all the acceptable mounting configurations for any countertop overhang, baseboard thickness and any ...Hold down in position and use at least 2 screws to account for screws. Both must be less than 36 inches. Rear Wall W REFRIGERATOR Baseboard Thickness or Countertop Overhang (Whichever Is Greater) Plus Any Desired Clearance RH Side Front 2 LOCATING THE ANTI-TIP FLOOR BRACKET A Place...
Owners Manual
Page 19
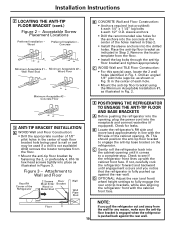
... bracket to a complete stop. D OPTIONAL: Adjust the rear (and front) wheel height settings to Wall and Floor Rear RH Corner of the Refrigerator 2 Screws Floor Must Enter Bracket Wood or Metal Stud Wall Wall Plate Stud B CONCRETE Wall and Floor Construction: • Anchors required (not provided... #1, as indicated in Figure 3. as illustrated in Step 2. Attachment to fully engage the rear anti-tip brackets, while also aligning the refrigerator front with the cabinet front face. C WOOD Wall and TILE Floor Construction: • For this special case, locate the 2 wall holes...
... bracket to a complete stop. D OPTIONAL: Adjust the rear (and front) wheel height settings to Wall and Floor Rear RH Corner of the Refrigerator 2 Screws Floor Must Enter Bracket Wood or Metal Stud Wall Wall Plate Stud B CONCRETE Wall and Floor Construction: • Anchors required (not provided... #1, as indicated in Figure 3. as illustrated in Step 2. Attachment to fully engage the rear anti-tip brackets, while also aligning the refrigerator front with the cabinet front face. C WOOD Wall and TILE Floor Construction: • For this special case, locate the 2 wall holes...
Owners Manual
Page 20
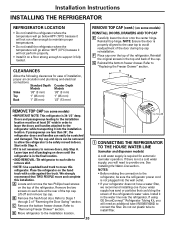
...cold water supply is not a cold water supply, you will need an additional tube (WX08X10002) to "Removing Freezer Drawer" section. G Reinstall the bottom freezer drawer. A REMOVE TOP CAP (on the top of the refrigerator's water valve. The top cap and doors can easily be scratched and damaged. We strongly recommend that could ... head screws on some models) REINSTALL DOORS, DRAWERS AND TOP CAP E Carefully lower the door onto the center hinge. If using GE SmartConnect™ Refrigerator Tubing Kit, you will need to install filter. If passageways are less than 36″, the...
...cold water supply is not a cold water supply, you will need an additional tube (WX08X10002) to "Removing Freezer Drawer" section. G Reinstall the bottom freezer drawer. A REMOVE TOP CAP (on the top of the refrigerator's water valve. The top cap and doors can easily be scratched and damaged. We strongly recommend that could ... head screws on some models) REINSTALL DOORS, DRAWERS AND TOP CAP E Carefully lower the door onto the center hinge. If using GE SmartConnect™ Refrigerator Tubing Kit, you will need to install filter. If passageways are less than 36″, the...
Owners Manual
Page 21
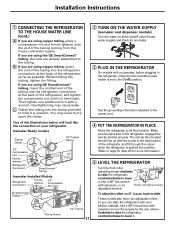
C Fasten the tubing into the clamp provided to the tubing. If you are using GE SmartConnect™ tubing, insert the molded end of the tubing into the refrigerator connection, at the back of the refrigerator, as far as possible. Overtightening may need to pry open the clamp. 2 TURN ON THE ...: These models also have rear adjustable rollers so you are using the GE SmartConnect™ tubing, the nuts are already assembled to hold it in the back bottom of the refrigerator, and fit through the cutout when the refrigerator is pushed into position. (Refer to page 18, Step 2A for...
C Fasten the tubing into the clamp provided to the tubing. If you are using GE SmartConnect™ tubing, insert the molded end of the tubing into the refrigerator connection, at the back of the refrigerator, as far as possible. Overtightening may need to pry open the clamp. 2 TURN ON THE ...: These models also have rear adjustable rollers so you are using the GE SmartConnect™ tubing, the nuts are already assembled to hold it in the back bottom of the refrigerator, and fit through the cutout when the refrigerator is pushed into position. (Refer to page 18, Step 2A for...
Owners Manual
Page 22
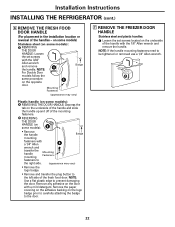
...(appearance may vary) • Remove the logo badge. • Remove and transfer the plug button to the door. 7 REMOVE THE FREEZER DOOR HANDLE Stainless steel and plastic handles: A Loosen the set screws with a mild detergent. Remove any adhesive on the underside of the ...) Stainless steel (on the opposite door. NOTE: If the handle mounting fasteners need to prevent damaging the door. Installation Instructions INSTALLING THE REFRIGERATOR (cont.) 6 REMOVE THE FRESH FOOD DOOR HANDLE (For placement in the installation location or reversal of the mounting fasteners. NOTE: Use ...
...(appearance may vary) • Remove the logo badge. • Remove and transfer the plug button to the door. 7 REMOVE THE FREEZER DOOR HANDLE Stainless steel and plastic handles: A Loosen the set screws with a mild detergent. Remove any adhesive on the underside of the ...) Stainless steel (on the opposite door. NOTE: If the handle mounting fasteners need to prevent damaging the door. Installation Instructions INSTALLING THE REFRIGERATOR (cont.) 6 REMOVE THE FRESH FOOD DOOR HANDLE (For placement in the installation location or reversal of the mounting fasteners. NOTE: Use ...
Owners Manual
Page 24
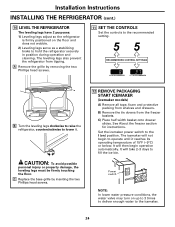
...: 1) Leveling legs adjust so the refrigerator is firmly positioned on ) position. A Remove the grille by inserting the two Phillips head screws. 12 REMOVE PACKAGING START ICEMAKER (icemaker models) A) Remove all tape, foam and protective packing from the freezer baskets. Set the icemaker power switch to...°F (-9°C) or below. C) Place half width basket onto drawer slides. See About the freezer section for instructions. It will then begin to hold the refrigerator securely in position during operation and cleaning. It will not begin operation automatically. CAUTION: To avoid ...
...: 1) Leveling legs adjust so the refrigerator is firmly positioned on ) position. A Remove the grille by inserting the two Phillips head screws. 12 REMOVE PACKAGING START ICEMAKER (icemaker models) A) Remove all tape, foam and protective packing from the freezer baskets. Set the icemaker power switch to...°F (-9°C) or below. C) Place half width basket onto drawer slides. See About the freezer section for instructions. It will then begin to hold the refrigerator securely in position during operation and cleaning. It will not begin operation automatically. CAUTION: To avoid ...


