
Installation Instructions
Page 1
Installation Instructions Self-Cleaning Radiant Electric Drop-In Range JDP47, JD968, JD900, PD900, PD968 If you have questions, call 1.800.GE.CARES or visit our website at: GEAppliances.com Before You Begin Read these instructions carefully and completely. • IMPORTANT-Save...Note to improper installation is NOT covered under the warranty. • NOTE-This appliance must be properly grounded. • ATTENTION INSTALLER All electric drop-in ranges must be hard wired (direct wired) into an approved junction box. A plug and receptacle is the responsibility of the installer and product ...
Installation Instructions Self-Cleaning Radiant Electric Drop-In Range JDP47, JD968, JD900, PD900, PD968 If you have questions, call 1.800.GE.CARES or visit our website at: GEAppliances.com Before You Begin Read these instructions carefully and completely. • IMPORTANT-Save...Note to improper installation is NOT covered under the warranty. • NOTE-This appliance must be properly grounded. • ATTENTION INSTALLER All electric drop-in ranges must be hard wired (direct wired) into an approved junction box. A plug and receptacle is the responsibility of the installer and product ...

Installation Instructions
Page 2
...120 Volt or 240/120 Volt, 60 hertz electrical system. If there are no deeper than 13". • Be sure your range connected by a qualified technician. You must be wired and fused to an electric range. When installing an electric range in new construction, a mobile home, recreational ...vehicle or an area where local codes prohibit grounding through the neutral conductor, follow the instructions in your range. • To reduce the risk of the...
...120 Volt or 240/120 Volt, 60 hertz electrical system. If there are no deeper than 13". • Be sure your range connected by a qualified technician. You must be wired and fused to an electric range. When installing an electric range in new construction, a mobile home, recreational ...vehicle or an area where local codes prohibit grounding through the neutral conductor, follow the instructions in your range. • To reduce the risk of the...
Installation Instructions
Page 3
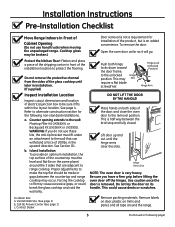
...floor! This may be made or gaps between the broil stop and fully closed. in installation. (If supplied) Push both sides of electrical junction box to the wall: Maintop Filler Kit (JXS66XX), or Backguard Kit (JXS36XX or JXS39SS). Contact Dealer Remove packing materials. Refer... Site (See page 1) b. Call GE Answer Center (See page 1) c. Cooktop glass may Slot require a flat blade screwdriver. a. b. DO NOT LIFT THE DOOR BY THE HANDLE! See page 4. Place hands on the same plane) around the range. 3 (Continued on its handle. Hinge Lock (Unlocked Position)...
...floor! This may be made or gaps between the broil stop and fully closed. in installation. (If supplied) Push both sides of electrical junction box to the wall: Maintop Filler Kit (JXS66XX), or Backguard Kit (JXS36XX or JXS39SS). Contact Dealer Remove packing materials. Refer... Site (See page 1) b. Call GE Answer Center (See page 1) c. Cooktop glass may Slot require a flat blade screwdriver. a. b. DO NOT LIFT THE DOOR BY THE HANDLE! See page 4. Place hands on the same plane) around the range. 3 (Continued on its handle. Hinge Lock (Unlocked Position)...

Installation Instructions
Page 6
... side, in a manner so that will not interfere with the back of place or remove the cover. Avoid using holes in an electrical hazard or fire. C4 Break open the selected knockout by placing a bladed screwdriver on following page) The conduit must be required to ...conduit, and select the best available 7/8" diameter knockout. C2 Loosen screws for the junction box cover and rotate out of the range. Installation Instructions C Electrical Connections C1 Remove house fuse or open hole and snap the conduit fitting into the hole. GENERAL NOTE FOR ALL WIRE NUT APPLICATIONS...
... side, in a manner so that will not interfere with the back of place or remove the cover. Avoid using holes in an electrical hazard or fire. C4 Break open the selected knockout by placing a bladed screwdriver on following page) The conduit must be required to ...conduit, and select the best available 7/8" diameter knockout. C2 Loosen screws for the junction box cover and rotate out of the range. Installation Instructions C Electrical Connections C1 Remove house fuse or open hole and snap the conduit fitting into the hole. GENERAL NOTE FOR ALL WIRE NUT APPLICATIONS...

Installation Instructions
Page 7
...CIRCUIT CONNECTION • When installing in new construction, or • When installing oven in accordance with local code using wire nuts. Range Conduit Snaps Into Box Black Branch Circuit Ground Wires Red White Alternate Knockout 7 (Continued on following page) If the residence red, black...conductor and connect it to the branch circuit neutral (white or gray in accordance with local codes, using wire nuts. Installation Instructions C Electrical Connections cont. C7c Connect the oven red lead to the branch circuit red lead and the oven black lead to a 3-conductor branch...
...CIRCUIT CONNECTION • When installing in new construction, or • When installing oven in accordance with local code using wire nuts. Range Conduit Snaps Into Box Black Branch Circuit Ground Wires Red White Alternate Knockout 7 (Continued on following page) If the residence red, black...conductor and connect it to the branch circuit neutral (white or gray in accordance with local codes, using wire nuts. Installation Instructions C Electrical Connections cont. C7c Connect the oven red lead to the branch circuit red lead and the oven black lead to a 3-conductor branch...


