Installation Instructions
Page 1
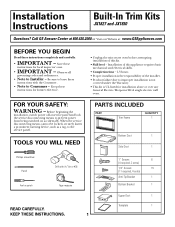
...GE Answer Center at 800.626.2000 or Visit our Website at service panel and lock the service disconnecting means to improper installation is not covered under the Warranty. • This kit is UL listed for future reference. • Unplug the microwave oven before attempting installation... - Keep these instructions with 7⁄64″ bit or #35 Tape measure READ CAREFULLY. Installation Instructions Built-In Trim Kits JX1827 and JX1830 Questions? Installation of the installer. • Product failure due to prevent power from being switched on accidentally. TOOLS YOU WILL NEED...
...GE Answer Center at 800.626.2000 or Visit our Website at service panel and lock the service disconnecting means to improper installation is not covered under the Warranty. • This kit is UL listed for future reference. • Unplug the microwave oven before attempting installation... - Keep these instructions with 7⁄64″ bit or #35 Tape measure READ CAREFULLY. Installation Instructions Built-In Trim Kits JX1827 and JX1830 Questions? Installation of the installer. • Product failure due to prevent power from being switched on accidentally. TOOLS YOU WILL NEED...
Installation Instructions
Page 2
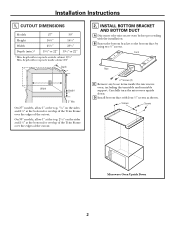
...;2″ screws. On 30″ models, allow 1″ at the top, 11⁄16″ on the sides and 13⁄8″ at the bottom for overlap of the Trim Frame over the edges of the cutout. 1⁄2″ Screws (2) C Remove any loose items inside cabinet 22″ Depth 2. INSTALL BOTTOM BRACKET AND...
...;2″ screws. On 30″ models, allow 1″ at the top, 11⁄16″ on the sides and 13⁄8″ at the bottom for overlap of the Trim Frame over the edges of the cutout. 1⁄2″ Screws (2) C Remove any loose items inside cabinet 22″ Depth 2. INSTALL BOTTOM BRACKET AND...
Installation Instructions
Page 3
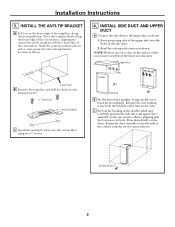
... Screw (1) 3 Mark the center positions with an awl or center punch for the anti-tip bracket. 1⁄2″ Screws (2) Anti-Tip Bracket C Install the anti-tip bracket onto the cutout floor using two 1⁄2″ screws. 4. NOTE: Remove any oil or dirt on the microwave cabinet, aligning ... front edge of the cutout floor, aligning the center line of the microwave oven before the ducts are attached. Press down firmly on the ducts. Installation Instructions 3. Insert projecting tabs of the upper duct into the holes of the double sided tape. Upper Duct 3 Holes 3 Tabs (1) Side Duct ...
... Screw (1) 3 Mark the center positions with an awl or center punch for the anti-tip bracket. 1⁄2″ Screws (2) Anti-Tip Bracket C Install the anti-tip bracket onto the cutout floor using two 1⁄2″ screws. 4. NOTE: Remove any oil or dirt on the microwave cabinet, aligning ... front edge of the cutout floor, aligning the center line of the microwave oven before the ducts are attached. Press down firmly on the ducts. Installation Instructions 3. Insert projecting tabs of the upper duct into the holes of the double sided tape. Upper Duct 3 Holes 3 Tabs (1) Side Duct ...
Installation Instructions
Page 4
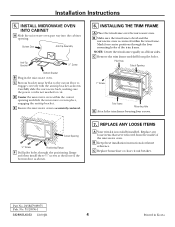
...sure the power cord is accurately centered. 6. INSTALLING THE TRIM FRAME A Place the trim frame over the microwave oven. Replace any loose items that were removed from the inside of the trim frame. Part No. 245B1790P075 Pub. Installation Instructions 5. INSTALL MICROWAVE OVEN INTO CABINET A Slide the microwave...holes. No. 31-20936-1 3828W5U0053 12-00 JR 4 Printed in the microwave oven. B Keep these installation instructions for future reference. D Center the microwave oven within the trim frame. C Replace house fuse or close circuit breaker. C Bottom bracket must be flat to the ...
...sure the power cord is accurately centered. 6. INSTALLING THE TRIM FRAME A Place the trim frame over the microwave oven. Replace any loose items that were removed from the inside of the trim frame. Part No. 245B1790P075 Pub. Installation Instructions 5. INSTALL MICROWAVE OVEN INTO CABINET A Slide the microwave...holes. No. 31-20936-1 3828W5U0053 12-00 JR 4 Printed in the microwave oven. B Keep these installation instructions for future reference. D Center the microwave oven within the trim frame. C Replace house fuse or close circuit breaker. C Bottom bracket must be flat to the ...


