Use and Care Manual
Page 1
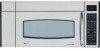
...manual de instrucciones, visite nuestro sitio de internet ge.com. Microwave Spacemaker Oven ge.com Safety Instructions . . . .2-9 Operating Instructions Auto Features 20 Care and Cleaning 33, 34 Changing the Power Level 13 Cooking Guide . . . . .15, 16 Defrosting Guide . . . . . .18 Exhaust Feature . . . .37, 38 Features of Your Microwave Oven . . . .11, 12 Microwave.... . . . .14-19 Troubleshooting Tips . . .39 Things That Are Normal With Your Microwave Oven 40 Consumer Support Consumer Support . . . . . .Back Cover Optional Kits 10 Product Registration 41, 42 Warranty 43 Español...
...manual de instrucciones, visite nuestro sitio de internet ge.com. Microwave Spacemaker Oven ge.com Safety Instructions . . . .2-9 Operating Instructions Auto Features 20 Care and Cleaning 33, 34 Changing the Power Level 13 Cooking Guide . . . . .15, 16 Defrosting Guide . . . . . .18 Exhaust Feature . . . .37, 38 Features of Your Microwave Oven . . . .11, 12 Microwave.... . . . .14-19 Troubleshooting Tips . . .39 Things That Are Normal With Your Microwave Oven 40 Consumer Support Consumer Support . . . . . .Back Cover Optional Kits 10 Product Registration 41, 42 Warranty 43 Español...
Use and Care Manual
Page 2
... seals and sealing surfaces. s Do Not Operate the oven if it is no damage to microwave energy. Energy section above. s This microwave oven is important not to accumulate on page 8. s Do Not Place any object between the oven front face and the door or allow soil or cleaner...using electrical appliances, basic safety precautions should be followed, including the following: s Read and follow the s Install or locate this manual must be adjusted or repaired by anyone except properly qualified service personnel. READ ALL INSTRUCTIONS BEFORE USING. It is s This appliance ...
... seals and sealing surfaces. s Do Not Operate the oven if it is no damage to microwave energy. Energy section above. s This microwave oven is important not to accumulate on page 8. s Do Not Place any object between the oven front face and the door or allow soil or cleaner...using electrical appliances, basic safety precautions should be followed, including the following: s Read and follow the s Install or locate this manual must be adjusted or repaired by anyone except properly qualified service personnel. READ ALL INSTRUCTIONS BEFORE USING. It is s This appliance ...
Use and Care Manual
Page 3
...To reduce the risk of fire in this appliance. Do not use as described in this Owner's Manual. Do not use Time Cook for its intended use corrosive chemicals or vapors in the oven cavity: s This over ranges no wider than 36″. s This appliance should be serviced ... in succession on the appliance. Safety Instructions Operating Instructions ge.com Use this appliance only for additional cooking time. If food is not intended for example, in a wet basement, near a swimming pool, near water- This microwave oven is specifically designed to heat, dry or cook food,...
...To reduce the risk of fire in this appliance. Do not use as described in this Owner's Manual. Do not use Time Cook for its intended use corrosive chemicals or vapors in the oven cavity: s This over ranges no wider than 36″. s This appliance should be serviced ... in succession on the appliance. Safety Instructions Operating Instructions ge.com Use this appliance only for additional cooking time. If food is not intended for example, in a wet basement, near a swimming pool, near water- This microwave oven is specifically designed to heat, dry or cook food,...
Use and Care Manual
Page 7
...using foil in the microwave oven, keep the foil at least partially uncovered because they are glass or ceramic materials and may not be at least 1″ away from hands and face. Troubleshooting Tips Consumer Support 7 Safety Instructions Operating Instructions ge.com s "Boilable" ...cooking pouches and tightly closed plastic bags should be slit, pierced or vented as directed in this manual. In longer exposures to overcooking, the food and cookware could burst...
...using foil in the microwave oven, keep the foil at least partially uncovered because they are glass or ceramic materials and may not be at least 1″ away from hands and face. Troubleshooting Tips Consumer Support 7 Safety Instructions Operating Instructions ge.com s "Boilable" ...cooking pouches and tightly closed plastic bags should be slit, pierced or vented as directed in this manual. In longer exposures to overcooking, the food and cookware could burst...
Use and Care Manual
Page 11
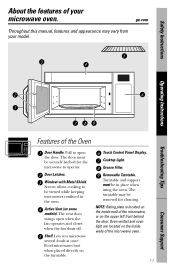
... the door. Pull to be securely latched for cleaning. Door Latches. Cooktop Light. ge.com Throughout this manual, features and appearance may be in the oven. Lets you microwave several foods at once. The door must be removed for the microwave to operate. Screen allows cooking to open when the fan operates and closes when...
... the door. Pull to be securely latched for cleaning. Door Latches. Cooktop Light. ge.com Throughout this manual, features and appearance may be in the oven. Lets you microwave several foods at once. The door must be removed for the microwave to operate. Screen allows cooking to open when the fan operates and closes when...
Use and Care Manual
Page 42
... Product Ownership Registration Dear Customer: Thank you for purchasing our product and thank you for placing your Owner's Manual carefully. Louisville, KY 40225 ge.com s Check here if you do not want to receive, Appliances via e-mail, discounts, special offers ...and other important General Electric Company communications from GEA's carefully selected partners. 42 Our service number is registered, or register online at ge.com. ✂ Cut here Consumer Product Ownership Registration ImpToMoradtiaal yn! Model Number Serial Number Important: If you require service. t...
... Product Ownership Registration Dear Customer: Thank you for purchasing our product and thank you for placing your Owner's Manual carefully. Louisville, KY 40225 ge.com s Check here if you do not want to receive, Appliances via e-mail, discounts, special offers ...and other important General Electric Company communications from GEA's carefully selected partners. 42 Our service number is registered, or register online at ge.com. ✂ Cut here Consumer Product Ownership Registration ImpToMoradtiaal yn! Model Number Serial Number Important: If you require service. t...
Use and Care Manual
Page 44
...impaired, please call 800.626.2224 during normal business hours. Printed in this manual cover procedures to : General Manager, Customer Relations GE Appliances, Appliance Park Louisville, KY 40225 Register Your Appliance ge.com Register your new appliance on our Website with your convenience! Caution must...You can now download Owner's Manuals, order parts or even schedule service on -line anytime, or call 800.TDD.GEAC (800.833.4322). For details of physical and mental abilities and impairments. Real Life Design Studio ge.com GE supports the Universal Design concept-products...
...impaired, please call 800.626.2224 during normal business hours. Printed in this manual cover procedures to : General Manager, Customer Relations GE Appliances, Appliance Park Louisville, KY 40225 Register Your Appliance ge.com Register your new appliance on our Website with your convenience! Caution must...You can now download Owner's Manuals, order parts or even schedule service on -line anytime, or call 800.TDD.GEAC (800.833.4322). For details of physical and mental abilities and impairments. Real Life Design Studio ge.com GE supports the Universal Design concept-products...
Installation Instructions
Page 1
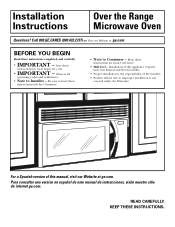
...and electrical skills. • Proper installation is the responsibility of this manual, visit our Website at : ge.com BEFORE YOU BEGIN Read these instructions for local inspector's use. &#...manual de instrucciones, visite nuestro sitio de internet ge.com. Installation of the installer. • Product failure due to leave these instructions for future reference. • Skill level - Save these instructions with the Consumer. • Note to Installer - Keep these instructions completely and carefully. • IMPORTANT - Installation Instructions Over the Range Microwave Oven...
...and electrical skills. • Proper installation is the responsibility of this manual, visit our Website at : ge.com BEFORE YOU BEGIN Read these instructions for local inspector's use. &#...manual de instrucciones, visite nuestro sitio de internet ge.com. Installation of the installer. • Product failure due to leave these instructions for future reference. • Skill level - Save these instructions with the Consumer. • Note to Installer - Keep these instructions completely and carefully. • IMPORTANT - Installation Instructions Over the Range Microwave Oven...

Installation Instructions
Page 7
...wide and free of Cabinet Needs to the Top of the Microwave Bottom Edge of obstructions. • If the space between the microwave oven and the cabinets. Your Owner's Manual contains the kit number for your microwave oven to the outside, see Hood Exhaust Section for exhaust duct ...preparation. • When installing the microwave oven beneath smooth, flat cabinets, be careful to ...
...wide and free of Cabinet Needs to the Top of the Microwave Bottom Edge of obstructions. • If the space between the microwave oven and the cabinets. Your Owner's Manual contains the kit number for your microwave oven to the outside, see Hood Exhaust Section for exhaust duct ...preparation. • When installing the microwave oven beneath smooth, flat cabinets, be careful to ...

Installation Instructions
Page 11
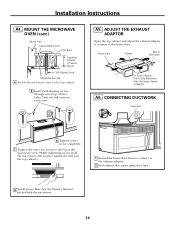
Select the type of ventilation: A. Recirculating (Non-Vented Ductless) NOTE: This microwave is designed for adaptation to that section. Outside Back Exhaust (Horizontal Duct) C. A OUTSIDE TOP EXHAUST (VERTICAL DUCT) Adaptor in Place ...exhaust. (See your installation and proceed to the following three types of ventilation required for your Owner's Manual for the kit number.) Outside Top Exhaust (Vertical Duct) B. Installation Instructions 2 INSTALLATION TYPES (Choose A, B or C) This microwave oven is shipped assembled for Outside Top Exhaust (except for non-vented models).
Select the type of ventilation: A. Recirculating (Non-Vented Ductless) NOTE: This microwave is designed for adaptation to that section. Outside Back Exhaust (Horizontal Duct) C. A OUTSIDE TOP EXHAUST (VERTICAL DUCT) Adaptor in Place ...exhaust. (See your installation and proceed to the following three types of ventilation required for your Owner's Manual for the kit number.) Outside Top Exhaust (Vertical Duct) B. Installation Instructions 2 INSTALLATION TYPES (Choose A, B or C) This microwave oven is shipped assembled for Outside Top Exhaust (except for non-vented models).
Installation Instructions
Page 14
... Front Cabinet Bottom Shelf Filler Block Equivalent to Depth of Cabinet Recess Self-Aligning Screw Microwave Oven Top 4 Attach the microwave oven to the exhaust adaptor. 2 Seal exhaust duct joints using duct tape. 8 Install ...Tighten the outer two screws to the top of Microwave For Front-to-Back or Side-to the house duct. Blower Plate Damper Back of the microwave oven. (While tightening screws, hold the microwave oven in place against the wall and the top ... Slide the Exhaust Adaptor as Needed A6. See the Owner's Manual packed with the microwave. 14 Installation Instructions A4.
... Front Cabinet Bottom Shelf Filler Block Equivalent to Depth of Cabinet Recess Self-Aligning Screw Microwave Oven Top 4 Attach the microwave oven to the exhaust adaptor. 2 Seal exhaust duct joints using duct tape. 8 Install ...Tighten the outer two screws to the top of Microwave For Front-to-Back or Side-to the house duct. Blower Plate Damper Back of the microwave oven. (While tightening screws, hold the microwave oven in place against the wall and the top ... Slide the Exhaust Adaptor as Needed A6. See the Owner's Manual packed with the microwave. 14 Installation Instructions A4.
Installation Instructions
Page 18
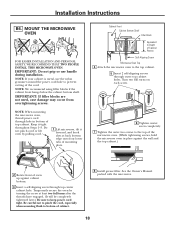
...screws to keep power cord tight. See the Owner's Manual packed with the microwave. 18 IMPORTANT: If filler blocks are not used, case damage may occur from overtightening screws. NOTE: When mounting the microwave oven, thread power cord through hole in place against the...Depth of Cabinet Recess Self-Aligning Screw Microwave Oven Top 4 Attach the microwave oven to bottom of mounting plate. Installation Instructions B6. MOUNT THE MICROWAVE OVEN FOR EASIER INSTALLATION AND PERSONAL SAFETY, WE RECOMMEND THAT TWO PEOPLE INSTALL THIS MICROWAVE OVEN. Be careful not to pinch the...
...screws to keep power cord tight. See the Owner's Manual packed with the microwave. 18 IMPORTANT: If filler blocks are not used, case damage may occur from overtightening screws. NOTE: When mounting the microwave oven, thread power cord through hole in place against the...Depth of Cabinet Recess Self-Aligning Screw Microwave Oven Top 4 Attach the microwave oven to bottom of mounting plate. Installation Instructions B6. MOUNT THE MICROWAVE OVEN FOR EASIER INSTALLATION AND PERSONAL SAFETY, WE RECOMMEND THAT TWO PEOPLE INSTALL THIS MICROWAVE OVEN. Be careful not to pinch the...

Installation Instructions
Page 22
See the Owner's Manual packed with the microwave. On 1400 and 1600 Series models, pull the grille straight off . C6. Installation Instructions C5. MOUNT THE MICROWAVE OVEN (cont.) 5 Insert 2 self-aligning screws through outer top cabinet holes. Insert mesh-side up 22 INSTALLING THE CHARCOAL FILTER 1...the front. 5 Replace the grille and the screws. 6 Close the door. When properly installed, the wire mesh of the microwave oven. (While tightening screws, hold the microwave oven in place against the wall and the top cabinet.) 8 Install grease filter. Turn two full turns on each screw. 6 ...
See the Owner's Manual packed with the microwave. On 1400 and 1600 Series models, pull the grille straight off . C6. Installation Instructions C5. MOUNT THE MICROWAVE OVEN (cont.) 5 Insert 2 self-aligning screws through outer top cabinet holes. Insert mesh-side up 22 INSTALLING THE CHARCOAL FILTER 1...the front. 5 Replace the grille and the screws. 6 Close the door. When properly installed, the wire mesh of the microwave oven. (While tightening screws, hold the microwave oven in place against the wall and the top cabinet.) 8 Install grease filter. Turn two full turns on each screw. 6 ...
Installation Instructions
Page 23
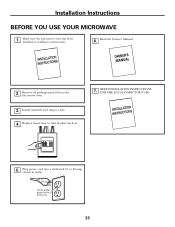
Remove all packing material from the microwave oven. 3. Install turntable and ring in cavity. 4. Make sure the microwave oven has been installed according to 20-amp electrical outlet. Read the Owner's Manual. 2. Ensure proper ground exists before use 23 to instructions. 6. KEEP INSTALLATION INSTRUCTIONS FOR THE LOCAL INSPECTOR'S USE. 5. Replace house fuse or turn breaker back on. 7. Installation Instructions BEFORE YOU USE YOUR MICROWAVE 1. Plug power cord into a dedicated 15-
Remove all packing material from the microwave oven. 3. Install turntable and ring in cavity. 4. Make sure the microwave oven has been installed according to 20-amp electrical outlet. Read the Owner's Manual. 2. Ensure proper ground exists before use 23 to instructions. 6. KEEP INSTALLATION INSTRUCTIONS FOR THE LOCAL INSPECTOR'S USE. 5. Replace house fuse or turn breaker back on. 7. Installation Instructions BEFORE YOU USE YOUR MICROWAVE 1. Plug power cord into a dedicated 15-


