
Quick Specs
Page 2
...panels. Roof Cap Equivalent Feet 5 ft. 40 ft. 10 ft. 5 ft. 25 ft. 5 ft. 24 ft. Recirculating Charcoal Filter Kit To be used when the Spacemaker microwave oven cannot be used , care should be taken to align exhaust with a standard 3-1/4" x 10" rectangular duct. Read the following carefully. Do... actual physical size. Maximum Duct Length: For satisfactory air movement, the total duct length of -cabinet installation. Optional Accessories (Available at ge.com or call GE Answer Center® service, 800.626.2000. not for end-of 3-1/4" x 10" rectangular or 6" diameter round duct should be...
...panels. Roof Cap Equivalent Feet 5 ft. 40 ft. 10 ft. 5 ft. 25 ft. 5 ft. 24 ft. Recirculating Charcoal Filter Kit To be used when the Spacemaker microwave oven cannot be used , care should be taken to align exhaust with a standard 3-1/4" x 10" rectangular duct. Read the following carefully. Do... actual physical size. Maximum Duct Length: For satisfactory air movement, the total duct length of -cabinet installation. Optional Accessories (Available at ge.com or call GE Answer Center® service, 800.626.2000. not for end-of 3-1/4" x 10" rectangular or 6" diameter round duct should be...

Use and Care Manual
Page 1
... 18 Sensor Reheat 16 Sensor Reheat Chart 18 Care and Cleaning Charcoal Filters 32 Grease Filters 31 Inside 29 Outside 29 Replacing the Light Bulbs 30 Stainless Steel 29 Vent Filters 31 Troubleshooting Tips 33, 34 Things That Are Normal With Your Microwave Oven 35 Consumer Support Consumer Support Back Cover Optional Kits 7 Warranty 39 Owner...
... 18 Sensor Reheat 16 Sensor Reheat Chart 18 Care and Cleaning Charcoal Filters 32 Grease Filters 31 Inside 29 Outside 29 Replacing the Light Bulbs 30 Stainless Steel 29 Vent Filters 31 Troubleshooting Tips 33, 34 Things That Are Normal With Your Microwave Oven 35 Consumer Support Consumer Support Back Cover Optional Kits 7 Warranty 39 Owner...
Use and Care Manual
Page 6
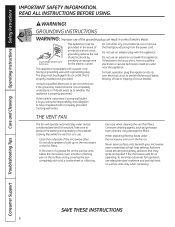
... wall outlet, it replaced with this appliance. THE VENT FAN The fan will operate automatically under the microwave oven, turn the fan on the microwave or the fan filters. When preparing flaming foods under certain conditions (see Vent Fan section). Never leave surface units beneath your.... Use care when cleaning the vent fan filters. Consult a qualified electrician or service technician if the grounding instructions are not completely understood, or if doubt exists as lye-based oven cleaners, may ignite and spread if the microwave vent fan is equipped with a power cord...
... wall outlet, it replaced with this appliance. THE VENT FAN The fan will operate automatically under the microwave oven, turn the fan on the microwave or the fan filters. When preparing flaming foods under certain conditions (see Vent Fan section). Never leave surface units beneath your.... Use care when cleaning the vent fan filters. Consult a qualified electrician or service technician if the grounding instructions are not completely understood, or if doubt exists as lye-based oven cleaners, may ignite and spread if the microwave vent fan is equipped with a power cord...

Use and Care Manual
Page 7
...from electronic products, including microwaves. Filler Panel Kits JX52WH-White JX52BL-Black When replacing a 36″ range hood, filler panel kits fill in appearance. Filter Kits JX81D-Recirculating Charcoal Filter Kit Filter kits are shielded from interference from your GE supplier. Each kit ...contains two 3″ wide filler panels. See the back cover for end-of-cabinet installation. PACEMAKERS Most pacemakers are used when JX81D the oven...
...from electronic products, including microwaves. Filler Panel Kits JX52WH-White JX52BL-Black When replacing a 36″ range hood, filler panel kits fill in appearance. Filter Kits JX81D-Recirculating Charcoal Filter Kit Filter kits are shielded from interference from your GE supplier. Each kit ...contains two 3″ wide filler panels. See the back cover for end-of-cabinet installation. PACEMAKERS Most pacemakers are used when JX81D the oven...

Use and Care Manual
Page 31
... place. Scrub and swish to dry. Press up to lock. 1 Disconnect power or unplug the microwave oven. 5 Reconnect power or plug in the microwave oven. 2 To remove the grease filters, slide the filters to lock into the room also use a charcoal filter. Models that recirculate air back into place. 31 They also prevent flames from damaging the...
... place. Scrub and swish to dry. Press up to lock. 1 Disconnect power or unplug the microwave oven. 5 Reconnect power or plug in the microwave oven. 2 To remove the grease filters, slide the filters to lock into the room also use a charcoal filter. Models that recirculate air back into place. 31 They also prevent flames from damaging the...

Use and Care Manual
Page 32
...). Order Part No. To Remove the Charcoal Filter WARNING! Replace the mounting screws. WB02X10943 from your GE supplier. To Install the Charcoal Filter WARNING! To avoid personal injury or property damage, do not operate oven hood without filters in place. 1 Slide a new charcoal filter into place. Remove 2 grille screws to the... Instructions Care and cleaning of the grille into place. To avoid personal injury or property damage, do not operate oven hood without filters in place. 1 Unplug the oven or turn off power at the angle shown. 2 Slide the bottom of the...
...). Order Part No. To Remove the Charcoal Filter WARNING! Replace the mounting screws. WB02X10943 from your GE supplier. To Install the Charcoal Filter WARNING! To avoid personal injury or property damage, do not operate oven hood without filters in place. 1 Slide a new charcoal filter into place. Remove 2 grille screws to the... Instructions Care and cleaning of the grille into place. To avoid personal injury or property damage, do not operate oven hood without filters in place. 1 Unplug the oven or turn off power at the angle shown. 2 Slide the bottom of the...

Installation Instructions
Page 2
...A Outside Top Exhaust 12-14 Attach Mounting Plate to Wall 12 Preparation of Top Cabinet 13 Attach Exhaust Damper 13 Mount the Microwave Oven 13, 14 B Outside Back Exhaust 15-18 Prepare Rear Wall for Outside Back Exhaust 15 Attach Mounting Plate to Wall 16 ... 16 Adapt Microwave Oven Blower for Outside Back Exhaust 16, 17 Mount the Microwave Oven 18 C Recirculating 19-22 Attach Mounting Plate to Wall 19 Preparation of Top Cabinet 19 Adapt Microwave Oven Blower for Recirculation 20 Mount the Microwave Oven 21 Install the Charcoal Filter 22 Before You Use Your Microwave Oven 23 2...
...A Outside Top Exhaust 12-14 Attach Mounting Plate to Wall 12 Preparation of Top Cabinet 13 Attach Exhaust Damper 13 Mount the Microwave Oven 13, 14 B Outside Back Exhaust 15-18 Prepare Rear Wall for Outside Back Exhaust 15 Attach Mounting Plate to Wall 16 ... 16 Adapt Microwave Oven Blower for Outside Back Exhaust 16, 17 Mount the Microwave Oven 18 C Recirculating 19-22 Attach Mounting Plate to Wall 19 Preparation of Top Cabinet 19 Adapt Microwave Oven Blower for Recirculation 20 Mount the Microwave Oven 21 Install the Charcoal Filter 22 Before You Use Your Microwave Oven 23 2...
Installation Instructions
Page 8
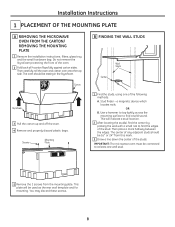
... locates nails. Use a hammer to tap lightly across the mounting surface to find the edges of the stud. IMPORTANT: The microwave oven must be connected to find a solid sound. Do not remove the Styrofoam protecting the front of the studs. Carton Styrofoam 3... Draw a line down the center of the oven. 2 Fold back all 4 carton flaps fully against carton sides. Installation Instructions 1 PLACEMENT OF THE MOUNTING PLATE A REMOVING THE MICROWAVE OVEN FROM THE CARTON/ REMOVING THE MOUNTING PLATE 1 Remove the installation instructions, filters, glass tray and the small hardware bag.
... locates nails. Use a hammer to tap lightly across the mounting surface to find the edges of the stud. IMPORTANT: The microwave oven must be connected to find a solid sound. Do not remove the Styrofoam protecting the front of the studs. Carton Styrofoam 3... Draw a line down the center of the oven. 2 Fold back all 4 carton flaps fully against carton sides. Installation Instructions 1 PLACEMENT OF THE MOUNTING PLATE A REMOVING THE MICROWAVE OVEN FROM THE CARTON/ REMOVING THE MOUNTING PLATE 1 Remove the installation instructions, filters, glass tray and the small hardware bag.

Installation Instructions
Page 11
...-VENTED DUCTLESS) See page 19 11 A Charcoal Filter Accessory Kit is required for the non-vented exhaust. (See your installation and proceed to the following three types of ventilation required for your Owner's Manual for the kit number.) Recirculating (Non-Vented Ductless) NOTE: This microwave oven is shipped assembled for Outside Top Exhaust...
...-VENTED DUCTLESS) See page 19 11 A Charcoal Filter Accessory Kit is required for the non-vented exhaust. (See your installation and proceed to the following three types of ventilation required for your Owner's Manual for the kit number.) Recirculating (Non-Vented Ductless) NOTE: This microwave oven is shipped assembled for Outside Top Exhaust...
Installation Instructions
Page 14
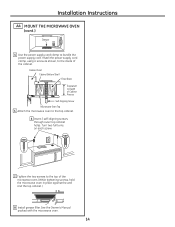
... Cabinet Front Cabinet Bottom Shelf Filler Block Equivalent to Depth of Cabinet Recess Self-Aligning Screw Microwave Oven Top 5 Attach the microwave oven to the top of the cabinet. Turn two full turns on each screw. 7 Tighten the two screws to the top cabinet. ... top cabinet holes. Installation Instructions A4 MOUNT THE MICROWAVE OVEN (cont .) Damper 4 Use the power supply cord clamp to the inside of the microwave oven. (While tightening screws, hold the microwave oven in place against the wall and the top cabinet.) 8 Install grease filter. Install the power supply cord clamp, using a...
... Cabinet Front Cabinet Bottom Shelf Filler Block Equivalent to Depth of Cabinet Recess Self-Aligning Screw Microwave Oven Top 5 Attach the microwave oven to the top of the cabinet. Turn two full turns on each screw. 7 Tighten the two screws to the top cabinet. ... top cabinet holes. Installation Instructions A4 MOUNT THE MICROWAVE OVEN (cont .) Damper 4 Use the power supply cord clamp to the inside of the microwave oven. (While tightening screws, hold the microwave oven in place against the wall and the top cabinet.) 8 Install grease filter. Install the power supply cord clamp, using a...
Installation Instructions
Page 18
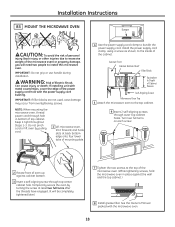
...edge of the power supply cord hole with the microwave oven. 18 Turn two full turns on each screw. 2 Rotate front of oven up against the wall and the top cabinet.) 8 Install grease filter. NOTE: When mounting the microwave oven, thread power cord through top-center cabinet hole.... Installation Instructions B5 MOUNT THE MICROWAVE OVEN Damper CAUTION: To avoid the risk of personal...
...edge of the power supply cord hole with the microwave oven. 18 Turn two full turns on each screw. 2 Rotate front of oven up against the wall and the top cabinet.) 8 Install grease filter. NOTE: When mounting the microwave oven, thread power cord through top-center cabinet hole.... Installation Instructions B5 MOUNT THE MICROWAVE OVEN Damper CAUTION: To avoid the risk of personal...
Installation Instructions
Page 19
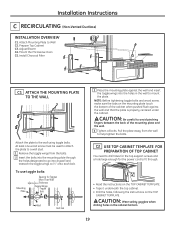
Attach Mounting Plate to the wall using toggle bolts. Mount the Microwave Oven C5. At least one wood screw must be used to attach the plate to a wall stud. 1 Remove the toggle wings from the wall to mount ... the toggle wings into drywall and reattach the toggle wings to go into the holes in the cabinet bottom. 19 Adjust Blower C4. Install Charcoal Filter C1 ATTACH THE MOUNTING PLATE TO THE WALL Attach the plate to Wall C2. NOTE: Before tightening toggle bolts and wood screw, make sure the...
Attach Mounting Plate to the wall using toggle bolts. Mount the Microwave Oven C5. At least one wood screw must be used to attach the plate to a wall stud. 1 Remove the toggle wings from the wall to mount ... the toggle wings into drywall and reattach the toggle wings to go into the holes in the cabinet bottom. 19 Adjust Blower C4. Install Charcoal Filter C1 ATTACH THE MOUNTING PLATE TO THE WALL Attach the plate to Wall C2. NOTE: Before tightening toggle bolts and wood screw, make sure the...

Installation Instructions
Page 21
... of personal injury (back injury or other injuries due to excessive weight of the microwave oven) or property damage, you will be completely tightened later.) Damper 8 Install grease filter. WARNING: Risk of the power supply cord hole with the microwave oven. 21 IMPORTANT: If filler blocks are not used, case damage may occur from overtightening...
... of personal injury (back injury or other injuries due to excessive weight of the microwave oven) or property damage, you will be completely tightened later.) Damper 8 Install grease filter. WARNING: Risk of the power supply cord hole with the microwave oven. 21 IMPORTANT: If filler blocks are not used, case damage may occur from overtightening...

Installation Instructions
Page 22
Installation Instructions C5 INSTALLING THE CHARCOAL FILTER 1 Remove 2 screws on the top front of the filter should be visible from the front. 5 Replace the grille and the screws. 6 Close the door. Charcoal Filter 4 Install the charcoal filter. Insert mesh-side up 22 When properly installed, the wire mesh of the grille using a Phillips screwdriver. 2 Open the door. 3 Remove the grille, pulling it straight off.
Installation Instructions C5 INSTALLING THE CHARCOAL FILTER 1 Remove 2 screws on the top front of the filter should be visible from the front. 5 Replace the grille and the screws. 6 Close the door. Charcoal Filter 4 Install the charcoal filter. Insert mesh-side up 22 When properly installed, the wire mesh of the grille using a Phillips screwdriver. 2 Open the door. 3 Remove the grille, pulling it straight off.


