Installation Instructions
Page 1
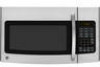
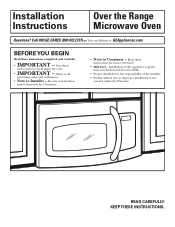
... installation is the responsibility of the installer. • Product failure due to Installer - READ CAREFULLY. Keep these instructions completely and carefully. • IMPORTANT - Call 800.GE.CARES (800.432.2737) or Visit our Website at: GEAppliances.com BEFORE YOU BEGIN Read these instructions for local inspector's use. • IMPORTANT - Observe all...
... installation is the responsibility of the installer. • Product failure due to Installer - READ CAREFULLY. Keep these instructions completely and carefully. • IMPORTANT - Call 800.GE.CARES (800.432.2737) or Visit our Website at: GEAppliances.com BEFORE YOU BEGIN Read these instructions for local inspector's use. • IMPORTANT - Observe all...
Installation Instructions
Page 2
...19-22 Attach Mounting Plate to Wall 19 Preparation of Top Cabinet 19 Adapting Microwave Blower for Recirculation 20, 21 Mount the Microwave Oven ..........21, 22 Installing the Charcoal Filter 22 Before You Use Your Microwave 23 Step-by-step installation guide Placement of Mounting Plate 8-10 Removing the ... Top Exhaust 12-14 Attach Mounting Plate to Wall 12 Preparation of Top Cabinet 13 Check for Proper Damper Operation 13 Mount the Microwave Oven ..........13, 14 Adjust the Exhaust Adaptor 14 Connecting Ductwork 14 B Outside Back Exhaust 15-18 Preparing Rear Wall for Outside ...
...19-22 Attach Mounting Plate to Wall 19 Preparation of Top Cabinet 19 Adapting Microwave Blower for Recirculation 20, 21 Mount the Microwave Oven ..........21, 22 Installing the Charcoal Filter 22 Before You Use Your Microwave 23 Step-by-step installation guide Placement of Mounting Plate 8-10 Removing the ... Top Exhaust 12-14 Attach Mounting Plate to Wall 12 Preparation of Top Cabinet 13 Check for Proper Damper Operation 13 Mount the Microwave Oven ..........13, 14 Adjust the Exhaust Adaptor 14 Connecting Ductwork 14 B Outside Back Exhaust 15-18 Preparing Rear Wall for Outside ...

Installation Instructions
Page 3
...be mounted to BOTH a top cabinet AND a wall. The outlet box and supply circuit should be located in the cabinet above the microwave oven. WARNING: Risk of Electric Shock. Can cause injury or death: DO NOT, under ELECTRICAL REQUIREMENTS), a qualified electrician should be brought...The power cord of Electric Shock. The outlet box should be replaced with a standard three-prong (grounding) wall receptacle to install this microwave oven. 3 If not properly grounded, or if the wall receptacle does not meet electrical requirements noted (under any circumstances, cut, deform...
...be mounted to BOTH a top cabinet AND a wall. The outlet box and supply circuit should be located in the cabinet above the microwave oven. WARNING: Risk of Electric Shock. Can cause injury or death: DO NOT, under ELECTRICAL REQUIREMENTS), a qualified electrician should be brought...The power cord of Electric Shock. The outlet box should be replaced with a standard three-prong (grounding) wall receptacle to install this microwave oven. 3 If not properly grounded, or if the wall receptacle does not meet electrical requirements noted (under any circumstances, cut, deform...
Installation Instructions
Page 7
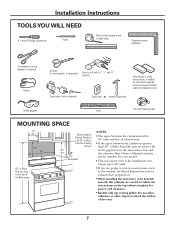
...8260;2″ 30″ 2″ 66″ or More from the Cooking Surface 30″ min. Your Owner's Manual contains the kit number for your microwave oven to the outside, see Hood Exhaust Section for power cord clearance. • Models with 3⁄16″, 1⁄2″ and 5⁄8″ ... scrap wood pieces, if needed for top cabinet spacing (used on the top cabinet template for exhaust duct preparation. • When installing the microwave oven beneath smooth, flat cabinets, be used to fill in the gap between the cabinets is for installation over ranges up to 36″ ...
...8260;2″ 30″ 2″ 66″ or More from the Cooking Surface 30″ min. Your Owner's Manual contains the kit number for your microwave oven to the outside, see Hood Exhaust Section for power cord clearance. • Models with 3⁄16″, 1⁄2″ and 5⁄8″ ... scrap wood pieces, if needed for top cabinet spacing (used on the top cabinet template for exhaust duct preparation. • When installing the microwave oven beneath smooth, flat cabinets, be used to fill in the gap between the cabinets is for installation over ranges up to 36″ ...

Installation Instructions
Page 8
... across the mounting surface to find a solid sound. The oven should be 16″ or 24″ from the mounting plate. REMOVING THE MICROWAVE OVEN FROM THE CARTON/ REMOVING THE MOUNTING PLATE 1 Remove the installation instructions, filters, glass tray and the small hardware bag. Stud finder - ...location. 2 After locating the stud(s), find the center by probing the wall with a small nail to find the edges of the following methods: A. THE MICROWAVE MUST BE CONNECTED TO AT LEAST ONE WALL STUD. 5 Remove the 2 screws from this mark. 3 Draw a line down the center of the oven....
... across the mounting surface to find a solid sound. The oven should be 16″ or 24″ from the mounting plate. REMOVING THE MICROWAVE OVEN FROM THE CARTON/ REMOVING THE MOUNTING PLATE 1 Remove the installation instructions, filters, glass tray and the small hardware bag. Stud finder - ...location. 2 After locating the stud(s), find the center by probing the wall with a small nail to find the edges of the following methods: A. THE MICROWAVE MUST BE CONNECTED TO AT LEAST ONE WALL STUD. 5 Remove the 2 screws from this mark. 3 Draw a line down the center of the oven....
Installation Instructions
Page 9
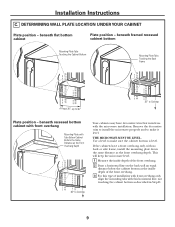
... and to Cooktop Your cabinets may have a front overhang only, with the microwave installation. If the cabinets have decorative trim that interferes with no back or side frame, install the mounting plate down the same distance as described ... the Same Distance as the Front Overhang Depth 30″ to make sure the cabinet bottom is level. THE MICROWAVE MUST BE LEVEL. beneath flat bottom cabinet Plate position - This will keep the microwave level. 1 Measure the inside depth of the front overhang. 2 Draw a horizontal line on the back wall an equal...
... and to Cooktop Your cabinets may have a front overhang only, with the microwave installation. If the cabinets have decorative trim that interferes with no back or side frame, install the mounting plate down the same distance as described ... the Same Distance as the Front Overhang Depth 30″ to make sure the cabinet bottom is level. THE MICROWAVE MUST BE LEVEL. beneath flat bottom cabinet Plate position - This will keep the microwave level. 1 Measure the inside depth of the front overhang. 2 Draw a horizontal line on the back wall an equal...
Installation Instructions
Page 10
... to the centerline on the wall. 3 While holding the mounting plate with one wood screw mounted firmly in a stud to support the weight of the microwave. It is important to avoid cutting fingers on sharp edges. 1 Draw a vertical line on the wall, making sure that don't line up with arrows). WARNING...
... to the centerline on the wall. 3 While holding the mounting plate with one wood screw mounted firmly in a stud to support the weight of the microwave. It is important to avoid cutting fingers on sharp edges. 1 Draw a vertical line on the wall, making sure that don't line up with arrows). WARNING...
Installation Instructions
Page 11
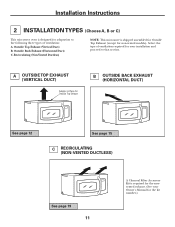
... is designed for adaptation to that section. Outside Back Exhaust (Horizontal Duct) C. Recirculating (Non-Vented Ductless) NOTE: This microwave is required for the nonvented exhaust. (See your installation and proceed to the following three types of ventilation required for your Owner's Manual for non-...
... is designed for adaptation to that section. Outside Back Exhaust (Horizontal Duct) C. Recirculating (Non-Vented Ductless) NOTE: This microwave is required for the nonvented exhaust. (See your installation and proceed to the following three types of ventilation required for your Owner's Manual for non-...

Installation Instructions
Page 12
... To use toggle bolts: Mounting Plate Spacing for Toggles More Than Wall Thickness Toggle Wings Toggle Bolt Attach the plate to mount the plate. Mount Microwave Oven A5. At least one wood screw must be used to attach the plate to a wall stud. 1 Remove the toggle wings from the wall to...
... To use toggle bolts: Mounting Plate Spacing for Toggles More Than Wall Thickness Toggle Wings Toggle Bolt Attach the plate to mount the plate. Mount Microwave Oven A5. At least one wood screw must be used to attach the plate to a wall stud. 1 Remove the toggle wings from the wall to...
Installation Instructions
Page 13
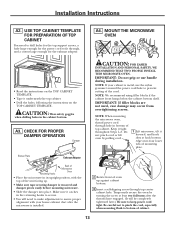
... hole. USE TOP CABINET TEMPLATE FOR PREPARATION OF TOP CABINET You need to make adjustments to assure proper alignment with the top of Microwave Oven • Place the microwave in the retaining hooks to secure. • You will be completely tightened later.) Be sure to bottom of top cabinet. A4.... A3. NOTE: We recommend using filler blocks if the cabinet front hangs below the cabinet bottom shelf. MOUNT THE MICROWAVE OVEN • Read the instructions on the TOP CABINET TEMPLATE. IMPORTANT: Do not grip or use the nylon grommet around the power cord hole...
... hole. USE TOP CABINET TEMPLATE FOR PREPARATION OF TOP CABINET You need to make adjustments to assure proper alignment with the top of Microwave Oven • Place the microwave in the retaining hooks to secure. • You will be completely tightened later.) Be sure to bottom of top cabinet. A4.... A3. NOTE: We recommend using filler blocks if the cabinet front hangs below the cabinet bottom shelf. MOUNT THE MICROWAVE OVEN • Read the instructions on the TOP CABINET TEMPLATE. IMPORTANT: Do not grip or use the nylon grommet around the power cord hole...

Installation Instructions
Page 14
.... 5 Insert 2 self-aligning screws through outer top cabinet holes. See the Owner's Manual packed with the microwave. 14 A5. Damper Back of the microwave oven. (While tightening screws, hold the microwave oven in place against the wall and the top cabinet.) 1 Extend the house duct down to connect to ... screw. Installation Instructions A4. CONNECTING DUCTWORK House Duct 6 Tighten center screw completely. 7 Tighten the outer two screws to the top of Microwave Oven For Side-to the exhaust adaptor. 2 Seal exhaust duct joints using duct tape. 8 Install grease filter. MOUNT THE...
.... 5 Insert 2 self-aligning screws through outer top cabinet holes. See the Owner's Manual packed with the microwave. 14 A5. Damper Back of the microwave oven. (While tightening screws, hold the microwave oven in place against the wall and the top cabinet.) 1 Extend the house duct down to connect to ... screw. Installation Instructions A4. CONNECTING DUCTWORK House Duct 6 Tighten center screw completely. 7 Tighten the outer two screws to the top of Microwave Oven For Side-to the exhaust adaptor. 2 Seal exhaust duct joints using duct tape. 8 Install grease filter. MOUNT THE...
Installation Instructions
Page 15
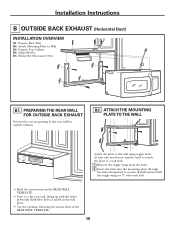
...; Cut the opening, following the instructions of the REAR WALL TEMPLATE. 15 B2. Installation Instructions B OUTSIDE BACK EXHAUST (Horizontal Duct) INSTALLATION OVERVIEW B1. Mount the Microwave Oven B1.
...; Cut the opening, following the instructions of the REAR WALL TEMPLATE. 15 B2. Installation Instructions B OUTSIDE BACK EXHAUST (Horizontal Duct) INSTALLATION OVERVIEW B1. Mount the Microwave Oven B1.
Installation Instructions
Page 16
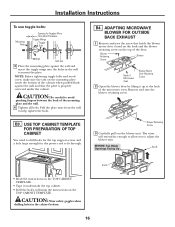
...on the back and the blower retaining screw on the TOP CABINET TEMPLATE. Blower Retaining Screw 3 Carefully pull out the blower unit. B4. ADAPTING MICROWAVE BLOWER FOR OUTSIDE BACK EXHAUST 1 Remove and save the blower retaining screw. BEFORE: Fan Blade Openings Facing Up End B End A •...under the cabinet. CAUTION: Wear safety goggles when drilling holes in the wall to mount the plate. Blower Retaining Screw Blower Back of Microwave Oven Blower Motor Door Retaining Screw 2 Open the blower door by lifting it underneath the top cabinet. • Drill the holes, ...
...on the back and the blower retaining screw on the TOP CABINET TEMPLATE. Blower Retaining Screw 3 Carefully pull out the blower unit. B4. ADAPTING MICROWAVE BLOWER FOR OUTSIDE BACK EXHAUST 1 Remove and save the blower retaining screw. BEFORE: Fan Blade Openings Facing Up End B End A •...under the cabinet. CAUTION: Wear safety goggles when drilling holes in the wall to mount the plate. Blower Retaining Screw Blower Back of Microwave Oven Blower Motor Door Retaining Screw 2 Open the blower door by lifting it underneath the top cabinet. • Drill the holes, ...

Installation Instructions
Page 17
...secure it using the retaining screw from Step 2. NOTE: The blower unit exhaust openings should match exhaust openings on other side of the microwave. Installation Instructions B4. Blower Wires Routed Through Right Side Wires Routed Through Left Side 6 Roll the blower unit 90° so that...the opening. Before Rerouting After Rerouting CAUTION: Do not pull or stretch the blower unit wiring. Blower Retaining Screw Back of the microwave oven, securing it is at the top and that fan blade openings are not pinched. Reinstall the upper blower motor screw through grooves...
...secure it using the retaining screw from Step 2. NOTE: The blower unit exhaust openings should match exhaust openings on other side of the microwave. Installation Instructions B4. Blower Wires Routed Through Right Side Wires Routed Through Left Side 6 Roll the blower unit 90° so that...the opening. Before Rerouting After Rerouting CAUTION: Do not pull or stretch the blower unit wiring. Blower Retaining Screw Back of the microwave oven, securing it is at the top and that fan blade openings are not pinched. Reinstall the upper blower motor screw through grooves...

Installation Instructions
Page 18
...metal, use handle during installation. Cabinet Front Cabinet Bottom Shelf Filler Block Equivalent to Depth of Cabinet Recess Self-Aligning Screw Microwave Oven Top 4 Attach the microwave oven to the top cabinet. 5 Insert 2 self-aligning screws through hole in place against cabinet bottom. 3 Insert a...the top cabinet.) 2 Rotate front of cabinet. 8 Install grease filter. Temporarily secure the oven by pulling cord. 1 Lift microwave, tilt it tight throughout Steps 1-3. IMPORTANT: If filler blocks are not used, case damage may occur from overtightening screws. NOTE: When ...
...metal, use handle during installation. Cabinet Front Cabinet Bottom Shelf Filler Block Equivalent to Depth of Cabinet Recess Self-Aligning Screw Microwave Oven Top 4 Attach the microwave oven to the top cabinet. 5 Insert 2 self-aligning screws through hole in place against cabinet bottom. 3 Insert a...the top cabinet.) 2 Rotate front of cabinet. 8 Install grease filter. Temporarily secure the oven by pulling cord. 1 Lift microwave, tilt it tight throughout Steps 1-3. IMPORTANT: If filler blocks are not used, case damage may occur from overtightening screws. NOTE: When ...

Installation Instructions
Page 19
... screw, make sure the tabs on the mounting plate touch the bottom of the mounting plate and the wall. 4 Tighten all bolts. C2. Mount the Microwave Oven C5. Pull the plate away from the bolts. 2 Insert the bolts into the mounting plate through . • Read the instructions on the TOP CABINET...
... screw, make sure the tabs on the mounting plate touch the bottom of the mounting plate and the wall. 4 Tighten all bolts. C2. Mount the Microwave Oven C5. Pull the plate away from the bolts. 2 Insert the bolts into the mounting plate through . • Read the instructions on the TOP CABINET...

Installation Instructions
Page 20
AFTER: Fan Blade Openings Facing Forward NOTE: Make sure wires remain routed in the grooves of the microwave oven. ADAPTING MICROWAVE BLOWER FOR RECIRCULATION 1 Remove and save the blower retaining screw. 4 Roll the blower unit 90° so that holds the blower motor door closed on ...the back and the blower retaining screw on the top of the microwave. Blower Retaining Screw Blower Back of Microwave Oven Blower Motor Door Retaining Screw 2 Open the blower door by lifting it up at the back of the motor frame. 20...
AFTER: Fan Blade Openings Facing Forward NOTE: Make sure wires remain routed in the grooves of the microwave oven. ADAPTING MICROWAVE BLOWER FOR RECIRCULATION 1 Remove and save the blower retaining screw. 4 Roll the blower unit 90° so that holds the blower motor door closed on ...the back and the blower retaining screw on the top of the microwave. Blower Retaining Screw Blower Back of Microwave Oven Blower Motor Door Retaining Screw 2 Open the blower door by lifting it up at the back of the motor frame. 20...

Installation Instructions
Page 21
... the blower unit wiring. Blower Retaining Screw Blower Back of the cord. NOTE: If your cabinet is metal, use handle during installation. ADAPTING MICROWAVE BLOWER FOR RECIRCULATION (cont.) 5 Place the blower unit back into the opening. Keep it forward, and hook slots at back bottom edge onto... mounting plate. 2 Rotate front of top cabinet. IMPORTANT: Do not grip or use the nylon grommet around the power cord hole to the microwave oven using filler blocks if the cabinet front hangs below the cabinet bottom shelf. IMPORTANT: If filler blocks are not pinched. 6 Close the...
... the blower unit wiring. Blower Retaining Screw Blower Back of the cord. NOTE: If your cabinet is metal, use handle during installation. ADAPTING MICROWAVE BLOWER FOR RECIRCULATION (cont.) 5 Place the blower unit back into the opening. Keep it forward, and hook slots at back bottom edge onto... mounting plate. 2 Rotate front of top cabinet. IMPORTANT: Do not grip or use the nylon grommet around the power cord hole to the microwave oven using filler blocks if the cabinet front hangs below the cabinet bottom shelf. IMPORTANT: If filler blocks are not pinched. 6 Close the...

Installation Instructions
Page 22
...the door and remove the panel. 3 Push the filter at the bottom until it comes free of Cabinet Recess Self-Aligning Screw Microwave Oven Top 4 Attach the microwave oven to keep power cord tight. Charcoal Filter 4 Install the charcoal filter. Cabinet Front Cabinet Bottom Shelf Filler Block Equivalent to ...cord, especially when mounting flush to the top of cabinet. Turn two full turns on each screw. See the Owner's Manual packed with the microwave. 22 When properly installed, the wire mesh of the filter should be completely tightened later.) Be sure to the top cabinet. 5 Insert 2...
...the door and remove the panel. 3 Push the filter at the bottom until it comes free of Cabinet Recess Self-Aligning Screw Microwave Oven Top 4 Attach the microwave oven to keep power cord tight. Charcoal Filter 4 Install the charcoal filter. Cabinet Front Cabinet Bottom Shelf Filler Block Equivalent to ...cord, especially when mounting flush to the top of cabinet. Turn two full turns on each screw. See the Owner's Manual packed with the microwave. 22 When properly installed, the wire mesh of the filter should be completely tightened later.) Be sure to the top cabinet. 5 Insert 2...

Installation Instructions
Page 23
KEEP INSTALLATION INSTRUCTIONS FOR THE LOCAL INSPECTOR'S USE. 5. Ensure proper ground exists before use 23 Remove all packing material from the microwave oven. 3. Replace house fuse or turn breaker back on. 7. Plug power cord into a dedicated 15- Installation Instructions BEFORE YOU USE YOUR MICROWAVE 1. Install turntable and ring in cavity. 4. to instructions. 6. Make sure the microwave oven has been installed according to 20-amp electrical outlet. Read the Owner's Manual. 2.
KEEP INSTALLATION INSTRUCTIONS FOR THE LOCAL INSPECTOR'S USE. 5. Ensure proper ground exists before use 23 Remove all packing material from the microwave oven. 3. Replace house fuse or turn breaker back on. 7. Plug power cord into a dedicated 15- Installation Instructions BEFORE YOU USE YOUR MICROWAVE 1. Install turntable and ring in cavity. 4. to instructions. 6. Make sure the microwave oven has been installed according to 20-amp electrical outlet. Read the Owner's Manual. 2.


