User Manual
Page 32
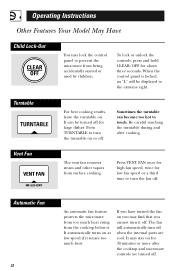
... surface cooking. Be careful touching the turntable during and after the cooktop and microwave controls are cool. It automatically turns on . When the control panel is locked,...at low speed if it senses too much heat rising from the cooktop below it off when the internal parts are turned off for about three seconds. It may stay on for low fan speed or a third time...fan speed, twice for 30 minutes or more after cooking. Automatic Fan 32 An automatic fan feature protects the microwave from too much heat. To lock or unlock the controls, press and hold CLEAR/OFF for large dishes....
... surface cooking. Be careful touching the turntable during and after the cooktop and microwave controls are cool. It automatically turns on . When the control panel is locked,...at low speed if it senses too much heat rising from the cooktop below it off when the internal parts are turned off for about three seconds. It may stay on for low fan speed or a third time...fan speed, twice for 30 minutes or more after cooking. Automatic Fan 32 An automatic fan feature protects the microwave from too much heat. To lock or unlock the controls, press and hold CLEAR/OFF for large dishes....

User Manual
Page 36
... cook before larger parts. Note that is not molded to food (upturned edges act like antennas). • metal such as roasts or cakes are allowed to stand to finish cooking or to shield thin parts, such as the tips of the oven. • foil that a microwaved cake is especially important... in the oven. After covering a dish with regular ovens, foods such as twist ties, poultry pins, gold-rimmed dishes. • ...
... cook before larger parts. Note that is not molded to food (upturned edges act like antennas). • metal such as roasts or cakes are allowed to stand to finish cooking or to shield thin parts, such as the tips of the oven. • foil that a microwaved cake is especially important... in the oven. After covering a dish with regular ovens, foods such as twist ties, poultry pins, gold-rimmed dishes. • ...

User Manual
Page 37
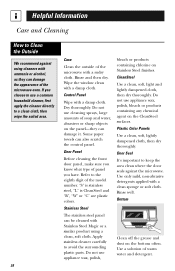
...the Inside Walls, Floor, Inside Window, Metal and Plastic Parts on oven walls. Do not use a commercial oven cleaner on any part of this oven. Shelf (if included) Clean with mild soap and water or in a self-cleaning oven. Do not clean in the dishwasher. Removable Turntable and .... Temperature Probe (if included) Clean immediately after cooking. Care and Cleaning Helpful Hints An occasional thorough wiping with a solution of your microwave. Never use abrasive cleaners or sharp utensils on the Door Some spatters can be removed with a paper towel, others may require a ...
...the Inside Walls, Floor, Inside Window, Metal and Plastic Parts on oven walls. Do not use a commercial oven cleaner on any part of this oven. Shelf (if included) Clean with mild soap and water or in a self-cleaning oven. Do not clean in the dishwasher. Removable Turntable and .... Temperature Probe (if included) Clean immediately after cooking. Care and Cleaning Helpful Hints An occasional thorough wiping with a solution of your microwave. Never use abrasive cleaners or sharp utensils on the Door Some spatters can be removed with a paper towel, others may require a ...
User Manual
Page 38
...Do not use a common household cleaner, first apply the cleaner directly to the eighth digit of the microwave with a sudsy cloth. Door Seal It's important to avoid the surrounding plastic parts. Bottom Clean off the grease and dust on the CleanSteel surfaces. Use a solution of soap and... stainless steel, "L" is CleanSteel and "B", "W" or "C" are plastic colors. Rinse and then dry. Rinse well. If you know what type of the microwave oven. Dry thoroughly. Refer to a clean cloth, then wipe the soiled area. 38 Case Clean the outside of the model number. Plastic Color Panels Use ...
...Do not use a common household cleaner, first apply the cleaner directly to the eighth digit of the microwave with a sudsy cloth. Door Seal It's important to avoid the surrounding plastic parts. Bottom Clean off the grease and dust on the CleanSteel surfaces. Use a solution of soap and... stainless steel, "L" is CleanSteel and "B", "W" or "C" are plastic colors. Rinse and then dry. Rinse well. If you know what type of the microwave oven. Dry thoroughly. Refer to a clean cloth, then wipe the soiled area. 38 Case Clean the outside of the model number. Plastic Color Panels Use ...

User Manual
Page 41
..."Optional Kits," page 9, for more information. To remove the charcoal filter, disconnect power at an angle on 2 side support tabs and in front of the oven and remove it in place. If the model is noticeably dirty or discolored (usually after 6-12 months, depending on some models) The charcoal filter cannot... be replaced. Insert the filter into the top opening of the oven as shown. To Install Charcoal Filter To install a new filter, remove plastic and other outer wrapping from your...
..."Optional Kits," page 9, for more information. To remove the charcoal filter, disconnect power at an angle on 2 side support tabs and in front of the oven and remove it in place. If the model is noticeably dirty or discolored (usually after 6-12 months, depending on some models) The charcoal filter cannot... be replaced. Insert the filter into the top opening of the oven as shown. To Install Charcoal Filter To install a new filter, remove plastic and other outer wrapping from your...

User Manual
Page 46
..., or call 800.626.2224 during normal business hours. Get on -line. You can now download Owner's Manuals, order parts, catalogs, or even schedule service on -line and schedule your service at your questions, and so much more... GE Consumer Home Services will still be used by people of the year! Expert...
..., or call 800.626.2224 during normal business hours. Get on -line. You can now download Owner's Manuals, order parts, catalogs, or even schedule service on -line and schedule your service at your questions, and so much more... GE Consumer Home Services will still be used by people of the year! Expert...

User Manual
Page 47
... Discover cards are accepted.) Order on -line- at 800.626.2002 during normal business hours. Parts and Accessories ge.com 800.626.2002 Register Your Appliance ge.com Individuals qualified to service their own appliances can have parts or accessories sent directly to qualified service personnel. You may cause unsafe operation. Other servicing generally...
... Discover cards are accepted.) Order on -line- at 800.626.2002 during normal business hours. Parts and Accessories ge.com 800.626.2002 Register Your Appliance ge.com Individuals qualified to service their own appliances can have parts or accessories sent directly to qualified service personnel. You may cause unsafe operation. Other servicing generally...
User Manual
Page 48
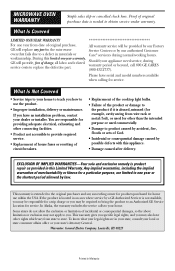
MICROWAVE OVEN WARRANTY Staple sales slip or cancelled check here. Should your dealer or installer. You...during warranty period or beyond, call 800.GE.CARES (800.432.2737). If the product is not available, you may be required to bring the product to the original purchaser and any part in your state, consult your local or... of charge, all labor and related service costs to you. If you may not apply to replace the defective part. During this Limited Warranty. Please have an installation problem, contact your appliance need service, during normal working hours....
MICROWAVE OVEN WARRANTY Staple sales slip or cancelled check here. Should your dealer or installer. You...during warranty period or beyond, call 800.GE.CARES (800.432.2737). If the product is not available, you may be required to bring the product to the original purchaser and any part in your state, consult your local or... of charge, all labor and related service costs to you. If you may not apply to replace the defective part. During this Limited Warranty. Please have an installation problem, contact your appliance need service, during normal working hours....
Installation Instructions
Page 2
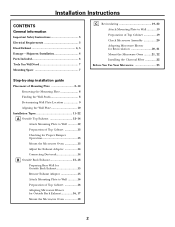
...Parts Included 6 Tools You Will Need 7 Mounting Space 7 C Recirculating 19-22 Attach Mounting Plate to Wall 19 Preparation of Top Cabinet 19 Check Microwave Assembly 20 Adapting Microwave Blower for Recirculation 20, 21 Mount the Microwave Oven ..........21, 22 Installing the Charcoal Filter 22 Before You Use Your Microwave... 12-14 Attach Mounting Plate to Wall 12 Preparation of Top Cabinet 13 Checking for Proper Damper Operation 13 Mount the Microwave Oven 13 Adjust the Exhaust Adaptor 14 Connecting Ductwork 14 B Outside Back Exhaust 15-18 Preparing Rear Wall for Outside Back ...
...Parts Included 6 Tools You Will Need 7 Mounting Space 7 C Recirculating 19-22 Attach Mounting Plate to Wall 19 Preparation of Top Cabinet 19 Check Microwave Assembly 20 Adapting Microwave Blower for Recirculation 20, 21 Mount the Microwave Oven ..........21, 22 Installing the Charcoal Filter 22 Before You Use Your Microwave... 12-14 Attach Mounting Plate to Wall 12 Preparation of Top Cabinet 13 Checking for Proper Damper Operation 13 Mount the Microwave Oven 13 Adjust the Exhaust Adaptor 14 Connecting Ductwork 14 B Outside Back Exhaust 15-18 Preparing Rear Wall for Outside Back ...
Installation Instructions
Page 6
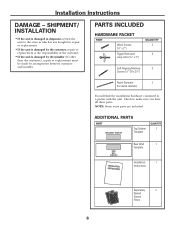
...the installation hardware contained in shipment, return the unit to make sure you have all these parts. ADDITIONAL PARTS PART TOP CABINET TEMPLATE Top Cabinet Template QUANTITY 1 REAR WALL TEMPLATE Rear Wall 1 Template Installation 1 Instructions Separately 2 Packed Grease... Grommet 2 (for repair or replacement. • If the unit is damaged by arrangement between customer and installer. NOTE: Some extra parts are included. Installation Instructions DAMAGE - SHIPMENT/ INSTALLATION • If the unit is damaged by the installer (if other than the customer...
...the installation hardware contained in shipment, return the unit to make sure you have all these parts. ADDITIONAL PARTS PART TOP CABINET TEMPLATE Top Cabinet Template QUANTITY 1 REAR WALL TEMPLATE Rear Wall 1 Template Installation 1 Instructions Separately 2 Packed Grease... Grommet 2 (for repair or replacement. • If the unit is damaged by arrangement between customer and installer. NOTE: Some extra parts are included. Installation Instructions DAMAGE - SHIPMENT/ INSTALLATION • If the unit is damaged by the installer (if other than the customer...


