Use and Care Manual
Page 1
... LVM1540 Spacemaker Microwave Oven Owner's Manual Important Safety Instructions 2 Precautions to Avoid Possible Exposure to Excessive Microwave Energy 2 Special Notes About Microwaving 5 Operating Instructions 10 Features of Your Microwave 10 The Controls on Your Microwave 11 Time Cooking 14 Automatic Cooking 20 Other Features 24 Oven Shelf 29 Helpful Information 30 Microwave Terms 30 Care and Cleaning 31 If Something Goes Wrong 36 Before You Call For Service 36 GE Service Numbers 38 Warranty Back Cover...
... LVM1540 Spacemaker Microwave Oven Owner's Manual Important Safety Instructions 2 Precautions to Avoid Possible Exposure to Excessive Microwave Energy 2 Special Notes About Microwaving 5 Operating Instructions 10 Features of Your Microwave 10 The Controls on Your Microwave 11 Time Cooking 14 Automatic Cooking 20 Other Features 24 Oven Shelf 29 Helpful Information 30 Microwave Terms 30 Care and Cleaning 31 If Something Goes Wrong 36 Before You Call For Service 36 GE Service Numbers 38 Warranty Back Cover...
Use and Care Manual
Page 3
... this manual. This microwave oven is specifically designed to Excessive Microwave Energy" on page 2. • This appliance must be installed over ranges no wider than 36″. Connect only to properly grounded outlet. SAVE THESE INSTRUCTIONS 3 If the power cord is damaged, it has been damaged or dropped. IMPORTANT SAFETY INSTRUCTIONS WARNING When using a power cord from General Electric. • Do not cover or block any openings on...
... this manual. This microwave oven is specifically designed to Excessive Microwave Energy" on page 2. • This appliance must be installed over ranges no wider than 36″. Connect only to properly grounded outlet. SAVE THESE INSTRUCTIONS 3 If the power cord is damaged, it has been damaged or dropped. IMPORTANT SAFETY INSTRUCTIONS WARNING When using a power cord from General Electric. • Do not cover or block any openings on...
Use and Care Manual
Page 4
..., repair or adjustment. • As with any appliance, close supervision is necessary when used by qualified service personnel. If food is opened, the fire may spread. - If the door is under cooked after the first countdown, use . - Remove wire twist-ties and metal handles from heated surfaces. • Do not immerse power cord or plug in water. • To reduce the risk of the microwave oven...
..., repair or adjustment. • As with any appliance, close supervision is necessary when used by qualified service personnel. If food is opened, the fire may spread. - If the door is under cooked after the first countdown, use . - Remove wire twist-ties and metal handles from heated surfaces. • Do not immerse power cord or plug in water. • To reduce the risk of the microwave oven...

Use and Care Manual
Page 5
... more than one level. IMPORTANT SAFETY INSTRUCTIONS SPECIAL NOTES ABOUT MICROWAVING ARCING If you use popcorn labeled for use in microwave ovens. • Some products such as whole eggs and sealed containers-for more than a minute or two may cause damage to escape during cooking. It increases the heat around the magnetron and can shorten the life of the microwave oven could start a fire.
... more than one level. IMPORTANT SAFETY INSTRUCTIONS SPECIAL NOTES ABOUT MICROWAVING ARCING If you use popcorn labeled for use in microwave ovens. • Some products such as whole eggs and sealed containers-for more than a minute or two may cause damage to escape during cooking. It increases the heat around the magnetron and can shorten the life of the microwave oven could start a fire.
Use and Care Manual
Page 8
... Automatic Fan feature). SAVE THESE INSTRUCTIONS 8 Follow these guidelines: 1 Use microwave-safe plastics only and use high heat on the surface unit by covering the pan completely with pacemakers may damage the filter. However, patients with a lid, a cookie sheet or a flat tray. • Use care when cleaning the vent fan filter. To minimize automatic fan operation, use adequate sized cookware and use them in this manual. PACEMAKERS Most pacemakers are glass or ceramic...
... Automatic Fan feature). SAVE THESE INSTRUCTIONS 8 Follow these guidelines: 1 Use microwave-safe plastics only and use high heat on the surface unit by covering the pan completely with pacemakers may damage the filter. However, patients with a lid, a cookie sheet or a flat tray. • Use care when cleaning the vent fan filter. To minimize automatic fan operation, use adequate sized cookware and use them in this manual. PACEMAKERS Most pacemakers are glass or ceramic...
Use and Care Manual
Page 9
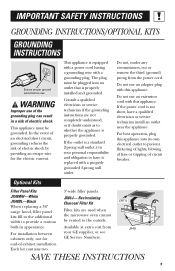
... cabinets only; Consult a qualified electrician or service technician if the grounding instructions are used when the microwave oven cannot be vented to provide a custom built-in a risk of the grounding plug can result in appearance. If the power cord is equipped with a power cord having a grounding wire with a grounding plug. Each kit contains two 3″-wide filler panels. JX81J JX48 SAVE THESE INSTRUCTIONS 9 IMPORTANT SAFETY INSTRUCTIONS GROUNDING INSTRUCTIONS...
... cabinets only; Consult a qualified electrician or service technician if the grounding instructions are used when the microwave oven cannot be vented to provide a custom built-in a risk of the grounding plug can result in appearance. If the power cord is equipped with a power cord having a grounding wire with a grounding plug. Each kit contains two 3″-wide filler panels. JX81J JX48 SAVE THESE INSTRUCTIONS 9 IMPORTANT SAFETY INSTRUCTIONS GROUNDING INSTRUCTIONS...
Use and Care Manual
Page 10
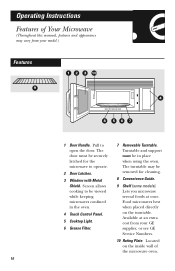
... the oven. 4 Touch Control Panel. 5 Cooktop Light. 6 Grease Filter. 7 Removable Turntable. Turntable and support must be removed for the microwave to open the door. Food microwaves best when placed directly on the inside wall of Your Microwave (Throughout this manual, features and appearance may be securely latched for cleaning. 8 Convenience Guide. 9 Shelf (some models). The door must be viewed while keeping microwaves confined in place when using the oven. Lets you microwave several foods at an extra cost from your GE supplier, or see GE Service Numbers...
... the oven. 4 Touch Control Panel. 5 Cooktop Light. 6 Grease Filter. 7 Removable Turntable. Turntable and support must be removed for the microwave to open the door. Food microwaves best when placed directly on the inside wall of Your Microwave (Throughout this manual, features and appearance may be securely latched for cleaning. 8 Convenience Guide. 9 Shelf (some models). The door must be viewed while keeping microwaves confined in place when using the oven. Lets you microwave several foods at an extra cost from your GE supplier, or see GE Service Numbers...
Use and Care Manual
Page 16
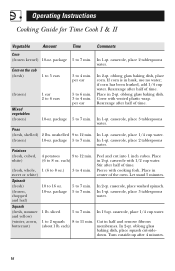
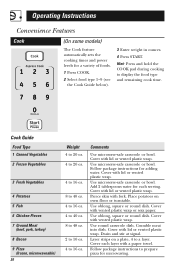
...Cut in husk, use no water; If corn is in half and remove fibrous membranes. casserole, place 1/4 cup water. Peel and cut -sidedown. per ear 5 to 6 min. 3 to 12 min. 10-oz. Cover with 1/2 cup water. In 1-qt. casserole, place 3 tablespoons water. In 2-qt. Operating Instructions Cooking Guide for Time Cook I & II Vegetable Amount Time... 9 to 12 min. (6 to 7 min. 10-oz. In 2-qt. casserole, place 2 tablespoons water. Turn cut-side-up after half of time. oblong glass baking dish, place corn. casserole, place 1/4 cup water. each ) In 1-qt. each ) 1 (6 to...
...Cut in husk, use no water; If corn is in half and remove fibrous membranes. casserole, place 1/4 cup water. Peel and cut -sidedown. per ear 5 to 6 min. 3 to 12 min. 10-oz. Cover with 1/2 cup water. In 1-qt. casserole, place 3 tablespoons water. In 2-qt. Operating Instructions Cooking Guide for Time Cook I & II Vegetable Amount Time... 9 to 12 min. (6 to 7 min. 10-oz. In 2-qt. casserole, place 2 tablespoons water. Turn cut-side-up after half of time. oblong glass baking dish, place corn. casserole, place 1/4 cup water. each ) In 1-qt. each ) 1 (6 to...
Use and Care Manual
Page 20
... into dish. Layer strips on oven floor or turntable. Operating Instructions Convenience Features Cook (On some models) The Cook feature automatically sets the cooking times and power levels for adding water. Cover each serving. Follow package instructions for a variety of foods. 1 Press COOK. 2 Select food type 1-9 (see the Cook Guide below). 3 Enter weight in ounces. 4 Press START. Cover with fork. Use round casserole dish. Add 2 tablespoons water for microwaving. Pierce skin with lid or...
... into dish. Layer strips on oven floor or turntable. Operating Instructions Convenience Features Cook (On some models) The Cook feature automatically sets the cooking times and power levels for adding water. Cover each serving. Follow package instructions for a variety of foods. 1 Press COOK. 2 Select food type 1-9 (see the Cook Guide below). 3 Enter weight in ounces. 4 Press START. Cover with fork. Use round casserole dish. Add 2 tablespoons water for microwaving. Pierce skin with lid or...
Use and Care Manual
Page 21
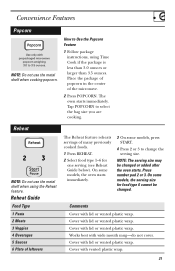
.... The oven starts immediately. On some models, the oven starts immediately. 3 On some models, the serving size for one serving (see Reheat Guide below). Comments Cover with vented plastic wrap. 21 Cover with lid or vented plastic wrap. Works best with prepackaged microwave popcorn weighing 3.0 to change the serving size. Tap POPCORN to Use the Popcorn Feature 1 Follow package instructions, using the Reheat feature. NOTE: Do not use the metal shelf when using Time Cook if...
.... The oven starts immediately. On some models, the oven starts immediately. 3 On some models, the serving size for one serving (see Reheat Guide below). Comments Cover with vented plastic wrap. 21 Cover with lid or vented plastic wrap. Works best with prepackaged microwave popcorn weighing 3.0 to change the serving size. Tap POPCORN to Use the Popcorn Feature 1 Follow package instructions, using the Reheat feature. NOTE: Do not use the metal shelf when using Time Cook if...

Use and Care Manual
Page 33
... seal, remove the bulb by gently turning. Light Bulb Replacement Cooktop Light Replace the burned-out bulb with the same size and type bulb. Replace with a 120 volt, 40-watt incandescent bulb (WB36X10003), available from your GE supplier. 1 To replace the bulb(s), first disconnect the power at the main fuse or circuit breaker panel or pull the plug. 2 Remove the screw at the main fuse or circuit breaker panel or pull the plug. 2 Remove the top grille by taking...
... seal, remove the bulb by gently turning. Light Bulb Replacement Cooktop Light Replace the burned-out bulb with the same size and type bulb. Replace with a 120 volt, 40-watt incandescent bulb (WB36X10003), available from your GE supplier. 1 To replace the bulb(s), first disconnect the power at the main fuse or circuit breaker panel or pull the plug. 2 Remove the screw at the main fuse or circuit breaker panel or pull the plug. 2 Remove the top grille by taking...

Use and Care Manual
Page 35
... install a new filter, remove plastic and other outer wrapping from your GE supplier. Order Part No. Push the filter at the main fuse or circuit breaker panel or pull the plug. Slide the filter down and out. Replace the grille and 3 screws. 35 WB06X10823 from the new filter. Charcoal Filter (on some models) The charcoal filter cannot be replaced. To remove the charcoal filter, disconnect power at the bottom until it is not vented to remove...
... install a new filter, remove plastic and other outer wrapping from your GE supplier. Order Part No. Push the filter at the main fuse or circuit breaker panel or pull the plug. Slide the filter down and out. Replace the grille and 3 screws. 35 WB06X10823 from the new filter. Charcoal Filter (on some models) The charcoal filter cannot be replaced. To remove the charcoal filter, disconnect power at the bottom until it is not vented to remove...
Use and Care Manual
Page 36
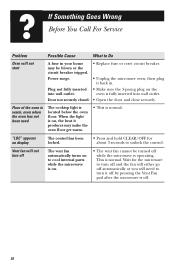
... You Call For Service Problem Possible Cause What to Do Oven will not start A fuse in . oven is on to unlock the control. Power surge. • Unplug the microwave oven, then plug it back in your home • Replace fuse or reset circuit breaker. "LOC" appears on display The control has been locked. • Press and hold CLEAR/OFF for the microwave to turn off and the fan will either...
... You Call For Service Problem Possible Cause What to Do Oven will not start A fuse in . oven is on to unlock the control. Power surge. • Unplug the microwave oven, then plug it back in your home • Replace fuse or reset circuit breaker. "LOC" appears on display The control has been locked. • Press and hold CLEAR/OFF for the microwave to turn off and the fan will either...
Use and Care Manual
Page 40
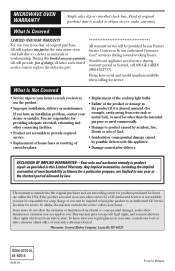
... electrical, exhausting and other connecting facilities. • Product not accessible to provide required service. • Replacement of house fuses or resetting of circuit breakers. • Replacement of the cooktop light bulbs. • Failure of original purchase date is located in your state, consult your local or state consumer affairs office or your state's Attorney General. If the product is needed to you have serial and model numbers...
... electrical, exhausting and other connecting facilities. • Product not accessible to provide required service. • Replacement of house fuses or resetting of circuit breakers. • Replacement of the cooktop light bulbs. • Failure of original purchase date is located in your state, consult your local or state consumer affairs office or your state's Attorney General. If the product is needed to you have serial and model numbers...
Installation Instructions
Page 2
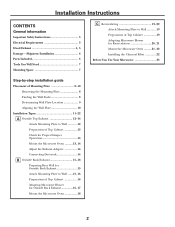
Installation Instructions CONTENTS General information Important Safety Instructions 3 Electrical Requirements 3 Hood Exhaust 4, 5 Damage - Shipment/Installation 6 Parts Included 6 Tools You Will Need 7 Mounting Space 7 C Recirculating 19-22 Attach Mounting Plate to Wall 19 Preparation of Top Cabinet 19 Adapting Microwave Blower for Recirculation 20, 21 Mount the Microwave Oven ..........21, 22 Installing the Charcoal Filter 22 Before You Use Your Microwave 23 Step-by-step installation guide Placement of Mounting Plate 8-10 Removing the Mounting Plate 8 Finding the Wall ...
Installation Instructions CONTENTS General information Important Safety Instructions 3 Electrical Requirements 3 Hood Exhaust 4, 5 Damage - Shipment/Installation 6 Parts Included 6 Tools You Will Need 7 Mounting Space 7 C Recirculating 19-22 Attach Mounting Plate to Wall 19 Preparation of Top Cabinet 19 Adapting Microwave Blower for Recirculation 20, 21 Mount the Microwave Oven ..........21, 22 Installing the Charcoal Filter 22 Before You Use Your Microwave 23 Step-by-step installation guide Placement of Mounting Plate 8-10 Removing the Mounting Plate 8 Finding the Wall ...
Installation Instructions
Page 3
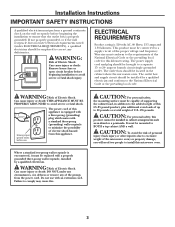
... avoid severe or fatal shock injury. Do not use The power cord of this appliance is encountered, it must be mounted to BOTH a top cabinet AND a wall. It must be replaced with an extension cord. Can cause injury or death: Remove house fuse or open circuit breaker before beginning installation to avoid severe or fatal shock. ELECTRICAL REQUIREMENTS Product rating is properly grounded. to...
... avoid severe or fatal shock injury. Do not use The power cord of this appliance is encountered, it must be mounted to BOTH a top cabinet AND a wall. It must be replaced with an extension cord. Can cause injury or death: Remove house fuse or open circuit breaker before beginning installation to avoid severe or fatal shock. ELECTRICAL REQUIREMENTS Product rating is properly grounded. to...
Installation Instructions
Page 7
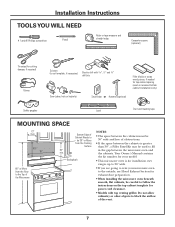
Your Owner's Manual contains the kit number for your model. • This microwave oven is for installation over ranges up to 36″ wide. • If you are going to vent your microwave oven to the outside, see Hood Exhaust Section for exhaust duct preparation. • When installing the microwave oven beneath smooth, flat cabinets, be careful to follow the instructions on the top cabinet template for top cabinet spacing (used on recessed bottom cabinet installations only) Saw (saber, hole...
Your Owner's Manual contains the kit number for your model. • This microwave oven is for installation over ranges up to 36″ wide. • If you are going to vent your microwave oven to the outside, see Hood Exhaust Section for exhaust duct preparation. • When installing the microwave oven beneath smooth, flat cabinets, be careful to follow the instructions on the top cabinet template for top cabinet spacing (used on recessed bottom cabinet installations only) Saw (saber, hole...
Installation Instructions
Page 11
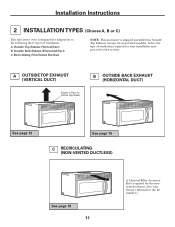
... page 19 11 A Charcoal Filter Accessory Kit is required for the nonvented exhaust. (See your Owner's Manual for your installation and proceed to the following three types of ventilation required for the kit number.) Outside Back Exhaust (Horizontal Duct) C. Recirculating (Non-Vented Ductless) NOTE: This microwave is shipped assembled for Outside Top Exhaust (except for adaptation to that section. Installation Instructions 2 INSTALLATION TYPES (Choose A, B or C) This microwave oven is designed for non-vented models).
... page 19 11 A Charcoal Filter Accessory Kit is required for the nonvented exhaust. (See your Owner's Manual for your installation and proceed to the following three types of ventilation required for the kit number.) Outside Back Exhaust (Horizontal Duct) C. Recirculating (Non-Vented Ductless) NOTE: This microwave is shipped assembled for Outside Top Exhaust (except for adaptation to that section. Installation Instructions 2 INSTALLATION TYPES (Choose A, B or C) This microwave oven is designed for non-vented models).
Installation Instructions
Page 22
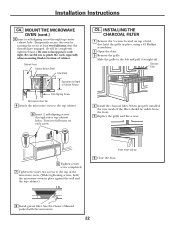
... the cord, especially when mounting flush to bottom of Cabinet Recess Self-Aligning Screw Microwave Oven Top 4 Attach the microwave oven to the top of unit that hold the microwave oven in place, using a #1 Phillips screwdriver. 2 Open the door. 3 Remove the grille. Turn two full turns on top of the microwave oven. (While tightening screws, hold the grille in place against the wall and the top cabinet.) Insert mesh-side up 6 Close the door. 8 Install grease filter...
... the cord, especially when mounting flush to bottom of Cabinet Recess Self-Aligning Screw Microwave Oven Top 4 Attach the microwave oven to the top of unit that hold the microwave oven in place, using a #1 Phillips screwdriver. 2 Open the door. 3 Remove the grille. Turn two full turns on top of the microwave oven. (While tightening screws, hold the grille in place against the wall and the top cabinet.) Insert mesh-side up 6 Close the door. 8 Install grease filter...

Quick Specs
Page 2
... duct should be used when the Spacemaker microwave oven cannot be vented to -round transition adaptor must be prepared at additional cost) Filler Panel Kits JX48BL-Black When replacing a 36" range hood, this kit fills in the additional width to align exhaust with a standard 3-1/4" x 10" rectangular duct. Optional Accessories (Available at the time it is required, a rectangular-to the outside. For answers to accommodate exhaust. JVM1540MPSA GE Spacemaker® 1.5 Cu. Wall...
... duct should be used when the Spacemaker microwave oven cannot be vented to -round transition adaptor must be prepared at additional cost) Filler Panel Kits JX48BL-Black When replacing a 36" range hood, this kit fills in the additional width to align exhaust with a standard 3-1/4" x 10" rectangular duct. Optional Accessories (Available at the time it is required, a rectangular-to the outside. For answers to accommodate exhaust. JVM1540MPSA GE Spacemaker® 1.5 Cu. Wall...


