Quick Specs
Page 1
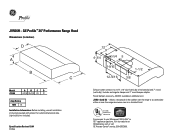
...-the-range microwave oven or a standard hood. Specification Revised 5/04 220966 12 9 4-3/4 1-1/4 5 1-9/16 12-9/16 1-1/2 3/8 Exhaust outlet connects to your Monogram,® GE Profile™ or GE® appliance questions, visit our website at additional cost. Allows a receptacle in inches) D A B C Model JV566 A B CD 4-3/4 35-7/8 20 12 Amp Rating 120V 1.4 hood_a_b_c_new.eps Installation Information: Before installing, consult installation instructions packed with product for current dimensional data. JXHC1 Cord Kit - JV666.eps Listed...
...-the-range microwave oven or a standard hood. Specification Revised 5/04 220966 12 9 4-3/4 1-1/4 5 1-9/16 12-9/16 1-1/2 3/8 Exhaust outlet connects to your Monogram,® GE Profile™ or GE® appliance questions, visit our website at additional cost. Allows a receptacle in inches) D A B C Model JV566 A B CD 4-3/4 35-7/8 20 12 Amp Rating 120V 1.4 hood_a_b_c_new.eps Installation Information: Before installing, consult installation instructions packed with product for current dimensional data. JXHC1 Cord Kit - JV666.eps Listed...

Quick Specs
Page 2
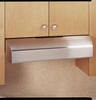
...• Halogen light - TM JV566H - GE Profile™ 36" Performance Range Hood JV536/566HSS Features and Benefits • Convertible venting - Provides bright light that illuminates the cooking surface below hood. • Removable grease filter - Durable filters can be removed for easy cleaning and maintenance. • Round and rectangular ducting - Powerful variable speed exhaust system effectively pulls smoke and vapors out of various installation requirements. • Vertical and rear exhaust - Stainless Steel • Model JV565HWW - White on black Specification...
...• Halogen light - TM JV566H - GE Profile™ 36" Performance Range Hood JV536/566HSS Features and Benefits • Convertible venting - Provides bright light that illuminates the cooking surface below hood. • Removable grease filter - Durable filters can be removed for easy cleaning and maintenance. • Round and rectangular ducting - Powerful variable speed exhaust system effectively pulls smoke and vapors out of various installation requirements. • Vertical and rear exhaust - Stainless Steel • Model JV565HWW - White on black Specification...
Use and Care Manual
Page 1
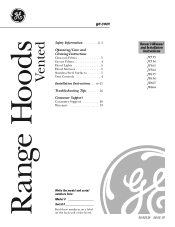
Range Hoods Vented ge.com Safety Information 2, 3 Operating/Care and Cleaning Instructions Charcoal Filters 5 Grease Filters 4 Hood Lights 5 Hood Surfaces 5 Stainless Steel Surfaces 5 Vent Controls 4 Installation Instructions . . .6-15 Troubleshooting Tips 16 Consumer Support Consumer Support 20 Warranty 19 Owner's Manual and Installation Instructions JV535 JV536 JV565 JV566 JV635 JV636 JV665 JV666 Write the model and serial numbers here: Model Serial Find these numbers on a label on the back wall of the hood. 49-80438 08-06 JR
Range Hoods Vented ge.com Safety Information 2, 3 Operating/Care and Cleaning Instructions Charcoal Filters 5 Grease Filters 4 Hood Lights 5 Hood Surfaces 5 Stainless Steel Surfaces 5 Vent Controls 4 Installation Instructions . . .6-15 Troubleshooting Tips 16 Consumer Support Consumer Support 20 Warranty 19 Owner's Manual and Installation Instructions JV535 JV536 JV565 JV566 JV635 JV636 JV665 JV666 Write the model and serial numbers here: Model Serial Find these numbers on a label on the back wall of the hood. 49-80438 08-06 JR

Use and Care Manual
Page 2
... use this unit with all applicable codes and standards, including fire-rated construction. D. When cutting or drilling into wall or ceiling, do not go out immediately, EVACUATE AND CALL THE FIRE DEPARTMENT. C. Installation work and electrical wiring must be vented to prevent back drafting. Sufficient air is needed for proper combustion and exhausting of gases through the flue (chimney) of your back to the service panel. C. D. Use proper pan size. BE CAREFUL TO...
... use this unit with all applicable codes and standards, including fire-rated construction. D. When cutting or drilling into wall or ceiling, do not go out immediately, EVACUATE AND CALL THE FIRE DEPARTMENT. C. Installation work and electrical wiring must be vented to prevent back drafting. Sufficient air is needed for proper combustion and exhausting of gases through the flue (chimney) of your back to the service panel. C. D. Use proper pan size. BE CAREFUL TO...
Use and Care Manual
Page 4
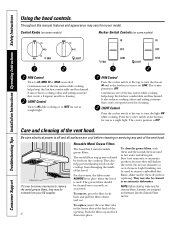
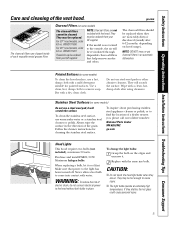
... cleaning. Care and cleaning of the hood. To clean the grease filters, soak them and then swish them into place. Don't use abrasives or oven cleaners. Consumer Support Troubleshooting Tips Installation Instructions Operating Instructions Safety Instructions Using the hood controls. Continuous use of the fan system while cooking helps keep the kitchen comfortable and less humid. The center position is OFF. For this manual, features and appearance may vary from your model. To remove, press the filter...
... cleaning. Care and cleaning of the hood. To clean the grease filters, soak them and then swish them into place. Don't use abrasives or oven cleaners. Consumer Support Troubleshooting Tips Installation Instructions Operating Instructions Safety Instructions Using the hood controls. Continuous use of the fan system while cooking helps keep the kitchen comfortable and less humid. The center position is OFF. For this manual, features and appearance may vary from your model. To remove, press the filter...
Use and Care Manual
Page 5
.... Safety Instructions Operating Instructions Installation Instructions Troubleshooting Tips Consumer Support Care and cleaning of the grain. Never allow a hot bulb to find the location of electric shock, do not connect electrical power to the outside, the air will scratch the surface. it cool first. Always wipe the surface in the direction of the vent hood. To change the light bulbs: Grasp the bulb on some models) The charcoal filters cannot be ordered from your GE supplier. They...
.... Safety Instructions Operating Instructions Installation Instructions Troubleshooting Tips Consumer Support Care and cleaning of the grain. Never allow a hot bulb to find the location of electric shock, do not connect electrical power to the outside, the air will scratch the surface. it cool first. Always wipe the surface in the direction of the vent hood. To change the light bulbs: Grasp the bulb on some models) The charcoal filters cannot be ordered from your GE supplier. They...
Use and Care Manual
Page 6
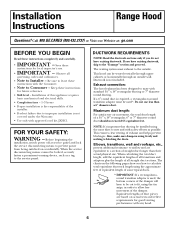
... hood. 6 Installation Instructions Range Hood Questions? Exhaust connection: The hood exhaust has been designed to improper installation is used *. Elbows, transitions, wall and roofcaps, etc., present additional resistance to airflow and are based on accidentally. Installation of this appliance requires basic mechanical and electrical skills. • Completion time - 1-3 hours • Proper installation is required, a rectangular-to-round transition adaptor must exhaust to the service panel. Call 800.GE.CARES (800.432.2737) or Visit our Website at service panel...
... hood. 6 Installation Instructions Range Hood Questions? Exhaust connection: The hood exhaust has been designed to improper installation is used *. Elbows, transitions, wall and roofcaps, etc., present additional resistance to airflow and are based on accidentally. Installation of this appliance requires basic mechanical and electrical skills. • Completion time - 1-3 hours • Proper installation is required, a rectangular-to-round transition adaptor must exhaust to the service panel. Call 800.GE.CARES (800.432.2737) or Visit our Website at service panel...
Use and Care Manual
Page 7
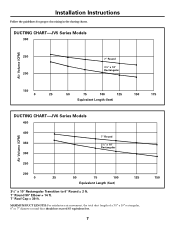
...) DUCTING CHART-JV6 Series Models 450 Air Volume (CFM) 400 350 • • • • • • 7″ Round 31⁄4″ x 10″ • • 300 • • Rectangular • • 250 200 0 25 50 75 100 125 150 Equivalent Length (feet) 31⁄4″ x 10″ Rectangular Transition to 6″ Round = 2 ft. 7″ Round 90° Elbow = 14 ft. 7″ Roof Cap...
...) DUCTING CHART-JV6 Series Models 450 Air Volume (CFM) 400 350 • • • • • • 7″ Round 31⁄4″ x 10″ • • 300 • • Rectangular • • 250 200 0 25 50 75 100 125 150 Equivalent Length (feet) 31⁄4″ x 10″ Rectangular Transition to 6″ Round = 2 ft. 7″ Round 90° Elbow = 14 ft. 7″ Roof Cap...

Use and Care Manual
Page 8
... Ft. transition, 90° elbow x( ) = Ft. Installation Instructions WORKSHEET-CALCULATE TOTAL EQUIVALENT DUCTWORK LENGTH DUCT PIECES 31⁄4″ x 10″ Rect., straight EQUIVALENT NUMBER LENGTH x USED = TOTAL 1 Ft. MAXIMUM DUCT LENGTH: For satisfactory air movement, the total duct length of a 31⁄4″ x 10″ rectangular, 6″ or 7″ diameter round duct should not exceed 65 equivalent feet. w/o with damper 31⁄4″ x 10″ 2 Ft. roof cap...
... Ft. transition, 90° elbow x( ) = Ft. Installation Instructions WORKSHEET-CALCULATE TOTAL EQUIVALENT DUCTWORK LENGTH DUCT PIECES 31⁄4″ x 10″ Rect., straight EQUIVALENT NUMBER LENGTH x USED = TOTAL 1 Ft. MAXIMUM DUCT LENGTH: For satisfactory air movement, the total duct length of a 31⁄4″ x 10″ rectangular, 6″ or 7″ diameter round duct should not exceed 65 equivalent feet. w/o with damper 31⁄4″ x 10″ 2 Ft. roof cap...
Use and Care Manual
Page 9
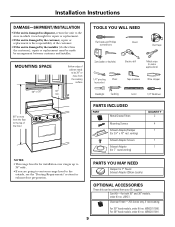
... the unit is for installation over ranges up to 36″ wide. • If you are going to the outside, see the "Ducting Requirements" section for 7″ Round Exhaust Adaptor (Obtain Locally) OPTIONAL ACCESSORIES These kits can be made by the customer, repair or replacement is the responsibility of the hood PARTS INCLUDED PART Metal Grease Filters Mounting Screws Exhaust Adaptor/Damper (for 31⁄4″ x 10″ rect. venting) Exhaust Adaptor Screws Exhaust Adaptor (for 7" round venting...
... the unit is for installation over ranges up to 36″ wide. • If you are going to the outside, see the "Ducting Requirements" section for 7″ Round Exhaust Adaptor (Obtain Locally) OPTIONAL ACCESSORIES These kits can be made by the customer, repair or replacement is the responsibility of the hood PARTS INCLUDED PART Metal Grease Filters Mounting Screws Exhaust Adaptor/Damper (for 31⁄4″ x 10″ rect. venting) Exhaust Adaptor Screws Exhaust Adaptor (for 7" round venting...

Use and Care Manual
Page 10
... electrical access hole will use. IMPORTANT: If the hood is to be knocked out of the hood. A Outside top exhaust (Vertical duct-31⁄4″ x 10″ Rectangular) C Outside rear exhaust (Horizontal duct-31⁄4″ x 10″ Rectangular) B Outside top exhaust (Vertical duct-7″ Round) D Recirculating (Non-vented ductless-Optional for JV5 Series models only) 10 The JV6 Series models cannot be recirculated. Installation Instructions 1 CHOOSE VENT OPTION Determine the vent option that your installation will require...
... electrical access hole will use. IMPORTANT: If the hood is to be knocked out of the hood. A Outside top exhaust (Vertical duct-31⁄4″ x 10″ Rectangular) C Outside rear exhaust (Horizontal duct-31⁄4″ x 10″ Rectangular) B Outside top exhaust (Vertical duct-7″ Round) D Recirculating (Non-vented ductless-Optional for JV5 Series models only) 10 The JV6 Series models cannot be recirculated. Installation Instructions 1 CHOOSE VENT OPTION Determine the vent option that your installation will require...
Use and Care Manual
Page 11
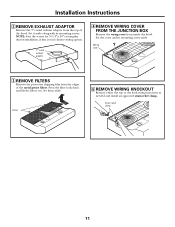
... its mounting screws. Set it aside along with its mounting screw aside. Press the filter locks back and lift the filters out. Strain relief clamp 11 Installation Instructions 2 REMOVE EXHAUST ADAPTOR Remove the 7″ round exhaust adaptor from the edges of the hood. Set them aside. NOTE: Save the screws for 3-1/4″ x 10″ rectangular ducted installation, if that is your chosen venting option. 7″ round exhaust adaptor 4 REMOVE WIRING COVER FROM THE JUNCTION BOX Remove the wiring cover...
... its mounting screws. Set it aside along with its mounting screw aside. Press the filter locks back and lift the filters out. Strain relief clamp 11 Installation Instructions 2 REMOVE EXHAUST ADAPTOR Remove the 7″ round exhaust adaptor from the edges of the hood. Set them aside. NOTE: Save the screws for 3-1/4″ x 10″ rectangular ducted installation, if that is your chosen venting option. 7″ round exhaust adaptor 4 REMOVE WIRING COVER FROM THE JUNCTION BOX Remove the wiring cover...
Use and Care Manual
Page 12
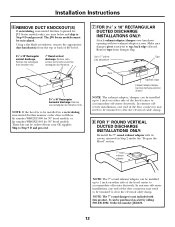
... kits can be ordered from damper flap. Using a flat blade screwdriver, remove the appropriate duct knockout(s) from the top or back of the duct connector may need to be trimmed to clear the electrical cable clamp. 8 FOR 7″ ROUND VERTICAL DUCTED DISCHARGE INSTALLATIONS ONLY: Re-install the 7″ round exhaust adaptor with its screws, removed in a recirculating, non-vented ductless manner, order charcoal filters, kit number WB02X11000 for 30″ hood models, or kit number WB02X11001 for JV5 Series models...
... kits can be ordered from damper flap. Using a flat blade screwdriver, remove the appropriate duct knockout(s) from the top or back of the duct connector may need to be trimmed to clear the electrical cable clamp. 8 FOR 7″ ROUND VERTICAL DUCTED DISCHARGE INSTALLATIONS ONLY: Re-install the 7″ round exhaust adaptor with its screws, removed in a recirculating, non-vented ductless manner, order charcoal filters, kit number WB02X11000 for 30″ hood models, or kit number WB02X11001 for JV5 Series models...
Use and Care Manual
Page 13
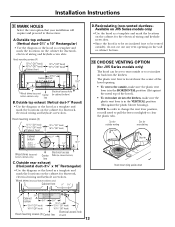
... the outside, make sure the plastic vent lever is in cabinet bottom) C.Outside rear exhaust (Horizontal duct-31⁄4″ x 10″ Rectangular) • Use the diagram or the hood as a template and mark the locations on the cabinet for the electrical wiring and keyhole screw slots. • Since the hood is in the VERTICAL position (flat against the metal top of the hood). • To recirculate air into the kitchen, make...
... the outside, make sure the plastic vent lever is in cabinet bottom) C.Outside rear exhaust (Horizontal duct-31⁄4″ x 10″ Rectangular) • Use the diagram or the hood as a template and mark the locations on the cabinet for the electrical wiring and keyhole screw slots. • Since the hood is in the VERTICAL position (flat against the metal top of the hood). • To recirculate air into the kitchen, make...
Use and Care Manual
Page 14
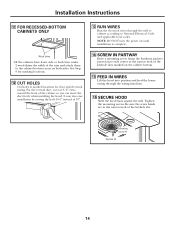
... electrical wires through the wiring knockout. 16 SECURE HOOD Slide the hood back against the wall. Mounting screw (4) Keyhole (4) 14 Be sure the screw heads are in the narrow neck of the cabinet so you can move the duct freely when installing the hood. For the vertical duct, cut out 3/4″ extra toward the front of the keyhole slot. NOTE: DO NOT turn the power on until installation...
... electrical wires through the wiring knockout. 16 SECURE HOOD Slide the hood back against the wall. Mounting screw (4) Keyhole (4) 14 Be sure the screw heads are in the narrow neck of the cabinet so you can move the duct freely when installing the hood. For the vertical duct, cut out 3/4″ extra toward the front of the keyhole slot. NOTE: DO NOT turn the power on until installation...
Use and Care Manual
Page 15
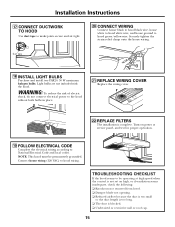
... small or the duct length is too long. ❏ The duct is complete. Duct tape 18 INSTALL LIGHT BULBS Purchase and install two PAR20, 50 W maximum halogen bulbs. NOTE: This hood must be operating at service panel, and test for proper operation. 19 FOLLOW ELECTRICAL CODE Complete the electrical wiring according to the hood without both bulbs in place. 21 REPLACE WIRING COVER Replace the wiring cover. 22 REPLACE FILTERS The installation is blocked. ❏ Undersized or restrictive wall or roof cap. 15
... small or the duct length is too long. ❏ The duct is complete. Duct tape 18 INSTALL LIGHT BULBS Purchase and install two PAR20, 50 W maximum halogen bulbs. NOTE: This hood must be operating at service panel, and test for proper operation. 19 FOLLOW ELECTRICAL CODE Complete the electrical wiring according to the hood without both bulbs in place. 21 REPLACE WIRING COVER Replace the wiring cover. 22 REPLACE FILTERS The installation is blocked. ❏ Undersized or restrictive wall or roof cap. 15
Use and Care Manual
Page 16
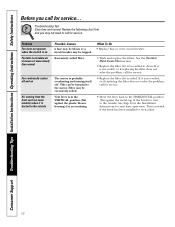
... vent (on some models) when it is not soiled, or if replacing the filter does not solve the problem, call for service. • Replace the filter if it is ducted to call for vent lever operation. The motor is normal if the hood has been installed to clean. If it is too soiled to recirculate. 16 Consumer Support Troubleshooting Tips Installation Instructions Operating Instructions Safety Instructions Before you may be tripped. Review the following chart...
... vent (on some models) when it is not soiled, or if replacing the filter does not solve the problem, call for service. • Replace the filter if it is ducted to call for vent lever operation. The motor is normal if the hood has been installed to clean. If it is too soiled to recirculate. 16 Consumer Support Troubleshooting Tips Installation Instructions Operating Instructions Safety Instructions Before you may be tripped. Review the following chart...

Use and Care Manual
Page 17
Safety Instructions Operating Instructions Installation Instructions Troubleshooting Tips Consumer Support Notes. 17
Safety Instructions Operating Instructions Installation Instructions Troubleshooting Tips Consumer Support Notes. 17
Use and Care Manual
Page 19
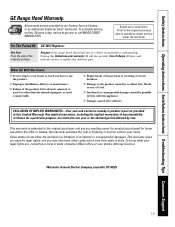
..., or an authorized Customer Care® technician. I Failure of God. EXCLUSION OF IMPLIED WARRANTIES-Your sole and exclusive remedy is extended to state. Warrantor: General Electric Company. Safety Instructions Operating Instructions Installation Instructions Troubleshooting Tips Consumer Support GE Range Hood Warranty. Staple your state's Attorney General. This warranty is product repair as provided in -home service to use within the USA. For The Period Of: GE Will Replace: One Year From...
..., or an authorized Customer Care® technician. I Failure of God. EXCLUSION OF IMPLIED WARRANTIES-Your sole and exclusive remedy is extended to state. Warrantor: General Electric Company. Safety Instructions Operating Instructions Installation Instructions Troubleshooting Tips Consumer Support GE Range Hood Warranty. Staple your state's Attorney General. This warranty is product repair as provided in -home service to use within the USA. For The Period Of: GE Will Replace: One Year From...
Use and Care Manual
Page 20
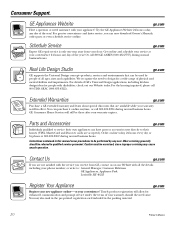
.... Schedule Service ge.com Expert GE repair service is still in Mexico For details of GE's Universal Design applications, including kitchen design ideas for enhanced communication and prompt service under the terms of the year! Parts and Accessories ge.com Individuals qualified to qualified service personnel. Instructions contained in this manual cover procedures to their homes (VISA, MasterCard and Discover cards are not satisfied with your warranty expires...
.... Schedule Service ge.com Expert GE repair service is still in Mexico For details of GE's Universal Design applications, including kitchen design ideas for enhanced communication and prompt service under the terms of the year! Parts and Accessories ge.com Individuals qualified to qualified service personnel. Instructions contained in this manual cover procedures to their homes (VISA, MasterCard and Discover cards are not satisfied with your warranty expires...


