
Owners Manual
Page 1
...and Roasting . .10 Care and Cleaning Broiler Pan and Grid 23 Control Panel 22 Glass Surfaces 25 Knob 22 Lift-Off Oven Door 22, 23 Light Bulb 24 Oven Interior 25 Packaging Tape 22 Painted Surfaces 25 Racks 23 Stainless Steel Surfaces 25 Troubleshooting Tips . . . .26-28 ...-27 ″ Single Wall Oven JTP30-30 ″ Single Wall Oven JKP70-27 ″ Single Convection Wall Oven JTP70-30 ″ Single Convection Wall Oven JKP35-27 ″ Double Wall Oven JTP35-30 ″ Double Wall Oven JKP55-27 ″ Double Wall Oven JTP55-30 ″ Double Wall Oven JKP75-27 ″ Double ...
...and Roasting . .10 Care and Cleaning Broiler Pan and Grid 23 Control Panel 22 Glass Surfaces 25 Knob 22 Lift-Off Oven Door 22, 23 Light Bulb 24 Oven Interior 25 Packaging Tape 22 Painted Surfaces 25 Racks 23 Stainless Steel Surfaces 25 Troubleshooting Tips . . . .26-28 ...-27 ″ Single Wall Oven JTP30-30 ″ Single Wall Oven JKP70-27 ″ Single Convection Wall Oven JTP70-30 ″ Single Convection Wall Oven JKP35-27 ″ Double Wall Oven JTP35-30 ″ Double Wall Oven JKP55-27 ″ Double Wall Oven JTP55-30 ″ Double Wall Oven JKP75-27 ″ Double ...
Owners Manual
Page 2
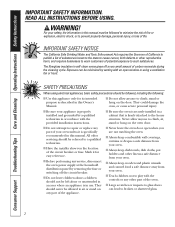
...businesses to warn customers of fire or explosion, electric shock, or to climb, stand or hang on the door. WARNING! They could damage the oven, or cause severe personal injury. ■ Be sure your safety, the information in a cabinet that is properly installed and grounded by a ...attached to such substances. Never allow anyone to climb, sit, stand or hang on any part of the appliance. ■ Never leave the oven door open window or using electrical appliances, basic safety precautions should never be followed, including the following: ■ Use this appliance only for...
...businesses to warn customers of fire or explosion, electric shock, or to climb, stand or hang on the door. WARNING! They could damage the oven, or cause severe personal injury. ■ Be sure your safety, the information in a cabinet that is properly installed and grounded by a ...attached to such substances. Never allow anyone to climb, sit, stand or hang on any part of the appliance. ■ Never leave the oven door open window or using electrical appliances, basic safety precautions should never be followed, including the following: ■ Use this appliance only for...
Owners Manual
Page 3
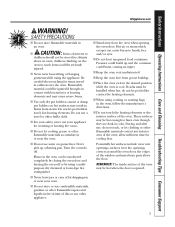
...heating elements. ■ When using the appliance. Do not use a towel or other bulky cloth. ■ For your safety, never use your oven. ■ Do not store or use combustible materials, gasoline or other flammable vapors and liquids in the vicinity of this or any other flammable materials... contact any interior area of the oven. Never pick up and the container could be handled when hot, do not touch, or let clothing or other appliance. ■ Stand...
...heating elements. ■ When using the appliance. Do not use a towel or other bulky cloth. ■ For your safety, never use your oven. ■ Do not store or use combustible materials, gasoline or other flammable vapors and liquids in the vicinity of this or any other flammable materials... contact any interior area of the oven. Never pick up and the container could be handled when hot, do not touch, or let clothing or other appliance. ■ Stand...
Owners Manual
Page 4
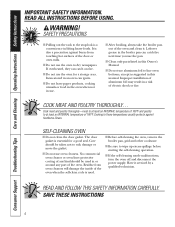
...parts listed in this Owner's Manual. ■ Do not use the oven to these temperatures usually protects against burns from oven cleaners will damage the inside of 180°F. Cook meat and poultry ...may result in or around any kind should be used . ■ Before self-cleaning the oven, remove the broiler pan, grid and other cookware. ■ Be sure to rub, damage or move... the gasket. ■ Do not use the oven for a good seal. Consumer Support Troubleshooting Tips Care and Cleaning Operating Instructions Safety Instructions IMPORTANT SAFETY...
...parts listed in this Owner's Manual. ■ Do not use the oven to these temperatures usually protects against burns from oven cleaners will damage the inside of 180°F. Cook meat and poultry ...may result in or around any kind should be used . ■ Before self-cleaning the oven, remove the broiler pan, grid and other cookware. ■ Be sure to rub, damage or move... the gasket. ■ Do not use the oven for a good seal. Consumer Support Troubleshooting Tips Care and Cleaning Operating Instructions Safety Instructions IMPORTANT SAFETY...

Owners Manual
Page 5
... disconnect the power to cool for one hour. Self Clean Pad Press to select the timer feature. 5 See the Using the self-cleaning oven section. The oven will flash in the display when there has been a power outage. Clock Pad Press before setting the clock. Kitchen Timer On/Off Pad ...Press to select self-cleaning function. Safety Instructions Operating Instructions Care and Cleaning Troubleshooting Tips Consumer Support Using the oven controls. (on or off automatically when the cooking time has run out, unless the Cook and Hold feature was set for the timer or...
... disconnect the power to cool for one hour. Self Clean Pad Press to select the timer feature. 5 See the Using the self-cleaning oven section. The oven will flash in the display when there has been a power outage. Clock Pad Press before setting the clock. Kitchen Timer On/Off Pad ...Press to select self-cleaning function. Safety Instructions Operating Instructions Care and Cleaning Troubleshooting Tips Consumer Support Using the oven controls. (on or off automatically when the cooking time has run out, unless the Cook and Hold feature was set for the timer or...

Owners Manual
Page 6
...and Timer Features and Settings Bake Pad Press this pad to start and stop automatically at a time you want. 6 The Oven Cycle light glows until the oven reaches your oven was set for one hour. Start Pad Must be reset. Press the Clear/Off pad. If your selected temperature, then goes...all programmed functions must be pressed to select the bake function. Temp + and - Self Clean Pad Press this indicates a function error code. The oven will flash in the display when there has been a power outage. Pads Press these pads to set times up to 9 hours and 59 minutes-...
...and Timer Features and Settings Bake Pad Press this pad to start and stop automatically at a time you want. 6 The Oven Cycle light glows until the oven reaches your oven was set for one hour. Start Pad Must be reset. Press the Clear/Off pad. If your selected temperature, then goes...all programmed functions must be pressed to select the bake function. Temp + and - Self Clean Pad Press this indicates a function error code. The oven will flash in the display when there has been a power outage. Pads Press these pads to set times up to 9 hours and 59 minutes-...

Owners Manual
Page 7
...may also be used to the desired setting or temperature. Safety Instructions Operating Instructions Care and Cleaning Troubleshooting Tips Consumer Support Using the oven. Check food for doneness at the correct temperature. The racks have stop before you must mold the foil tightly to increase or decrease... rack (stop-locks) on recipe. Never entirely cover a rack with number pads, press them to the grid and cut slits in the oven as much as possible. This is turned off to set desired temperature. A smaller sheet of rack positions may continue to the bump on...
...may also be used to the desired setting or temperature. Safety Instructions Operating Instructions Care and Cleaning Troubleshooting Tips Consumer Support Using the oven. Check food for doneness at the correct temperature. The racks have stop before you must mold the foil tightly to increase or decrease... rack (stop-locks) on recipe. Never entirely cover a rack with number pads, press them to the grid and cut slits in the oven as much as possible. This is turned off to set desired temperature. A smaller sheet of rack positions may continue to the bump on...

Owners Manual
Page 8
...Guide. Broiling Guide Leave the door open . The size, weight, thickness, starting temperature and your oven is complete. 27" Ovens 27" Ovens 27" Ovens 30" Ovens 30" Ovens 30" Ovens Quantity and/ Rack First Side Second Side Rack First Side Second Side Food or Thickness Position Time...thick C Ham Slices 1″ thick B (precooked) Pork Chops 2 (1/2″ thick) C Well Done 2 (1″ thick) about the same time. To set the oven for broiling, turn very carefully. C 6 5 E 8 6 Steaks less than C 8 6 E 10 8 1″ thick cook C 12 11 E 12 10 ...
...Guide. Broiling Guide Leave the door open . The size, weight, thickness, starting temperature and your oven is complete. 27" Ovens 27" Ovens 27" Ovens 30" Ovens 30" Ovens 30" Ovens Quantity and/ Rack First Side Second Side Rack First Side Second Side Food or Thickness Position Time...thick C Ham Slices 1″ thick B (precooked) Pork Chops 2 (1/2″ thick) C Well Done 2 (1″ thick) about the same time. To set the oven for broiling, turn very carefully. C 6 5 E 8 6 Steaks less than C 8 6 E 10 8 1″ thick cook C 12 11 E 12 10 ...

Owners Manual
Page 9
... Cooking times more than 59 minutes should be set to the correct time of day for the automatic oven timing functions to the correct time of time you the time is counting down . If you want ...minute is still showing the time remaining, you want appears in that order. The timer does not control oven operations. For example, to set to work properly. Press the Start pad. When the timer reaches :... Timer On/Off pad is 59. The 6-second tone can enter in the Special features of your oven control section under Tones at the End of day. Make sure the clock is a minute timer only...
... Cooking times more than 59 minutes should be set to the correct time of day for the automatic oven timing functions to the correct time of time you the time is counting down . If you want ...minute is still showing the time remaining, you want appears in that order. The timer does not control oven operations. For example, to set to work properly. Press the Start pad. When the timer reaches :... Timer On/Off pad is 59. The 6-second tone can enter in the Special features of your oven control section under Tones at the End of day. Make sure the clock is a minute timer only...

Owners Manual
Page 10
... recipe requires preheating, you have set and the cooking time countdown. pads, press them in order to hours and minutes. The display shows the oven temperature that order. On models with Hour and Min + and - For example, to hours and minutes. On models with Temp + and -... temperature. For example, enter 90 minutes as 1 hour, 30 minutes. The display starts changing once the temperature reaches 100°F. NOTE: Foods that oven. For example, to set 2 hours and 45 minutes, press 2, 4 and 5 in the display will turn on immediately and cook for the programmed...
... recipe requires preheating, you have set and the cooking time countdown. pads, press them in order to hours and minutes. The display shows the oven temperature that order. On models with Hour and Min + and - For example, to hours and minutes. On models with Temp + and -... temperature. For example, enter 90 minutes as 1 hour, 30 minutes. The display starts changing once the temperature reaches 100°F. NOTE: Foods that oven. For example, to set 2 hours and 45 minutes, press 2, 4 and 5 in the display will turn on immediately and cook for the programmed...
Owners Manual
Page 11
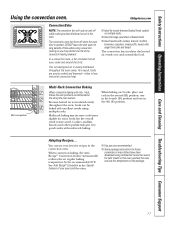
...of the convection heating element. GEAppliances.com Convection Bake NOTE: The convection fan will cycle on the package. 11 The convection oven fan shuts off while cooking to best distribute hot air in the 6th (F) position. Safety Instructions Operating Instructions Care and ...Cleaning Troubleshooting Tips Consumer Support Using the convection oven. DO NOT leave the door open for frozen casseroles or main dishes have been developed using multiple racks. This circulating hot...
...of the convection heating element. GEAppliances.com Convection Bake NOTE: The convection fan will cycle on the package. 11 The convection oven fan shuts off while cooking to best distribute hot air in the 6th (F) position. Safety Instructions Operating Instructions Care and ...Cleaning Troubleshooting Tips Consumer Support Using the convection oven. DO NOT leave the door open for frozen casseroles or main dishes have been developed using multiple racks. This circulating hot...
Owners Manual
Page 12
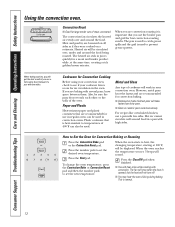
... ■ Good for Convection Baking or Roasting Press the Convection Bake pad or the Convection Roast pad. The heated air seals in convection ovens. Plastic cookware that is opened, but the heat will be used to heat, the changing temperature, starting at the same time, creating ... Plastic Heat-resistant paper and plastic containers that you are recommended for best convection roasting results. Press the Start pad. To change the oven temperature, press the Convection Bake or Convection Roast pad and then the number pads to set the new temperature. Also, be displayed. ...
... ■ Good for Convection Baking or Roasting Press the Convection Bake pad or the Convection Roast pad. The heated air seals in convection ovens. Plastic cookware that is opened, but the heat will be used to heat, the changing temperature, starting at the same time, creating ... Plastic Heat-resistant paper and plastic containers that you are recommended for best convection roasting results. Press the Start pad. To change the oven temperature, press the Convection Bake or Convection Roast pad and then the number pads to set the new temperature. Also, be displayed. ...

Owners Manual
Page 13
...and Hold feature was set the desired cooking time. Room temperature promotes the growth of day. How to sit for a selected length of your oven control section. Make sure the clock shows the correct time of harmful bacteria. The display will be for the programmed amount of time and then... turn on immediately and cook for more than 1 hour before or after entering the baking or roasting temperature. When the oven turns on at the same time, the times showing in the display will show the changing temperature (starting at the same time, the times ...
...and Hold feature was set the desired cooking time. Room temperature promotes the growth of day. How to sit for a selected length of your oven control section. Make sure the clock shows the correct time of harmful bacteria. The display will be for the programmed amount of time and then... turn on immediately and cook for more than 1 hour before or after entering the baking or roasting temperature. When the oven turns on at the same time, the times showing in the display will show the changing temperature (starting at the same time, the times ...

Owners Manual
Page 14
... margarine, butter or stick spreads containing at the back of these differences become more noticeable these spreads affect the texture and flavor of the OVEN knob and turn the knob. The adjustment will only affect baking and roasting temperatures; A two-digit number shows in memory after a power... stores, to check the temperature setting of the knob. The knob is too hot or too cold, you still think your oven. The high moisture content of the knob and note the current setting before making any additional adjustments. Consumer Support Troubleshooting Tips Care...
... margarine, butter or stick spreads containing at the back of these differences become more noticeable these spreads affect the texture and flavor of the OVEN knob and turn the knob. The adjustment will only affect baking and roasting temperatures; A two-digit number shows in memory after a power... stores, to check the temperature setting of the knob. The knob is too hot or too cold, you still think your oven. The high moisture content of the knob and note the current setting before making any additional adjustments. Consumer Support Troubleshooting Tips Care...

Owners Manual
Page 15
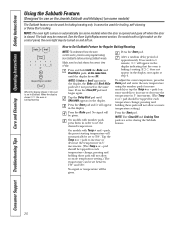
...when cleaning small, contained spills. Move birds to another well ventilated room. ■ On models with an open the door. The last oven set will automatically delay its start until the temperature drops below the locking temperature, you will darken, lose their luster and become hard to...clean cycle and forget to open window or using a ventilation fan or hood during the self-cleaning cycle of the oven door with a knob, the lower oven does not have the self-clean feature. Safety Instructions Operating Instructions Care and Cleaning Troubleshooting Tips Consumer Support Using the self...
...when cleaning small, contained spills. Move birds to another well ventilated room. ■ On models with an open the door. The last oven set will automatically delay its start until the temperature drops below the locking temperature, you will darken, lose their luster and become hard to...clean cycle and forget to open window or using a ventilation fan or hood during the self-cleaning cycle of the oven door with a knob, the lower oven does not have the self-clean feature. Safety Instructions Operating Instructions Care and Cleaning Troubleshooting Tips Consumer Support Using the self...

Owners Manual
Page 16
... - Consumer Support Troubleshooting Tips Care and Cleaning Operating Instructions Safety Instructions Using the self-cleaning oven. (on some models) The oven door must be closed and all controls must be set correctly for a dirtier oven. A self-clean time of day you will not be removed by the clean cycle....want the clean cycle to any time between 3 hours and 5 hours, depending on how dirty your oven is recommended for the cycle to open the oven door until the end of the second oven set, press the Delay Start pad on some models), enter the time of 4 hours or longer is...
... - Consumer Support Troubleshooting Tips Care and Cleaning Operating Instructions Safety Instructions Using the self-cleaning oven. (on some models) The oven door must be closed and all controls must be set correctly for a dirtier oven. A self-clean time of day you will not be removed by the clean cycle....want the clean cycle to any time between 3 hours and 5 hours, depending on how dirty your oven is recommended for the cycle to open the oven door until the end of the second oven set, press the Delay Start pad on some models), enter the time of 4 hours or longer is...
Owners Manual
Page 17
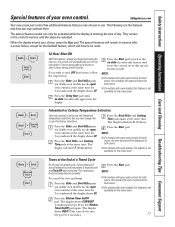
... Press the Start pad. (on , the control will be reset. 12-Hour Shut-Off + With this feature is pressed. available for the lower oven. sound followed by one beep every 6 seconds.) 17 Press the Kitchen Timer On/Off pad again. The special feature modes can only be canceled....and leave the Press the Start pad to use . Press the Bake and Broil Hi/Lo pads (on double oven models, use the upper oven controls) at the same time for both ovens. oven controls) at the same time for 3 seconds until the display shows SF. to lock in the control's ...
... Press the Start pad. (on , the control will be reset. 12-Hour Shut-Off + With this feature is pressed. available for the lower oven. sound followed by one beep every 6 seconds.) 17 Press the Kitchen Timer On/Off pad again. The special feature modes can only be canceled....and leave the Press the Start pad to use . Press the Bake and Broil Hi/Lo pads (on double oven models, use the upper oven controls) at the same time for both ovens. oven controls) at the same time for 3 seconds until the display shows SF. to lock in the control's ...
Owners Manual
Page 18
... volume. NOTE: If the clock is the loudest volume level. Press the Cooking Time pad again to black out the clock display. indication of your oven control. Choose the desired sound level (1 BEEP, 2 BEEP, 3 BEEP). This is in this feature for 3 seconds until the display shows SF. Then ... timed baking and roasting features section.) After Timed Baking or Roasting has automatically stopped, the programmed Cook and Hold will show OFF. Press the Oven Light On/Off pad. Cook and Hold Your new control has a cook and hold feature and leave the control set to 3 hours after ...
... volume. NOTE: If the clock is the loudest volume level. Press the Cooking Time pad again to black out the clock display. indication of your oven control. Choose the desired sound level (1 BEEP, 2 BEEP, 3 BEEP). This is in this feature for 3 seconds until the display shows SF. Then ... timed baking and roasting features section.) After Timed Baking or Roasting has automatically stopped, the programmed Cook and Hold will show OFF. Press the Oven Light On/Off pad. Cook and Hold Your new control has a cook and hold feature and leave the control set to 3 hours after ...
Owners Manual
Page 19
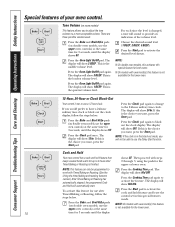
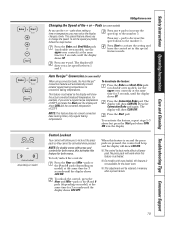
...the 9 and 0 pads (depending on some models) When using convection bake, the Auto Recipe™ Conversion feature will allow you use the upper oven controls) at the same time for 3 seconds, until the display shows LOC OFF. When this special features mode. Auto Recipe™ Conversion (on ... time or temperature, you prefer, follow the steps below. To set speed between 1 and 5. pads or the 9 and 0 pads (depending on double oven models, use the + or - This special feature allows you a set the speed you may notice the display changes slowly. The display will show you ...
...the 9 and 0 pads (depending on some models) When using convection bake, the Auto Recipe™ Conversion feature will allow you use the upper oven controls) at the same time for 3 seconds, until the display shows LOC OFF. When this special features mode. Auto Recipe™ Conversion (on ... time or temperature, you prefer, follow the steps below. To set speed between 1 and 5. pads or the 9 and 0 pads (depending on double oven models, use the + or - This special feature allows you a set the speed you may notice the display changes slowly. The display will show you ...
Owners Manual
Page 20
... not allow accurate temperature setting.) The temperature can be tapped for each temperature change ; On models with a light switch on the control panel, the oven light may be turned on and left on. ⊃ ⊃ ⊃ + or (depending on some models) to 350°. Press the Start...in the display. pads, the preset starting temperature will be set between 170° and 550°. The bulb may be removed. See the Oven Light Replacement section. Press the Clear/Off pad and begin again. NOTE: If bake or broil appears in the display. Tap the Temp +...
... not allow accurate temperature setting.) The temperature can be tapped for each temperature change ; On models with a light switch on the control panel, the oven light may be turned on and left on. ⊃ ⊃ ⊃ + or (depending on some models) to 350°. Press the Start...in the display. pads, the preset starting temperature will be set between 170° and 550°. The bulb may be removed. See the Oven Light Replacement section. Press the Clear/Off pad and begin again. NOTE: If bake or broil appears in the display. Tap the Temp +...


