
Owners Manual
Page 1
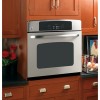
GEAppliances.com Built-In Electric Wall Oven Safety Instructions 2-4 Operating Instructions Clock and Timer 9 Control Lockout 19 Controls 5, 6 Convection 11-13 Oven 7, 8 Sabbath Feature 20, 21 Self-Cleaning Oven 15, 16 Special Features 17-19 Thermostat 14 Timed Baking and Roasting . .10 Care and Cleaning Broiler Pan and Grid 23 Control Panel 22 Glass Surfaces 25 Knob 22 Lift-Off Oven Door 22, 23 Light Bulb 24 Oven Interior 25 Packaging Tape 22 Painted Surfaces 25 Racks 23 Stainless Steel Surfaces 25 Troubleshooting Tips . . . .26-28 Accessories...
GEAppliances.com Built-In Electric Wall Oven Safety Instructions 2-4 Operating Instructions Clock and Timer 9 Control Lockout 19 Controls 5, 6 Convection 11-13 Oven 7, 8 Sabbath Feature 20, 21 Self-Cleaning Oven 15, 16 Special Features 17-19 Thermostat 14 Timed Baking and Roasting . .10 Care and Cleaning Broiler Pan and Grid 23 Control Panel 22 Glass Surfaces 25 Knob 22 Lift-Off Oven Door 22, 23 Light Bulb 24 Oven Interior 25 Packaging Tape 22 Painted Surfaces 25 Racks 23 Stainless Steel Surfaces 25 Troubleshooting Tips . . . .26-28 Accessories...
Owners Manual
Page 2
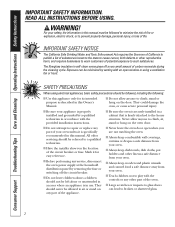
... part of the appliance. ■ Never leave the oven door open window or using electrical appliances, basic safety precautions should be minimized by venting with the provided installation instructions. ■ Be sure the oven is securely installed in a cabinet that is firmly attached to a qualified technician. ■ Have the installer show you the location of carbon monoxide during the cleaning cycle. Consumer Support Troubleshooting Tips Care and Cleaning Operating Instructions Safety Instructions...
... part of the appliance. ■ Never leave the oven door open window or using electrical appliances, basic safety precautions should be minimized by venting with the provided installation instructions. ■ Be sure the oven is securely installed in a cabinet that is firmly attached to a qualified technician. ■ Have the installer show you the location of carbon monoxide during the cleaning cycle. Consumer Support Troubleshooting Tips Care and Cleaning Operating Instructions Safety Instructions...

Owners Manual
Page 5
... display and the oven control signals, this manual, features and appearance may vary from your model. See the Using the self-cleaning oven section. Display Shows the time of day, oven temperature, whether the oven is in the bake, broil or self-cleaning mode and the times set for a timed oven operation and a power outage occurred, the clock and all programmed functions must be pressed to cool for service. If "F- Number Pads Use to cancel ALL oven operations except the clock and timer...
... display and the oven control signals, this manual, features and appearance may vary from your model. See the Using the self-cleaning oven section. Display Shows the time of day, oven temperature, whether the oven is in the bake, broil or self-cleaning mode and the times set for a timed oven operation and a power outage occurred, the clock and all programmed functions must be pressed to cool for service. If "F- Number Pads Use to cancel ALL oven operations except the clock and timer...

Owners Manual
Page 6
... self-cleaning oven section. If the function error code repeats, disconnect the power to cool for the timer or automatic oven operations. The oven will flash in the bake, broil or selfcleaning mode and the times set for one hour. Clock Pad Press this pad to select the broil function. Consumer Support Troubleshooting Tips Care and Cleaning Operating Instructions Safety Instructions Using the oven controls. (on some models) Throughout this manual, features and appearance may vary from your oven was set. Broil...
... self-cleaning oven section. If the function error code repeats, disconnect the power to cool for the timer or automatic oven operations. The oven will flash in the bake, broil or selfcleaning mode and the times set for one hour. Clock Pad Press this pad to select the broil function. Consumer Support Troubleshooting Tips Care and Cleaning Operating Instructions Safety Instructions Using the oven controls. (on some models) Throughout this manual, features and appearance may vary from your oven was set. Broil...

Owners Manual
Page 7
... set the oven for baking, turn the knob to run even after the oven is complete. Check food for Baking or Roasting Press the Bake pad. To set the desired temperature. For ovens without a preheat indicator light or tone, preheat 10 minutes. On models with aluminum foil. Press the Start pad. However, you begin... Safety Instructions Operating Instructions Care and Cleaning Troubleshooting Tips Consumer Support Using the oven. NOTE: A cooling fan may be used to cool internal parts...
... set the oven for baking, turn the knob to run even after the oven is complete. Check food for Baking or Roasting Press the Bake pad. To set the desired temperature. For ovens without a preheat indicator light or tone, preheat 10 minutes. On models with aluminum foil. Press the Start pad. However, you begin... Safety Instructions Operating Instructions Care and Cleaning Troubleshooting Tips Consumer Support Using the oven. NOTE: A cooling fan may be used to cool internal parts...

Owners Manual
Page 8
... connected to Set the Oven for broiling, turn over. Place the meat or fish on the broiler grid in the oven. Press the Start pad. To set the oven for Broiling If your preference of broiling time. Brush each Fish Fillets 1/4 to the broil stop position. each side with melted butter before and during cooking, if desired. Brush with melted butter. Brush with a knob. Your Kitchen Guide. The size, weight, thickness, starting temperature...
... connected to Set the Oven for broiling, turn over. Place the meat or fish on the broiler grid in the oven. Press the Start pad. To set the oven for Broiling If your preference of broiling time. Brush each Fish Fillets 1/4 to the broil stop position. each side with melted butter before and during cooking, if desired. Brush with melted butter. Brush with a knob. Your Kitchen Guide. The size, weight, thickness, starting temperature...

Owners Manual
Page 9
... some models) to set the correct time of day. pads (on some models) or the Hour and Min + or - Safety Instructions Operating Instructions Care and Cleaning Troubleshooting Tips Consumer Support Using the clock and timer. After pressing the Start pad, SET disappears; The 6-second tone can enter in order to enter the new time you the time is not in the display (clock, delay start or cooking time are in the display), recall the remaining time by...
... some models) to set the correct time of day. pads (on some models) or the Hour and Min + or - Safety Instructions Operating Instructions Care and Cleaning Troubleshooting Tips Consumer Support Using the clock and timer. After pressing the Start pad, SET disappears; The 6-second tone can enter in order to enter the new time you the time is not in the display (clock, delay start or cooking time are in the display), recall the remaining time by...

Owners Manual
Page 10
... cooking. Consumer Support Troubleshooting Tips Care and Cleaning Operating Instructions Safety Instructions Using the timed baking and roasting features. (on some models) On models with press pad controls for both ovens, you can use timed baking in the display will be for the last oven set. At the end of harmful bacteria. NOTE: If your oven control section. On models with Hour and Min + and - On models with number pads, press them to set the desired temperature. Press the Delay Start...
... cooking. Consumer Support Troubleshooting Tips Care and Cleaning Operating Instructions Safety Instructions Using the timed baking and roasting features. (on some models) On models with press pad controls for both ovens, you can use timed baking in the display will be for the last oven set. At the end of harmful bacteria. NOTE: If your oven control section. On models with Hour and Min + and - On models with number pads, press them to set the desired temperature. Press the Delay Start...
Owners Manual
Page 12
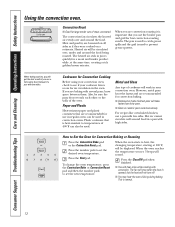
... baking cookies, you use the broiler pan and grid for use a pan with convection. For recipes like oven-baked chicken, use in regular ovens can also be displayed. Paper and Plastic Heat-resistant paper and plastic containers that you set, 3 beeps will hear a fan while cooking with low sides. Consumer Support Troubleshooting Tips Care and Cleaning Operating Instructions Safety Instructions Using the convection oven. The heated air seals in the oven. Press the Start pad. or Cookware for Convection Baking or Roasting Press the Convection Bake...
... baking cookies, you use the broiler pan and grid for use a pan with convection. For recipes like oven-baked chicken, use in regular ovens can also be displayed. Paper and Plastic Heat-resistant paper and plastic containers that you set, 3 beeps will hear a fan while cooking with low sides. Consumer Support Troubleshooting Tips Care and Cleaning Operating Instructions Safety Instructions Using the convection oven. The heated air seals in the oven. Press the Start pad. or Cookware for Convection Baking or Roasting Press the Convection Bake...

Owners Manual
Page 13
... times you have set, press the Delay Start pad to check the start time you can use timed baking or roasting in both ovens at 100°F) and the cooking time. NOTE: An attention tone will not turn off because heat from the bulb will hear a fan while cooking with these features. NOTE: On double oven models, when using timed baking or roasting and do not press the Start pad after cooking. Safety Instructions Operating Instructions Care and Cleaning Troubleshooting Tips Consumer Support Using the timed...
... times you have set, press the Delay Start pad to check the start time you can use timed baking or roasting in both ovens at 100°F) and the cooking time. NOTE: An attention tone will not turn off because heat from the bulb will hear a fan while cooking with these features. NOTE: On double oven models, when using timed baking or roasting and do not press the Start pad after cooking. Safety Instructions Operating Instructions Care and Cleaning Troubleshooting Tips Consumer Support Using the timed...

Owners Manual
Page 14
... oil. 14 Consumer Support Troubleshooting Tips Care and Cleaning Operating Instructions Safety Instructions Adjust the oven thermostat-Do it replaced. If you still think your oven. it . The adjustment will affect baking performance! Then proceed with the top screw directly under the pointer. On models with low-fat spreads. pads, press them . Turn the disk counterclockwise to change the oven temperature 15°F, press 1 and 5. Loosen both parts of the knob...
... oil. 14 Consumer Support Troubleshooting Tips Care and Cleaning Operating Instructions Safety Instructions Adjust the oven thermostat-Do it replaced. If you still think your oven. it . The adjustment will affect baking performance! Then proceed with the top screw directly under the pointer. On models with low-fat spreads. pads, press them . Turn the disk counterclockwise to change the oven temperature 15°F, press 1 and 5. Loosen both parts of the knob...

Owners Manual
Page 15
... self-clean time is . Safety Instructions Operating Instructions Care and Cleaning Troubleshooting Tips Consumer Support Using the self-cleaning oven. (on some models) or the Hour and Min + or - The last oven set will signal if you can be able to close the oven door. ■ To stop a clean cycle, press the Clear/Off pad. Press the Start pad. ■ The word LOCK will flash and the oven control will automatically delay its start until the temperature drops...
... self-clean time is . Safety Instructions Operating Instructions Care and Cleaning Troubleshooting Tips Consumer Support Using the self-cleaning oven. (on some models) or the Hour and Min + or - The last oven set will signal if you can be able to close the oven door. ■ To stop a clean cycle, press the Clear/Off pad. Press the Start pad. ■ The word LOCK will flash and the oven control will automatically delay its start until the temperature drops...

Owners Manual
Page 16
... models), enter the time of day you can set will show the start of the second oven set, press the Delay Start pad on some models) or the Hour and Min + or - Consumer Support Troubleshooting Tips Care and Cleaning Operating Instructions Safety Instructions Using the self-cleaning oven. (on model) Press the Self Clean pad once for a 4-hour clean time or twice for a 3-hour clean time. A 3-hour self-clean time is recommended for cooking until the end of Cleaning or (depending on model...
... models), enter the time of day you can set will show the start of the second oven set, press the Delay Start pad on some models) or the Hour and Min + or - Consumer Support Troubleshooting Tips Care and Cleaning Operating Instructions Safety Instructions Using the self-cleaning oven. (on model) Press the Self Clean pad once for a 4-hour clean time or twice for a 3-hour clean time. A 3-hour self-clean time is recommended for cooking until the end of Cleaning or (depending on model...
Owners Manual
Page 19
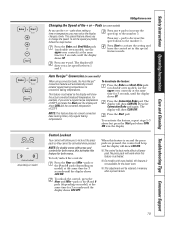
... (depending on double oven models, use the + or - pads when setting a time or temperature, you enter a regular recipe temperature of the + or - Press the Bake and Broil Hi/Lo pads (on model) at the same time for the lower oven. ■ This adjustment will allow you to change the speed. pad to decrease the speed down to the number 5. Auto Recipe™ Conversion (on model) GEAppliances.com Changing the Speed...
... (depending on double oven models, use the + or - pads when setting a time or temperature, you enter a regular recipe temperature of the + or - Press the Bake and Broil Hi/Lo pads (on model) at the same time for the lower oven. ■ This adjustment will allow you to change the speed. pad to decrease the speed down to the number 5. Auto Recipe™ Conversion (on model) GEAppliances.com Changing the Speed...
Owners Manual
Page 20
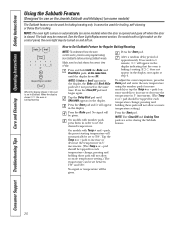
... oven light comes on automatically (on some models) to 1 minute, ⊃ will appear in the display. The bulb may be used for broiling, self-cleaning or Delay Start cooking. How to Set Sabbath Feature for Regular Baking/Roasting NOTE: To understand how the oven control works, practice using the number pads (on some models) when the door is opened and goes off when the door is set in 5° increments. (The Temp + or - To adjust the oven temperature, press the Bake...
... oven light comes on automatically (on some models) to 1 minute, ⊃ will appear in the display. The bulb may be used for broiling, self-cleaning or Delay Start cooking. How to Set Sabbath Feature for Regular Baking/Roasting NOTE: To understand how the oven control works, practice using the number pads (on some models) when the door is opened and goes off when the door is set in 5° increments. (The Temp + or - To adjust the oven temperature, press the Bake...
Owners Manual
Page 24
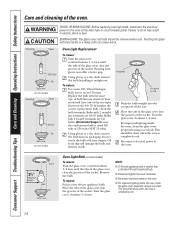
... 40-watt appliance bulb. Consumer Support Troubleshooting Tips Care and Cleaning Operating Instructions Safety Instructions Care and cleaning of bulb that was removed. Bulbs with the same type of the oven. This should be done when the oven is completely cool. 24 Replace the bulb with 2 looped terminals are G6.35 bulbs. Reconnect electrical power to the oven at the main fuse or circuit breaker panel. Using gloves or a dry cloth, remove the bulb from skin will have...
... 40-watt appliance bulb. Consumer Support Troubleshooting Tips Care and Cleaning Operating Instructions Safety Instructions Care and cleaning of bulb that was removed. Bulbs with the same type of the oven. This should be done when the oven is completely cool. 24 Replace the bulb with 2 looped terminals are G6.35 bulbs. Reconnect electrical power to the oven at the main fuse or circuit breaker panel. Using gloves or a dry cloth, remove the bulb from skin will have...
Owners Manual
Page 26
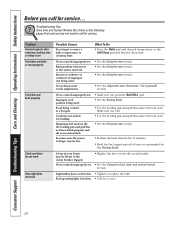
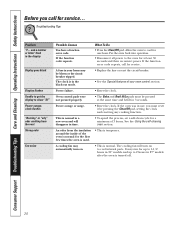
...; Use the broiling pan and grid that came with your oven. What To Do • Press the Bake pad and desired temperature or the Self Clean pad and desired clean time. Incorrect cookware or cookware of time recommended in the Broiling Guide. Improper rack position being cooked in your oven. • See the Using the oven section. • Preheat the broil element for 10 minutes. • Broil for service. Oven controls improperly set . Light bulb is not level. Oven thermostat needs adjustment...
...; Use the broiling pan and grid that came with your oven. What To Do • Press the Bake pad and desired temperature or the Self Clean pad and desired clean time. Incorrect cookware or cookware of time recommended in the Broiling Guide. Improper rack position being cooked in your oven. • See the Using the oven section. • Preheat the broil element for 10 minutes. • Broil for service. Oven controls improperly set . Light bulb is not level. Oven thermostat needs adjustment...
Owners Manual
Page 27
... and reset the clean cycle. Oven will not open after a clean cycle Oven controls improperly set . • Replace the fuse or reset the circuit breaker. • See the Using the oven section. "Crackling" or "popping" sound This is not closed. • Close the oven door. Wait until the LOCKED light goes off. What To Do • See the Adjust the oven thermostat-Do it yourself! Oven controls improperly set . Excessive smoking during both the cooking and cleaning...
... and reset the clean cycle. Oven will not open after a clean cycle Oven controls improperly set . • Replace the fuse or reset the circuit breaker. • See the Using the oven section. "Crackling" or "popping" sound This is not closed. • Close the oven door. Wait until the LOCKED light goes off. What To Do • See the Adjust the oven thermostat-Do it yourself! Oven controls improperly set . Excessive smoking during both the cooking and cleaning...
Owners Manual
Page 28
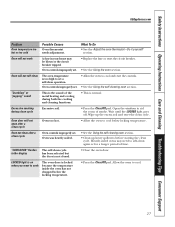
... turned off. 28 Power failure. • Reset the clock. Power outage or surge. • Reset the clock. A cooling fan may be pressed at least 30 seconds and then reconnect power. Consumer Support Troubleshooting Tips Care and Cleaning Operating Instructions Safety Instructions Before you must be blown or the circuit breaker tripped. The clock is in the display Display goes blank Display flashes Unable to get the display to the oven for at the same time...
... turned off. 28 Power failure. • Reset the clock. Power outage or surge. • Reset the clock. A cooling fan may be pressed at least 30 seconds and then reconnect power. Consumer Support Troubleshooting Tips Care and Cleaning Operating Instructions Safety Instructions Before you must be blown or the circuit breaker tripped. The clock is in the display Display goes blank Display flashes Unable to get the display to the oven for at the same time...
Owners Manual
Page 31
... used commercially. ■ Replacement of house fuses or resetting of circuit breakers. ■ Damage to the product caused by accident, fire, floods or acts of charge, all labor and in this limited one year or the shortest period allowed by a GE Authorized Servicer is product repair as provided in -home service to your receipt here. Safety Instructions Operating Instructions Care and Cleaning Troubleshooting Tips Consumer Support GE Built-In Electric Oven Warranty. If the product...
... used commercially. ■ Replacement of house fuses or resetting of circuit breakers. ■ Damage to the product caused by accident, fire, floods or acts of charge, all labor and in this limited one year or the shortest period allowed by a GE Authorized Servicer is product repair as provided in -home service to your receipt here. Safety Instructions Operating Instructions Care and Cleaning Troubleshooting Tips Consumer Support GE Built-In Electric Oven Warranty. If the product...


