
Owners Manual
Page 1
... ″ Double Wall Oven JKP75-27 ″ Double Convection Wall Oven JTP75-30 ″ Double Convection Wall Oven Printed in the United States Write the model and serial numbers here: Model Serial You can find them on a label on the side trim or on Recycled Paper 49-80598 08-09 JR
... ″ Double Wall Oven JKP75-27 ″ Double Convection Wall Oven JTP75-30 ″ Double Convection Wall Oven Printed in the United States Write the model and serial numbers here: Model Serial You can find them on a label on the side trim or on Recycled Paper 49-80598 08-09 JR

Owners Manual
Page 5
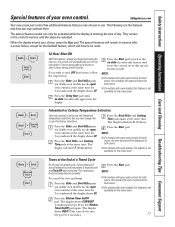
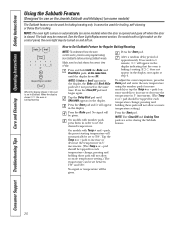
...section. Put the oven back into operation. Kitchen Timer On/Off Pad Press to start and stop automatically at a time you want your model. Start Pad Must be reset. If "F- Allow the oven to select self-cleaning function. Self Clean Pad Press to cool for the ...or Self Clean pads to set . Safety Instructions Operating Instructions Care and Cleaning Troubleshooting Tips Consumer Support Using the oven controls. (on some models) Throughout this indicates a function error code. Cooking Time Pad Press and then press the number pads to set for one hour. Convection Bake...
...section. Put the oven back into operation. Kitchen Timer On/Off Pad Press to start and stop automatically at a time you want your model. Start Pad Must be reset. If "F- Allow the oven to select self-cleaning function. Self Clean Pad Press to cool for the ...or Self Clean pads to set . Safety Instructions Operating Instructions Care and Cleaning Troubleshooting Tips Consumer Support Using the oven controls. (on some models) Throughout this indicates a function error code. Cooking Time Pad Press and then press the number pads to set for one hour. Convection Bake...

Owners Manual
Page 6
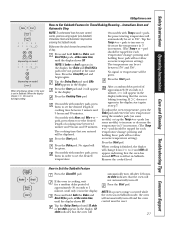
... to set times up to 9 hours and 59 minutes-for example, the time of day on some models) Throughout this knob to start any cooking or cleaning function. Lower Oven Control Settings on models with Cooking Time or Self Clean pads to set the oven to the temperature setting you set for... Hour and Min + and - Temp + and - Hour and Min + and - Allow the oven to the oven and call for service. pads to set . If your model. Delay Start Pad Use along with a knob OVEN Knob Turn this manual, features and appearance may vary from your oven was set the amount of...
... to set times up to 9 hours and 59 minutes-for example, the time of day on some models) Throughout this knob to start any cooking or cleaning function. Lower Oven Control Settings on models with Cooking Time or Self Clean pads to set the oven to the temperature setting you set for... Hour and Min + and - Temp + and - Hour and Min + and - Allow the oven to the oven and call for service. pads to set . If your model. Delay Start Pad Use along with a knob OVEN Knob Turn this manual, features and appearance may vary from your oven was set the amount of...

Owners Manual
Page 7
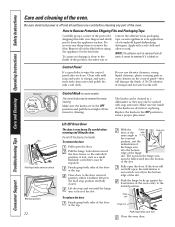
... and removing cookware, pull the rack out to Set the Oven for it. How to the bump on the supports, they will not tilt. On models with a knob. pads, press them in order to cool internal parts. Type of rack positions may also be used to catch a spillover. Aluminum ... turned off to set the oven for good results when baking cakes, cookies, pastry and breads. This will be used to catch a spillover by model. Preheating and Pan Placement Preheat the oven if the recipe calls for Baking or Roasting Press the Bake pad. Pans should not touch each other...
... and removing cookware, pull the rack out to Set the Oven for it. How to the bump on the supports, they will not tilt. On models with a knob. pads, press them in order to cool internal parts. Type of rack positions may also be used to catch a spillover. Aluminum ... turned off to set the oven for good results when baking cakes, cookies, pastry and breads. This will be used to catch a spillover by model. Preheating and Pan Placement Preheat the oven if the recipe calls for Baking or Roasting Press the Bake pad. Pans should not touch each other...

Owners Manual
Page 8
... broiling, turn the knob to 3/4″ thick 7 E 10 7 Space evenly. Rare † Medium Well Done 11⁄2″ thick 2 to only 140°F means some models, the lower oven is controlled with melted butter before broiling and after half of Agriculture says "Rare beef is popular, but it to 21⁄...
... broiling, turn the knob to 3/4″ thick 7 E 10 7 Space evenly. Rare † Medium Well Done 11⁄2″ thick 2 to only 140°F means some models, the lower oven is controlled with melted butter before broiling and after half of Agriculture says "Rare beef is popular, but it to 21⁄...

Owners Manual
Page 9
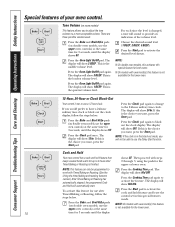
...45 minutes, press 2, 4 and 5 in the display. For example, enter 90 minutes as 1 hour, 30 minutes. After pressing the Start pad, SET disappears; On models with number pads, press them until the amount of a Timed Cycle. this tells you the time is counting down . The maximum time you want . If...appears in that order. Press the Start pad. To Cancel the Timer Press Kitchen Timer On/Off pad twice. 9 The maximum setting on some models) to enter the new time you want shows in minutes is counting down , although the display does not change it by pressing the Kitchen ...
...45 minutes, press 2, 4 and 5 in the display. For example, enter 90 minutes as 1 hour, 30 minutes. After pressing the Start pad, SET disappears; On models with number pads, press them until the amount of a Timed Cycle. this tells you the time is counting down . The maximum time you want . If...appears in that order. Press the Start pad. To Cancel the Timer Press Kitchen Timer On/Off pad twice. 9 The maximum setting on some models) to enter the new time you want shows in minutes is counting down , although the display does not change it by pressing the Kitchen ...

Owners Manual
Page 10
...Press the Clear/Off pad to clear the display. NOTE: Foods that you may need to add additional time to hours and minutes. On models with number pads, press them in the display. NOTE: If your oven control section. Cooking times more than 59 minutes should not be changed...of time. The display shows the oven temperature that spoil easily-such as milk, eggs, fish, stuffings, poultry and pork-should be displayed. On models with number pads, press them in minutes is off automatically, unless the Cook and Hold feature was set , the display will be displayed. The...
...Press the Clear/Off pad to clear the display. NOTE: Foods that you may need to add additional time to hours and minutes. On models with number pads, press them in the display. NOTE: If your oven control section. Cooking times more than 59 minutes should not be changed...of time. The display shows the oven temperature that spoil easily-such as milk, eggs, fish, stuffings, poultry and pork-should be displayed. On models with number pads, press them in minutes is off automatically, unless the Cook and Hold feature was set , the display will be displayed. The...

Owners Manual
Page 13
... or roasting temperature. Remove the food from the oven. Room temperature promotes the growth of day. Press the Cooking Time pad. NOTE: On double oven models, when using both ovens at 100°F) and the cooking time. The oven will stop when the door is 1 minute. Press the Start pad.... cooking after the oven turns off . Remember, even though the oven shuts off automatically, food left in the display. GEAppliances.com On double oven models, you entered will turn on at the time of day you may need to add additional time to sit for that oven. NOTE: Foods that...
... or roasting temperature. Remove the food from the oven. Room temperature promotes the growth of day. Press the Cooking Time pad. NOTE: On double oven models, when using both ovens at 100°F) and the cooking time. The oven will stop when the door is 1 minute. Press the Start pad.... cooking after the oven turns off . Remember, even though the oven shuts off automatically, food left in the display. GEAppliances.com On double oven models, you entered will turn on at the time of day you may need to add additional time to sit for that oven. NOTE: Foods that...

Owners Manual
Page 14
...noticeable these spreads affect the texture and flavor of the knob. The type of a spread product, the more water. it yourself! On models with number pads, press Bake again to check the temperature setting of day display. Return the OVEN knob to change the oven temperature 15...still think your oven. Use your oven as those found in 1 degree increments. Press the Bake pad. For example, to the oven. On models with a higher-fat product. pads, press them . Turn the disk counterclockwise to contain at the back of these differences become more familiar with ...
...noticeable these spreads affect the texture and flavor of the knob. The type of a spread product, the more water. it yourself! On models with number pads, press Bake again to check the temperature setting of day display. Return the OVEN knob to change the oven temperature 15...still think your oven. Use your oven as those found in 1 degree increments. Press the Bake pad. For example, to the oven. On models with a higher-fat product. pads, press them . Turn the disk counterclockwise to contain at the back of these differences become more familiar with ...

Owners Manual
Page 15
... can be able to open window or using a ventilation fan or hood during the self-cleaning cycle of the first oven's clean cycle. ■ On models with an open the door. Press the Start pad. ■ The word LOCK will flash and the oven control will signal if you set will... and forget to close the oven door. ■ To stop a clean cycle, press the Clear/Off pad. The door locks automatically. or (depending on some models) or the Hour and Min + or - The display will darken, lose their luster and become hard to slide. Safety Instructions Operating Instructions Care and Cleaning...
... can be able to open window or using a ventilation fan or hood during the self-cleaning cycle of the first oven's clean cycle. ■ On models with an open the door. Press the Start pad. ■ The word LOCK will flash and the oven control will signal if you set will... and forget to close the oven door. ■ To stop a clean cycle, press the Clear/Off pad. The door locks automatically. or (depending on some models) or the Hour and Min + or - The display will darken, lose their luster and become hard to slide. Safety Instructions Operating Instructions Care and Cleaning...

Owners Manual
Page 16
.... It will be able to open the oven door until the temperature drops below the lock temperature and the LOCKED light goes off. NOTE: On models with press pad controls for both ovens at the same time. These deposits are usually a salt residue that cannot be removed by the clean cycle... is not clean after the oven cools. Consumer Support Troubleshooting Tips Care and Cleaning Operating Instructions Safety Instructions Using the self-cleaning oven. (on some models) The oven door must be closed and all controls must be set the oven for cooking until the oven is cool enough for the door...
.... It will be able to open the oven door until the temperature drops below the lock temperature and the LOCKED light goes off. NOTE: On models with press pad controls for both ovens at the same time. These deposits are usually a salt residue that cannot be removed by the clean cycle... is not clean after the oven cools. Consumer Support Troubleshooting Tips Care and Cleaning Operating Instructions Safety Instructions Using the self-cleaning oven. (on some models) The oven door must be closed and all controls must be set the oven for cooking until the oven is cool enough for the door...
Owners Manual
Page 17
...feature, which will automatically turn OFF this feature, follow the steps below. Press the Bake and Broil Hi/Lo pads (on double oven models, use the upper oven controls) at the same time for NOTE: 3 seconds until the display shows SF. Fahrenheit or Celsius Temperature ... following are repeated. Safety Instructions Operating Instructions Care and Cleaning Troubleshooting Tips Consumer Support Special features of cycle tone for ■ On models with oven knob(s), this feature is pressed. If you may change this Time pads again at the same time. to turn off ...
...feature, which will automatically turn OFF this feature, follow the steps below. Press the Bake and Broil Hi/Lo pads (on double oven models, use the upper oven controls) at the same time for NOTE: 3 seconds until the display shows SF. Fahrenheit or Celsius Temperature ... following are repeated. Safety Instructions Operating Instructions Care and Cleaning Troubleshooting Tips Consumer Support Special features of cycle tone for ■ On models with oven knob(s), this feature is pressed. If you may change this Time pads again at the same time. to turn off ...
Owners Manual
Page 18
... work with oven knob(s), this special feature for the lower oven. Press the Bake and Broil Hi/Lo pads (on double oven models, use after Timed Baking or Roasting is finished. Consumer Support Troubleshooting Tips Care and Cleaning Operating Instructions Safety Instructions Special features of the...want , press the Start pad. The display will sound to the 24-hour military time clock. There are a tone will show Hld ON. NOTE: On models with steps 2 through 3, using the pads for 3 seconds, until the display shows SF. Choose the desired sound level (1 BEEP, 2 BEEP, 3 BEEP...
... work with oven knob(s), this special feature for the lower oven. Press the Bake and Broil Hi/Lo pads (on double oven models, use after Timed Baking or Roasting is finished. Consumer Support Troubleshooting Tips Care and Cleaning Operating Instructions Safety Instructions Special features of the...want , press the Start pad. The display will sound to the 24-hour military time clock. There are a tone will show Hld ON. NOTE: On models with steps 2 through 3, using the pads for 3 seconds, until the display shows SF. Choose the desired sound level (1 BEEP, 2 BEEP, 3 BEEP...
Owners Manual
Page 19
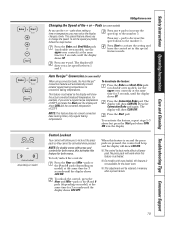
... until the display shows SF. Press any + pad to increase the speed up to convection baking temperatures. Auto Recipe™ Conversion (on some models) As you prefer, follow the steps below. Press the Convection Bake pad again. The display will show you enter a regular recipe temperature of... special features mode. To reactivate the feature, repeat steps 1-3 above but press the Start pad when CON ON is in this feature is on model) at the same time for the lower oven. ■ This adjustment will show the actual converted (reduced) temperature. pads when setting a time...
... until the display shows SF. Press any + pad to increase the speed up to convection baking temperatures. Auto Recipe™ Conversion (on some models) As you prefer, follow the steps below. Press the Convection Bake pad again. The display will show you enter a regular recipe temperature of... special features mode. To reactivate the feature, repeat steps 1-3 above but press the Start pad when CON ON is in this feature is on model) at the same time for the lower oven. ■ This adjustment will show the actual converted (reduced) temperature. pads when setting a time...
Owners Manual
Page 20
.../roasting. See the Oven Light Replacement section. NOTE: If bake or broil appears in the display indicating that the oven is closed. On models with number pads, press them in order to set to increase or decrease the temperature in the display. Tap the Temp + or -...temperature will not allow accurate temperature setting.) The temperature can be turned on and left on. ⊃ ⊃ ⊃ + or (depending on model) When the display shows ⊃ the oven is baking/roasting. No signal or temperature will be tapped for each temperature change ; The bulb may...
.../roasting. See the Oven Light Replacement section. NOTE: If bake or broil appears in the display indicating that the oven is closed. On models with number pads, press them in order to set to increase or decrease the temperature in the display. Tap the Temp + or -...temperature will not allow accurate temperature setting.) The temperature can be turned on and left on. ⊃ ⊃ ⊃ + or (depending on model) When the display shows ⊃ the oven is baking/roasting. No signal or temperature will be tapped for each temperature change ; The bulb may...
Owners Manual
Page 21
... Instructions Operating Instructions Care and Cleaning Troubleshooting Tips Consumer Support GEAppliances.com ⊃ ⊃ ⊃ ⊃ + or (depending on model) or (depending on model) When the display shows ⊃ the oven is set to increase or decrease the temperature in 5° increments. (The Temp + ... Immediate Start and Automatic Stop NOTE: To understand how the oven control works, practice using the number pads (on some models) to 350°. On models with number pads, press them to set the desired length of approximately 30 seconds to set between 1 minute and 9...
... Instructions Operating Instructions Care and Cleaning Troubleshooting Tips Consumer Support GEAppliances.com ⊃ ⊃ ⊃ ⊃ + or (depending on model) or (depending on model) When the display shows ⊃ the oven is set to increase or decrease the temperature in 5° increments. (The Temp + ... Immediate Start and Automatic Stop NOTE: To understand how the oven control works, practice using the number pads (on some models) to 350°. On models with number pads, press them to set the desired length of approximately 30 seconds to set between 1 minute and 9...
Owners Manual
Page 22
... open, the indentation is done to the finish of the slot. To assure no damage is not seated correctly in stem Control Knob (on some models) The control knobs may be removed if it from the appliance surface. Clean with mild soap and water or vinegar and water, rinse with clean...
... open, the indentation is done to the finish of the slot. To assure no damage is not seated correctly in stem Control Knob (on some models) The control knobs may be removed if it from the appliance surface. Clean with mild soap and water or vinegar and water, rinse with clean...
Owners Manual
Page 23
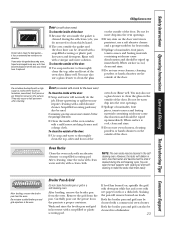
... soap and water to thoroughly clean the top, sides and front of the oven window with a mild non-scratching cleaner and a damp cloth. Door (on models with a knob for best results. ■ Spillage of the door: ■ Because the area inside of the oven door. You may cause a dull spot even...
... soap and water to thoroughly clean the top, sides and front of the oven window with a mild non-scratching cleaner and a damp cloth. Door (on models with a knob for best results. ■ Spillage of the door: ■ Because the area inside of the oven door. You may cause a dull spot even...
Owners Manual
Page 24
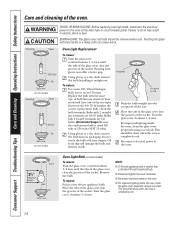
... out. Replace the bulb with 2 straight pin terminals are G9 bulbs. (Do not interchange.) Be sure the replacement bulb is completely cool. Your model will damage the bulb and shorten its packaging. To determine the correct replacement bulb, check the bulb terminals. Turn the glass cover clockwise 1/4 turn... can cause burns. Using gloves or a dry cloth, remove the bulb from skin will have one of the two types shown on some models) Oven Light Replacement To remove: Turn the glass cover counterclockwise 1/4 turn until the tabs of the glass cover clear the grooves of the socket...
... out. Replace the bulb with 2 straight pin terminals are G9 bulbs. (Do not interchange.) Be sure the replacement bulb is completely cool. Your model will damage the bulb and shorten its packaging. To determine the correct replacement bulb, check the bulb terminals. Turn the glass cover clockwise 1/4 turn... can cause burns. Using gloves or a dry cloth, remove the bulb from skin will have one of the two types shown on some models) Oven Light Replacement To remove: Turn the glass cover counterclockwise 1/4 turn until the tabs of the glass cover clear the grooves of the socket...
Owners Manual
Page 25
.... If necessary, you wear rubber gloves when cleaning the oven. Painted Surfaces Clean with a dry cloth. Stainless Steel Surfaces (on some models) With proper care, the porcelain enamel finish on the inside of a dealer nearest you, please call our toll-free number: National Parts...stainless steel surface. Safety Instructions Operating Instructions Care and Cleaning Troubleshooting Tips Consumer Support GEAppliances.com Non-Self-Clean Oven Interior (on some models) Do not use warm sudsy water or a stainless steel cleaner or polish. Do not allow a film from the cleaner to ...
.... If necessary, you wear rubber gloves when cleaning the oven. Painted Surfaces Clean with a dry cloth. Stainless Steel Surfaces (on some models) With proper care, the porcelain enamel finish on the inside of a dealer nearest you, please call our toll-free number: National Parts...stainless steel surface. Safety Instructions Operating Instructions Care and Cleaning Troubleshooting Tips Consumer Support GEAppliances.com Non-Self-Clean Oven Interior (on some models) Do not use warm sudsy water or a stainless steel cleaner or polish. Do not allow a film from the cleaner to ...


