
Owners Manual
Page 1
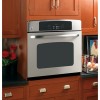
... 32 Warranty 31 Owner's Manual JKP30-27 ″ Single Wall Oven JTP30-30 ″ Single Wall Oven JKP70-27 ″ Single Convection Wall Oven JTP70-30 ″ Single Convection Wall Oven JKP35-27 ″ Double Wall Oven JTP35-30 ″ Double Wall Oven JKP55-27 ″ Double Wall Oven JTP55...-30 ″ Double Wall Oven JKP75-27 ″ Double Convection Wall Oven JTP75-30 ″ Double Convection Wall Oven Printed in the United States Write the ...
... 32 Warranty 31 Owner's Manual JKP30-27 ″ Single Wall Oven JTP30-30 ″ Single Wall Oven JKP70-27 ″ Single Convection Wall Oven JTP70-30 ″ Single Convection Wall Oven JKP35-27 ″ Double Wall Oven JTP35-30 ″ Double Wall Oven JKP55-27 ″ Double Wall Oven JTP55...-30 ″ Double Wall Oven JKP75-27 ″ Double Convection Wall Oven JTP75-30 ″ Double Convection Wall Oven Printed in the United States Write the ...

Owners Manual
Page 8
.... Rare † Medium Well Done 11⁄2″ thick 2 to increase browning. C 10 7-8 E 10 8 Pan frying is complete. 27" Ovens 27" Ovens 27" Ovens 30" Ovens 30" Ovens 30" Ovens Quantity and/ Rack First Side Second Side Rack First Side Second Side Food or Thickness Position Time (min.) Time (min.) Position Time (min...
.... Rare † Medium Well Done 11⁄2″ thick 2 to increase browning. C 10 7-8 E 10 8 Pan frying is complete. 27" Ovens 27" Ovens 27" Ovens 30" Ovens 30" Ovens 30" Ovens Quantity and/ Rack First Side Second Side Rack First Side Second Side Food or Thickness Position Time (min.) Time (min.) Position Time (min...

Owners Manual
Page 9
... order to set to work properly. The maximum setting on some models) or the Hour and Min + or - For example, enter 90 minutes as 1 hour, 30 minutes. To Set the Clock The clock must be shown in that order. this tells you may change until one beep every 6 seconds until the...
... order to set to work properly. The maximum setting on some models) or the Hour and Min + or - For example, enter 90 minutes as 1 hour, 30 minutes. To Set the Clock The clock must be shown in that order. this tells you may change until one beep every 6 seconds until the...

Owners Manual
Page 10
... of time, then shut off because heat from the bulb will continue to set . Press the Start pad. For example, enter 90 minutes as 1 hour, 30 minutes. On models with number pads, press them to hours and minutes. Press the Bake pad. On models with Hour and Min + and - When the... oven turns on some models), enter the time of your oven control section. For example, enter 90 minutes as 1 hour, 30 minutes. The maximum time you have set or press the Cooking Time pad to check the length of day you can also use timed baking...
... of time, then shut off because heat from the bulb will continue to set . Press the Start pad. For example, enter 90 minutes as 1 hour, 30 minutes. On models with number pads, press them to hours and minutes. Press the Bake pad. On models with Hour and Min + and - When the... oven turns on some models), enter the time of your oven control section. For example, enter 90 minutes as 1 hour, 30 minutes. The maximum time you have set or press the Cooking Time pad to check the length of day you can also use timed baking...
Owners Manual
Page 20
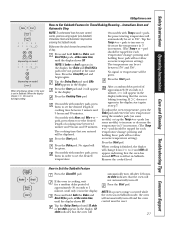
... display shows ⊃ the oven is baking/roasting. pad should be set the desired temperature. Make sure the clock shows the correct time of approximately 30 seconds to 350°. Tap the Delay Start pad until the display shows SF. Consumer Support Troubleshooting Tips Care and Cleaning Operating Instructions Safety Instructions...
... display shows ⊃ the oven is baking/roasting. pad should be set the desired temperature. Make sure the clock shows the correct time of approximately 30 seconds to 350°. Tap the Delay Start pad until the display shows SF. Consumer Support Troubleshooting Tips Care and Cleaning Operating Instructions Safety Instructions...
Owners Manual
Page 21
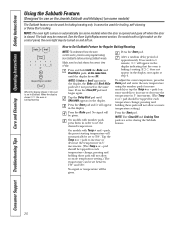
...them to 1 minute, until SAb bAtH appears in Sabbath. Press the Bake pad. Press the Start pad. pressing and holding these pads will 21 approximately 30 seconds to set in the display. pressing and holding these pads will be tapped for a random delay period of day. When the display shows ⊃... will appear in the display. 12 shdn indicates that the oven is baking/roasting. pad should be given. After a random delay period of approximately 30 seconds to 350°. Remove the cooked food. no shdn appears in the display. control must be displayed.
...them to 1 minute, until SAb bAtH appears in Sabbath. Press the Bake pad. Press the Start pad. pressing and holding these pads will 21 approximately 30 seconds to set in the display. pressing and holding these pads will be tapped for a random delay period of day. When the display shows ⊃... will appear in the display. 12 shdn indicates that the oven is baking/roasting. pad should be given. After a random delay period of approximately 30 seconds to 350°. Remove the cooked food. no shdn appears in the display. control must be displayed.
Owners Manual
Page 28
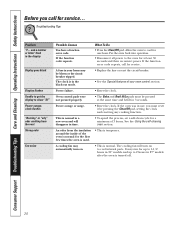
... the fuse or reset the circuit breaker. • See the Special features of the oven is normal for service... It may be pressed at least 30 seconds and then reconnect power. Consumer Support Troubleshooting Tips Care and Cleaning Operating Instructions Safety Instructions Before you must be blown or the circuit breaker..." Power outage, clock flashes "Burning" or "oily" odor emitting from the insulation around the inside of your home may run for up to 1-1/2 hours in 30″ models and up to 2 hours in your oven control section.
... the fuse or reset the circuit breaker. • See the Special features of the oven is normal for service... It may be pressed at least 30 seconds and then reconnect power. Consumer Support Troubleshooting Tips Care and Cleaning Operating Instructions Safety Instructions Before you must be blown or the circuit breaker..." Power outage, clock flashes "Burning" or "oily" odor emitting from the insulation around the inside of your home may run for up to 1-1/2 hours in 30″ models and up to 2 hours in your oven control section.
Owners Manual
Page 29
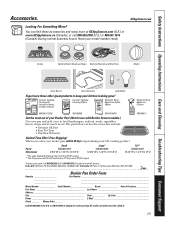
You can find these other great products to keep your GE cooking product. When you order your broiler pan within 30 days of purchasing your kitchen looking great! To place your order, call 800.626.2002 (U.S.), 800.661.1616 (Canada) or mail this form to ...), or call 800.626.2002 (U.S.) or 800.661.1616 (Canada) (during normal business hours). The pan below catches the excess fats and oils. • Genuine GE Part • Easy To Clean • One-Year Warranty Limited Time Offer! I_n C_ana_da:_GE_Pa_rts,_1 F_act_ory_Lan_e, M_on_cto_n, _N.B_. E1_C 9_M3_ _ _ _ _ _ Broiler ...
You can find these other great products to keep your GE cooking product. When you order your broiler pan within 30 days of purchasing your kitchen looking great! To place your order, call 800.626.2002 (U.S.), 800.661.1616 (Canada) or mail this form to ...), or call 800.626.2002 (U.S.) or 800.661.1616 (Canada) (during normal business hours). The pan below catches the excess fats and oils. • Genuine GE Part • Easy To Clean • One-Year Warranty Limited Time Offer! I_n C_ana_da:_GE_Pa_rts,_1 F_act_ory_Lan_e, M_on_cto_n, _N.B_. E1_C 9_M3_ _ _ _ _ _ Broiler ...
Owners Manual
Page 30
Consumer Support Troubleshooting Tips Care and Cleaning Operating Instructions Safety Instructions Notes. 30
Consumer Support Troubleshooting Tips Care and Cleaning Operating Instructions Safety Instructions Notes. 30

