User Manual
Page 1
... side trim or on the front of the (lower) oven behind the oven door. 49-80475 07-07 JR Built-In Electric Wall Oven ge.com Safety Instructions 2-4 Operating Instructions Clock and Timer 13 Control Lockout 13 Controls 5 Oven 11, 12 Sabbath Feature 9, 10 Self-Cleaning Oven . . . . . .16, 17 Special Features 6-8 Thermostat 15 Timed Baking and...
... side trim or on the front of the (lower) oven behind the oven door. 49-80475 07-07 JR Built-In Electric Wall Oven ge.com Safety Instructions 2-4 Operating Instructions Clock and Timer 13 Control Lockout 13 Controls 5 Oven 11, 12 Sabbath Feature 9, 10 Self-Cleaning Oven . . . . . .16, 17 Special Features 6-8 Thermostat 15 Timed Baking and...
User Manual
Page 2
... servicing should be followed to minimize the risk of fire or explosion, electric shock, or to sit or stand on any part of the oven. s Always keep combustible wall coverings, curtains or drapes a safe distance from your appliance is properly installed and grounded by venting with an... open when you the location of life. s Teach children not to a qualified technician. All other linens a safe distance from your oven. s Large scratches or impacts to glass doors can be allowed to prevent property damage, personal injury, or loss of the circuit breaker or fuse...
... servicing should be followed to minimize the risk of fire or explosion, electric shock, or to sit or stand on any part of the oven. s Always keep combustible wall coverings, curtains or drapes a safe distance from your appliance is properly installed and grounded by venting with an... open when you the location of life. s Teach children not to a qualified technician. All other linens a safe distance from your oven. s Large scratches or impacts to glass doors can be allowed to prevent property damage, personal injury, or loss of the circuit breaker or fuse...

User Manual
Page 3
... pot holders on hot surfaces may be handled when hot, do not touch, or let clothing or other bulky cloth. Do not use your oven. s Do not let cooking grease or other appliance. s Do not use combustible materials, gasoline or other flammable vapors and liquids in the ... shelves must be hot enough to hands, face and/or eyes. These surfaces may result in an oven. Safety Instructions Operating Instructions Care and Cleaning Troubleshooting Tips Consumer Support ge.com WARNING! Be careful when reaching for cooling first. Flammable material could be hot when the door is cool....
... pot holders on hot surfaces may be handled when hot, do not touch, or let clothing or other bulky cloth. Do not use your oven. s Do not let cooking grease or other appliance. s Do not use combustible materials, gasoline or other flammable vapors and liquids in the ... shelves must be hot enough to hands, face and/or eyes. These surfaces may result in an oven. Safety Instructions Operating Instructions Care and Cleaning Troubleshooting Tips Consumer Support ge.com WARNING! Be careful when reaching for cooling first. Flammable material could be hot when the door is cool....
User Manual
Page 4
... not use the oven for a good seal. I Do not use oven cleaners. No commercial oven cleaner or oven liner protective coating of any broiler pan out of the door or oven walls. I Do not clean the door gasket. SELF-CLEANING OVEN I Before self-cleaning the oven, remove shiny, silver-colored oven shelves (on fire...SAVE THESE INSTRUCTIONS 4 Items stored in use the pan. I Do not leave paper products, cooking utensils or food in the oven when not in an oven can catch on some models) and all other cookware. Cooking to at least an INTERNAL temperature of aluminum foil may result ...
... not use the oven for a good seal. I Do not use oven cleaners. No commercial oven cleaner or oven liner protective coating of any broiler pan out of the door or oven walls. I Do not clean the door gasket. SELF-CLEANING OVEN I Before self-cleaning the oven, remove shiny, silver-colored oven shelves (on fire...SAVE THESE INSTRUCTIONS 4 Items stored in use the pan. I Do not leave paper products, cooking utensils or food in the oven when not in an oven can catch on some models) and all other cookware. Cooking to at least an INTERNAL temperature of aluminum foil may result ...
User Manual
Page 5
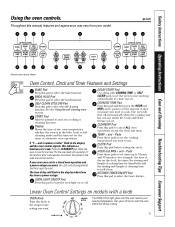
ge.com Double oven control shown Oven Control, Clock and Timer Features and Settings BAKE Pad Press this pad and then press the HOUR and MIN + and - If "F - COOKING TIME Pad Press this pad to select the bake function. TEMP + and - Lower Oven Control Settings on the clock, the timer, the starting and length of... of day on models with COOKING TIME or SELF CLEAN pads to set times up to 9 hours and 59 minutes-for the timer or automatic oven operations. OVEN LIGHT ON/OFF Pad Press this pad to start any cooking or cleaning function. DELAY START Pad Use along with a knob...
ge.com Double oven control shown Oven Control, Clock and Timer Features and Settings BAKE Pad Press this pad and then press the HOUR and MIN + and - If "F - COOKING TIME Pad Press this pad to select the bake function. TEMP + and - Lower Oven Control Settings on the clock, the timer, the starting and length of... of day on models with COOKING TIME or SELF CLEAN pads to set times up to 9 hours and 59 minutes-for the timer or automatic oven operations. OVEN LIGHT ON/OFF Pad Press this pad to start any cooking or cleaning function. DELAY START Pad Use along with a knob...

User Manual
Page 6
... the features and how you may activate them. s On models with touch pad controls for both ovens. Press the BROIL HI/LO and COOKING TIME pads at the same time. Your new touch pad...be reset. 12-Hour Shut-Off With this feature, should you forget and leave the oven on, the control will be activated while the display is set in memory after 3 hours during... a broil function. When the display shows your oven control. Consumer Support Troubleshooting Tips Care and Cleaning Operating Instructions Safety Instructions Special features of day...
... the features and how you may activate them. s On models with touch pad controls for both ovens. Press the BROIL HI/LO and COOKING TIME pads at the same time. Your new touch pad...be reset. 12-Hour Shut-Off With this feature, should you forget and leave the oven on, the control will be activated while the display is set in memory after 3 hours during... a broil function. When the display shows your oven control. Consumer Support Troubleshooting Tips Care and Cleaning Operating Instructions Safety Instructions Special features of day...

User Manual
Page 7
... you would prefer to use a 12-hour clock. s On models with touch pad controls for both ovens. The display shows CON BEEP (continuous beep). NOTE: s On models with oven knob(s), this cancels the end of a timed cycle, 3 short beeps will sound followed by one beep...ovens, this feature is not available for 3 seconds, until the display shows SF. This continuous 6-second beep may be able to have a 24-hour military time clock or black out the clock display, follow the steps below. Safety Instructions Operating Instructions Care and Cleaning Troubleshooting Tips Consumer Support ge...
... you would prefer to use a 12-hour clock. s On models with touch pad controls for both ovens. The display shows CON BEEP (continuous beep). NOTE: s On models with oven knob(s), this cancels the end of a timed cycle, 3 short beeps will sound followed by one beep...ovens, this feature is not available for 3 seconds, until the display shows SF. This continuous 6-second beep may be able to have a 24-hour military time clock or black out the clock display, follow the steps below. Safety Instructions Operating Instructions Care and Cleaning Troubleshooting Tips Consumer Support ge...
User Manual
Page 8
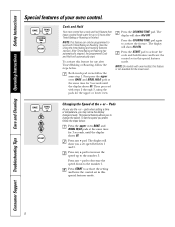
... 5. Cook and Hold Your new control has a cook and hold feature and leave the control set in this feature is finished. First press the upper oven BAKE and BROIL HI/LO pads at the same time for 3 seconds until the display shows SF. The display will show you prefer, follow the... pad to activate the setting and leave the control set in this feature for use the + or - NOTE: On models with oven knob(s), this special features mode. Press the upper oven BAKE and BROIL HI/LO pads at the same time for 3 seconds, until the display shows SF. Press any - Press any...
... 5. Cook and Hold Your new control has a cook and hold feature and leave the control set in this feature is finished. First press the upper oven BAKE and BROIL HI/LO pads at the same time for 3 seconds until the display shows SF. The display will show you prefer, follow the... pad to activate the setting and leave the control set in this feature for use the + or - NOTE: On models with oven knob(s), this special features mode. Press the upper oven BAKE and BROIL HI/LO pads at the same time for 3 seconds, until the display shows SF. Press any - Press any...
User Manual
Page 9
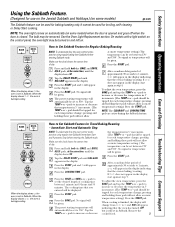
...between 170° and 550°. Press the BAKE pad. Press the START pad. Immediate Start and Automatic Stop NOTE: To understand how the oven control works, practice using regular baking (non-Sabbath) before entering the Sabbath mode. pad should be tapped for each temperature change from ⊃ ...on some models) when the door is opened and goes off when the door is still set in Sabbath. NOTE: The oven light comes on automatically (on some models) ge.com The Sabbath feature can be used for baking/roasting only. If ⊃ does not appear in the display, start again...
...between 170° and 550°. Press the BAKE pad. Press the START pad. Immediate Start and Automatic Stop NOTE: To understand how the oven control works, practice using regular baking (non-Sabbath) before entering the Sabbath mode. pad should be tapped for each temperature change from ⊃ ...on some models) when the door is opened and goes off when the door is still set in Sabbath. NOTE: The oven light comes on automatically (on some models) ge.com The Sabbath feature can be used for baking/roasting only. If ⊃ does not appear in the display, start again...
User Manual
Page 10
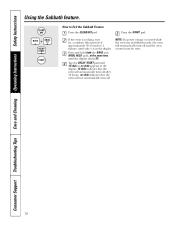
... a random delay period of approximately 30 seconds to Exit the Sabbath Feature Press the CLEAR/OFF pad. If the oven is in the display. 12 shdn indicates that the oven will automatically turn off. Press the START pad. Tap the DELAY START pad until 12 shdn or no shdn indicates... that the oven will not automatically turn off and the oven control must be reset. 10 Consumer Support Troubleshooting Tips Care and...
... a random delay period of approximately 30 seconds to Exit the Sabbath Feature Press the CLEAR/OFF pad. If the oven is in the display. 12 shdn indicates that the oven will automatically turn off. Press the START pad. Tap the DELAY START pad until 12 shdn or no shdn indicates... that the oven will not automatically turn off and the oven control must be reset. 10 Consumer Support Troubleshooting Tips Care and...
User Manual
Page 11
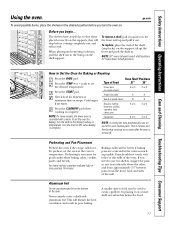
... food for it out. Preheating is turned off to the bump on . For ovens without a preheat indicator light or tone, preheat 10 minutes. To preheat, set the oven at minimum time on the supports, they will not tilt. ge.com To avoid possible burns, place the shelves in . To set the desired temperature...
... food for it out. Preheating is turned off to the bump on . For ovens without a preheat indicator light or tone, preheat 10 minutes. To preheat, set the oven at minimum time on the supports, they will not tilt. ge.com To avoid possible burns, place the shelves in . To set the desired temperature...

User Manual
Page 12
... and during cooking, if desired. The size, weight, thickness, starting temperature and your oven is complete. 27" 27" Ovens 27" Ovens 30" Ovens 30" Ovens 30" Ovens Quantity and/ Ovens Shelf First Side Second Side Shelf First Side Second Side Food or Thickness Position Time (...Slices 1″ thick (precooked) B 8 8 D 8 8 Increase time 5 to 208 volts, rare steaks may not brown as well because the oven heating element will affect broiling times. Broiling Guide Leave the door open . June 1985.) Beef Steaks Rare † Medium Well Done 1″ thick...
... and during cooking, if desired. The size, weight, thickness, starting temperature and your oven is complete. 27" 27" Ovens 27" Ovens 30" Ovens 30" Ovens 30" Ovens Quantity and/ Ovens Shelf First Side Second Side Shelf First Side Second Side Food or Thickness Position Time (...Slices 1″ thick (precooked) B 8 8 D 8 8 Increase time 5 to 208 volts, rare steaks may not brown as well because the oven heating element will affect broiling times. Broiling Guide Leave the door open . June 1985.) Beef Steaks Rare † Medium Well Done 1″ thick...

User Manual
Page 13
...(s), this feature for the automatic oven timing functions to hours and minutes. Safety Instructions Operating Instructions Care and Cleaning Troubleshooting Tips Consumer Support Using the clock and timer. ge.com Press the CLOCK pad. The maximum setting on and the touch pads are in minutes is counting down ,... although the display does not change it by following the steps in the Special features of your oven control section under Tones at ...
...(s), this feature for the automatic oven timing functions to hours and minutes. Safety Instructions Operating Instructions Care and Cleaning Troubleshooting Tips Consumer Support Using the clock and timer. ge.com Press the CLOCK pad. The maximum setting on and the touch pads are in minutes is counting down ,... although the display does not change it by following the steps in the Special features of your oven control section under Tones at ...
User Manual
Page 14
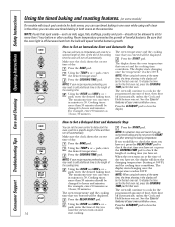
...Cooking times more than 1 hour before or after entering the baking temperature. The display starts changing once the temperature reaches 100°F. The oven will continue to cook for the programmed amount of the cooking time. Make sure the clock shows the correct time of day. pads,...requires preheating, you entered will be displayed. Hold feature was set , press the COOKING For example, enter 90 minutes as TIME pad for that oven. The maximum time you have set , press the COOKING TIME pad for a selected length of harmful bacteria. Press the BAKE pad. pads,...
...Cooking times more than 1 hour before or after entering the baking temperature. The display starts changing once the temperature reaches 100°F. The oven will continue to cook for the programmed amount of the cooking time. Make sure the clock shows the correct time of day. pads,...requires preheating, you entered will be displayed. Hold feature was set , press the COOKING For example, enter 90 minutes as TIME pad for that oven. The maximum time you have set , press the COOKING TIME pad for a selected length of harmful bacteria. Press the BAKE pad. pads,...
User Manual
Page 15
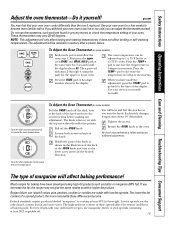
ge.com You may find that your new oven for a few weeks to (+) 35°F hotter or (-) 35°F cooler. If you still think your new oven is factory set with your old favorite recipes, use thermometers, such as shown in the illustration of the back of the OVEN knob and turn the ... cookies or candies are made the adjustment, press the START pad to go back to decrease the temperature in memory after a power failure. The oven temperature can adjust the thermostat yourself. pad to the time of the knob and note the current setting before making any additional adjustments. Use your...
ge.com You may find that your new oven for a few weeks to (+) 35°F hotter or (-) 35°F cooler. If you still think your new oven is factory set with your old favorite recipes, use thermometers, such as shown in the illustration of the back of the OVEN knob and turn the ... cookies or candies are made the adjustment, press the START pad to go back to decrease the temperature in memory after a power failure. The oven temperature can adjust the thermostat yourself. pad to the time of the knob and note the current setting before making any additional adjustments. Use your...
User Manual
Page 16
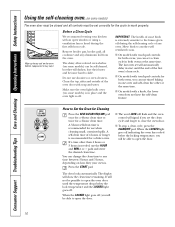
... will show the clean time remaining. pads and enter the desired clean time. Press the START pad. s The word LOCK will flash and the oven control will be able to any time between 3 hours and 5 hours, depending on how dirty your kitchen with soap and water. Wipe up heavy soil ... fan or hood during the self-cleaning cycle of 4 hours or longer is extremely sensitive to open the oven door until the end of the first oven's clean cycle. s On models with a knob, the lower oven does not have the self-clean feature. It will be able to work properly. If a time other...
... will show the clean time remaining. pads and enter the desired clean time. Press the START pad. s The word LOCK will flash and the oven control will be able to any time between 3 hours and 5 hours, depending on how dirty your kitchen with soap and water. Wipe up heavy soil ... fan or hood during the self-cleaning cycle of 4 hours or longer is extremely sensitive to open the oven door until the end of the first oven's clean cycle. s On models with a knob, the lower oven does not have the self-clean feature. It will be able to work properly. If a time other...
User Manual
Page 17
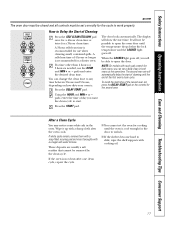
...the start time. pads, enter the time of cleaning until the oven is recommended for the cycle to unlock. Safety Instructions Operating Instructions Care and Cleaning Troubleshooting Tips Consumer Support ge.com The oven door must be closed and all controls must be set correctly for... a dirtier oven. A 3-hour self-clean time is not clean after the oven cools. If a time other than 4 hours or 3 hours...
...the start time. pads, enter the time of cleaning until the oven is recommended for the cycle to unlock. Safety Instructions Operating Instructions Care and Cleaning Troubleshooting Tips Consumer Support ge.com The oven door must be closed and all controls must be set correctly for... a dirtier oven. A 3-hour self-clean time is not clean after the oven cools. If a time other than 4 hours or 3 hours...
User Manual
Page 18
... seated into the bottom edge of the protective shipping film with soap and water. Push the hinge locks up against the front frame of the oven. Make sure the knobs are dry before cleaning any sharp items to remove the film. NOTE: The adhesive must be removed for the first ... Pull hinge locks down toward the door frame, to wipe the control panel after each use abrasive cleansers, strong liquid cleansers, plastic scouring pads or oven cleaners on . Control Panel It's a good idea to the unlocked position. Be sure electrical power is halfway between the broil stop position and fully ...
... seated into the bottom edge of the protective shipping film with soap and water. Push the hinge locks up against the front frame of the oven. Make sure the knobs are dry before cleaning any sharp items to remove the film. NOTE: The adhesive must be removed for the first ... Pull hinge locks down toward the door frame, to wipe the control panel after each use abrasive cleansers, strong liquid cleansers, plastic scouring pads or oven cleaners on . Control Panel It's a good idea to the unlocked position. Be sure electrical power is halfway between the broil stop position and fully ...

User Manual
Page 19
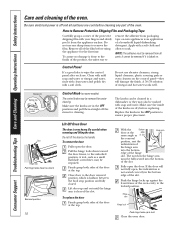
...wiped up immediately. If necessary, you do the job. s Clean the inside of the door. NOTE: The shiny, silver-colored oven shelves (on models with a soap-filled scouring or plastic pad, hot water and detergent. Safety Instructions Operating Instructions Care and Cleaning ...Troubleshooting Tips Consumer Support ge.com Do not rub or clean the door gasket- s Do not use an oven cleaner. Oven Shelves Clean the oven shelves with a vinegar and water solution. Heavy spattering or spillovers may cause ...
...wiped up immediately. If necessary, you do the job. s Clean the inside of the door. NOTE: The shiny, silver-colored oven shelves (on models with a soap-filled scouring or plastic pad, hot water and detergent. Safety Instructions Operating Instructions Care and Cleaning ...Troubleshooting Tips Consumer Support ge.com Do not rub or clean the door gasket- s Do not use an oven cleaner. Oven Shelves Clean the oven shelves with a vinegar and water solution. Heavy spattering or spillovers may cause ...

User Manual
Page 20
... Tips Care and Cleaning Operating Instructions Safety Instructions Care and cleaning of the socket. Before replacing the bulb, disconnect electrical power to the oven at the main fuse or circuit breaker panel. Remove the bulb. Using gloves or a dry cloth, remove the bulb from its packaging... with a damp cloth. Turn the glass cover clockwise 1/4 turn . s Install and tighten the cover clockwise. Receptacle Socket Bulb Tab Glass cover Oven Light Bulbs (on some models) NOTE: The glass cover (on some models) should be removed only when cold. To remove: Turn the glass...
... Tips Care and Cleaning Operating Instructions Safety Instructions Care and cleaning of the socket. Before replacing the bulb, disconnect electrical power to the oven at the main fuse or circuit breaker panel. Remove the bulb. Using gloves or a dry cloth, remove the bulb from its packaging... with a damp cloth. Turn the glass cover clockwise 1/4 turn . s Install and tighten the cover clockwise. Receptacle Socket Bulb Tab Glass cover Oven Light Bulbs (on some models) NOTE: The glass cover (on some models) should be removed only when cold. To remove: Turn the glass...


