Use and Care Manual
Page 1
"Select-Top" Built-In Modular Downdraft Cooktop Safety Instructions 4, 5 _---_ Problem Solver 35, 36 Operating Instructions, Tips Coil Surface Unit Module 10, 11 _/_ iii I Controls 9 Cooktop Comparison 8 Cooktop Vent System 22 Features 6, 7 Griddle Accessory 18-20 Griddle Cooking Guide 20 Grill Module 14-17 Grill Cooking Guide 17 Home Canning Tips 21 Radiant Module 12-14 Installation Instructions 28...
"Select-Top" Built-In Modular Downdraft Cooktop Safety Instructions 4, 5 _---_ Problem Solver 35, 36 Operating Instructions, Tips Coil Surface Unit Module 10, 11 _/_ iii I Controls 9 Cooktop Comparison 8 Cooktop Vent System 22 Features 6, 7 Griddle Accessory 18-20 Griddle Cooking Guide 20 Grill Module 14-17 Grill Cooking Guide 17 Home Canning Tips 21 Radiant Module 12-14 Installation Instructions 28...
Use and Care Manual
Page 3
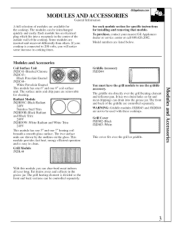
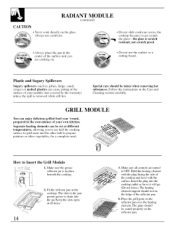
... can char-broil meat indoors all year long. See each module section for specific instructions for cleaning. Black Porcelain Enamel JXDC44- Each module has an electrical plug which fits into the grease jar. This module provides fast heat, energy efficient operation and is easy to ... and removing that module. To purchase, contact your cooktop is divided so the front and back sections can be interchanged quickly and easily. Some modules are listed below. If your nearest GE Appliances dealer or service center or call 800.626.2002. Grill Module JXDL44 JXDD44 Griddle ...
... can char-broil meat indoors all year long. See each module section for specific instructions for cleaning. Black Porcelain Enamel JXDC44- Each module has an electrical plug which fits into the grease jar. This module provides fast heat, energy efficient operation and is easy to ... and removing that module. To purchase, contact your cooktop is divided so the front and back sections can be interchanged quickly and easily. Some modules are listed below. If your nearest GE Appliances dealer or service center or call 800.626.2002. Grill Module JXDL44 JXDD44 Griddle ...
Use and Care Manual
Page 4
...brought in place. cookie sheet or flat tray. During and after use combustible materials. Potentially hot surfaces include the cooktop, removable modules, accessories and areas facing the cooktop. • Cook meat and poultry thoroughlyimeat to at least an INTERNAL temperature of 160°F and poultry to the... cooktop. All other flammable materials accumulate on fire. • Be sure the drip pans Ion coil modules only) are not covered and are in contact with a well-fitting lid. Mark it...
...brought in place. cookie sheet or flat tray. During and after use combustible materials. Potentially hot surfaces include the cooktop, removable modules, accessories and areas facing the cooktop. • Cook meat and poultry thoroughlyimeat to at least an INTERNAL temperature of 160°F and poultry to the... cooktop. All other flammable materials accumulate on fire. • Be sure the drip pans Ion coil modules only) are not covered and are in contact with a well-fitting lid. Mark it...
Use and Care Manual
Page 5
... be hot. • NEVER USE WATER ON A GREASE FIRE. Contact a qualified technician immediately should your glass cooktop become hot and could cause burns (on radiant modules only). • To avoid the possibility of a burn or electric shock, always be as dry as possible. Replace with a mayonnaise jar which could cause steam burns if...
... be hot. • NEVER USE WATER ON A GREASE FIRE. Contact a qualified technician immediately should your glass cooktop become hot and could cause burns (on radiant modules only). • To avoid the possibility of a burn or electric shock, always be as dry as possible. Replace with a mayonnaise jar which could cause steam burns if...

Use and Care Manual
Page 7
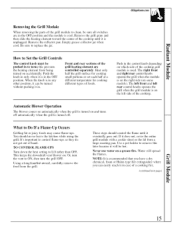
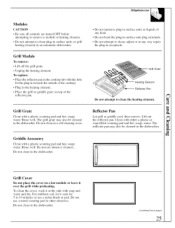
...surface units from LO to HI. 9 Indicator Light Lights when any unit of the cooktop is turned on. Use with the Grill Module heating element and reflector pan. 3 Grill Grate Part of the Grill Module. Use with the grill grate or griddle plate accessory and the reflector pan. 5 ...Reflector Pan Part of the Grill Module. 6 Cooktop Tub Easily cleaned when modules are removed. 7 Grease Collector System Uses wide mouth canning jars to collect grease....
...surface units from LO to HI. 9 Indicator Light Lights when any unit of the cooktop is turned on. Use with the Grill Module heating element and reflector pan. 3 Grill Grate Part of the Grill Module. Use with the grill grate or griddle plate accessory and the reflector pan. 5 ...Reflector Pan Part of the Grill Module. 6 Cooktop Tub Easily cleaned when modules are removed. 7 Grease Collector System Uses wide mouth canning jars to collect grease....
Use and Care Manual
Page 8
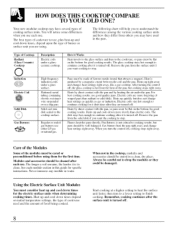
...cleaned after it is turned off . You will help you to stop . The following chart will notice some differences when you are using them electric coils. How it is not critical to cooking results, but does not change heat settings right away. Heat is turned off . Heats by ...surface and then to clean. Your new modular cooktop may have several types of food being cooked. 8 When not in this guide for good cooking results. The glass cooMop stays hot enough to continue cooking after each use each module section in the cooktop, modules and accessories should be fiat on the ...
...cleaned after it is turned off . You will help you to stop . The following chart will notice some differences when you are using them electric coils. How it is not critical to cooking results, but does not change heat settings right away. Heat is turned off . Heats by ...surface and then to clean. Your new modular cooktop may have several types of food being cooked. 8 When not in this guide for good cooking results. The glass cooMop stays hot enough to continue cooking after each use each module section in the cooktop, modules and accessories should be fiat on the ...

Use and Care Manual
Page 9
... the control to the heat Y setting desired. Reduce heat setting after starting at a medium boil or simmer. It will glow when ANY heat on any module surface unit is used. 9 Medium High--(Setting halfway between HI and MED.) Maintains a fast boil on when the grill or griddle is on. keeps food...
... the control to the heat Y setting desired. Reduce heat setting after starting at a medium boil or simmer. It will glow when ANY heat on any module surface unit is used. 9 Medium High--(Setting halfway between HI and MED.) Maintains a fast boil on when the grill or griddle is on. keeps food...
Use and Care Manual
Page 10
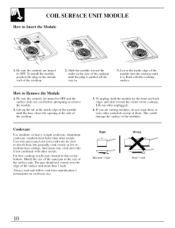
...'s instructions on the bottom. Lift out when unplugged. 4. Right Not over the edge of the cooktop until the plug is flush with other materials on top of the modules. To unplug, hold the module by the front and back edges and slide toward the outlet in the side of the surface... unit more than other metals. Aluminum cookware conducts heat faster than 1 inch. Lift up the tab at the inside edge of the module into the cooktop until the base clears the opening at low to OFF. Cast-iron and coated cast-iron cookware are cool before attempting to the outside...
...'s instructions on the bottom. Lift out when unplugged. 4. Right Not over the edge of the cooktop until the plug is flush with other materials on top of the modules. To unplug, hold the module by the front and back edges and slide toward the outlet in the side of the surface... unit more than other metals. Aluminum cookware conducts heat faster than 1 inch. Lift up the tab at the inside edge of the module into the cooktop until the base clears the opening at low to OFF. Cast-iron and coated cast-iron cookware are cool before attempting to the outside...
Use and Care Manual
Page 11
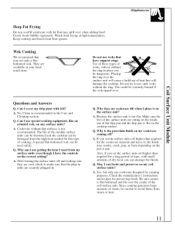
... time, with or without fiat surfaces is fiat-bottomed and fits over the surface unit will cause a build-up of the module surface units can be shortened and the cooktop can be dangerous. The life of heat that the plug-in units are cool, check to make sure that will damage the...that have the controls on the pot or pan. Be sure canner is not recommended. A. Check the manufacturer's instructions and recipes for canning purposes. Keep cooktop and hood clean from steam or heat. 11 Can I can be careful to use woks that you set the surface unit coil higher than required...
... time, with or without fiat surfaces is fiat-bottomed and fits over the surface unit will cause a build-up of the module surface units can be shortened and the cooktop can be dangerous. The life of heat that the plug-in units are cool, check to make sure that will damage the...that have the controls on the pot or pan. Be sure canner is not recommended. A. Check the manufacturer's instructions and recipes for canning purposes. Keep cooktop and hood clean from steam or heat. 11 Can I can be careful to use woks that you set the surface unit coil higher than required...
Use and Care Manual
Page 12
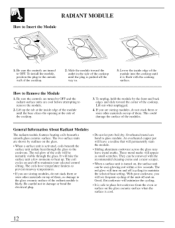
Be sure the controls are turned to OFF and the radiant surface units are turned to the glass ceramic surface of the cooktop. If you are storing modules, do not stack them or store other materials on top of them , as small scratches. The coil cycles on and off and on ...you will turn on . The red glow of the module into the cooktop until the plug is safe to Remove the Module 1. An overheated copper pot will leave a residue that will be removed with the cooking surface. RADIANT MODULE How to damage or bend the electrical plug. • Do not let pots boil dry....
Be sure the controls are turned to OFF and the radiant surface units are turned to the glass ceramic surface of the cooktop. If you are storing modules, do not stack them or store other materials on top of them , as small scratches. The coil cycles on and off and on ...you will turn on . The red glow of the module into the cooktop until the plug is safe to Remove the Module 1. An overheated copper pot will leave a residue that will be removed with the cooking surface. RADIANT MODULE How to damage or bend the electrical plug. • Do not let pots boil dry....
Use and Care Manual
Page 14
...round, prepared in the pan permit grease to Insert the Grill Module 1. Fit the reflector pan in the Care and Cleaning section carefully. The slots in the convenience of the cooktop and level with the surface. GRILL MODULE You can be taken when removing hot substances. Insert the plug... into the jar. CAUTION RADIANT MODULE (continued) • Never cook directly on . • Do not use ...
...round, prepared in the pan permit grease to Insert the Grill Module 1. Fit the reflector pan in the Care and Cleaning section carefully. The slots in the convenience of the cooktop and level with the surface. GRILL MODULE You can be taken when removing hot substances. Insert the plug... into the jar. CAUTION RADIANT MODULE (continued) • Never cook directly on . • Do not use ...
Use and Care Manual
Page 15
... for cooking different types of foods. Automatic Blower Operation The blower comes on automatically when the grill is turned on the left side of the cooktop grill module is in any other position, it can easily reach it is recommended that you have a dry chemical, foam or Halon type fire extinguisher where... goes out. Never use water on . Remove the grill grate and then slide the heating element toward the center of the cooktop until it does not, cover the entire grill module with a cookie sheet or the lid from the grill. How to Set the Grill Controls The control knob must be turned...
... for cooking different types of foods. Automatic Blower Operation The blower comes on automatically when the grill is turned on the left side of the cooktop grill module is in any other position, it can easily reach it is recommended that you have a dry chemical, foam or Halon type fire extinguisher where... goes out. Never use water on . Remove the grill grate and then slide the heating element toward the center of the cooktop until it does not, cover the entire grill module with a cookie sheet or the lid from the grill. How to Set the Grill Controls The control knob must be turned...
Use and Care Manual
Page 16
... so they should. Use tongs to turn and rearrange meats on and turns off . Questions and Answers Q. What could damage the electrical contacts. When cooking many individual foods, what can I followed the cooking times suggested in food can be used only as 1 would...8226; The blower comes on automatically when the grill is turned off automatically when the grill is turned on the grill; Your interchangeable cooktop modules can change cooking times required. Slash the fat on some models). Q. What can 1 keep barbecued developing an unattractive and taste? forks...
... so they should. Use tongs to turn and rearrange meats on and turns off . Questions and Answers Q. What could damage the electrical contacts. When cooking many individual foods, what can I followed the cooking times suggested in food can be used only as 1 would...8226; The blower comes on automatically when the grill is turned off automatically when the grill is turned on the grill; Your interchangeable cooktop modules can change cooking times required. Slash the fat on some models). Q. What can 1 keep barbecued developing an unattractive and taste? forks...
Use and Care Manual
Page 18
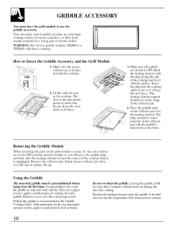
... the griddle. Fit the reflector pan in place beneath the cooktop. 2. Make sure all controls are in the OFF position and the module is cool. Place the griddle plate on the reflector pan with these cooktops. Then use griddle modules JXDD43 or JXDD46 with the griddle's drain holes at the ...use the griddle accessory. Using the Griddle The non-stick griddle must have the grill module to drain into the cooktop outlet as far as recommended in a frying pan or electric skillet. Removing the Griddle Module When removing the parts of oil or butter. 18 Do not overheat the griddle. ...
... the griddle. Fit the reflector pan in place beneath the cooktop. 2. Make sure all controls are in the OFF position and the module is cool. Place the griddle plate on the reflector pan with these cooktops. Then use griddle modules JXDD43 or JXDD46 with the griddle's drain holes at the ...use the griddle accessory. Using the Griddle The non-stick griddle must have the grill module to drain into the cooktop outlet as far as recommended in a frying pan or electric skillet. Removing the Griddle Module When removing the parts of oil or butter. 18 Do not overheat the griddle. ...
Use and Care Manual
Page 19
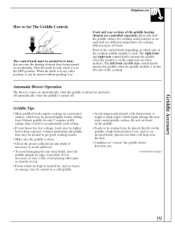
... get good cooking results. • Make sure the griddle is used. The left front and left side of the cooktop. Preheat griddle for cooking different types of the cooktop griddle module is clean. • Check the grease collector jar and empty if necessary to avoid spillovers. • To avoid.... Push the knob in only when it in the control knob depending on the left rear control knobs operate the griddle when the griddle module is on which are controlled separately. Push in . A longer preheating and griddle time may be greased lightly before first-time use. (continued...
... get good cooking results. • Make sure the griddle is used. The left front and left side of the cooktop. Preheat griddle for cooking different types of the cooktop griddle module is clean. • Check the grease collector jar and empty if necessary to avoid spillovers. • To avoid.... Push the knob in only when it in the control knob depending on the left rear control knobs operate the griddle when the griddle module is on which are controlled separately. Push in . A longer preheating and griddle time may be greased lightly before first-time use. (continued...
Use and Care Manual
Page 20
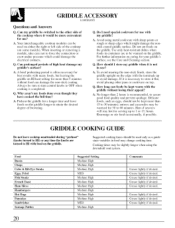
...points or rough or sharp edges which could damage the electrical contacts. entrees and casseroles may change cooking time. Grease lightly if desired. Grease lightly if desired. 2O GRIDDLE ACCESSORY (continued) Questions and Answers Q. Your interchangeable cooktop modules can damage the non-stick coating. A. Always be warmed..., such as a guide since variables in food may be sure to turn control knobs to OFF when cooking is recommended, to 30 minutes; Hors d'oeuvres will stay hot for me? Suggested cooking times should be kept more convenient for serving up to store it...
...points or rough or sharp edges which could damage the electrical contacts. entrees and casseroles may change cooking time. Grease lightly if desired. Grease lightly if desired. 2O GRIDDLE ACCESSORY (continued) Questions and Answers Q. Your interchangeable cooktop modules can damage the non-stick coating. A. Always be warmed..., such as a guide since variables in food may be sure to turn control knobs to OFF when cooking is recommended, to 30 minutes; Hors d'oeuvres will stay hot for me? Suggested cooking times should be kept more convenient for serving up to store it...
Use and Care Manual
Page 21
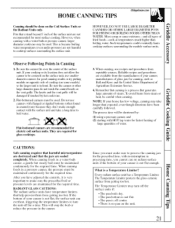
... time will be used . After you must be shortened by hot cookwaJce. 2. If the bottom of glass jars for electric coil surface units. Such temperatures could eventually hahn cooktop surfaces surrounding the module surface units. Flat-bottomed canners must make enough contact with flanged or rippled bottoms (often found in processing time, you...
... time will be used . After you must be shortened by hot cookwaJce. 2. If the bottom of glass jars for electric coil surface units. Such temperatures could eventually hahn cooktop surfaces surrounding the module surface units. Flat-bottomed canners must make enough contact with flanged or rippled bottoms (often found in processing time, you...
Use and Care Manual
Page 22
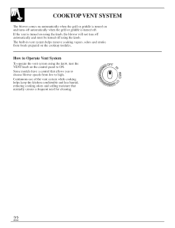
... from foods prepared on the control panel to high. The built-in vent system helps remove cooking vapors, odors and smoke from low to ON. COOKTOP VENT SYSTEM The blower comes on automatically when the grill or griddle is turned on and turns off automatically when the grill or griddle is...
... from foods prepared on the control panel to high. The built-in vent system helps remove cooking vapors, odors and smoke from low to ON. COOKTOP VENT SYSTEM The blower comes on automatically when the grill or griddle is turned on and turns off automatically when the grill or griddle is...
Use and Care Manual
Page 25
... in the dishwasher. For stubborn soil, let it soak for the plug-in towards the outside of the cooktop. • Plug in the heating element. • Place the grill or griddle grate on a hot module or leave it at the sink with a plastic scouring pad and hot, soapy watm: Rinse well. Do... liquids of the reflector pan. Grill Grate -- Clean with a plastic scouring pad and hot, soapy water. To replace: • Place the reflector pan in the cooktop tub with the hole for 5 to clean the heating element. Do not clean in the dishwasher. (continued next page) 25 Do not clean in a self...
... in the dishwasher. For stubborn soil, let it soak for the plug-in towards the outside of the cooktop. • Plug in the heating element. • Place the grill or griddle grate on a hot module or leave it at the sink with a plastic scouring pad and hot, soapy watm: Rinse well. Do... liquids of the reflector pan. Grill Grate -- Clean with a plastic scouring pad and hot, soapy water. To replace: • Place the reflector pan in the cooktop tub with the hole for 5 to clean the heating element. Do not clean in the dishwasher. (continued next page) 25 Do not clean in a self...
Use and Care Manual
Page 26
...: It is very important that you plug it with the receptacle. • Insert the terminals of the cooktop cleaning cream will burn off any kind. • Do not clean the surface units or the module in a covered container (or a plastic bag) with a soap-filled scouring pad if necessary. The drip ... the surface unit more than 1 inch. Clean the area under the drip pans often. Cleaning the Radiant Module Normal Daily Use Cleaning ONLY use of the surface unit through the opening in the cooktop. To replace a surface unit: • Replace the drip pan into place so it may not be ...
...: It is very important that you plug it with the receptacle. • Insert the terminals of the cooktop cleaning cream will burn off any kind. • Do not clean the surface units or the module in a covered container (or a plastic bag) with a soap-filled scouring pad if necessary. The drip ... the surface unit more than 1 inch. Clean the area under the drip pans often. Cleaning the Radiant Module Normal Daily Use Cleaning ONLY use of the surface unit through the opening in the cooktop. To replace a surface unit: • Replace the drip pan into place so it may not be ...
