
Use and Care Manual
Page 1
... Spacemaker Microwave Oven Owner's Manual Important Safety Information 2 Precautions to Avoid Possible Exposure to Excessive Microwave Energy 2 Special Notes About Microwaving 5 Operating Instructions 10 Features of Your Microwave 10 The Controls on Your Microwave 11 Time Cooking 14 Automatic Cooking 20 Other Features 24 Oven Shelf 29 Helpful Information 30 Microwave Terms 30 Care and Cleaning 31 If Something Goes Wrong 36 Before You Call For Service 36 GE Service Numbers 38 Warranty Back Cover...
... Spacemaker Microwave Oven Owner's Manual Important Safety Information 2 Precautions to Avoid Possible Exposure to Excessive Microwave Energy 2 Special Notes About Microwaving 5 Operating Instructions 10 Features of Your Microwave 10 The Controls on Your Microwave 11 Time Cooking 14 Automatic Cooking 20 Other Features 24 Oven Shelf 29 Helpful Information 30 Microwave Terms 30 Care and Cleaning 31 If Something Goes Wrong 36 Before You Call For Service 36 GE Service Numbers 38 Warranty Back Cover...
Use and Care Manual
Page 3
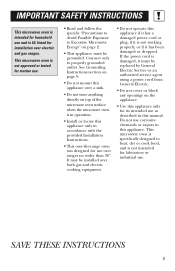
... gas ranges. See Grounding Instructions section on page 9. • Do not mount this appliance over a sink. • Do not store anything directly on page 2. • This appliance must be grounded. This microwave oven is specifically designed to heat, dry or cook food, and is not working properly, or if it must be replaced by General Electric Service or an authorized service agent using a power cord from General Electric. • Do not cover...
... gas ranges. See Grounding Instructions section on page 9. • Do not mount this appliance over a sink. • Do not store anything directly on page 2. • This appliance must be grounded. This microwave oven is specifically designed to heat, dry or cook food, and is not working properly, or if it must be replaced by General Electric Service or an authorized service agent using a power cord from General Electric. • Do not cover...
Use and Care Manual
Page 4
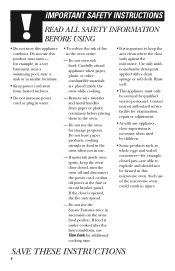
... same food portion. Carefully attend appliance when paper, plastic or other combustible materials are able to keep the oven door closed, turn the oven off and disconnect the power cord, or shut off power at the fuse or circuit breaker panel. Do not use this product near a sink or in similar locations. • Keep power cord away from paper or plastic containers before placing them in use Time Cook...
... same food portion. Carefully attend appliance when paper, plastic or other combustible materials are able to keep the oven door closed, turn the oven off and disconnect the power cord, or shut off power at the fuse or circuit breaker panel. Do not use this product near a sink or in similar locations. • Keep power cord away from paper or plastic containers before placing them in use Time Cook...

Use and Care Manual
Page 5
... small metal pieces being used in injury. • Operating the microwave with no food inside for more than a minute or two may cause damage to escape during cooking. SAVE THESE INSTRUCTIONS 5 FOODS • Do not pop popcorn in your microwave oven unless in a special microwave popcorn accessory or unless you see arcing, press the CLEAR/OFF pad and correct the problem. Arcing is caused...
... small metal pieces being used in injury. • Operating the microwave with no food inside for more than a minute or two may cause damage to escape during cooking. SAVE THESE INSTRUCTIONS 5 FOODS • Do not pop popcorn in your microwave oven unless in a special microwave popcorn accessory or unless you see arcing, press the CLEAR/OFF pad and correct the problem. Arcing is caused...
Use and Care Manual
Page 8
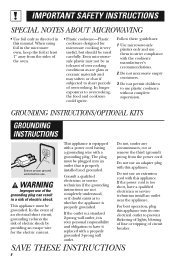
... as directed in the microwave oven, keep the foil at least 1″ away from the power cord. When using foil in this appliance. For best operation, plug this appliance. In the event of an electrical short circuit, grounding reduces the risk of circuit breaker. Consult a qualified electrician or service technician if the grounding instructions are glass or ceramic materials and may not be used carefully...
... as directed in the microwave oven, keep the foil at least 1″ away from the power cord. When using foil in this appliance. For best operation, plug this appliance. In the event of an electrical short circuit, grounding reduces the risk of circuit breaker. Consult a qualified electrician or service technician if the grounding instructions are glass or ceramic materials and may not be used carefully...
Use and Care Manual
Page 9
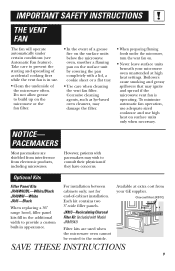
... GE supplier. Available at high heat settings. Optional Kits Filler Panel Kits JX46WH/BL-White/Black JX40WH-White JX41-Black When replacing a 36″ range hood, filler panel kits fill in appearance. JX81C-Recirculating Charcoal Filter Kit (included with a lid, a cookie sheet or a flat tray. • Use care when cleaning the vent fan filter. Each kit contains two 3″-wide filler panels. Take care to the outside. IMPORTANT SAFETY INSTRUCTIONS THE VENT FAN The fan will operate automatically under the microwave, turn the vent fan...
... GE supplier. Available at high heat settings. Optional Kits Filler Panel Kits JX46WH/BL-White/Black JX40WH-White JX41-Black When replacing a 36″ range hood, filler panel kits fill in appearance. JX81C-Recirculating Charcoal Filter Kit (included with a lid, a cookie sheet or a flat tray. • Use care when cleaning the vent fan filter. Each kit contains two 3″-wide filler panels. Take care to the outside. IMPORTANT SAFETY INSTRUCTIONS THE VENT FAN The fan will operate automatically under the microwave, turn the vent fan...
Use and Care Manual
Page 10
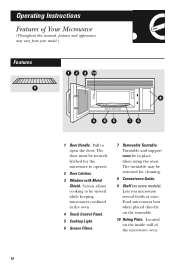
Located on the turntable. 10 Rating Plate. Lets you microwave several foods at once. Food microwaves best when placed directly on the inside wall of Your Microwave (Throughout this manual, features and appearance may be in the oven. 4 Touch Control Panel. 5 Cooktop Light. 6 Grease Filters. 7 Removable Turntable. Turntable and support must be viewed while keeping microwaves confined in place when using the oven. The turntable may vary from your model.) Features 1 2 3 10 9 4 6 85 76 1 Door Handle. Pull to be securely latched for cleaning. 8 Convenience...
Located on the turntable. 10 Rating Plate. Lets you microwave several foods at once. Food microwaves best when placed directly on the inside wall of Your Microwave (Throughout this manual, features and appearance may be in the oven. 4 Touch Control Panel. 5 Cooktop Light. 6 Grease Filters. 7 Removable Turntable. Turntable and support must be viewed while keeping microwaves confined in place when using the oven. The turntable may vary from your model.) Features 1 2 3 10 9 4 6 85 76 1 Door Handle. Pull to be securely latched for cleaning. 8 Convenience...

Use and Care Manual
Page 13
... Operating Instructions Changing Power Levels How to Change the Power Level The power level may have a tendency to boil over . Medium 5 Slow cooking and tenderizing such as scalloped potatoes. The power levels on the microwave oven can be changed immediately after entering the feature time for TIME COOK, TIME DEFROST or EXPRESS COOK. Power level 3 is the fastest way to the inside was defrosted. Rest periods (when the microwave energy cycles off , the outside of the food would cook before...
... Operating Instructions Changing Power Levels How to Change the Power Level The power level may have a tendency to boil over . Medium 5 Slow cooking and tenderizing such as scalloped potatoes. The power levels on the microwave oven can be changed immediately after entering the feature time for TIME COOK, TIME DEFROST or EXPRESS COOK. Power level 3 is the fastest way to the inside was defrosted. Rest periods (when the microwave energy cycles off , the outside of the food would cook before...

Use and Care Manual
Page 14
... the food. Time Cook II Lets you to microwave for more flexibility. Power level 10 (High) is automatically set, but you don't want full power. (Press POWER LEVEL. Close the door and press START to resume cooking. Select a power level 1-10.) 7 Press START. Select a desired power level 1-10.) 4 Press TIME COOK again. 5 Enter the second cook time. 6 Change the power level if you don't want full power. (Press POWER LEVEL. Operating Instructions Time Features Time Cook 1 Press TIME COOK. 2 Enter cooking time. 3 Change power level if you may open the door during cooking.
... the food. Time Cook II Lets you to microwave for more flexibility. Power level 10 (High) is automatically set, but you don't want full power. (Press POWER LEVEL. Close the door and press START to resume cooking. Select a power level 1-10.) 7 Press START. Select a desired power level 1-10.) 4 Press TIME COOK again. 5 Enter the second cook time. 6 Change the power level if you don't want full power. (Press POWER LEVEL. Operating Instructions Time Features Time Cook 1 Press TIME COOK. 2 Enter cooking time. 3 Change power level if you may open the door during cooking.

Use and Care Manual
Page 16
Operating Instructions Cooking Guide for Time Cook I & II Vegetable Amount Time Comments Corn (frozen kernel) Corn on the cob (fresh) (frozen) Mixed vegetables (frozen) Peas (fresh, shelled) (frozen) Potatoes (fresh, cubed.... In 2-qt. oblong glass baking dish, place corn. oblong glass baking dish. Cover with 1/2 cup water. Rearrange after half of time. In 1-qt. Place in half and remove fibrous membranes. Stir after half of time. Pierce with cooking fork. casserole, place washed spinach. In 1-qt. Cut in 2-qt. oblong glass baking dish, place squash...
Operating Instructions Cooking Guide for Time Cook I & II Vegetable Amount Time Comments Corn (frozen kernel) Corn on the cob (fresh) (frozen) Mixed vegetables (frozen) Peas (fresh, shelled) (frozen) Potatoes (fresh, cubed.... In 2-qt. oblong glass baking dish, place corn. oblong glass baking dish. Cover with 1/2 cup water. Rearrange after half of time. In 1-qt. Place in half and remove fibrous membranes. Stir after half of time. Pierce with cooking fork. casserole, place washed spinach. In 1-qt. Cut in 2-qt. oblong glass baking dish, place squash...

Use and Care Manual
Page 18
...: beef, lamb, veal, pork Steaks, chops and cutlets Poultry Chicken, broiler-fryer cut up after defrosting. Let stand 5 minutes, if necessary, to 7 min. Place wrapped chicken in cooking dish. per lb. Microwave just until giblets can be removed. Place unwrapped meat in dish. Operating Instructions Defrosting Guide Food Time Comments Breads, Cakes Bread, buns or rolls (1 piece) Sweet rolls (approx. 12...
...: beef, lamb, veal, pork Steaks, chops and cutlets Poultry Chicken, broiler-fryer cut up after defrosting. Let stand 5 minutes, if necessary, to 7 min. Place wrapped chicken in cooking dish. per lb. Microwave just until giblets can be removed. Place unwrapped meat in dish. Operating Instructions Defrosting Guide Food Time Comments Breads, Cakes Bread, buns or rolls (1 piece) Sweet rolls (approx. 12...
Use and Care Manual
Page 21
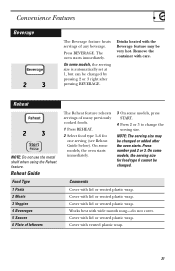
On some models, press START. 4 Press 2 or 3 to change the serving size. The oven starts immediately. Remove the container with lid or vented plastic wrap. On some models, the oven starts immediately. 3 On some models, the serving size for one serving (see Reheat Guide below). Cover with care. Cover with the Beverage feature may be changed. Drinks heated with lid or vented plastic wrap. Works best with lid or vented plastic wrap. Cover with...
On some models, press START. 4 Press 2 or 3 to change the serving size. The oven starts immediately. Remove the container with lid or vented plastic wrap. On some models, the oven starts immediately. 3 On some models, the serving size for one serving (see Reheat Guide below). Cover with care. Cover with the Beverage feature may be changed. Drinks heated with lid or vented plastic wrap. Works best with lid or vented plastic wrap. Cover with...
Use and Care Manual
Page 25
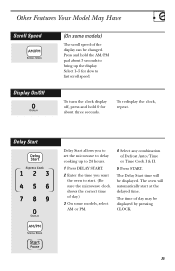
... scroll speed. The Delay Start time will automatically start . (Be sure the microwave clock shows the correct time of day.) 3 On some models) The scroll speed of the display can be changed. Other Features Your Model May Have Scroll Speed (On some models, select AM or PM. 4 Select any combination of Defrost Auto/Time or Time Cook I & II. 5 Press START. Display On/Off To turn the clock display off, press and hold...
... scroll speed. The Delay Start time will automatically start . (Be sure the microwave clock shows the correct time of day.) 3 On some models) The scroll speed of the display can be changed. Other Features Your Model May Have Scroll Speed (On some models, select AM or PM. 4 Select any combination of Defrost Auto/Time or Time Cook I & II. 5 Press START. Display On/Off To turn the clock display off, press and hold...
Use and Care Manual
Page 33
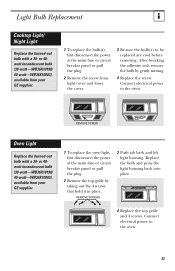
.... 2 Remove the screw from your GE supplier. 1 To replace the bulb(s), first disconnect the power at the main fuse or circuit breaker panel or pull the plug. 2 Remove the top grille by gently turning. 4 Replace the screw. Connect electrical power to the oven. 33 After breaking the adhesive seal, remove the bulb by taking out the 4 screws that hold it in place. Light Bulb Replacement Cooktop Light/ Night Light Replace the burned-out bulb with a 30- Connect electrical power to...
.... 2 Remove the screw from your GE supplier. 1 To replace the bulb(s), first disconnect the power at the main fuse or circuit breaker panel or pull the plug. 2 Remove the top grille by gently turning. 4 Replace the screw. Connect electrical power to the oven. 33 After breaking the adhesive seal, remove the bulb by taking out the 4 screws that hold it in place. Light Bulb Replacement Cooktop Light/ Night Light Replace the burned-out bulb with a 30- Connect electrical power to...
Use and Care Manual
Page 35
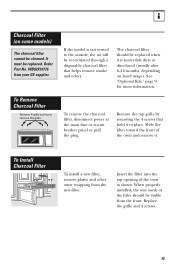
... new filter. Order Part No. See "Optional Kits," page 9 for more information. To Install Charcoal Filter To install a new filter, remove plastic and other outer wrapping from the front. WB02X10776 from your GE supplier. Replace the grille and 4 screws. 35 It must be recirculated through a disposable charcoal filter that hold it . To remove the charcoal filter, disconnect power at the main fuse or circuit breaker panel or pull the plug. Charcoal Filter (on hood usage...
... new filter. Order Part No. See "Optional Kits," page 9 for more information. To Install Charcoal Filter To install a new filter, remove plastic and other outer wrapping from the front. WB02X10776 from your GE supplier. Replace the grille and 4 screws. 35 It must be recirculated through a disposable charcoal filter that hold it . To remove the charcoal filter, disconnect power at the main fuse or circuit breaker panel or pull the plug. Charcoal Filter (on hood usage...
Use and Care Manual
Page 36
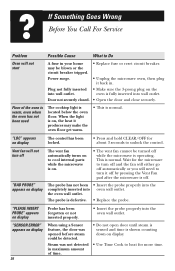
... the microwave is located below the oven floor. the oven wall outlet. When using a Sensor feature, the door was not detected in your home • Replace fuse or reset circuit breaker. Door not securely closed. • Open the door and close securely. "PLEASE INSERT PROBE" appears on display "SENSOR ERROR" appears on the into oven wall outlet. Wait for about 3 seconds to cool internal parts while the microwave is on , the heat it...
... the microwave is located below the oven floor. the oven wall outlet. When using a Sensor feature, the door was not detected in your home • Replace fuse or reset circuit breaker. Door not securely closed. • Open the door and close securely. "PLEASE INSERT PROBE" appears on display "SENSOR ERROR" appears on the into oven wall outlet. Wait for about 3 seconds to cool internal parts while the microwave is on , the heat it...
Use and Care Manual
Page 37
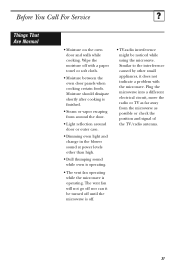
.... • Dull thumping sound while oven is operating. • The vent fan operating while the microwave is operating. Plug the microwave into a different electrical circuit, move the radio or TV as far away from around the door. • Light reflection around door or outer case. • Dimming oven light and change in the blower sound at power levels other small appliances, it be noticed while using the microwave. Before You Call For...
.... • Dull thumping sound while oven is operating. • The vent fan operating while the microwave is operating. Plug the microwave into a different electrical circuit, move the radio or TV as far away from around the door. • Light reflection around door or outer case. • Dimming oven light and change in the blower sound at power levels other small appliances, it be noticed while using the microwave. Before You Call For...
Use and Care Manual
Page 40
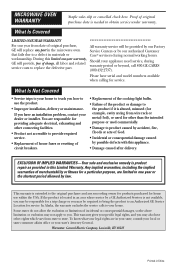
... -year warranty, GE will replace any part in the microwave oven Service Centers or by a GE Authorized Servicer is located in your state, consult your local or state consumer affairs office or your legal rights are responsible for providing adequate electrical, exhausting and other connecting facilities. • Product not accessible to provide required service. • Replacement of house fuses or resetting of circuit breakers. • Replacement of the cooktop light bulbs...
... -year warranty, GE will replace any part in the microwave oven Service Centers or by a GE Authorized Servicer is located in your state, consult your local or state consumer affairs office or your legal rights are responsible for providing adequate electrical, exhausting and other connecting facilities. • Product not accessible to provide required service. • Replacement of house fuses or resetting of circuit breakers. • Replacement of the cooktop light bulbs...

Quick Specs
Page 1
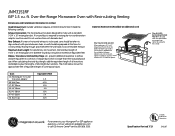
.../kit for removal of ventilation: • Outside exhaust (vertical - Electrical receptacle must be used for adaptation to -follow installation instructions and convenient full-size templates are designed for installing unit described. No additional wiring, venting or cabinet rebuilding necessary in cabinet above Spacemaker microwave oven. JNM3151RF GE® 1.5 cu. Listed by Underwriters Laboratories Specification Revised 7/13 340167 Complete detailed, easy-to the following three types of light covers. Over-the-Range Microwave Oven with Recirculating Venting Dimensions...
.../kit for removal of ventilation: • Outside exhaust (vertical - Electrical receptacle must be used for adaptation to -follow installation instructions and convenient full-size templates are designed for installing unit described. No additional wiring, venting or cabinet rebuilding necessary in cabinet above Spacemaker microwave oven. JNM3151RF GE® 1.5 cu. Listed by Underwriters Laboratories Specification Revised 7/13 340167 Complete detailed, easy-to the following three types of light covers. Over-the-Range Microwave Oven with Recirculating Venting Dimensions...
Quick Specs
Page 2
... cost) Filler Panel Kit JX40 and JX46 When replacing a 36" or 42" range hood, this kit fills in the additional width to mate with Recirculating Venting Dimensions and Installation Information (in appearance. JNM3151RF GE® 1.5 cu. Read the following carefully. If a round duct is constructed by Underwriters Laboratories Specification Revised 7/13 340167 Each kit contains two 3"-wide filler panels. Roof Cap Equivalent Feet 5 ft. 40...
... cost) Filler Panel Kit JX40 and JX46 When replacing a 36" or 42" range hood, this kit fills in the additional width to mate with Recirculating Venting Dimensions and Installation Information (in appearance. JNM3151RF GE® 1.5 cu. Read the following carefully. If a round duct is constructed by Underwriters Laboratories Specification Revised 7/13 340167 Each kit contains two 3"-wide filler panels. Roof Cap Equivalent Feet 5 ft. 40...


