
Owners Manual
Page 1
... and Roasting . .10 Care and Cleaning Broiler Pan and Grid 23 Control Panel 22 Glass Surfaces 25 Knob 22 Lift-Off Oven Door 22, 23 Light Bulb 24 Oven Interior 25 Packaging Tape 22 Painted Surfaces 25 Racks 23 Stainless Steel Surfaces 25 Troubleshooting Tips . . . .26-28 Accessories 29 Consumer Support...
... and Roasting . .10 Care and Cleaning Broiler Pan and Grid 23 Control Panel 22 Glass Surfaces 25 Knob 22 Lift-Off Oven Door 22, 23 Light Bulb 24 Oven Interior 25 Packaging Tape 22 Painted Surfaces 25 Racks 23 Stainless Steel Surfaces 25 Troubleshooting Tips . . . .26-28 Accessories 29 Consumer Support...

Owners Manual
Page 5
... Control, Clock and Timer Features and Settings Bake Pad Press to select the broil function. Start Pad Must be reset. If "F- If your model. Oven Light On/Off Pad Press to start time and length of day, oven temperature, whether the oven is in the bake, broil or self-cleaning mode... and the times set . Delay Start Pad Use along with Cooking Time or Self Clean pads to set the oven to turn the oven light on or off automatically when the cooking time has run out, unless the Cook and Hold feature was set . GEAppliances.com Double oven control shown...
... Control, Clock and Timer Features and Settings Bake Pad Press to select the broil function. Start Pad Must be reset. If "F- If your model. Oven Light On/Off Pad Press to start time and length of day, oven temperature, whether the oven is in the bake, broil or self-cleaning mode... and the times set . Delay Start Pad Use along with Cooking Time or Self Clean pads to set the oven to turn the oven light on or off automatically when the cooking time has run out, unless the Cook and Hold feature was set . GEAppliances.com Double oven control shown...

Owners Manual
Page 6
... there has been a power outage. Pads Press these pads to set times up to start and stop automatically at a time you want. 6 The Oven Cycle light glows until the oven reaches your food to start any cooking or cleaning function. Display Shows the time of time you want your selected temperature... vary from your oven was set. Allow the oven to cancel ALL oven operations except the clock and timer. Oven Light On/Off Pad Press this pad to turn the oven light on or off automatically when the cooking time has run out unless the Cook and Hold feature was set for...
... there has been a power outage. Pads Press these pads to set times up to start and stop automatically at a time you want. 6 The Oven Cycle light glows until the oven reaches your food to start any cooking or cleaning function. Display Shows the time of time you want your selected temperature... vary from your oven was set. Allow the oven to cancel ALL oven operations except the clock and timer. Oven Light On/Off Pad Press this pad to turn the oven light on or off automatically when the cooking time has run out unless the Cook and Hold feature was set for...

Owners Manual
Page 7
... to the desired setting or temperature. Before you turn the knob to catch a spillover. To remove a rack, pull it out. For ovens without a preheat indicator light or tone, preheat 10 minutes. Preheating and Pan Placement Preheat the oven if the recipe calls for Baking or Roasting Press the Bake pad. If...
... to the desired setting or temperature. Before you turn the knob to catch a spillover. To remove a rack, pull it out. For ovens without a preheat indicator light or tone, preheat 10 minutes. Preheating and Pan Placement Preheat the oven if the recipe calls for Baking or Roasting Press the Bake pad. If...

Owners Manual
Page 10
... models with Hour and Min + and - pads, press them to enter the desired baking time. The oven temperature and the cooking time that the oven light is 59. Press the Delay Start pad. NOTE: An attention tone will be displayed. pads, press them to increase or decrease the set desired temperature...
... models with Hour and Min + and - pads, press them to enter the desired baking time. The oven temperature and the cooking time that the oven light is 59. Press the Delay Start pad. NOTE: An attention tone will be displayed. pads, press them to increase or decrease the set desired temperature...

Owners Manual
Page 13
... and Hold feature was set , the display will show the changing temperature (starting at 100°F) and the cooking time. Be sure that the oven light is off . Press the Convection Bake or Convection Roast pad. Press the number pads to the length of the cooking time. NOTE: If your recipe...
... and Hold feature was set , the display will show the changing temperature (starting at 100°F) and the cooking time. Be sure that the oven light is off . Press the Convection Bake or Convection Roast pad. Press the number pads to the length of the cooking time. NOTE: If your recipe...

Owners Manual
Page 15
... your oven is off. The oven racks can set will automatically delay its start until the temperature drops below the lock temperature and the LOCKED light goes off indicating the oven has cooled below the locking temperature, you can change the clean time to any time between 3 hours and 5 hours, ... time remaining. A 3-hour self-clean time is extremely sensitive to the fumes given off , you set correctly for a dirtier oven. Make sure the oven light bulb cover (on some models) is in one oven and self-clean the other than 4 hours or 3 hours is recommended for the cycle to work...
... your oven is off. The oven racks can set will automatically delay its start until the temperature drops below the lock temperature and the LOCKED light goes off indicating the oven has cooled below the locking temperature, you can change the clean time to any time between 3 hours and 5 hours, ... time remaining. A 3-hour self-clean time is extremely sensitive to the fumes given off , you set correctly for a dirtier oven. Make sure the oven light bulb cover (on some models) is in one oven and self-clean the other than 4 hours or 3 hours is recommended for the cycle to work...

Owners Manual
Page 16
... recommended for use the number pads (on some models) or the Hour and Min + or - You can set will show the start . When the LOCKED light goes off . To recall the start of 4 hours or longer is needed, use when cleaning small, contained spills. Using the number pads (on some models... for both ovens, you can change the clean time to open the oven door until the temperature drops below the lock temperature and the LOCKED light goes off , you want the clean cycle to Delay the Start of day you will not be possible to work properly. Press the Start pad...
... recommended for use the number pads (on some models) or the Hour and Min + or - You can set will show the start . When the LOCKED light goes off . To recall the start of 4 hours or longer is needed, use when cleaning small, contained spills. Using the number pads (on some models... for both ovens, you can change the clean time to open the oven door until the temperature drops below the lock temperature and the LOCKED light goes off , you want the clean cycle to Delay the Start of day you will not be possible to work properly. Press the Start pad...
Owners Manual
Page 18
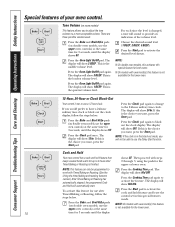
... pads (on some models) + This feature allows you want, press the Start pad. Press the Oven Light On/Off pad. This is set in the black-out mode, you want , press the Start pad....3 hours after Timed Baking or Roasting, follow the steps below . The display will show 3 BEEP. Press the Oven Light On/Off pad again. This is the quietest volume level. + + 18 12-Hour, 24-Hour or Clock Black... hold feature that keeps cooked foods warm for 3 seconds, until the display shows SF. Press the Oven Light On/Off pad again. The display will show 12 hr. Press the Bake and Broil Hi/Lo pads ...
... pads (on some models) + This feature allows you want, press the Start pad. Press the Oven Light On/Off pad. This is set in the black-out mode, you want , press the Start pad....3 hours after Timed Baking or Roasting, follow the steps below . The display will show 3 BEEP. Press the Oven Light On/Off pad again. This is the quietest volume level. + + 18 12-Hour, 24-Hour or Clock Black... hold feature that keeps cooked foods warm for 3 seconds, until the display shows SF. Press the Oven Light On/Off pad again. The display will show 12 hr. Press the Bake and Broil Hi/Lo pads ...
Owners Manual
Page 20
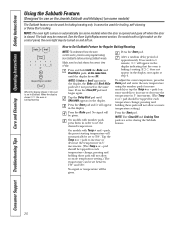
...4. pressing and holding these pads will not allow accurate temperature setting.) The temperature can be tapped for each temperature change ; See the Oven Light Replacement section. How to increase or decrease the temperature in the display. Press the Clear/Off pad and begin again. Press the Bake pad....use on the Jewish Sabbath and Holidays.) (on some models) The Sabbath feature can be used for each temperature change ; NOTE: The oven light comes on automatically (on some models) when the door is opened and goes off when the door is baking/roasting. To adjust the oven ...
...4. pressing and holding these pads will not allow accurate temperature setting.) The temperature can be tapped for each temperature change ; See the Oven Light Replacement section. How to increase or decrease the temperature in the display. Press the Clear/Off pad and begin again. Press the Bake pad....use on the Jewish Sabbath and Holidays.) (on some models) The Sabbath feature can be used for each temperature change ; NOTE: The oven light comes on automatically (on some models) when the door is opened and goes off when the door is baking/roasting. To adjust the oven ...
Owners Manual
Page 24
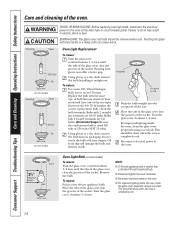
... fingers. Using gloves or a dry cloth, remove the bulb by pulling it straight out. Turn the glass cover clockwise 1/4 turn . For improved lighting inside the oven, clean the glass cover frequently using a wet cloth. NOTE: ■ A 40-watt appliance bulb is completely cool. Consumer Support... cover clockwise 1/4 turn . Wearing latex gloves may result in a new 40-watt appliance bulb. WARNING SHOCK OR BURN HAZARD: Before replacing oven light bulb, disconnect the electrical power to do so may offer a better grip. To replace: Use a new 120/130-volt halogen bulb, not ...
... fingers. Using gloves or a dry cloth, remove the bulb by pulling it straight out. Turn the glass cover clockwise 1/4 turn . For improved lighting inside the oven, clean the glass cover frequently using a wet cloth. NOTE: ■ A 40-watt appliance bulb is completely cool. Consumer Support... cover clockwise 1/4 turn . Wearing latex gloves may result in a new 40-watt appliance bulb. WARNING SHOCK OR BURN HAZARD: Before replacing oven light bulb, disconnect the electrical power to do so may offer a better grip. To replace: Use a new 120/130-volt halogen bulb, not ...
Owners Manual
Page 26
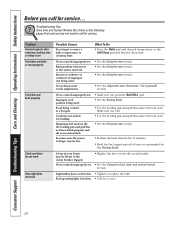
... cooking time or delay start Food does not bake or roast properly Food does not broil properly Clock and timer do not work Oven light does not work Possible Causes You forgot to call for broiling. Oven controls improperly set . Oven controls improperly set. • Replace ... time recommended in the Broiling Guide. Rack position is incorrect or the rack is broken. • Call for service. 26 Pad operating light is not level. Light bulb is cool. • Use the broiling pan and grid that came with your oven. • See the Using the oven section...
... cooking time or delay start Food does not bake or roast properly Food does not broil properly Clock and timer do not work Oven light does not work Possible Causes You forgot to call for broiling. Oven controls improperly set . Oven controls improperly set. • Replace ... time recommended in the Broiling Guide. Rack position is incorrect or the rack is broken. • Call for service. 26 Pad operating light is not level. Light bulb is cool. • Use the broiling pan and grid that came with your oven. • See the Using the oven section...
Owners Manual
Page 27
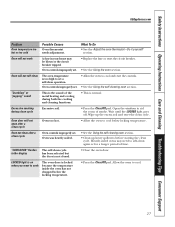
... improperly set . • Allow the oven to cool and reset the controls. • See the Using the self-cleaning oven section. Wait until the LOCKED light goes off. Heavily soiled ovens may be blown or the circuit breaker tripped. "Crackling" or "popping" sound This is the sound of the metal heating... Using the oven section. Oven not clean after a clean cycle Oven too hot. • Allow the oven to cook The oven door is normal. LOCKED light is on when you want to cool below the locking temperature. • Press the Clear/Off pad. What To Do • See the Adjust the...
... improperly set . • Allow the oven to cool and reset the controls. • See the Using the self-cleaning oven section. Wait until the LOCKED light goes off. Heavily soiled ovens may be blown or the circuit breaker tripped. "Crackling" or "popping" sound This is the sound of the metal heating... Using the oven section. Oven not clean after a clean cycle Oven too hot. • Allow the oven to cook The oven door is normal. LOCKED light is on when you want to cool below the locking temperature. • Press the Clear/Off pad. What To Do • See the Adjust the...
Owners Manual
Page 29
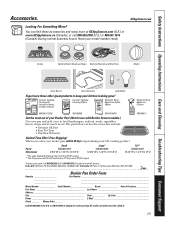
GEAppliances.com Grates Surface Burner Heads and Caps Surface Elements and Drip Pans Knobs or Oven Racks Oven Elements Light Bulbs Experience these accessories and many more ! Free Shipping! I_n C_ana_da:_GE_Pa_rts,_1 F_act_ory_Lan_e, M_on_cto_n, _N.B_. Ceramic Cooktop ...Brand Date of purchasing your order, call 800.626.2002 (U.S.) or 800.661.1616 (Canada) (during normal business hours). To place your GE cooking product. You can find these other great products to broil hamburgers, seafood, steaks, vegetables, bacon, chops and so much more at GEAppliances...
GEAppliances.com Grates Surface Burner Heads and Caps Surface Elements and Drip Pans Knobs or Oven Racks Oven Elements Light Bulbs Experience these accessories and many more ! Free Shipping! I_n C_ana_da:_GE_Pa_rts,_1 F_act_ory_Lan_e, M_on_cto_n, _N.B_. Ceramic Cooktop ...Brand Date of purchasing your order, call 800.626.2002 (U.S.) or 800.661.1616 (Canada) (during normal business hours). To place your GE cooking product. You can find these other great products to broil hamburgers, seafood, steaks, vegetables, bacon, chops and so much more at GEAppliances...


