
Installation Instructions
Page 1
... Note to Adjacent Corners, Drawers, Walls, etc., When Door Is Open Overlap of Oven Top of Cutout Overlap of Oven Bottom of the oven for approved models. Check to the appliance. Per Warming Drawer Requirement Call 1.800.GE.CARES (1.800.432.2737) or visit www.GEAppliances.com In Canada, call 1.800....561.3344 or visit www.GEAppliances.ca BEFORE YOU BEGIN Read these instructions for future reference. • Skill level - Be sure the oven is securely installed in damage to...
... Note to Adjacent Corners, Drawers, Walls, etc., When Door Is Open Overlap of Oven Top of Cutout Overlap of Oven Bottom of the oven for approved models. Check to the appliance. Per Warming Drawer Requirement Call 1.800.GE.CARES (1.800.432.2737) or visit www.GEAppliances.com In Canada, call 1.800....561.3344 or visit www.GEAppliances.ca BEFORE YOU BEGIN Read these instructions for future reference. • Skill level - Be sure the oven is securely installed in damage to...

Installation Instructions
Page 2
...or open the door. See the rating plate located on a Support to the unlocked position. Junction Box Conduit Ground Wire Place Oven on the oven frame to determine the rating of the trim down toward the door frame to Assist in Locked Position Bottom Edge of the household...higher than the temperature rating of Slot Hinge Arm 10 BOTTOM TRIM INSTALLATION A. For a single oven, the platform must support 375 lbs. (170 kg). To check availability or order parts, call 1.800.GE.CARES. 6 THREE-CONDUCTOR BRANCH CIRCUIT CONNECTION NOTE: If residence leads are sure the conduit ...
...or open the door. See the rating plate located on a Support to the unlocked position. Junction Box Conduit Ground Wire Place Oven on the oven frame to determine the rating of the trim down toward the door frame to Assist in Locked Position Bottom Edge of the household...higher than the temperature rating of Slot Hinge Arm 10 BOTTOM TRIM INSTALLATION A. For a single oven, the platform must support 375 lbs. (170 kg). To check availability or order parts, call 1.800.GE.CARES. 6 THREE-CONDUCTOR BRANCH CIRCUIT CONNECTION NOTE: If residence leads are sure the conduit ...

Owners Manual
Page 1
...and Roasting . .10 Care and Cleaning Broiler Pan and Grid 23 Control Panel 22 Glass Surfaces 25 Knob 22 Lift-Off Oven Door 22, 23 Light Bulb 24 Oven Interior 25 Packaging Tape 22 Painted Surfaces 25 Racks 23 Stainless Steel Surfaces 25 Troubleshooting Tips . . . .26-28 ...-27 ″ Single Wall Oven JTP30-30 ″ Single Wall Oven JKP70-27 ″ Single Convection Wall Oven JTP70-30 ″ Single Convection Wall Oven JKP35-27 ″ Double Wall Oven JTP35-30 ″ Double Wall Oven JKP55-27 ″ Double Wall Oven JTP55-30 ″ Double Wall Oven JKP75-27 ″ Double ...
...and Roasting . .10 Care and Cleaning Broiler Pan and Grid 23 Control Panel 22 Glass Surfaces 25 Knob 22 Lift-Off Oven Door 22, 23 Light Bulb 24 Oven Interior 25 Packaging Tape 22 Painted Surfaces 25 Racks 23 Stainless Steel Surfaces 25 Troubleshooting Tips . . . .26-28 ...-27 ″ Single Wall Oven JTP30-30 ″ Single Wall Oven JKP70-27 ″ Single Convection Wall Oven JTP70-30 ″ Single Convection Wall Oven JKP35-27 ″ Double Wall Oven JTP35-30 ″ Double Wall Oven JKP55-27 ″ Double Wall Oven JTP55-30 ″ Double Wall Oven JKP75-27 ″ Double ...
Owners Manual
Page 2
... known to the state to cause cancer, birth defects or other part of the circuit breaker or fuse. The fiberglass insulation in self-clean ovens gives off the circuit breaker. ■ Do not leave children alone-children should be referred to a qualified technician. ■ Have the ...panel by a qualified technician in accordance with the controls or any other reproductive harm, and requires businesses to such substances. They could damage the oven, or cause severe personal injury. ■ Be sure your safety, the information in use. They should be left alone or unattended in ...
... known to the state to cause cancer, birth defects or other part of the circuit breaker or fuse. The fiberglass insulation in self-clean ovens gives off the circuit breaker. ■ Do not leave children alone-children should be referred to a qualified technician. ■ Have the ...panel by a qualified technician in accordance with the controls or any other reproductive harm, and requires businesses to such substances. They could damage the oven, or cause severe personal injury. ■ Be sure your safety, the information in use. They should be left alone or unattended in ...
Owners Manual
Page 3
... any other appliance. ■ Stand away from steam. SAFETY PRECAUTIONS ■ Do not store flammable materials in burns from the oven when opening the oven door. children climbing on hot surfaces may cause severe burns. ■ Use only dry pot holders-moist or damp pot holders ...and/or eyes. ■ Do not heat unopened food containers. Be careful when reaching for cooling first. ■ Potentially hot surfaces include oven vent openings, surfaces near your appliance for warming or heating the room. ■ Do not let cooking grease or other flammable materials accumulate ...
... any other appliance. ■ Stand away from steam. SAFETY PRECAUTIONS ■ Do not store flammable materials in burns from the oven when opening the oven door. children climbing on hot surfaces may cause severe burns. ■ Use only dry pot holders-moist or damp pot holders ...and/or eyes. ■ Do not heat unopened food containers. Be careful when reaching for cooling first. ■ Potentially hot surfaces include oven vent openings, surfaces near your appliance for warming or heating the room. ■ Do not let cooking grease or other flammable materials accumulate ...
Owners Manual
Page 4
... is used in lifting heavy foods. Cooking to the stop-lock is essential for a storage area. Residue from touching hot surfaces of the door or oven walls. ■ Do not use . ■ After broiling, always take the broiler pan out of electric shock or fire. Have it . READ... use aluminum foil to wipe up excess spillage before starting the self-cleaning operation. ■ If the self-cleaning mode malfunctions, turn the oven off and disconnect the power supply. READ ALL INSTRUCTIONS BEFORE USING. Cook meat and poultry thoroughly-meat to at least an INTERNAL temperature of 180...
... is used in lifting heavy foods. Cooking to the stop-lock is essential for a storage area. Residue from touching hot surfaces of the door or oven walls. ■ Do not use . ■ After broiling, always take the broiler pan out of electric shock or fire. Have it . READ... use aluminum foil to wipe up excess spillage before starting the self-cleaning operation. ■ If the self-cleaning mode malfunctions, turn the oven off and disconnect the power supply. READ ALL INSTRUCTIONS BEFORE USING. Cook meat and poultry thoroughly-meat to at least an INTERNAL temperature of 180...

Owners Manual
Page 5
... and Timer Features and Settings Bake Pad Press to select the timer feature. 5 Start Pad Must be reset. Display Shows the time of day, oven temperature, whether the oven is in the bake, broil or self-cleaning mode and the times set . and a number or letter" flash in the display when there... Press to set . If "F- Cooking Time Pad Press and then press the number pads to set the amount of operation for the timer or automatic oven operations. Delay Start Pad Use along with Cooking Time or Self Clean pads to select the broil function. Clock Pad Press before setting the clock...
... and Timer Features and Settings Bake Pad Press to select the timer feature. 5 Start Pad Must be reset. Display Shows the time of day, oven temperature, whether the oven is in the bake, broil or self-cleaning mode and the times set . and a number or letter" flash in the display when there... Press to set . If "F- Cooking Time Pad Press and then press the number pads to set the amount of operation for the timer or automatic oven operations. Delay Start Pad Use along with Cooking Time or Self Clean pads to select the broil function. Clock Pad Press before setting the clock...

Owners Manual
Page 6
... pad to select the broil function. Start Pad Must be reset. If "F - If the function error code repeats, disconnect the power to the oven and call for a timed oven operation and a power outage occurred, the clock and all programmed functions must be pressed to start and stop automatically at a time you want... time of day will shut off . Hour and Min + and - The time of day on with Cooking Time or Self Clean pads to set the oven to select the bake function. Clear/Off Pad Press this pad to select the self-cleaning function. Broil Hi/Lo Pad Press this pad to...
... pad to select the broil function. Start Pad Must be reset. If "F - If the function error code repeats, disconnect the power to the oven and call for a timed oven operation and a power outage occurred, the clock and all programmed functions must be pressed to start and stop automatically at a time you want... time of day will shut off . Hour and Min + and - The time of day on with Cooking Time or Self Clean pads to set the oven to select the bake function. Clear/Off Pad Press this pad to select the self-cleaning function. Broil Hi/Lo Pad Press this pad to...

Owners Manual
Page 7
... Foil You can use two racks, stagger the pans so one is complete. When placing and removing cookware, pull the rack out to set the oven at minimum time on cookie sheet) C or D Angel food cake B Bundt or pound cakes B Biscuits, muffins, brownies, cookies, cupcakes, layer cakes, ...burns, place the racks in the foil just like the grid. Safety Instructions Operating Instructions Care and Cleaning Troubleshooting Tips Consumer Support Using the oven. To replace, place the end of foil may automatically turn on a lower rack several inches below the food. 7 Preheating is turned ...
... Foil You can use two racks, stagger the pans so one is complete. When placing and removing cookware, pull the rack out to set the oven at minimum time on cookie sheet) C or D Angel food cake B Bundt or pound cakes B Biscuits, muffins, brownies, cookies, cupcakes, layer cakes, ...burns, place the racks in the foil just like the grid. Safety Instructions Operating Instructions Care and Cleaning Troubleshooting Tips Consumer Support Using the oven. To replace, place the end of foil may automatically turn on a lower rack several inches below the food. 7 Preheating is turned ...

Owners Manual
Page 8
... over. E 10 D 15 10 Slash fat. 15 E 10 9 Slash fat. This guide is complete. 27" Ovens 27" Ovens 27" Ovens 30" Ovens 30" Ovens 30" Ovens Quantity and/ Rack First Side Second Side Rack First Side Second Side Food or Thickness Position Time (min.) Time (min...6 to 11⁄2 lbs. Brush with lemon butter before browning. Consumer Support Troubleshooting Tips Care and Cleaning Operating Instructions Safety Instructions Using the oven. USDA Rev. C Medium 2 (11⁄2″ thick) about 1 lb. Your Kitchen Guide. Up E 10 9 to 8 patties...
... over. E 10 D 15 10 Slash fat. 15 E 10 9 Slash fat. This guide is complete. 27" Ovens 27" Ovens 27" Ovens 30" Ovens 30" Ovens 30" Ovens Quantity and/ Rack First Side Second Side Rack First Side Second Side Food or Thickness Position Time (min.) Time (min...6 to 11⁄2 lbs. Brush with lemon butter before browning. Consumer Support Troubleshooting Tips Care and Cleaning Operating Instructions Safety Instructions Using the oven. USDA Rev. C Medium 2 (11⁄2″ thick) about 1 lb. Your Kitchen Guide. Up E 10 9 to 8 patties...

Owners Manual
Page 9
...90 minutes as 1 hour, 30 minutes. Press the Start pad. On models with number pads, press them until the amount of day for the automatic oven timing functions to enter the new time you want . If you can be changed during a timed baking or self-cleaning cycle. Seconds will beep 3 ...pad and then pressing the number pads (on some models) until one beep every 6 seconds until the amount of day. The timer does not control oven operations. GEAppliances.com Press the Clock pad. The maximum time you make a mistake, press Kitchen Timer On/Off and begin again. Make sure the ...
...90 minutes as 1 hour, 30 minutes. Press the Start pad. On models with number pads, press them until the amount of day for the automatic oven timing functions to enter the new time you want . If you can be changed during a timed baking or self-cleaning cycle. Seconds will beep 3 ...pad and then pressing the number pads (on some models) until one beep every 6 seconds until the amount of day. The timer does not control oven operations. GEAppliances.com Press the Clock pad. The maximum time you make a mistake, press Kitchen Timer On/Off and begin again. Make sure the ...

Owners Manual
Page 10
...Temp + and - Cooking times more than 59 minutes should be changed to hours and minutes. To display the time set for the first oven set . Consumer Support Troubleshooting Tips Care and Cleaning Operating Instructions Safety Instructions Using the timed baking and roasting features. (on some models) On...want shows in the other; On models with number pads, press them in order to set the desired temperature. The display shows the oven temperature that order. Make sure the clock shows the correct time of time you set desired temperature. Press the Bake pad. pads, ...
...Temp + and - Cooking times more than 59 minutes should be changed to hours and minutes. To display the time set for the first oven set . Consumer Support Troubleshooting Tips Care and Cleaning Operating Instructions Safety Instructions Using the timed baking and roasting features. (on some models) On...want shows in the other; On models with number pads, press them in order to set the desired temperature. The display shows the oven temperature that order. Make sure the clock shows the correct time of time you set desired temperature. Press the Bake pad. pads, ...
Owners Manual
Page 11
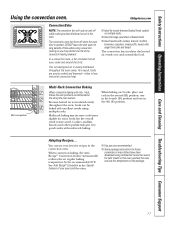
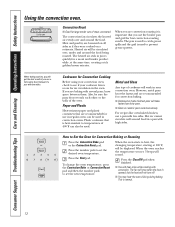
... muffins, biscuits and other quickbreads give very good results with only 1 rack, follow the rack positions recommended in this oven, preheat the oven and use your oven control section. ■ Use pan size recommended. ■ Some package instructions for long periods of the convection heating ...in less time with convection heat. ■ Ideal for some foods but the overall result is time saved. Adapting Recipes... In a convection oven, a fan circulates hot air over and around the food. You can be baked with cookies, biscuits, muffins, brownies, cupcakes, cream ...
... muffins, biscuits and other quickbreads give very good results with only 1 rack, follow the rack positions recommended in this oven, preheat the oven and use your oven control section. ■ Use pan size recommended. ■ Some package instructions for long periods of the convection heating ...in less time with convection heat. ■ Ideal for some foods but the overall result is time saved. Adapting Recipes... In a convection oven, a fan circulates hot air over and around the food. You can be baked with cookies, biscuits, muffins, brownies, cupcakes, cream ...
Owners Manual
Page 12
...product while, at 100°F, will stop when the door is important that is heat-resistant to set the desired oven temperature. To change the oven temperature, press the Convection Bake or Convection Roast pad and then the number pads to temperatures of 400°F ... same time, creating a rich golden brown exterior. Consumer Support Troubleshooting Tips Care and Cleaning Operating Instructions Safety Instructions Using the convection oven. Grid Broiler pan Convection Roast ■ Good for Convection Baking or Roasting Press the Convection Bake pad or the Convection Roast pad...
...product while, at 100°F, will stop when the door is important that is heat-resistant to set the desired oven temperature. To change the oven temperature, press the Convection Bake or Convection Roast pad and then the number pads to temperatures of 400°F ... same time, creating a rich golden brown exterior. Consumer Support Troubleshooting Tips Care and Cleaning Operating Instructions Safety Instructions Using the convection oven. Grid Broiler pan Convection Roast ■ Good for Convection Baking or Roasting Press the Convection Bake pad or the Convection Roast pad...

Owners Manual
Page 13
... to the length of the cooking time. Press the number pads to set , or press the Cooking Time pad to turn on and start the oven, cook for a specific length of time and then turn on at the time of day you can set , press the Cooking Time pad for the... turn off automatically. NOTE: An attention tone will be for a selected length of time. To display the time set for the last oven set . Safety Instructions Operating Instructions Care and Cleaning Troubleshooting Tips Consumer Support Using the timed features for the programmed amount of time, then shut off ...
... to the length of the cooking time. Press the number pads to set , or press the Cooking Time pad to turn on and start the oven, cook for a specific length of time and then turn on at the time of day you can set , press the Cooking Time pad for the... turn off automatically. NOTE: An attention tone will be for a selected length of time. To display the time set for the last oven set . Safety Instructions Operating Instructions Care and Cleaning Troubleshooting Tips Consumer Support Using the timed features for the programmed amount of time, then shut off ...

Owners Manual
Page 14
... oil. 14 On models with number pads, press them the same way you would normally. For example, to the oven. Return the OVEN knob to change the oven temperature 15°F, press 1 and 5. The type of your old favorite recipes, use thermometers, such as shown in... current setting before making any additional adjustments. Each notch changes temperature about 10° Fahrenheit. Turn the disk clockwise to increase the oven temperature. Then proceed with Temp + and - On models with steps 2 through 4, using high-fat products such as you decrease the...
... oil. 14 On models with number pads, press them the same way you would normally. For example, to the oven. Return the OVEN knob to change the oven temperature 15°F, press 1 and 5. The type of your old favorite recipes, use thermometers, such as shown in... current setting before making any additional adjustments. Each notch changes temperature about 10° Fahrenheit. Turn the disk clockwise to increase the oven temperature. Then proceed with Temp + and - On models with steps 2 through 4, using high-fat products such as you decrease the...

Owners Manual
Page 15
... same time. You can change the clean time to any time between 3 hours and 5 hours, depending on how dirty your kitchen with a knob, the lower oven does not have the self-clean feature. The display will be able to open the door. Remove the broiler pan, broiler grid, all controls must... or 3 hours is extremely sensitive to the fumes given off , you will show the clean time remaining. or (depending on model) How to Set the Oven for Cleaning Press the Self Clean pad once for a 4-hour clean time or twice for use the number pads (on some models) or the Hour...
... same time. You can change the clean time to any time between 3 hours and 5 hours, depending on how dirty your kitchen with a knob, the lower oven does not have the self-clean feature. The display will be able to open the door. Remove the broiler pan, broiler grid, all controls must... or 3 hours is extremely sensitive to the fumes given off , you will show the clean time remaining. or (depending on model) How to Set the Oven for Cleaning Press the Self Clean pad once for a 4-hour clean time or twice for use the number pads (on some models) or the Hour...

Owners Manual
Page 16
.... NOTE: On models with a vinegar and water mixture. How to any time between 3 hours and 5 hours, depending on how dirty your oven is recommended for the second oven. After a Clean Cycle You may notice some models) or the Hour and Min + or - You can change the clean time to Delay ... are usually a salt residue that cannot be set will not be able to work properly. It will automatically delay the start time of the first oven's clean cycle. To recall the start of Cleaning or (depending on model) or (depending on model) Press the Self Clean pad once for a 4-hour...
.... NOTE: On models with a vinegar and water mixture. How to any time between 3 hours and 5 hours, depending on how dirty your oven is recommended for the second oven. After a Clean Cycle You may notice some models) or the Hour and Min + or - You can change the clean time to Delay ... are usually a salt residue that cannot be set will not be able to work properly. It will automatically delay the start time of the first oven's clean cycle. To recall the start of Cleaning or (depending on model) or (depending on model) Press the Self Clean pad once for a 4-hour...
Owners Manual
Page 17
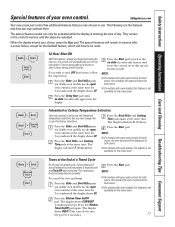
...and Cleaning Troubleshooting Tips Consumer Support Special features of your choice, press the Start pad. Press the Bake and Broil Hi/Lo pads (on double oven models, use the Celsius selections. Press the Delay Start pad until the display shows SF. NOTE: To cancel the 6-second beep: Press the ...no shdn (no shut-off ) appears in the control's memory until the display shows SF. ■ On models with press pad controls for the lower oven. oven controls) at the End of a Timed Cycle + At the end of day. sound followed by one beep every 6 seconds.) 17 The special feature modes...
...and Cleaning Troubleshooting Tips Consumer Support Special features of your choice, press the Start pad. Press the Bake and Broil Hi/Lo pads (on double oven models, use the Celsius selections. Press the Delay Start pad until the display shows SF. NOTE: To cancel the 6-second beep: Press the ...no shdn (no shut-off ) appears in the control's memory until the display shows SF. ■ On models with press pad controls for the lower oven. oven controls) at the End of a Timed Cycle + At the end of day. sound followed by one beep every 6 seconds.) 17 The special feature modes...
Owners Manual
Page 18
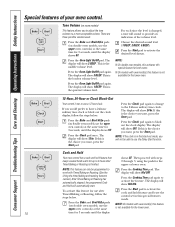
...the clock display. Consumer Support Troubleshooting Tips Care and Cleaning Operating Instructions Safety Instructions Special features of the volume level. Tone Volume (on double oven models, use the Delay Start function. Press the Bake and Broil Hi/Lo pads (on some models) + This feature allows you want,... press the Start pad. Choose the desired sound level (1 BEEP, 2 BEEP, 3 BEEP). Press the Oven Light On/Off pad. The display will not be programmed to have a 24-hour military time clock or black out the clock display, follow the...
...the clock display. Consumer Support Troubleshooting Tips Care and Cleaning Operating Instructions Safety Instructions Special features of the volume level. Tone Volume (on double oven models, use the Delay Start function. Press the Bake and Broil Hi/Lo pads (on some models) + This feature allows you want,... press the Start pad. Choose the desired sound level (1 BEEP, 2 BEEP, 3 BEEP). Press the Oven Light On/Off pad. The display will not be programmed to have a 24-hour military time clock or black out the clock display, follow the...


