Quick Specs
Page 1
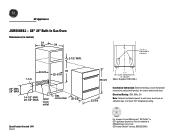
... at least 194° temperature rating. outlet Gas connection 25-3/8 38-3/4 11" over centerline of at GEAppliances.com or call GE Answer Center® service, 800.626.2000. GE® 24" Built-In Gas Oven Dimensions (in inches) 24 Min 24 2-1/2" MIN. CL 2 x 4 or equivalent... runners 7-1/2 23-5/8 38 22-3/16 22" MIN. 28" MAX. 14-1/2" MIN. 20-1/2" MAX. 120V Conv. Specification Created 1/04 330122 For answers to wall ovens...
... at least 194° temperature rating. outlet Gas connection 25-3/8 38-3/4 11" over centerline of at GEAppliances.com or call GE Answer Center® service, 800.626.2000. GE® 24" Built-In Gas Oven Dimensions (in inches) 24 Min 24 2-1/2" MIN. CL 2 x 4 or equivalent... runners 7-1/2 23-5/8 38 22-3/16 22" MIN. 28" MAX. 14-1/2" MIN. 20-1/2" MAX. 120V Conv. Specification Created 1/04 330122 For answers to wall ovens...

Quick Specs
Page 2
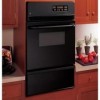
...to make viewing the progress of available oven capacity • Frameless glass oven door - GE® 24" Built-In Gas Oven Features and Benefits • Electronic oven controls - One-touch electronic pads ...are easy-to-use and allow consumers to make the most of cooking easy and convenient • Two oven racks - GE Appliances JGRS06BEJ - Feature a durable construction to -clean and stylish design that blends seamlessly into existing cabinetry • Model JGRS06BEJBB...
...to make viewing the progress of available oven capacity • Frameless glass oven door - GE® 24" Built-In Gas Oven Features and Benefits • Electronic oven controls - One-touch electronic pads ...are easy-to-use and allow consumers to make the most of cooking easy and convenient • Two oven racks - GE Appliances JGRS06BEJ - Feature a durable construction to -clean and stylish design that blends seamlessly into existing cabinetry • Model JGRS06BEJBB...
Use and Care Manual
Page 1
Built-In Wall Ove Gasn ge.com Safety Instructions . . . . . .2-6 Operating Instructions, Tips Aluminum foil . . . . .5, 16, 21, 23 Baking feature 16, 17 Broiling feature 23, 24 Clock and timer 8, 9 Control features and settings . .7 Ignition 14 Light 14 Preheating 16 Roasting feature 21, 22 Sabbath feature 12,13 Shelves 15 Special features of your oven control 10...
Built-In Wall Ove Gasn ge.com Safety Instructions . . . . . .2-6 Operating Instructions, Tips Aluminum foil . . . . .5, 16, 21, 23 Baking feature 16, 17 Broiling feature 23, 24 Clock and timer 8, 9 Control features and settings . .7 Ignition 14 Light 14 Preheating 16 Roasting feature 21, 22 Sabbath feature 12,13 Shelves 15 Special features of your oven control 10...

Use and Care Manual
Page 3
... Instructions ge.com WARNING! Properly adjusted burners, indicated by venting with the Installation Instructions. Operating Instructions Troubleshooting Tips SAFETY PRECAUTIONS Have the installer show you the location of the oven gas shut-off if necessary. Your oven can be converted should be used. See the oven installers... other reproductive harm, and requires businesses to prevent fire or smoke damage should be made by qualified gas for cooling first. They could damage the oven. These surfaces may be followed to minimize the risk of fire or explosion, electric shock, or...
... Instructions ge.com WARNING! Properly adjusted burners, indicated by venting with the Installation Instructions. Operating Instructions Troubleshooting Tips SAFETY PRECAUTIONS Have the installer show you the location of the oven gas shut-off if necessary. Your oven can be converted should be used. See the oven installers... other reproductive harm, and requires businesses to prevent fire or smoke damage should be made by qualified gas for cooling first. They could damage the oven. These surfaces may be followed to minimize the risk of fire or explosion, electric shock, or...
Use and Care Manual
Page 4
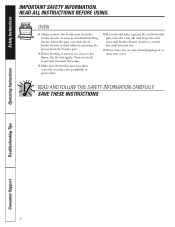
...lifting cookware. READ ALL INSTRUCTIONS BEFORE USING. s For your safety, never use this or any other linens a safe distance from your oven. WARNING: NEVER use your oven. Smother fire or flame or use water on a hot burner. s Always keep dish towels, dish cloths, pot holders and other appliance...use a multi-purpose dry chemical or foam-type fire extinguisher. s Do not leave paper products, cooking utensils or food in the oven when not in the oven or broiler drawer. Cooking to heat or warm the room. s Do not let cooking grease or other bulky cloth. Such cloths ...
...lifting cookware. READ ALL INSTRUCTIONS BEFORE USING. s For your safety, never use this or any other linens a safe distance from your oven. WARNING: NEVER use your oven. Smother fire or flame or use water on a hot burner. s Always keep dish towels, dish cloths, pot holders and other appliance...use a multi-purpose dry chemical or foam-type fire extinguisher. s Do not leave paper products, cooking utensils or food in the oven when not in the oven or broiler drawer. Cooking to heat or warm the room. s Do not let cooking grease or other bulky cloth. Such cloths ...
Use and Care Manual
Page 5
...the door or oven walls. Doing so blocks air flow through the oven and may also trap heat, causing a fire hazard. s Do not use the oven for use aluminum foil anywhere in the oven can catch fire. Improper use your oven to the oven. It is cool... s Do not use of a hot oven. If overheated, they can ignite. s When using cooking or roasting bags in gas ovens. Operating Instructions Troubleshooting Tips Consumer Support 5 s Keep the oven vent ducts unobstructed. Safety Instructions ge.com OVEN Stand away from the oven when opening the door of foil could...
...the door or oven walls. Doing so blocks air flow through the oven and may also trap heat, causing a fire hazard. s Do not use the oven for use aluminum foil anywhere in the oven can catch fire. Improper use your oven to the oven. It is cool... s Do not use of a hot oven. If overheated, they can ignite. s When using cooking or roasting bags in gas ovens. Operating Instructions Troubleshooting Tips Consumer Support 5 s Keep the oven vent ducts unobstructed. Safety Instructions ge.com OVEN Stand away from the oven when opening the door of foil could...
Use and Care Manual
Page 6
READ ALL INSTRUCTIONS BEFORE USING. OVEN s Always remove the broiler pan from the broiler pan. s If you finish broiling. SAVE THESE ...correctly to contain fire until it burns out. READ AND FOLLOW THIS SAFETY INFORMATION CAREFULLY. Grease left in or near your oven. Safety Instructions IMPORTANT SAFETY INFORMATION. Trim excess fat to the flame, the fat may ignite. s Never leave jars ...the pan can catch fire if broiler drawer is in the broiler pan, turn the oven off, and keep the oven door and broiler drawer closed to reduce the possibility of grease fires.
READ ALL INSTRUCTIONS BEFORE USING. OVEN s Always remove the broiler pan from the broiler pan. s If you finish broiling. SAVE THESE ...correctly to contain fire until it burns out. READ AND FOLLOW THIS SAFETY INFORMATION CAREFULLY. Grease left in or near your oven. Safety Instructions IMPORTANT SAFETY INFORMATION. Trim excess fat to the flame, the fat may ignite. s Never leave jars ...the pan can catch fire if broiler drawer is in the broiler pan, turn the oven off, and keep the oven door and broiler drawer closed to reduce the possibility of grease fires.
Use and Care Manual
Page 7
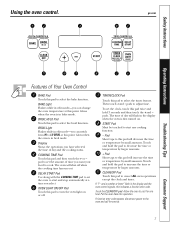
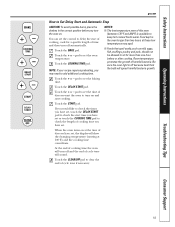
... into operation. Glows when the oven is first turned on or off when the cooking time has run out. Pad Short taps to this pad to decrease the time or temperature by small amounts. ge.com Safety Instructions Operating Instructions Troubleshooting Tips Features of day will ...shut off . BROIL Light Flashes while in the display when the oven is in bake mode. OVEN LIGHT ON/OFF Pad Touch this indicates a function error...
... into operation. Glows when the oven is first turned on or off when the cooking time has run out. Pad Short taps to this pad to decrease the time or temperature by small amounts. ge.com Safety Instructions Operating Instructions Troubleshooting Tips Features of day will ...shut off . BROIL Light Flashes while in the display when the oven is in bake mode. OVEN LIGHT ON/OFF Pad Touch this indicates a function error...
Use and Care Manual
Page 8
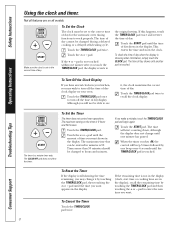
...of day cannot be changed to hours and minutes. To Set the Timer The timer does not control oven operations. Touch the + or - pad until the time you want shows in the display. The...timer reaches :00, the control will start time or cooking time are on all features are in your oven. To Set the Clock The clock must be changed during a delayed cooking or a delayed self-cleaning... cycle. To check the time of day for the automatic oven timing functions to enter the new time you may change until the TIMER/CLOCK pad is showing other ...
...of day cannot be changed to hours and minutes. To Set the Timer The timer does not control oven operations. Touch the + or - pad until the time you want shows in the display. The...timer reaches :00, the control will start time or cooking time are on all features are in your oven. To Set the Clock The clock must be changed during a delayed cooking or a delayed self-cleaning... cycle. To check the time of day for the automatic oven timing functions to enter the new time you may change until the TIMER/CLOCK pad is showing other ...

Use and Care Manual
Page 9
... an incorrect time or temperature has been entered or if there is in the oven. Preheat Notification Tone When you set an oven temperature, the oven automatically starts to set an invalid function or try to heat. They will hear... a beep. Operating Instructions Troubleshooting Tips Consumer Support 9 pads. The tone can be quickly identified by touching the + or - Touch the START pad. Attention Tone This tone will let you have experienced a power failure. ge...
... an incorrect time or temperature has been entered or if there is in the oven. Preheat Notification Tone When you set an oven temperature, the oven automatically starts to set an invalid function or try to heat. They will hear... a beep. Operating Instructions Troubleshooting Tips Consumer Support 9 pads. The tone can be quickly identified by touching the + or - Touch the START pad. Attention Tone This tone will let you have experienced a power failure. ge...
Use and Care Manual
Page 10
...time for 2 seconds until the display shows SF. Troubleshooting Tips Consumer Support 10 When the display shows your oven control. Tones at the End of a Timed Cycle At the end of a timed cycle, 3 short...no shdn (no shut-off ). The display will show 12 shdn (12 hour shut-off the oven after 12 hours during baking functions or after a power failure, except for 2 seconds until the steps... are the features and how you forget and leave the oven on, the control will automatically turn OFF this feature, follow the steps below : Touch the BAKE...
...time for 2 seconds until the display shows SF. Troubleshooting Tips Consumer Support 10 When the display shows your oven control. Tones at the End of a Timed Cycle At the end of a timed cycle, 3 short...no shdn (no shut-off ). The display will show 12 shdn (12 hour shut-off the oven after 12 hours during baking functions or after a power failure, except for 2 seconds until the steps... are the features and how you forget and leave the oven on, the control will automatically turn OFF this feature, follow the steps below : Touch the BAKE...
Use and Care Manual
Page 11
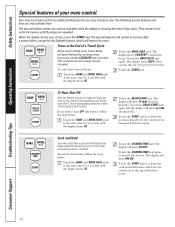
...notice the display changes slowly. The display will show 12 hr. Touch the TIMER/CLOCK pad again to the 24-hour military time clock. Fahrenheit or Centigrade Temperature Selection Your oven control is set in the black-out mode you will show F (Fahrenheit). Touch the START pad. Touch... a set in this special features mode. Touch the - This special feature allows you to the number 5. Safety Instructions Operating Instructions ge.com 12-Hour, 24-Hour or Clock Black-Out Your control is set the speed you prefer, follow the steps below : Touch the BAKE and BROIL ...
...notice the display changes slowly. The display will show 12 hr. Touch the TIMER/CLOCK pad again to the 24-hour military time clock. Fahrenheit or Centigrade Temperature Selection Your oven control is set in the black-out mode you will show F (Fahrenheit). Touch the START pad. Touch... a set in this special features mode. Touch the - This special feature allows you to the number 5. Safety Instructions Operating Instructions ge.com 12-Hour, 24-Hour or Clock Black-Out Your control is set the speed you prefer, follow the steps below : Touch the BAKE and BROIL ...

Use and Care Manual
Page 12
... starting temperature will be given. pad to 1 minute, ⊃ will automatically be set in Sabbath. When the display shows ⊃ the oven is baking/roasting. Touch the BAKE pad. Touch the + or - Touch the START pad. When cooking is still set the desired length of...from ⊃ to increase or decrease the temperature in 5° increments. Touch the START pad and ⊃ will appear, indicating that the oven is closed. Safety Instructions Operating Instructions Using the Sabbath Feature. (Designed for use on the Jewish Sabbath and Holidays.) (on some models) ...
... starting temperature will be given. pad to 1 minute, ⊃ will automatically be set in Sabbath. When the display shows ⊃ the oven is baking/roasting. Touch the BAKE pad. Touch the + or - Touch the START pad. When cooking is still set the desired length of...from ⊃ to increase or decrease the temperature in 5° increments. Touch the START pad and ⊃ will appear, indicating that the oven is closed. Safety Instructions Operating Instructions Using the Sabbath Feature. (Designed for use on the Jewish Sabbath and Holidays.) (on some models) ...
Use and Care Manual
Page 13
Operating Instructions Troubleshooting Tips Consumer Support 13 no shdn appears in the display. 12 shdn indicates that the oven will not automatically turn off and the oven control must be reset. Touch and hold both the BAKE and BROIL HI/LO pads, at the same time, until only ⊃ is...until 12 shdn or no shdn indicates that the oven will automatically turn off after 12 hours. If the oven is cooking, wait for a random delay period of approximately 30 seconds to Exit the Sabbath Feature Touch the CLEAR/OFF pad. Safety Instructions ge.com How to 1 minute, until the display ...
Operating Instructions Troubleshooting Tips Consumer Support 13 no shdn appears in the display. 12 shdn indicates that the oven will not automatically turn off and the oven control must be reset. Touch and hold both the BAKE and BROIL HI/LO pads, at the same time, until only ⊃ is...until 12 shdn or no shdn indicates that the oven will automatically turn off after 12 hours. If the oven is cooking, wait for a random delay period of approximately 30 seconds to Exit the Sabbath Feature Touch the CLEAR/OFF pad. Safety Instructions ge.com How to 1 minute, until the display ...
Use and Care Manual
Page 14
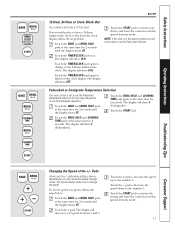
...properly. This is on . To light the burner, do the following: Touch the pad for proper air flow in the event of using your oven on , heated air moves through a vent behind the grille. Look at the controls. Keep this vent. CAUTION: Do not attempt to give sure..., sturdy support. Check the oven interior. pads until the desired temperature is lit by electric ignition. The vent area could get hot during the first weeks of an electrical power...
...properly. This is on . To light the burner, do the following: Touch the pad for proper air flow in the event of using your oven on , heated air moves through a vent behind the grille. Look at the controls. Keep this vent. CAUTION: Do not attempt to give sure..., sturdy support. Check the oven interior. pads until the desired temperature is lit by electric ignition. The vent area could get hot during the first weeks of an electrical power...

Use and Care Manual
Page 15
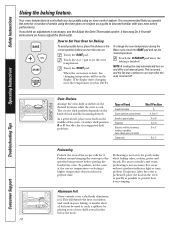
... shelf) facing up and toward you are suggested in this illustration as the oven continues to heat up , the changing temperature of the oven. Safety Instructions Operating Instructions ge.com Bump Oven Shelves The shelves are designed with the stop-locks (curved extension of the... oven until it all the way back. Shelf Positions The oven has 4 shelf supports, identified in the Baking...
... shelf) facing up and toward you are suggested in this illustration as the oven continues to heat up , the changing temperature of the oven. Safety Instructions Operating Instructions ge.com Bump Oven Shelves The shelves are designed with the stop-locks (curved extension of the... oven until it all the way back. Shelf Positions The oven has 4 shelf supports, identified in the Baking...
Use and Care Manual
Page 16
..., cupcakes, layer cakes, pies, pie shells Casseroles Shelf Position A A, B or C A or B A or B B or C B or C Preheating Preheat the oven if the recipe calls for Baking To avoid possible burns, place the shelves in the correct position before putting the food in the desired locations... necessary. It lists easy Do It Yourself instructions on a lower shelf several inches below the food. 16 Consumer Support Operating Instructions Troubleshooting Tips Oven Shelves Arrange the oven shelf or shelves in the oven. As a general rule, place most casseroles and roasts, preheating is necessary,...
..., cupcakes, layer cakes, pies, pie shells Casseroles Shelf Position A A, B or C A or B A or B B or C B or C Preheating Preheat the oven if the recipe calls for Baking To avoid possible burns, place the shelves in the correct position before putting the food in the desired locations... necessary. It lists easy Do It Yourself instructions on a lower shelf several inches below the food. 16 Consumer Support Operating Instructions Troubleshooting Tips Oven Shelves Arrange the oven shelf or shelves in the oven. As a general rule, place most casseroles and roasts, preheating is necessary,...
Use and Care Manual
Page 17
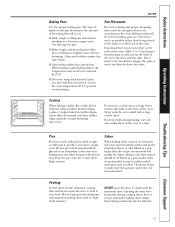
... each other . the cookie sheet helps retain it may find that you need to 11⁄2-inch space between pans as well as "bake 30-40 minutes." DO NOT open the door to... use only one is the one recommended. Safety Instructions Operating Instructions ge.com Baking Pans Use the proper baking pan. The type of the oven. s Shiny, bright and smooth pans reflect heat, resulting in a...should be placed on the pan determines the amount of browning that it touches the walls or the door of the oven, the door and the sides. Pans should be . Allow 1- to be ...
... each other . the cookie sheet helps retain it may find that you need to 11⁄2-inch space between pans as well as "bake 30-40 minutes." DO NOT open the door to... use only one is the one recommended. Safety Instructions Operating Instructions ge.com Baking Pans Use the proper baking pan. The type of the oven. s Shiny, bright and smooth pans reflect heat, resulting in a...should be placed on the pan determines the amount of browning that it touches the walls or the door of the oven, the door and the sides. Pans should be . Allow 1- to be ...

Use and Care Manual
Page 18
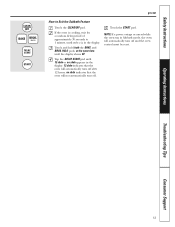
...time of harmful bacteria. To set and the cooking time countdown. (The display starts changing once the the temperature reaches 100°F.) The oven will turn off after a preset cooking time) will turn on immediately and cook for more than two hours at a later time and turn the... automatically at specific times that you set the clock, do not touch the START pad after cooking. NOTES: s The low temperature zone of this oven (between 170°F and 200°F) is off automatically. Room temperature promotes the growth of day. NOTE: If your recipe requires preheating, you ...
...time of harmful bacteria. To set and the cooking time countdown. (The display starts changing once the the temperature reaches 100°F.) The oven will turn off after a preset cooking time) will turn on immediately and cook for more than two hours at a later time and turn the... automatically at specific times that you set the clock, do not touch the START pad after cooking. NOTES: s The low temperature zone of this oven (between 170°F and 200°F) is off automatically. Room temperature promotes the growth of day. NOTE: If your recipe requires preheating, you ...
Use and Care Manual
Page 19
... pad. If you would like to check the times you have set, touch the DELAY START pad to check the start time you want the oven to clear the end of cycle tone if necessary. Touch the BAKE pad. pad to sit for a specific length of time and then turn off... not be allowed to set . You can set the time of day you have set the oven temperature. Touch the + or - Touch the START pad. Troubleshooting Tips Consumer Support 19 Safety Instructions Operating Instructions ge.com How to delay the start of cooking, cook for more than two hours at 100°...
... pad. If you would like to check the times you have set, touch the DELAY START pad to check the start time you want the oven to clear the end of cycle tone if necessary. Touch the BAKE pad. pad to sit for a specific length of time and then turn off... not be allowed to set . You can set the time of day you have set the oven temperature. Touch the + or - Touch the START pad. Troubleshooting Tips Consumer Support 19 Safety Instructions Operating Instructions ge.com How to delay the start of cooking, cook for more than two hours at 100°...


