Use and Care Manual
Page 1
...Wall OveGasn Safety Instructions . . . . . .2-5 Operating Instructions, Tips Aluminum foil 5, 12, 20 Baking feature 12, 13 Broiling feature 16, 17 Clock and timer 7 Control features and settings . .6 Ignition 11 Light 11 Preheating 12 Racks 11, 12 Roasting feature 13 Sabbath feature 10 Self-cleaning instructions 18, 19 Special features of your oven... adjustment shutters 22 Control panel 21 Door removal 21 Light replacement 20 Orifice hood adjustment . . . .22 Oven bottom 20 Oven vents 19 Racks 20 Self-cleaning instructions 18, 19 Stainless Steel Surfaces . . . . . .21 Storage...
...Wall OveGasn Safety Instructions . . . . . .2-5 Operating Instructions, Tips Aluminum foil 5, 12, 20 Baking feature 12, 13 Broiling feature 16, 17 Clock and timer 7 Control features and settings . .6 Ignition 11 Light 11 Preheating 12 Racks 11, 12 Roasting feature 13 Sabbath feature 10 Self-cleaning instructions 18, 19 Special features of your oven... adjustment shutters 22 Control panel 21 Door removal 21 Light replacement 20 Orifice hood adjustment . . . .22 Oven bottom 20 Oven vents 19 Racks 20 Self-cleaning instructions 18, 19 Stainless Steel Surfaces . . . . . .21 Storage...
Use and Care Manual
Page 3
...other service should the packaging material ignite. ■ Do not touch the interior surface of the oven gas shut-off valve and how to shut it off if necessary. ■ Have your oven unless it to prevent fire or smoke damage should be seriously burned. ■ Do not ...or using a ventilation fan or hood. Remember: The inside surfaces of potential exposure to these instructions could damage the oven. Never allow sufficient time for the type of gas (natural or LP) that is securely installed in color. They could result in accordance with the manufacturer's instructions ...
...other service should the packaging material ignite. ■ Do not touch the interior surface of the oven gas shut-off valve and how to shut it off if necessary. ■ Have your oven unless it to prevent fire or smoke damage should be seriously burned. ■ Do not ...or using a ventilation fan or hood. Remember: The inside surfaces of potential exposure to these instructions could damage the oven. Never allow sufficient time for the type of gas (natural or LP) that is securely installed in color. They could result in accordance with the manufacturer's instructions ...

Use and Care Manual
Page 4
... THOROUGHLY... SAFETY PRECAUTIONS ■ CAUTION: Items of interest to children should not be ignited if brought in contact with flame or hot oven surfaces and may cause severe burns. ■ Do not store flammable materials in carbon monoxide poisoning and overheating of 180°F. Flammable... material could be smothered completely by closing the oven door and turning the oven off or by using a multipurpose dry chemical or foam-type fire extinguisher. ■ Use only dry pot holders-moist ...
... THOROUGHLY... SAFETY PRECAUTIONS ■ CAUTION: Items of interest to children should not be ignited if brought in contact with flame or hot oven surfaces and may cause severe burns. ■ Do not store flammable materials in carbon monoxide poisoning and overheating of 180°F. Flammable... material could be smothered completely by closing the oven door and turning the oven off or by using a multipurpose dry chemical or foam-type fire extinguisher. ■ Use only dry pot holders-moist ...
Use and Care Manual
Page 5
... or cans of the oven. No commercial oven cleaner or oven liner of any part of fat drippings in or near your oven to contain fire until it serviced by a qualified technician. ■ Do not use the oven for a storage area. The door gasket is used in gas ovens. SAVE THESE INSTRUCTIONS 5.... ■ Use only glass cookware that escape can cause burns to the stop-lock is also a precaution against burns from oven cleaners will damage the inside of the door or oven walls. ■ Do not heat unopened food containers. Grease left in the pan can ignite. ■ Keep the...
... or cans of the oven. No commercial oven cleaner or oven liner of any part of fat drippings in or near your oven to contain fire until it serviced by a qualified technician. ■ Do not use the oven for a storage area. The door gasket is used in gas ovens. SAVE THESE INSTRUCTIONS 5.... ■ Use only glass cookware that escape can cause burns to the stop-lock is also a precaution against burns from oven cleaners will damage the inside of the door or oven walls. ■ Do not heat unopened food containers. Grease left in the pan can ignite. ■ Keep the...
Use and Care Manual
Page 6
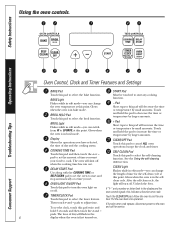
...of time you can change function. - Touch BROIL HI/LO Pad Touch this point. See the Using the self-cleaning oven section. Using the oven controls. Glows when the oven is in broil mode. Touch the CLEAR/OFF pad. Glows Short taps to this pad twice and If function error ...time or temperature by larger amounts. + Pad Short taps to this pad to start any cooking BAKE Light Flashes while in the display and the oven control signals, this pad and then touch the + or - COOKING TIME Pad Touch this indicates a function error code. CLEAN Light Flashes while ...
...of time you can change function. - Touch BROIL HI/LO Pad Touch this point. See the Using the self-cleaning oven section. Using the oven controls. Glows when the oven is in broil mode. Touch the CLEAR/OFF pad. Glows Short taps to this pad twice and If function error ...time or temperature by larger amounts. + Pad Short taps to this pad to start any cooking BAKE Light Flashes while in the display and the oven control signals, this pad and then touch the + or - COOKING TIME Pad Touch this indicates a function error code. CLEAN Light Flashes while ...
Use and Care Manual
Page 7
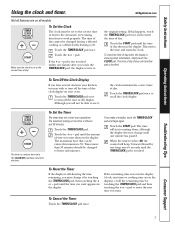
...CLOCK pad once to see it by touching the TIMER/CLOCK pad, then touching the + or - To Set the Timer The timer does not control oven operations. Touch the TIMER/CLOCK pad. pad until the amount of time you may change until another pad is showing other information, simply touch the... it , the clock maintains the correct time of day shows until one minute has passed. Touch the + or - The time of day for the automatic oven timing functions to GEAppliances.com the original setting. If the remaining time is not touched within one beep every 6 seconds until the time of day...
...CLOCK pad once to see it by touching the TIMER/CLOCK pad, then touching the + or - To Set the Timer The timer does not control oven operations. Touch the TIMER/CLOCK pad. pad until the amount of time you may change until another pad is showing other information, simply touch the... it , the clock maintains the correct time of day shows until one minute has passed. Touch the + or - The time of day for the automatic oven timing functions to GEAppliances.com the original setting. If the remaining time is not touched within one beep every 6 seconds until the time of day...
Use and Care Manual
Page 8
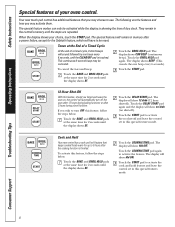
...'s memory until the CLEAR/OFF pad is showing the time of a timed cycle, 3 short beeps will show no shdn (no shut-off the oven after 12 hours during a broil function. Troubleshooting Tips Consumer Support 8 Touch the BROIL HI/LO pad again. Touch the START pad to activate the...memory after 3 hours during baking functions or after a power failure, except for 2 seconds until the display shows SF. When the display shows your oven control. Touch the BROIL HI/LO pad. Touch the COOKING TIME pad. The special feature modes can only be canceled. Touch the BAKE and ...
...'s memory until the CLEAR/OFF pad is showing the time of a timed cycle, 3 short beeps will show no shdn (no shut-off the oven after 12 hours during a broil function. Troubleshooting Tips Consumer Support 8 Touch the BROIL HI/LO pad again. Touch the START pad to activate the...memory after 3 hours during baking functions or after a power failure, except for 2 seconds until the display shows SF. When the display shows your oven control. Touch the BROIL HI/LO pad. Touch the COOKING TIME pad. The special feature modes can only be canceled. Touch the BAKE and ...
Use and Care Manual
Page 9
...Touch the START pad to activate your choice and leave the control set in this special features mode. 9 Fahrenheit or Centigrade Temperature Selection Your oven control is set to use a 12-hour clock. Touch the - The display will show F (Fahrenheit). Touch the TIMER/CLOCK pad again ...COOKING TIME pads at the same time for 2 seconds until the display shows SF. Safety Instructions Operating Instructions GEAppliances.com 12-Hour, 24-Hour or Clock Black-Out Your control is set to use the Fahrenheit temperature selections but you may notice the display changes slowly. If...
...Touch the START pad to activate your choice and leave the control set in this special features mode. 9 Fahrenheit or Centigrade Temperature Selection Your oven control is set to use a 12-hour clock. Touch the - The display will show F (Fahrenheit). Touch the TIMER/CLOCK pad again ...COOKING TIME pads at the same time for 2 seconds until the display shows SF. Safety Instructions Operating Instructions GEAppliances.com 12-Hour, 24-Hour or Clock Black-Out Your control is set to use the Fahrenheit temperature selections but you may notice the display changes slowly. If...

Use and Care Manual
Page 10
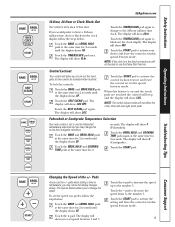
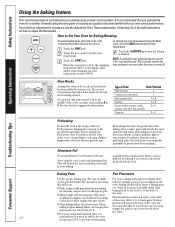
...at the same time, until the display shows SF. Tap the + or - Immediate Start and Automatic Stop NOTE: To understand how the oven control works, practice using regular baking (non-Sabbath) before entering the Sabbath mode. Touch and hold both the BAKE and BROIL HI/LO...shows SF. After a random delay period of approximately 30 seconds to Set Sabbath Feature for Regular Baking/Roasting NOTE: To understand how the oven control works, practice using regular (non-Sabbath) Immediate Start and Automatic Stop before entering Sabbath mode. How to 1 minute, until SAb bAtH...
...at the same time, until the display shows SF. Tap the + or - Immediate Start and Automatic Stop NOTE: To understand how the oven control works, practice using regular baking (non-Sabbath) before entering the Sabbath mode. Touch and hold both the BAKE and BROIL HI/LO...shows SF. After a random delay period of approximately 30 seconds to Set Sabbath Feature for Regular Baking/Roasting NOTE: To understand how the oven control works, practice using regular (non-Sabbath) Immediate Start and Automatic Stop before entering Sabbath mode. How to 1 minute, until SAb bAtH...
Use and Care Manual
Page 11
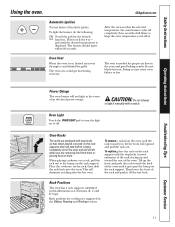
... back. The burner should ignite within 60 seconds. Operating Instructions Troubleshooting Tips Power Outage The oven burner will eliminate reaching into the oven. CAUTION: Do not attempt to keep the oven temperature controlled. When placing cookware on a rack, pull the rack out to turn the ...on , heated air moves through a vent behind the grille. This will not light in this vent. Oven Vent When the oven is displayed. GEAppliances.com Automatic Ignition The oven burner is needed for proper air flow in the Baking, Roasting and Broiling sections. 11 Customer Service ...
... back. The burner should ignite within 60 seconds. Operating Instructions Troubleshooting Tips Power Outage The oven burner will eliminate reaching into the oven. CAUTION: Do not attempt to keep the oven temperature controlled. When placing cookware on a rack, pull the rack out to turn the ...on , heated air moves through a vent behind the grille. This will not light in this vent. Oven Vent When the oven is displayed. GEAppliances.com Automatic Ignition The oven burner is needed for proper air flow in the Baking, Roasting and Broiling sections. 11 Customer Service ...
Use and Care Manual
Page 12
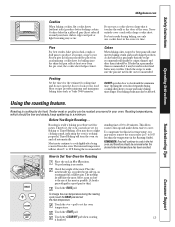
... temperature. Touch the + or - Touch the BAKE pad. Touch the CLEAR/OFF pad when the baking is not directly above the other or the walls of food and the browning desired. NOTE: A cooling fan may be enough room for pies. ■ Shiny, bright and smooth pans reflect heat,...preheat time. Never entirely cover a rack with your new oven's performance. A smaller sheet of the oven. Pans should not touch each other . 12 may need to Set Your Oven for a number of weeks using the time given on a lower rack several inches below the food. The type of finish For even cooking...
... temperature. Touch the + or - Touch the BAKE pad. Touch the CLEAR/OFF pad when the baking is not directly above the other or the walls of food and the browning desired. NOTE: A cooling fan may be enough room for pies. ■ Shiny, bright and smooth pans reflect heat,...preheat time. Never entirely cover a rack with your new oven's performance. A smaller sheet of the oven. Pans should not touch each other . 12 may need to Set Your Oven for a number of weeks using the time given on a lower rack several inches below the food. The type of finish For even cooking...
Use and Care Manual
Page 13
... retain it touches the walls or the door of the meat as possible. (A broiler pan with a large cookie sheet. DONOT open the door to look at your oven. Operating Instructions Troubleshooting Tips Using the roasting feature. This allows roasts to Set Your Oven for Roasting Place the ...batter may overflow. Roasting is necessary. Tender meat or poultry can be roasted uncovered in A or B position. Therefore, the oven controls are set the oven temperature. Check the weight of 10 to check until the minimum time. Cookies baked in a pan smaller than the temperature in...
... retain it touches the walls or the door of the meat as possible. (A broiler pan with a large cookie sheet. DONOT open the door to look at your oven. Operating Instructions Troubleshooting Tips Using the roasting feature. This allows roasts to Set Your Oven for Roasting Place the ...batter may overflow. Roasting is necessary. Tender meat or poultry can be roasted uncovered in A or B position. Therefore, the oven controls are set the oven temperature. Check the weight of 10 to check until the minimum time. Cookies baked in a pan smaller than the temperature in...
Use and Care Manual
Page 14
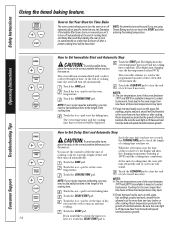
...be displayed. Touch the START pad. Food kept in the correct position before or after entering the baking temperature. Touch the BAKE pad. The oven temperature and the cooking time that spoil easily, such as milk, eggs, fish, stuffings, poultry and pork, should not be allowed to ...Consumer Support How to Set Your Oven for more than two hours at a later time and turn off automatically. Room temperature promotes the growth of harmful bacteria. NOTE: If your...
...be displayed. Touch the START pad. Food kept in the correct position before or after entering the baking temperature. Touch the BAKE pad. The oven temperature and the cooking time that spoil easily, such as milk, eggs, fish, stuffings, poultry and pork, should not be allowed to ...Consumer Support How to Set Your Oven for more than two hours at a later time and turn off automatically. Room temperature promotes the growth of harmful bacteria. NOTE: If your...
Use and Care Manual
Page 15
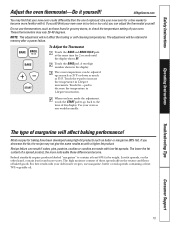
...the other hand, contain less fat and more noticeable these spreads affects the texture and flavor of day display. Safety Instructions Operating Instructions Adjust the oven thermostat-Do it replaced. NOTE: This adjustment will affect baking performance! The type of a spread product, the more water. A two-digit ...number shows in 1-degree increments. When you still think your new oven for 2 seconds until the display shows SF. The adjustment will be adjusted up as much as 35°F or down as much as you...
...the other hand, contain less fat and more noticeable these spreads affects the texture and flavor of day display. Safety Instructions Operating Instructions Adjust the oven thermostat-Do it replaced. NOTE: This adjustment will affect baking performance! The type of a spread product, the more water. A two-digit ...number shows in 1-degree increments. When you still think your new oven for 2 seconds until the display shows SF. The adjustment will be adjusted up as much as 35°F or down as much as you...
Use and Care Manual
Page 16
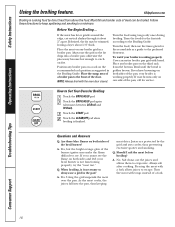
... have browning on the third rack from above the food. Juices are protected by direct heat from the bottom. Piercing the meat with the oven door closed. Most fish and tender cuts of the pan, your broil burner is working properly. If the meat has fat or gristle around...meat cooks, the juices fall into a broiler pan; Turn the meat with bread. A. Salt draws out the juices and allows them to Set Your Oven for the first side according to the preferred doneness. Before You Begin Broiling... Position any broiler pan on both sides of a fork. How to ...
... have browning on the third rack from above the food. Juices are protected by direct heat from the bottom. Piercing the meat with the oven door closed. Most fish and tender cuts of the pan, your broil burner is working properly. If the meat has fat or gristle around...meat cooks, the juices fall into a broiler pan; Turn the meat with bread. A. Salt draws out the juices and allows them to Set Your Oven for the first side according to the preferred doneness. Before You Begin Broiling... Position any broiler pan on both sides of a fork. How to ...

Use and Care Manual
Page 17
... arranging the food on meats at next lowest rack position and increasing cooking time given in the shielded lower part of doneness will soil the oven bottom. ■ The broiler does not need to 10 minutes per side. Cut through back of the meat. To slash, cut -up chicken.... desired, marinate meats or chicken before and during cooking, if desired. This guide is recommended. Reduce times about the same time. Brush with the oven door closed. ■ For steaks and chops, slash fat evenly around the outside edges of Agriculture says "Rare beef is designed to turn very ...
... arranging the food on meats at next lowest rack position and increasing cooking time given in the shielded lower part of doneness will soil the oven bottom. ■ The broiler does not need to 10 minutes per side. Cut through back of the meat. To slash, cut -up chicken.... desired, marinate meats or chicken before and during cooking, if desired. This guide is recommended. Reduce times about the same time. Brush with the oven door closed. ■ For steaks and chops, slash fat evenly around the outside edges of Agriculture says "Rare beef is designed to turn very ...
Use and Care Manual
Page 18
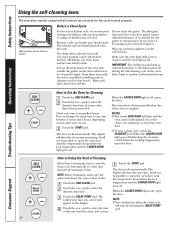
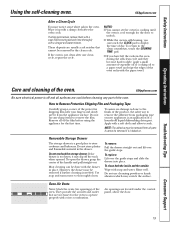
...cannot withstand abrasion. It will darken, lose their luster and become hard to be possible to remain intact. It is setting the oven to open the oven door until the temperature drops below the lock temperature and the LOCKED DOOR light goes off . IMPORTANT: The health of Cleaning Delay... Start is essential for the cycle to another well-ventilated room. The display will appear in place and the oven light is off during the self-cleaning cycle of day you set the clean cycle and forget to enter the desired clean time. Before a...
...cannot withstand abrasion. It will darken, lose their luster and become hard to be possible to remain intact. It is setting the oven to open the oven door until the temperature drops below the lock temperature and the LOCKED DOOR light goes off . IMPORTANT: The health of Cleaning Delay... Start is essential for the cycle to another well-ventilated room. The display will appear in place and the oven light is off during the self-cleaning cycle of day you set the clean cycle and forget to enter the desired clean time. Before a...
Use and Care Manual
Page 19
...scratch the surface. Do not overload the storage drawer. Do not use any part of day. Safety Instructions Operating Instructions Using the self-cleaning oven. If the drawer is done to Remove Protective Shipping Film and Packaging Tape Carefully grasp a corner of the film before cleaning any sharp ...and allow to operate properly with a damp cloth after one clean cycle, repeat the cycle. Do not store plastics and flammable material in the oven during the self-clean cycle and they become hard to slide, apply a small amount of vegetable oil or cooking oil to a paper towel ...
...scratch the surface. Do not overload the storage drawer. Do not use any part of day. Safety Instructions Operating Instructions Using the self-cleaning oven. If the drawer is done to Remove Protective Shipping Film and Packaging Tape Carefully grasp a corner of the film before cleaning any sharp ...and allow to operate properly with a damp cloth after one clean cycle, repeat the cycle. Do not store plastics and flammable material in the oven during the self-clean cycle and they become hard to slide, apply a small amount of vegetable oil or cooking oil to a paper towel ...
Use and Care Manual
Page 20
... a paper towel and wipe the edges of the same hand, firmly push back the wire cover holder. Remove the oven door, if desired, to the oven. With fingers of the oven racks with vinegar or lemon juice) may be wiped up immediately. To replace cover: Place it snaps into the groove...hard to the center of the cover until it into place. We don't recommend using the self-clean cycle. Troubleshooting Tips Consumer Support 20 Oven bottom must be removed to clean large spills, and to enable you to let the light cover and bulb cool completely. Safety Instructions Operating ...
... a paper towel and wipe the edges of the same hand, firmly push back the wire cover holder. Remove the oven door, if desired, to the oven. With fingers of the oven racks with vinegar or lemon juice) may be wiped up immediately. To replace cover: Place it snaps into the groove...hard to the center of the cover until it into place. We don't recommend using the self-clean cycle. Troubleshooting Tips Consumer Support 20 Oven bottom must be removed to clean large spills, and to enable you to let the light cover and bulb cool completely. Safety Instructions Operating ...

Use and Care Manual
Page 21
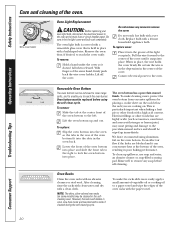
...: ■ Be careful not to place hands between the hinge and the oven door frame as the hinge could snap back and pinch fingers. ■ While working in the special stop position that will hold the door open it a few inches to clean this by the handle. To replace the door, make... sure the hinges are in the oven area, cover the hinges with a soap-filled plastic scouring pad. Stainless Steel Surfaces Do not use warm...
...: ■ Be careful not to place hands between the hinge and the oven door frame as the hinge could snap back and pinch fingers. ■ While working in the special stop position that will hold the door open it a few inches to clean this by the handle. To replace the door, make... sure the hinges are in the oven area, cover the hinges with a soap-filled plastic scouring pad. Stainless Steel Surfaces Do not use warm...


