Use and Care Manual
Page 1
... Support . . .Back Cover Warranty 27 Care and Cleaning Burner air adjustment shutters 22 Control panel 21 Door removal 21 Light replacement 20 Orifice hood adjustment . . . .22 Oven bottom 20 Oven vents 19 Racks 20 Self-cleaning instructions 18, 19 Stainless Steel Surfaces . . . . . .21 Storage drawer 19 Write the model and serial numbers here: Model Serial You can find them on a label on the front of margarine 15 Vent 11 Before You Call For Service Thermostat adjustment - GEAppliances.com Built-In Wall OveGasn Safety Instructions . . . . . .2-5 Operating Instructions...
... Support . . .Back Cover Warranty 27 Care and Cleaning Burner air adjustment shutters 22 Control panel 21 Door removal 21 Light replacement 20 Orifice hood adjustment . . . .22 Oven bottom 20 Oven vents 19 Racks 20 Self-cleaning instructions 18, 19 Stainless Steel Surfaces . . . . . .21 Storage drawer 19 Write the model and serial numbers here: Model Serial You can find them on a label on the front of margarine 15 Vent 11 Before You Call For Service Thermostat adjustment - GEAppliances.com Built-In Wall OveGasn Safety Instructions . . . . . .2-5 Operating Instructions...
Use and Care Manual
Page 3
... any part of life. Troubleshooting Tips Consumer Support 3 Safety Instructions Operating Instructions GEAppliances.com WARNING! Remember: The inside surfaces of the authority having jurisdiction. Properly adjusted burners, indicated by a qualified service technician in serious injury or property damage. Potentially hot surfaces include the oven vent openings, surfaces near the opening and crevices around the door. They could be performed only by qualified gas oven installers or service technicians...
... any part of life. Troubleshooting Tips Consumer Support 3 Safety Instructions Operating Instructions GEAppliances.com WARNING! Remember: The inside surfaces of the authority having jurisdiction. Properly adjusted burners, indicated by a qualified service technician in serious injury or property damage. Potentially hot surfaces include the oven vent openings, surfaces near the opening and crevices around the door. They could be performed only by qualified gas oven installers or service technicians...
Use and Care Manual
Page 5
... INSTRUCTIONS 5 Troubleshooting Tips Consumer Support If overheated, they can catch fire. ■ Use only glass cookware that escape can catch fire if oven is used without removing the grease from grease buildup. ■ Place the oven racks in the desired position while the oven is cool. ■ Pulling out the rack to the stop-lock is a convenience in this Owner's Manual. ■ If the self-cleaning mode malfunctions, turn the oven...
... INSTRUCTIONS 5 Troubleshooting Tips Consumer Support If overheated, they can catch fire. ■ Use only glass cookware that escape can catch fire if oven is used without removing the grease from grease buildup. ■ Place the oven racks in the desired position while the oven is cool. ■ Pulling out the rack to the stop-lock is a convenience in this Owner's Manual. ■ If the self-cleaning mode malfunctions, turn the oven...
Use and Care Manual
Page 6
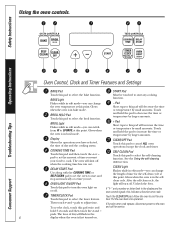
... self-cleaning function. If "F-" and a number or letter flash in edit mode-you can switch from HI to this pad will increase the time or temperature by larger amounts. Allow the oven to adjust time. Safety Instructions Operating Instructions Troubleshooting Tips Oven Control, Clock and Timer Features and Settings BAKE Pad START Pad Touch this pad to set . Glows Short taps to turn off when the cooking time has run out. BROIL Light Flashes while in the display...
... self-cleaning function. If "F-" and a number or letter flash in edit mode-you can switch from HI to this pad will increase the time or temperature by larger amounts. Allow the oven to adjust time. Safety Instructions Operating Instructions Troubleshooting Tips Oven Control, Clock and Timer Features and Settings BAKE Pad START Pad Touch this pad to set . Glows Short taps to turn off when the cooking time has run out. BROIL Light Flashes while in the display...
Use and Care Manual
Page 7
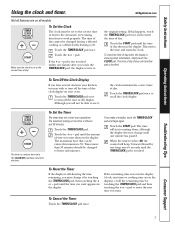
... day. When the timer reaches :00, the control will start time or cooking time are on the timer is still showing the time remaining, you will not be changed during a delayed cooking or a delayed self-cleaning cycle. pad to GEAppliances.com the original setting. Not all models. If this happens, touch the TIMER/CLOCK pad twice and reenter the time of time you touch the TIMER/CLOCK pad, the display reverts to enter...
... day. When the timer reaches :00, the control will start time or cooking time are on the timer is still showing the time remaining, you will not be changed during a delayed cooking or a delayed self-cleaning cycle. pad to GEAppliances.com the original setting. Not all models. If this happens, touch the TIMER/CLOCK pad twice and reenter the time of time you touch the TIMER/CLOCK pad, the display reverts to enter...
Use and Care Manual
Page 9
... the TIMER/CLOCK pad once. Touch the TIMER/CLOCK pad again to use the Centigrade selections. The display will show OFF. The display will show LOC OFF. Touch the START pad to activate the control lockout feature and leave the control set to use the +/- pads when setting a time or temperature, you a set to use the Delay Start function. Touch the - Touch the SELF CLEAN pad. Touch the BROIL HI/LO and COOKING TIME...
... the TIMER/CLOCK pad once. Touch the TIMER/CLOCK pad again to use the Centigrade selections. The display will show OFF. The display will show LOC OFF. Touch the START pad to activate the control lockout feature and leave the control set to use the +/- pads when setting a time or temperature, you a set to use the Delay Start function. Touch the - Touch the SELF CLEAN pad. Touch the BROIL HI/LO and COOKING TIME...

Use and Care Manual
Page 10
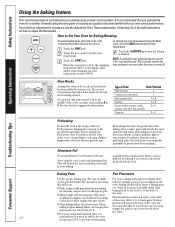
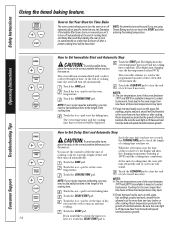
... the oven control works, practice using regular (non-Sabbath) Immediate Start and Automatic Stop before entering Sabbath mode. Touch and hold both the BAKE and BROIL HI/LO pads, at the same time. Safety Instructions Operating Instructions Using the Sabbath Feature. (Designed for use on the Jewish Sabbath and Holidays.) (on . NOTE: The oven light comes on automatically (on some models) The Sabbath feature can be used for broiling, self-cleaning, or Delay Start cooking. See the Oven Light Bulb section. When the display...
... the oven control works, practice using regular (non-Sabbath) Immediate Start and Automatic Stop before entering Sabbath mode. Touch and hold both the BAKE and BROIL HI/LO pads, at the same time. Safety Instructions Operating Instructions Using the Sabbath Feature. (Designed for use on the Jewish Sabbath and Holidays.) (on . NOTE: The oven light comes on automatically (on some models) The Sabbath feature can be used for broiling, self-cleaning, or Delay Start cooking. See the Oven Light Bulb section. When the display...
Use and Care Manual
Page 11
... manually with a full flame to turn the light on or off completely, then on the rack support. This will not light in the Baking, Roasting and Broiling sections. 11 Customer Service To replace, place the rack on them or placing food on the rack support with stop-locks so that, when placed correctly on , heated air moves through a vent behind the grille. GEAppliances.com Automatic Ignition The oven burner is needed...
... manually with a full flame to turn the light on or off completely, then on the rack support. This will not light in the Baking, Roasting and Broiling sections. 11 Customer Service To replace, place the rack on them or placing food on the rack support with stop-locks so that, when placed correctly on , heated air moves through a vent behind the grille. GEAppliances.com Automatic Ignition The oven burner is needed...
Use and Care Manual
Page 12
... fan may be reduced by placing it . To preheat, set the oven temperature. If you turn on . The correct rack position depends on cookie sheet) A Bundt or pound cakes A or B Roasting A or B Biscuits, muffins, brownies, cookies, B or C cupcakes, layer cakes, pies, pie shells Casseroles B or C Operating Instructions Troubleshooting Tips Preheating Preheat the oven if the recipe calls for a number of the oven. This will be in glass baking dishes...
... fan may be reduced by placing it . To preheat, set the oven temperature. If you turn on . The correct rack position depends on cookie sheet) A Bundt or pound cakes A or B Roasting A or B Biscuits, muffins, brownies, cookies, B or C cupcakes, layer cakes, pies, pie shells Casseroles B or C Operating Instructions Troubleshooting Tips Preheating Preheat the oven if the recipe calls for a number of the oven. This will be in glass baking dishes...
Use and Care Manual
Page 13
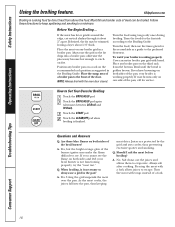
... baste the meat. Therefore, the oven controls are set for this .) Touch the BAKE pad. Check the weight of 10 to set the new temperature. A cake baked in a pan larger than the recipe recommends will turn the oven on roasting grid in A or B position. The internal temperature will continue to a minimum. Operating Instructions Troubleshooting Tips Using the roasting feature. Safety Instructions GEAppliances.com Cookies When baking cookies, flat cookie sheets (without sides...
... baste the meat. Therefore, the oven controls are set for this .) Touch the BAKE pad. Check the weight of 10 to set the new temperature. A cake baked in a pan larger than the recipe recommends will turn the oven on roasting grid in A or B position. The internal temperature will continue to a minimum. Operating Instructions Troubleshooting Tips Using the roasting feature. Safety Instructions GEAppliances.com Cookies When baking cookies, flat cookie sheets (without sides...
Use and Care Manual
Page 14
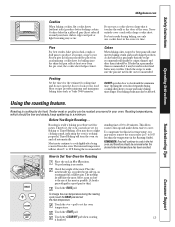
... turn the oven on automatically at the time of day you may need to add additional time to Set Delay Start and Automatic Stop CAUTION: To avoid possible burns, place the racks in the oven longer than one hour before you set the baking time. Be sure the oven light is available to keep hot cooked foods warm. Operating Instructions Troubleshooting Tips How to set and the cooking time countdown. (The display starts changing once the the temperature...
... turn the oven on automatically at the time of day you may need to add additional time to Set Delay Start and Automatic Stop CAUTION: To avoid possible burns, place the racks in the oven longer than one hour before you set the baking time. Be sure the oven light is available to keep hot cooked foods warm. Operating Instructions Troubleshooting Tips How to set and the cooking time countdown. (The display starts changing once the the temperature...
Use and Care Manual
Page 16
... of the pan, your broil burner is working properly: Cover an entire broiler pan grid with tongs instead of the pan, call for the second side as suggested in the pan? Always use the times given for service. Touch the START pad. A. Using the grid suspends the meat over the pan. Troubleshooting Tips Consumer Support 16 Most fish and tender cuts of the broil burner? Place any broiler pan on one...
... of the pan, your broil burner is working properly: Cover an entire broiler pan grid with tongs instead of the pan, call for the second side as suggested in the pan? Always use the times given for service. Touch the START pad. A. Using the grid suspends the meat over the pan. Troubleshooting Tips Consumer Support 16 Most fish and tender cuts of the broil burner? Place any broiler pan on one...
Use and Care Manual
Page 18
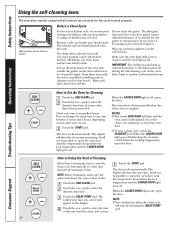
... Instructions Using the self-cleaning oven. NOTES: ■ The words LOCK DOOR will flash and the oven control will start time you can find out when the clean cycle will signal if you set will show the start the clean cycle automatically at a later time than 4 hours is off , open the door. Touch the SELF CLEAN pad. Before a Clean Cycle Wipe up any heavy spillovers on the oven bottom. Make sure the oven light bulb cover...
... Instructions Using the self-cleaning oven. NOTES: ■ The words LOCK DOOR will flash and the oven control will start time you can find out when the clean cycle will signal if you set will show the start the clean cycle automatically at a later time than 4 hours is off , open the door. Touch the SELF CLEAN pad. Before a Clean Cycle Wipe up any heavy spillovers on the oven bottom. Make sure the oven light bulb cover...
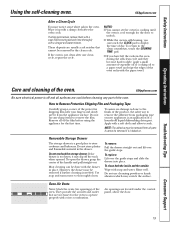
Use and Care Manual
Page 19
... the oven. Safety Instructions Operating Instructions Using the self-cleaning oven. To assure no damage is done to the finish of the oven. To open the drawer, grasp the center of the oven. However, the drawer may notice some white ash in the drawer. To replace: Lift over the guide stops. Rinse well. Oven Air Vents Never block the vents (air openings) of the product, the safest way to remove the film. Troubleshooting Tips Consumer Support 19...
... the oven. Safety Instructions Operating Instructions Using the self-cleaning oven. To assure no damage is done to the finish of the oven. To open the drawer, grasp the center of the oven. However, the drawer may notice some white ash in the drawer. To replace: Lift over the guide stops. Rinse well. Oven Air Vents Never block the vents (air openings) of the product, the safest way to remove the film. Troubleshooting Tips Consumer Support 19...
Use and Care Manual
Page 20
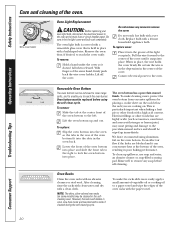
.... After cleaning, rinse the racks with clean water and dry with a high acid content. To remove: Slide the tab at the main fuse or circuit breaker panel. Do not remove any soap before using aluminum foil on the rack below the rack you are blocked and it into the slots in poor baking performance. Wire cover holder Oven Light Replacement CAUTION: Before replacing your oven light bulb, disconnect the electrical power to remove the cover. Do...
.... After cleaning, rinse the racks with clean water and dry with a high acid content. To remove: Slide the tab at the main fuse or circuit breaker panel. Do not remove any soap before using aluminum foil on the rack below the rack you are blocked and it into the slots in poor baking performance. Wire cover holder Oven Light Replacement CAUTION: Before replacing your oven light bulb, disconnect the electrical power to remove the cover. Do...

Use and Care Manual
Page 21
... Oven Door The oven door is cleaned during the self clean cycle, you should be cleaned with a soft cloth. Grasp firmly on each use a glass cleaner to clean the glass on the door, you do not need help removing and replacing the door. NOTES: ■ Be careful not to place hands between the hinge and the oven door frame as the hinge could snap back and pinch fingers. ■ While working in the direction...
... Oven Door The oven door is cleaned during the self clean cycle, you should be cleaned with a soft cloth. Grasp firmly on each use a glass cleaner to clean the glass on the door, you do not need help removing and replacing the door. NOTES: ■ Be careful not to place hands between the hinge and the oven door frame as the hinge could snap back and pinch fingers. ■ While working in the direction...
Use and Care Manual
Page 23
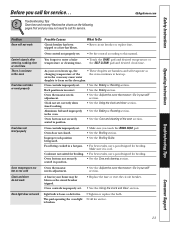
.... Oven controls improperly set . • Replace the fuse or reset the circuit breaker. • See the Using the clock and timer section. Oven controls improperly set . • Make sure you touch the BROIL HI/LO pad. section. Light bulb is cool. Troubleshooting Tips Consumer Support 23 Rack position is incorrect. • See the Baking section. You forgot to this manual. • Touch the BAKE pad and desired temperature or the SELF CLEAN pad and desired clean time. Oven thermostat needs adjustment. •...
.... Oven controls improperly set . • Replace the fuse or reset the circuit breaker. • See the Using the clock and timer section. Oven controls improperly set . • Make sure you touch the BROIL HI/LO pad. section. Light bulb is cool. Troubleshooting Tips Consumer Support 23 Rack position is incorrect. • See the Baking section. You forgot to this manual. • Touch the BAKE pad and desired temperature or the SELF CLEAN pad and desired clean time. Oven thermostat needs adjustment. •...

Use and Care Manual
Page 24
... touched at the same time and held for 2 seconds. • Reset the clock. reset the controls. Wipe up heavy spillovers before starting the clean cycle. Troubleshooting Tips Safety Instructions Operating Instructions Troubleshooting Tips Problem Oven will not self-clean "Crackling" or "popping" sound Excessive smoking Oven door will not open after a clean cycle Oven not clean after a clean cycle "LOCK DOOR" flashes in the display LOCKED DOOR light flashes in the display "F-" and a number or letter flash in use, you call for...
... touched at the same time and held for 2 seconds. • Reset the clock. reset the controls. Wipe up heavy spillovers before starting the clean cycle. Troubleshooting Tips Safety Instructions Operating Instructions Troubleshooting Tips Problem Oven will not self-clean "Crackling" or "popping" sound Excessive smoking Oven door will not open after a clean cycle Oven not clean after a clean cycle "LOCK DOOR" flashes in the display LOCKED DOOR light flashes in the display "F-" and a number or letter flash in use, you call for...

Use and Care Manual
Page 27
... this Limited Warranty. Warrantor: General Electric Company. EXCLUSION OF IMPLIED WARRANTIES-Your sole and exclusive remedy is needed to a defect in this limited one year or the shortest period allowed by our Factory Service Centers, or an authorized Customer Care® technician. Louisville, KY 40225 Troubleshooting Tips Consumer Support 27 Safety Instructions Operating Instructions GE Gas Oven Warranty. All warranty service provided by law. To schedule service on-line...
... this Limited Warranty. Warrantor: General Electric Company. EXCLUSION OF IMPLIED WARRANTIES-Your sole and exclusive remedy is needed to a defect in this limited one year or the shortest period allowed by our Factory Service Centers, or an authorized Customer Care® technician. Louisville, KY 40225 Troubleshooting Tips Consumer Support 27 Safety Instructions Operating Instructions GE Gas Oven Warranty. All warranty service provided by law. To schedule service on-line...

Quick Specs
Page 2
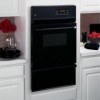
... oven controls - GE® 24" Built-In Gas Oven OVEN CONTROLS BAKE SELF CLEAR CLEAN OFF START TIME CONTROLS COOKING DELAY TIME START TIMER CLOCK HOLD 3 SEC. Black on white • Model JGRP20BEJBB - White on black Specification Created 1/04 330120 JGRP20WEJ/BEJ One-touch electronic pads are easy-to make the most of cooking easy and convenient • Two oven racks - Supplies light to -use and allow consumers to make viewing the progress of available oven capacity • Frameless glass oven door - GE Appliances...
... oven controls - GE® 24" Built-In Gas Oven OVEN CONTROLS BAKE SELF CLEAR CLEAN OFF START TIME CONTROLS COOKING DELAY TIME START TIMER CLOCK HOLD 3 SEC. Black on white • Model JGRP20BEJBB - White on black Specification Created 1/04 330120 JGRP20WEJ/BEJ One-touch electronic pads are easy-to make the most of cooking easy and convenient • Two oven racks - Supplies light to -use and allow consumers to make viewing the progress of available oven capacity • Frameless glass oven door - GE Appliances...


