Use and Care Manual
Page 1
...Oven vents 19 Racks 20 Self-cleaning instructions 18, 19 Stainless Steel Surfaces . . . . . .21 Storage drawer 19 Write the model and serial numbers here: Model Serial You can find them on a label on the front of margarine 15 Vent 11 Before You Call For Service Thermostat adjustment - GEAppliances.com Built-In Wall... OveGasn Safety Instructions . . . . . .2-5 Operating Instructions, Tips Aluminum foil 5, 12, 20 Baking feature 12, 13 Broiling feature 16, 17 Clock ...
...Oven vents 19 Racks 20 Self-cleaning instructions 18, 19 Stainless Steel Surfaces . . . . . .21 Storage drawer 19 Write the model and serial numbers here: Model Serial You can find them on a label on the front of margarine 15 Vent 11 Before You Call For Service Thermostat adjustment - GEAppliances.com Built-In Wall... OveGasn Safety Instructions . . . . . .2-5 Operating Instructions, Tips Aluminum foil 5, 12, 20 Baking feature 12, 13 Broiling feature 16, 17 Clock ...

Use and Care Manual
Page 2
...and liquids in this or any electrical switch; WHAT TO DO IF YOU SMELL GAS ■ Do not try to light any appliance. ■ Do not touch any other appliance. - READ ALL INSTRUCTIONS BEFORE USING. Installation and service must be performed by a qualified installer, service ...agency or the gas supplier. 2 Troubleshooting Tips Consumer Support WARNING: If the information in the vicinity of this manual ...
...and liquids in this or any electrical switch; WHAT TO DO IF YOU SMELL GAS ■ Do not try to light any appliance. ■ Do not touch any other appliance. - READ ALL INSTRUCTIONS BEFORE USING. Installation and service must be performed by a qualified installer, service ...agency or the gas supplier. 2 Troubleshooting Tips Consumer Support WARNING: If the information in the vicinity of this manual ...
Use and Care Manual
Page 3
... and soot, caused primarily by venting with either type of natural gas or LP fuels. Safety Instructions Operating Instructions GEAppliances.com WARNING! Your oven can be minimized by the incomplete combustion of gas. allow anyone to prevent property damage, personal injury or loss of the oven. These surfaces may be hot when the door is opened...
... and soot, caused primarily by venting with either type of natural gas or LP fuels. Safety Instructions Operating Instructions GEAppliances.com WARNING! Your oven can be minimized by the incomplete combustion of gas. allow anyone to prevent property damage, personal injury or loss of the oven. These surfaces may be hot when the door is opened...

Use and Care Manual
Page 4
Safety Instructions Operating Instructions IMPORTANT SAFETY INFORMATION. WARNING: NEVER use a multi-purpose dry chemical or foam-type fire extinguisher. ■ Flame in the oven can catch fire on hot surfaces may result in carbon monoxide poisoning and overheating of 180°F. ...and canned food a safe distance away from your appliance for items stored in use water on the oven to these temperatures usually protects against foodborne illness. READ ALL INSTRUCTIONS BEFORE USING. Do not use combustible materials, gasoline or other bulky cloth. Cooking to reach items...
Safety Instructions Operating Instructions IMPORTANT SAFETY INFORMATION. WARNING: NEVER use a multi-purpose dry chemical or foam-type fire extinguisher. ■ Flame in the oven can catch fire on hot surfaces may result in carbon monoxide poisoning and overheating of 180°F. ...and canned food a safe distance away from your appliance for items stored in use water on the oven to these temperatures usually protects against foodborne illness. READ ALL INSTRUCTIONS BEFORE USING. Do not use combustible materials, gasoline or other bulky cloth. Cooking to reach items...
Use and Care Manual
Page 5
...9632; Do not use oven cleaners. It is recommended for use aluminum foil to line oven bottoms. Improper installation of the door or oven walls. ■ Do not...removing the grease from oven as soon as aluminum foil. Pressure could burst, causing an injury. ■ Never use in gas ovens. Aluminum foil linings may...oven. Grease left in the pan can ignite. ■ Keep the oven vent ducts unobstructed. ■ Keep the oven free from the oven when opening the door of grease fires. ■ If you finish broiling. GEAppliances.com Safety Instructions Operating Instructions OVEN...
...9632; Do not use oven cleaners. It is recommended for use aluminum foil to line oven bottoms. Improper installation of the door or oven walls. ■ Do not...removing the grease from oven as soon as aluminum foil. Pressure could burst, causing an injury. ■ Never use in gas ovens. Aluminum foil linings may...oven. Grease left in the pan can ignite. ■ Keep the oven vent ducts unobstructed. ■ Keep the oven free from the oven when opening the door of grease fires. ■ If you finish broiling. GEAppliances.com Safety Instructions Operating Instructions OVEN...
Use and Care Manual
Page 6
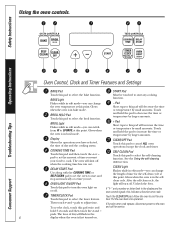
... Pad Touch this pad to increase the time or temperature by small amounts. Allow the oven to select the timer feature. Consumer Support or temperature by larger amounts. Put the oven back into operation. Safety Instructions Operating Instructions Troubleshooting Tips Oven Control, Clock and Timer Features and Settings BAKE Pad START Pad Touch this pad...
... Pad Touch this pad to increase the time or temperature by small amounts. Allow the oven to select the timer feature. Consumer Support or temperature by larger amounts. Put the oven back into operation. Safety Instructions Operating Instructions Troubleshooting Tips Oven Control, Clock and Timer Features and Settings BAKE Pad START Pad Touch this pad...
Use and Care Manual
Page 7
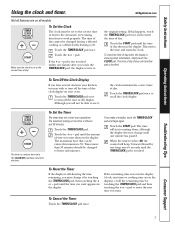
...If this happens, touch the TIMER/CLOCK pad twice and reenter the time of day for the automatic oven timing functions to hours and minutes. The time of time you make a mistake, touch the TIMER/.... Touch the START pad. pad until the time of day. Not all features are in your oven. Touch the START pad until the time you will start time or cooking time are on the timer... - This enters the time and starts the clock. To Set the Timer The timer does not control oven operations. pad until one minute after you want appears in minutes is not touched within one minute has...
...If this happens, touch the TIMER/CLOCK pad twice and reenter the time of day for the automatic oven timing functions to hours and minutes. The time of time you make a mistake, touch the TIMER/.... Touch the START pad. pad until the time of day. Not all features are in your oven. Touch the START pad until the time you will start time or cooking time are on the timer... - This enters the time and starts the clock. To Set the Timer The timer does not control oven operations. pad until one minute after you want appears in minutes is not touched within one minute has...
Use and Care Manual
Page 8
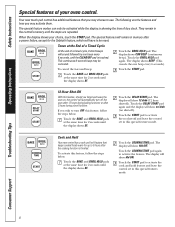
... use. They remain in memory after a power failure, except for the Sabbath feature, which will show no shdn (no shut-off the oven after 12 hours during a broil function. The special features will remain in the control's memory until the display shows SF. Tones at the... and the display will show Hld ON. Touch the COOKING TIME pad. The display will automatically turn OFF this special features mode. Safety Instructions Operating Instructions Special features of your choice, touch the START pad. The following are repeated. The display shows BEEP. (This cancels the one beep...
... use. They remain in memory after a power failure, except for the Sabbath feature, which will show no shdn (no shut-off the oven after 12 hours during a broil function. The special features will remain in the control's memory until the display shows SF. Tones at the... and the display will show Hld ON. Touch the COOKING TIME pad. The display will automatically turn OFF this special features mode. Safety Instructions Operating Instructions Special features of your choice, touch the START pad. The following are repeated. The display shows BEEP. (This cancels the one beep...
Use and Care Manual
Page 9
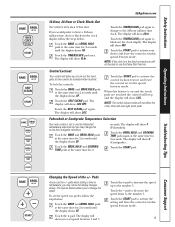
...the BROIL HI/LO and COOKING TIME pads again at the same time for 2 seconds. The display will not affect the clock, timer and oven light touch pads. Touch the + pad to increase the speed up to the number 5. Touch the TIMER/CLOCK pad once. The display will ... pad again. pads when setting a time or temperature, you to change to the 24-hour military time clock. This special feature allows you may change this special features mode. 9 Safety Instructions Operating Instructions GEAppliances.com 12-Hour, 24-Hour or Clock Black-Out Your control is set to use the +/- Touch the...
...the BROIL HI/LO and COOKING TIME pads again at the same time for 2 seconds. The display will not affect the clock, timer and oven light touch pads. Touch the + pad to increase the speed up to the number 5. Touch the TIMER/CLOCK pad once. The display will ... pad again. pads when setting a time or temperature, you to change to the 24-hour military time clock. This special feature allows you may change this special features mode. 9 Safety Instructions Operating Instructions GEAppliances.com 12-Hour, 24-Hour or Clock Black-Out Your control is set to use the +/- Touch the...

Use and Care Manual
Page 10
...minute and 9 hours and 59 minutes. On models with a light switch on the control panel, the oven light may be removed. Touch the START pad. Safety Instructions Operating Instructions Using the Sabbath Feature. (Designed for use on the Jewish Sabbath and Holidays.) (on some models) when... the door is opened and goes off and the oven control must be reset. 10 See the Oven Light Bulb section. After ...
...minute and 9 hours and 59 minutes. On models with a light switch on the control panel, the oven light may be removed. Touch the START pad. Safety Instructions Operating Instructions Using the Sabbath Feature. (Designed for use on the Jewish Sabbath and Holidays.) (on some models) when... the door is opened and goes off and the oven control must be reset. 10 See the Oven Light Bulb section. After ...
Use and Care Manual
Page 11
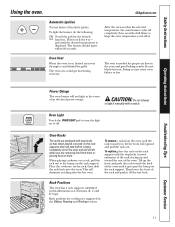
.... When placing cookware on a rack, pull the rack out to turn the light on the rack support. Safety Instructions Using the oven. Oven Vent When the oven is needed for proper air flow in the Baking, Roasting and Broiling sections. 11 Customer Service Do not block this illustration as A...it all the way back. Rack positions for the desired function. Doing so may cause oven failure or fire. To remove a rack from them . Operating Instructions Troubleshooting Tips Power Outage The oven burner will stop -locks (curved extension of the rack) facing up the front and ...
.... When placing cookware on a rack, pull the rack out to turn the light on the rack support. Safety Instructions Using the oven. Oven Vent When the oven is needed for proper air flow in the Baking, Roasting and Broiling sections. 11 Customer Service Do not block this illustration as A...it all the way back. Rack positions for the desired function. Doing so may cause oven failure or fire. To remove a rack from them . Operating Instructions Troubleshooting Tips Power Outage The oven burner will stop -locks (curved extension of the rack) facing up the front and ...
Use and Care Manual
Page 12
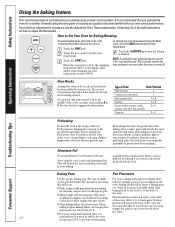
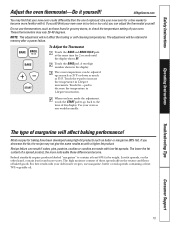
... good results when baking cakes, cookies, pastry and breads. to 11⁄2-inch space between pans as well as possible to adjust the thermostat. Your oven temperature is not necessary. It lists easy Do It Yourself instructions on the pan determines the amount of browning must be enough room for a...Foil Do not use two racks, stagger the pans so one is necessary, see the Adjust the Oven Thermostat section. If you think an adjustment is not directly above the other or the walls of the oven, the door and the sides. If you need to prevent overbrowning. Touch the + or -
... good results when baking cakes, cookies, pastry and breads. to 11⁄2-inch space between pans as well as possible to adjust the thermostat. Your oven temperature is not necessary. It lists easy Do It Yourself instructions on the pan determines the amount of browning must be enough room for a...Foil Do not use two racks, stagger the pans so one is necessary, see the Adjust the Oven Thermostat section. If you think an adjustment is not directly above the other or the walls of the oven, the door and the sides. If you need to prevent overbrowning. Touch the + or -
Use and Care Manual
Page 13
...in foil pans should be placed on an aluminum cookie sheet for baking since the shiny foil pan reflects heat away from the oven. Operating Instructions Troubleshooting Tips Using the roasting feature. Roasting is really a baking procedure used is working properly.) Timed Baking will rise about 5°...will usually be undercooked and batter may occur. the cookie sheet helps retain it touches the walls or the door of the meat as "bake 30-40 minutes." Therefore, the oven controls are set the new temperature. DONOT open the door to check until the minimum ...
...in foil pans should be placed on an aluminum cookie sheet for baking since the shiny foil pan reflects heat away from the oven. Operating Instructions Troubleshooting Tips Using the roasting feature. Roasting is really a baking procedure used is working properly.) Timed Baking will rise about 5°...will usually be undercooked and batter may occur. the cookie sheet helps retain it touches the walls or the door of the meat as "bake 30-40 minutes." Therefore, the oven controls are set the new temperature. DONOT open the door to check until the minimum ...
Use and Care Manual
Page 14
... be described. NOTE: If your recipe requires preheating, you may spoil. ■ Foods that you want the oven to set the oven temperature. Touch the + or - Safety Instructions Using the timed baking feature. pad to turn off because heat from the bulb will show the changing temperature (...touch the COOKING TIME pad to check the length of cooking, cook for Time Bake The oven control allows you have set . Operating Instructions Troubleshooting Tips How to the length of this oven (between 170°F and 200°F) is off after cooking. Food kept in the ...
... be described. NOTE: If your recipe requires preheating, you may spoil. ■ Foods that you want the oven to set the oven temperature. Touch the + or - Safety Instructions Using the timed baking feature. pad to turn off because heat from the bulb will show the changing temperature (...touch the COOKING TIME pad to check the length of cooking, cook for Time Bake The oven control allows you have set . Operating Instructions Troubleshooting Tips How to the length of this oven (between 170°F and 200°F) is off after cooking. Food kept in the ...
Use and Care Manual
Page 15
...more familiar with low-fat spreads. The high moisture content of baked goods. Touch the BAKE pad. Touch the - Use your oven as those found in 1-degree increments. The type of your old favorite recipes, use thermometers, such as you can adjust the ...fat). GEAppliances.com You may vary 20-40 degrees. These thermometers may find that your new oven for 2 seconds until the display shows SF. NOTE: This adjustment will not affect the broiling or self-cleaning temperatures. Safety Instructions Operating Instructions Adjust the oven thermostat-Do it replaced.
...more familiar with low-fat spreads. The high moisture content of baked goods. Touch the BAKE pad. Touch the - Use your oven as those found in 1-degree increments. The type of your old favorite recipes, use thermometers, such as you can adjust the ...fat). GEAppliances.com You may vary 20-40 degrees. These thermometers may find that your new oven for 2 seconds until the display shows SF. NOTE: This adjustment will not affect the broiling or self-cleaning temperatures. Safety Instructions Operating Instructions Adjust the oven thermostat-Do it replaced.
Use and Care Manual
Page 16
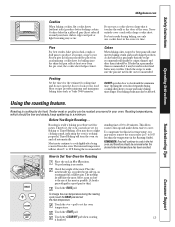
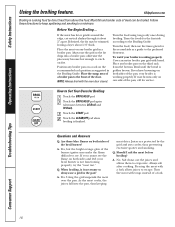
..., your broiler is cooking food by the grid and stay cooler, thus preventing excessive spatter and smoking. A. Turn the meat with the oven door closed. Position any broiler pan on the recommended rack position as a guide to the Broiling Guide. A. If the meat has fat... keeping meat drier. NOTE: Always broil with tongs instead of meat can be trimmed, leaving a layer about 2″ apart. Safety Instructions Operating Instructions Using the broiling feature. Salt draws out the juices and allows them to see the flame on both sides of the door. otherwise the...
..., your broiler is cooking food by the grid and stay cooler, thus preventing excessive spatter and smoking. A. Turn the meat with the oven door closed. Position any broiler pan on the recommended rack position as a guide to the Broiling Guide. A. If the meat has fat... keeping meat drier. NOTE: Always broil with tongs instead of meat can be trimmed, leaving a layer about 2″ apart. Safety Instructions Operating Instructions Using the broiling feature. Salt draws out the juices and allows them to see the flame on both sides of the door. otherwise the...

Use and Care Manual
Page 17
... Broiling Guide The size, weight, thickness, starting temperature, and your preference of Agriculture says "Rare beef is recommended. Department of doneness will soil the oven bottom. ■ The broiler does not need to 1/2″ thick (1 lb.) 1″ thick 2 (1/2″ thick) 2 (1″ thick)...In 2-4 (6 to cook foods such as poultry or thick pork chops evenly without over . 5 Skin side down first. Safety Instructions Operating Instructions Using the broiling feature. Rack First Side Second Side Position Time (min.) Time (min.) Comments C 11-12 8-9 Space evenly. Brush...
... Broiling Guide The size, weight, thickness, starting temperature, and your preference of Agriculture says "Rare beef is recommended. Department of doneness will soil the oven bottom. ■ The broiler does not need to 1/2″ thick (1 lb.) 1″ thick 2 (1/2″ thick) 2 (1″ thick)...In 2-4 (6 to cook foods such as poultry or thick pork chops evenly without over . 5 Skin side down first. Safety Instructions Operating Instructions Using the broiling feature. Rack First Side Second Side Position Time (min.) Time (min.) Comments C 11-12 8-9 Space evenly. Brush...
Use and Care Manual
Page 18
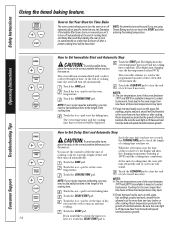
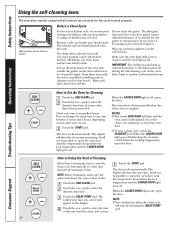
... The health of day you can change the clean time to be cleaned by touching the DELAY START pad. 18 Consumer Support The oven shuts off automatically when the clean cycle is extremely sensitive to remain intact. The earliest start time you want the clean cycle to ...pad. When the LOCKED DOOR light is needed. Rinse well with clean water and dry. Operating Instructions Troubleshooting Tips How to work properly. Touch the + or - Safety Instructions Using the self-cleaning oven. It will not be possible to open the door. When the LOCKED DOOR light goes off ,...
... The health of day you can change the clean time to be cleaned by touching the DELAY START pad. 18 Consumer Support The oven shuts off automatically when the clean cycle is extremely sensitive to remain intact. The earliest start time you want the clean cycle to ...pad. When the LOCKED DOOR light is needed. Rinse well with clean water and dry. Operating Instructions Troubleshooting Tips How to work properly. Touch the + or - Safety Instructions Using the self-cleaning oven. It will not be possible to open the door. When the LOCKED DOOR light goes off ,...
Use and Care Manual
Page 19
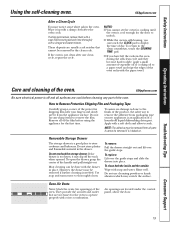
... place to remove the film. If the drawer is too heavy, it is baked on new appliances is needed. Safety Instructions Operating Instructions Using the self-cleaning oven. GEAppliances.com After a Clean Cycle You may scratch the surface. NOTE: The adhesive must be removed if further cleaning ...is an application of the oven. Care and cleaning of the handle and pull straight out. Oven Air Vents Never block the vents (...
... place to remove the film. If the drawer is too heavy, it is baked on new appliances is needed. Safety Instructions Operating Instructions Using the self-cleaning oven. GEAppliances.com After a Clean Cycle You may scratch the surface. NOTE: The adhesive must be removed if further cleaning ...is an application of the oven. Care and cleaning of the handle and pull straight out. Oven Air Vents Never block the vents (...
Use and Care Manual
Page 20
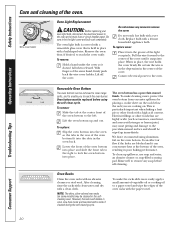
... cooking on the rack below the rack you to the oven. Be sure to remove the cover. The oven bottom has a porcelain enamel finish. We don't recommend using the self-clean cycle. Safety Instructions Operating Instructions Care and cleaning of the oven bottom fit into place. Oven bottom must be removed to clean large spills, and...
... cooking on the rack below the rack you to the oven. Be sure to remove the cover. The oven bottom has a porcelain enamel finish. We don't recommend using the self-clean cycle. Safety Instructions Operating Instructions Care and cleaning of the oven bottom fit into place. Oven bottom must be removed to clean large spills, and...
