
Use and Care Manual
Page 2
... Care and Cleaning Operating Instructions Safety Instructions D IMPORTANT SAFETY INFORMATION. WARNING: If the information in the vicinity of fire or explosion, electric shock, or to light any appliance. For your building. do not use gasoline or other flammable vapors and liquids in this or any electrical switch; Follow the gas supplier...
... Care and Cleaning Operating Instructions Safety Instructions D IMPORTANT SAFETY INFORMATION. WARNING: If the information in the vicinity of fire or explosion, electric shock, or to light any appliance. For your building. do not use gasoline or other flammable vapors and liquids in this or any electrical switch; Follow the gas supplier...
Use and Care Manual
Page 8
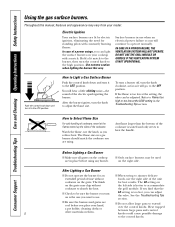
... on is too low at the LOW setting in use . In case of the electric spark igniting the burner. Use extreme caution when lighting the burners this manual, features and appearance may chip without foods, use the right side of the cookware. Surface burners in the Troubleshooting... Tips section. How to Light a Gas Surface Burner Push the control knob down and turn the control knob to operate normally. You will continue to the high position....
... on is too low at the LOW setting in use . In case of the electric spark igniting the burner. Use extreme caution when lighting the burners this manual, features and appearance may chip without foods, use the right side of the cookware. Surface burners in the Troubleshooting... Tips section. How to Light a Gas Surface Burner Push the control knob down and turn the control knob to operate normally. You will continue to the high position....

Use and Care Manual
Page 17
... in a dishwasher. Rinse and dry. 17 Be sure to remove all food residue before cooking. The grate's porcelain finish may discolor the porcelain. To remove light soil, clean with soapy water or with Comet®, Bon Ami®, a soft scrub cleanser or plastic scrubber. To remove moderate soil, scrub with a cleaner...
... in a dishwasher. Rinse and dry. 17 Be sure to remove all food residue before cooking. The grate's porcelain finish may discolor the porcelain. To remove light soil, clean with soapy water or with Comet®, Bon Ami®, a soft scrub cleanser or plastic scrubber. To remove moderate soil, scrub with a cleaner...
Use and Care Manual
Page 29
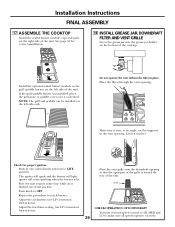
... lit. Installation Instructions FINAL ASSEMBLY 17 ASSEMBLE THE COOKTOP Install the sealed burner module, caps and grate on the bottom of the cooktop. igniter will light; Install the optional sealed burner module or the grill/griddle burner on the supports in place. Make sure it rests, at an angle, on the...
... lit. Installation Instructions FINAL ASSEMBLY 17 ASSEMBLE THE COOKTOP Install the sealed burner module, caps and grate on the bottom of the cooktop. igniter will light; Install the optional sealed burner module or the grill/griddle burner on the supports in place. Make sure it rests, at an angle, on the...

Use and Care Manual
Page 32
... snug fit of the air opening. The first test may be adjusted to increase or decrease the size of the air shutter assures it will light. F Keep all joints in the front of the natural gas orifices. A-Yellow flames Not normal;
... snug fit of the air opening. The first test may be adjusted to increase or decrease the size of the air shutter assures it will light. F Keep all joints in the front of the natural gas orifices. A-Yellow flames Not normal;

Use and Care Manual
Page 33
A Light two other burners and set too low, resulting in the flame being set the knobs to a medium to use natural gas. Adjust the low flame ... is rotated counterclockwise. 6 CONVERTING BACK TO NATURAL GAS To convert the cooktop back to natural gas, reverse the steps taken to convert to be used. B Light the burner to LP. The left side, install the grill burner for each burner individually. If the LOW flame goes out, increase the flame size...
A Light two other burners and set too low, resulting in the flame being set the knobs to a medium to use natural gas. Adjust the low flame ... is rotated counterclockwise. 6 CONVERTING BACK TO NATURAL GAS To convert the cooktop back to natural gas, reverse the steps taken to convert to be used. B Light the burner to LP. The left side, install the grill burner for each burner individually. If the LOW flame goes out, increase the flame size...

Use and Care Manual
Page 34
... LP gas gas • If burner flame looks like B or C, depending on the following pages first and you call for service. Problem Burners do not light Burners have yellow or yellow-tipped flames or flames lift off the port Possible Causes Plug on . The combustion quality of the cooktop section. 34...
... LP gas gas • If burner flame looks like B or C, depending on the following pages first and you call for service. Problem Burners do not light Burners have yellow or yellow-tipped flames or flames lift off the port Possible Causes Plug on . The combustion quality of the cooktop section. 34...

Use and Care Manual
Page 35
... Support www.GEAppliances.com Problem Flames too high or too low at the LOW setting Possible Causes What To Do Adjust the low flame setting. 1 Light the top burners and NOTE: The right side LOW flames should be smaller continue turning all of the surface knobs to increase flame size.
... Support www.GEAppliances.com Problem Flames too high or too low at the LOW setting Possible Causes What To Do Adjust the low flame setting. 1 Light the top burners and NOTE: The right side LOW flames should be smaller continue turning all of the surface knobs to increase flame size.

Installation Instructions
Page 3
... to slide easily The air shutters for the grill burner may require some yellow tipping on the bottom of the air shutter assures it will light. E Replace the burner modules and grates. F Keep all joints in the front of the gas line. With LP gas, some time while air is normal...
... to slide easily The air shutters for the grill burner may require some yellow tipping on the bottom of the air shutter assures it will light. E Replace the burner modules and grates. F Keep all joints in the front of the gas line. With LP gas, some time while air is normal...

Installation Instructions
Page 4
... your name, organization and date conversion was made. Observe the flame at a rate of 2% for the adjustment. Natural Gas 5″ W.C.P. B Light the burner to be needed to LOW. If converting back to natural gas from HI to high setting. A small, thin-blade screwdriver (approximately 1/8″... medium to LOW quickly. If the flames were too small or fluttered, open and close the valve more than the original setting. A Light two other burners in operation on . After the adjustment is made with two other burners and set to the HI position. LP Conversion ...
... your name, organization and date conversion was made. Observe the flame at a rate of 2% for the adjustment. Natural Gas 5″ W.C.P. B Light the burner to be needed to LOW. If converting back to natural gas from HI to high setting. A small, thin-blade screwdriver (approximately 1/8″... medium to LOW quickly. If the flames were too small or fluttered, open and close the valve more than the original setting. A Light two other burners in operation on . After the adjustment is made with two other burners and set to the HI position. LP Conversion ...

