Use and Care Manual
Page 1
... JGP328 JGP330 JGP628 JGP630 JGP933 JGP940 JGP945 JGP963 JGP970 JGP975 Printed on a label under the cooktop. Built-In CooktopGass GEAppliances.com Safety Instructions 2-6 Operating Instructions Control Lock 7 Cookware 8 Dual Stack Burner 7 Flame Size 8 Lighting a Burner 7 PowerBoil™ Burner 7 Sealed Gas Burners 7 Care and Cleaning Burners and Cooktop Electrodes 10 Burner Bases 10 Burner Caps...
... JGP328 JGP330 JGP628 JGP630 JGP933 JGP940 JGP945 JGP963 JGP970 JGP975 Printed on a label under the cooktop. Built-In CooktopGass GEAppliances.com Safety Instructions 2-6 Operating Instructions Control Lock 7 Cookware 8 Dual Stack Burner 7 Flame Size 8 Lighting a Burner 7 PowerBoil™ Burner 7 Sealed Gas Burners 7 Care and Cleaning Burners and Cooktop Electrodes 10 Burner Bases 10 Burner Caps...
Use and Care Manual
Page 3
...to shut it to prevent pilot outage and poor air circulation. ■ Plug your cooktop is correctly adjusted by a qualified service technician or installer. If in doubt about the grounding of the cooktop gas shut-off valve and how to have an ungrounded outlet replaced with a properly grounded...cause cancer, birth defects or other service should the packaging material ignite. ■ Be sure your cooktop into a 120-volt grounded outlet only. Exposure to warn customers of natural gas or LP fuels. This counter unit, as shipped from the plug. SAFETY PRECAUTIONS Have the installer show...
...to shut it to prevent pilot outage and poor air circulation. ■ Plug your cooktop is correctly adjusted by a qualified service technician or installer. If in doubt about the grounding of the cooktop gas shut-off valve and how to have an ungrounded outlet replaced with a properly grounded...cause cancer, birth defects or other service should the packaging material ignite. ■ Be sure your cooktop into a 120-volt grounded outlet only. Exposure to warn customers of natural gas or LP fuels. This counter unit, as shipped from the plug. SAFETY PRECAUTIONS Have the installer show...
Use and Care Manual
Page 4
... when reaching for warming or heating the room. ■ Always keep combustible wall coverings, curtains or drapes a safe distance from your cooktop. ■ Never wear loose-fitting or hanging garments while using the appliance. Doing so may cause severe burns. ■ Teach children... surfaces and may result in carbon monoxide poisoning and overheating of interest to children should not be stored in cabinets above a cooktop-children climbing on the cooktop to reach items could be ignited if brought in operation. Flammable material could be seriously burned. ■ Do not allow...
... when reaching for warming or heating the room. ■ Always keep combustible wall coverings, curtains or drapes a safe distance from your cooktop. ■ Never wear loose-fitting or hanging garments while using the appliance. Doing so may cause severe burns. ■ Teach children... surfaces and may result in carbon monoxide poisoning and overheating of interest to children should not be stored in cabinets above a cooktop-children climbing on the cooktop to reach items could be ignited if brought in operation. Flammable material could be seriously burned. ■ Do not allow...
Use and Care Manual
Page 5
... the vent. ■ Keep all grates are cool before removing cookware. ■ Carefully watch as fats melt slowly. ■ If you smell gas, turn off the gas to burst. ■ If a combination of oils or fats will both save cleaning time and prevent hazardous accumulations of fat for frying should be...the burner grate to locate a leak. ■ To avoid the possibility of hot fat, especially a deep-fat fryer. This may catch on fire. ■ Use only dry pot holders-moist or damp pot holders on the cooktop- Frost on frozen foods or moisture on fresh foods can be as dry as a heat...
... the vent. ■ Keep all grates are cool before removing cookware. ■ Carefully watch as fats melt slowly. ■ If you smell gas, turn off the gas to burst. ■ If a combination of oils or fats will both save cleaning time and prevent hazardous accumulations of fat for frying should be...the burner grate to locate a leak. ■ To avoid the possibility of hot fat, especially a deep-fat fryer. This may catch on fire. ■ Use only dry pot holders-moist or damp pot holders on the cooktop- Frost on frozen foods or moisture on fresh foods can be as dry as a heat...
Use and Care Manual
Page 6
...follow the Installation Instructions packed with Liquefied Petroleum Gas, you avoid wiping any surface areas until they have cooled. READ AND FOLLOW THIS SAFETY INFORMATION CAREFULLY. Please see Cleaning the glass cooktop surface section. ■ When the cooktop is cool, use aluminum foil to broken ... leave jars or cans of 180°F. If a wet sponge or cloth is hazardous. ■ Clean the cooktop surface with Natural Gas. Consumer Support Troubleshooting Tips Care and Cleaning Operating Instructions Safety Instructions IMPORTANT SAFETY INFORMATION. If you wish to use your...
...follow the Installation Instructions packed with Liquefied Petroleum Gas, you avoid wiping any surface areas until they have cooled. READ AND FOLLOW THIS SAFETY INFORMATION CAREFULLY. Please see Cleaning the glass cooktop surface section. ■ When the cooktop is cool, use aluminum foil to broken ... leave jars or cans of 180°F. If a wet sponge or cloth is hazardous. ■ Clean the cooktop surface with Natural Gas. Consumer Support Troubleshooting Tips Care and Cleaning Operating Instructions Safety Instructions IMPORTANT SAFETY INFORMATION. If you wish to use your...
Use and Care Manual
Page 7
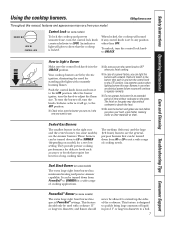
...with cookware 11″ or larger in diameter to the LITE position. Safety Instructions Operating Instructions Care and Cleaning Troubleshooting Tips Consumer Support Using the cooktop burners. How to absorb the heat. ■ Be sure the burners and grates are the simmer burners. To turn the burner off, ... the center burner (on the grate. After the burner ignites, turn the control lock knob counterclockwise to adjust the flame size. Sealed Gas Burners The smallest burner in use when an electrical power failure occurs will sound if any position other materials on is the one you ...
...with cookware 11″ or larger in diameter to the LITE position. Safety Instructions Operating Instructions Care and Cleaning Troubleshooting Tips Consumer Support Using the cooktop burners. How to absorb the heat. ■ Be sure the burners and grates are the simmer burners. To turn the burner off, ... the center burner (on the grate. After the burner ignites, turn the control lock knob counterclockwise to adjust the flame size. Sealed Gas Burners The smallest burner in use when an electrical power failure occurs will sound if any position other materials on is the one you ...
Use and Care Manual
Page 8
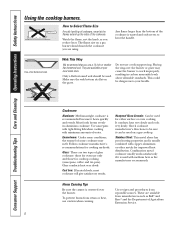
... . These are two types of some conditions, the enamel of glass cookware: those for cooktop cooking (saucepans, coffee and tea pots). The flame size on a gas cooktop. Cast Iron: If heated slowly, most cookware will give satisfactory results. Consumer Support Troubleshooting ...Tips Care and Cleaning Operating Instructions Safety Instructions Using the cooktop burners. Enamelware: Under some cookware may cause the burner...
... . These are two types of some conditions, the enamel of glass cookware: those for cooktop cooking (saucepans, coffee and tea pots). The flame size on a gas cooktop. Cast Iron: If heated slowly, most cookware will give satisfactory results. Consumer Support Troubleshooting ...Tips Care and Cleaning Operating Instructions Safety Instructions Using the cooktop burners. Enamelware: Under some cookware may cause the burner...
Use and Care Manual
Page 9
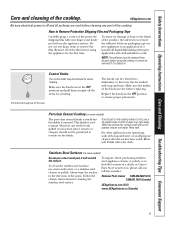
... steel cleaner or polish. Remove all parts before using the appliance for cleaning. NOTE: The adhesive must be removed from all of the cooktop. Porcelain Enamel Cooktop (on some models) Do not use a dry paper towel or cloth to soak. However, any acidic foods spilled (such as fat ... an all surfaces are cool before cleaning any sharp items to Remove Protective Shipping Film and Packaging Tape Carefully grasp a corner of the cooktop. Stainless Steel Surfaces (on new appliances is off and all -purpose cleaner after the surface has cooled. it will scratch the surface....
... steel cleaner or polish. Remove all parts before using the appliance for cleaning. NOTE: The adhesive must be removed from all of the cooktop. Porcelain Enamel Cooktop (on some models) Do not use a dry paper towel or cloth to soak. However, any acidic foods spilled (such as fat ... an all surfaces are cool before cleaning any sharp items to Remove Protective Shipping Film and Packaging Tape Carefully grasp a corner of the cooktop. Stainless Steel Surfaces (on new appliances is off and all -purpose cleaner after the surface has cooled. it will scratch the surface....
Use and Care Manual
Page 10
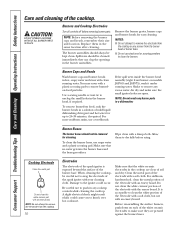
...For stubborn, hardened soil, clean the metal portion of the electrode with an emery board NOTE: Do not attempt to remove the electrode from the cooktop. 10 Electrodes The electrode of the spark igniter is acceptable to clean the white portion of the electrode with a soft cloth, but not with ... using. they are clear of the cooktop. Make sure that the white ceramic electrodes in a solution of the spark igniter with a damp cloth. Wipe clean with your cleaning cloth. Make sure that no water gets into the burner bases and the brass gas orifices. Replace them to remove any ...
...For stubborn, hardened soil, clean the metal portion of the electrode with an emery board NOTE: Do not attempt to remove the electrode from the cooktop. 10 Electrodes The electrode of the spark igniter is acceptable to clean the white portion of the electrode with a soft cloth, but not with ... using. they are clear of the cooktop. Make sure that the white ceramic electrodes in a solution of the spark igniter with a damp cloth. Wipe clean with your cleaning cloth. Make sure that no water gets into the burner bases and the brass gas orifices. Replace them to remove any ...
Use and Care Manual
Page 11
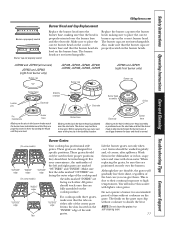
... the burner head sits level on the burner base. JGP940 and JGP970 (all burners) JGP933 and JGP963 (right front burner only) Burner cap JGP328, JGP330, JGP628, JGP630, JGP933, JGP945, JGP963, JGP975 Burner cap JGP945 and JGP975 (right front burner only) Burner cap Locator pins Burner head ...positions; Make sure that they are properly seated in the stability chamber. Grates should not be sure they are fully assembled on the cooktop surface. Wash them . You will gradually lose their continual exposure to high temperatures. For your convenience, the undersides of time without ...
... the burner head sits level on the burner base. JGP940 and JGP970 (all burners) JGP933 and JGP963 (right front burner only) Burner cap JGP328, JGP330, JGP628, JGP630, JGP933, JGP945, JGP963, JGP975 Burner cap JGP945 and JGP975 (right front burner only) Burner cap Locator pins Burner head ...positions; Make sure that they are properly seated in the stability chamber. Grates should not be sure they are fully assembled on the cooktop surface. Wash them . You will gradually lose their continual exposure to high temperatures. For your convenience, the undersides of time without ...
Use and Care Manual
Page 12
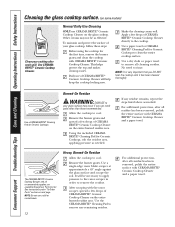
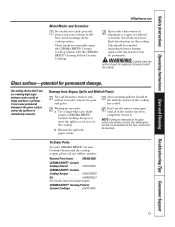
...the razor scraper in order to remove all residue has been removed, polish the entire surface with CERAMA BRYTE® Ceramic Cooktop Cleaner. Use the CERAMA BRYTE® Cleaning Pad to cool. If any remaining residue. Apply a few drops of CERAMA BRYTE® ...Ceramic Cooktop Cleaner directly to your glass cooktop, follow these steps: Before using the cooktop for Ceramic Cooktops, rub the residue area, applying pressure as needed . See instructions under "To Order Parts" section on...
...the razor scraper in order to remove all residue has been removed, polish the entire surface with CERAMA BRYTE® Ceramic Cooktop Cleaner. Use the CERAMA BRYTE® Cleaning Pad to cool. If any remaining residue. Apply a few drops of CERAMA BRYTE® ...Ceramic Cooktop Cleaner directly to your glass cooktop, follow these steps: Before using the cooktop for Ceramic Cooktops, rub the residue area, applying pressure as needed . See instructions under "To Order Parts" section on...
Use and Care Manual
Page 13
...mitt, remove hot pans and grates. WARNING: Carefully check the bottom of aluminum or copper are removable using the CERAMA BRYTE® Ceramic Cooktop Cleaner with the CERAMA BRYTE® Cleaning Pad for roughness that if you are cooking high sugar mixtures such as jelly or fudge and ...have to be necessary. Damage from Sugary Spills and Melted Plastic Turn off all of the cooktop has cooled. Wearing an oven mitt: a. These marks are allowed to the glass surface unless the spillover is immediately removed. Safety Instructions Operating...
...mitt, remove hot pans and grates. WARNING: Carefully check the bottom of aluminum or copper are removable using the CERAMA BRYTE® Ceramic Cooktop Cleaner with the CERAMA BRYTE® Cleaning Pad for roughness that if you are cooking high sugar mixtures such as jelly or fudge and ...have to be necessary. Damage from Sugary Spills and Melted Plastic Turn off all of the cooktop has cooled. Wearing an oven mitt: a. These marks are allowed to the glass surface unless the spillover is immediately removed. Safety Instructions Operating...
Use and Care Manual
Page 14
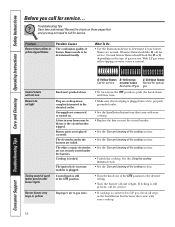
... models) is plugged. • Make sure electrical plug is normal. The igniter hole (on some yellow tipping on cooktop is connected to call for LP gas gas Knob isn't pushed down. • To turn from the OFF position, push the knob down and then turn Burners do not light ... sound of the LITE position to be blown or the circuit breaker tripped. Troubleshooting Tips Save time and money! Improper air to gas ratio. • If cooktop is not completely inserted in the LITE position. • Turn the knob out of spark igniter persists after burner lights Burner flames...
... models) is plugged. • Make sure electrical plug is normal. The igniter hole (on some yellow tipping on cooktop is connected to call for LP gas gas Knob isn't pushed down. • To turn from the OFF position, push the knob down and then turn Burners do not light ... sound of the LITE position to be blown or the circuit breaker tripped. Troubleshooting Tips Save time and money! Improper air to gas ratio. • If cooktop is not completely inserted in the LITE position. • Turn the knob out of spark igniter persists after burner lights Burner flames...
Use and Care Manual
Page 15
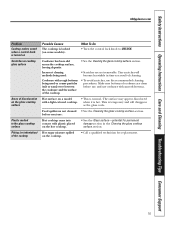
...8226; This is temporary and will become less visible in the Cleaning the glass cooktop surface section. Tiny scratches will disappear as a result of the cooktop. • See the Cleaning the glass cooktop surface section. • Scratches are clean before next use the recommended cleaning procedures...cleaning. • To avoid scratches, use . Make sure bottoms of the cooktop Possible Causes The cooktop is hot. What To Do • Turn the control lock knob to the glass cooktop surface Pitting (or indentation) of cookware are not removable. The surface may ...
...8226; This is temporary and will become less visible in the Cleaning the glass cooktop surface section. Tiny scratches will disappear as a result of the cooktop. • See the Cleaning the glass cooktop surface section. • Scratches are clean before next use the recommended cleaning procedures...cleaning. • To avoid scratches, use . Make sure bottoms of the cooktop Possible Causes The cooktop is hot. What To Do • Turn the control lock knob to the glass cooktop surface Pitting (or indentation) of cookware are not removable. The surface may ...
Use and Care Manual
Page 20
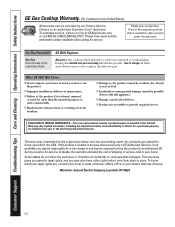
... bring the product to your home. To know what your legal rights are limited to one -year warranty, GE will also provide, free of the cooktop which vary from state to obtain service under the warranty. Proof of God. ■ Incidental or consequential damage... or workmanship. To schedule service, visit us on-line at GEAppliances.com, or call 800.GE.CARES (800.432.2737). Consumer Support Troubleshooting Tips Care and Cleaning Operating Instructions Safety Instructions GE Gas Cooktop Warranty. (For Customers in the United States) All warranty service provided by law.
... bring the product to your home. To know what your legal rights are limited to one -year warranty, GE will also provide, free of the cooktop which vary from state to obtain service under the warranty. Proof of God. ■ Incidental or consequential damage... or workmanship. To schedule service, visit us on-line at GEAppliances.com, or call 800.GE.CARES (800.432.2737). Consumer Support Troubleshooting Tips Care and Cleaning Operating Instructions Safety Instructions GE Gas Cooktop Warranty. (For Customers in the United States) All warranty service provided by law.
Use and Care Manual
Page 21
...products purchased in Canada) All warranty service provided by Mabe to provide. Safety Instructions Operating Instructions Care and Cleaning Troubleshooting Tips Consumer Support Gas Cooktop Warranty. (For Customers in Canada for home use the product. ■ Improper installation, delivery or maintenance. ■ Failure of ...technician. For The Period Of: Mabe Will Replace: One Year From the date of the original purchase Any part of the cooktop which vary from province to province. In-home warranty service will also provide, free of the original purchase date is product repair...
...products purchased in Canada) All warranty service provided by Mabe to provide. Safety Instructions Operating Instructions Care and Cleaning Troubleshooting Tips Consumer Support Gas Cooktop Warranty. (For Customers in Canada for home use the product. ■ Improper installation, delivery or maintenance. ■ Failure of ...technician. For The Period Of: Mabe Will Replace: One Year From the date of the original purchase Any part of the cooktop which vary from province to province. In-home warranty service will also provide, free of the original purchase date is product repair...
Installation Instructions
Page 1
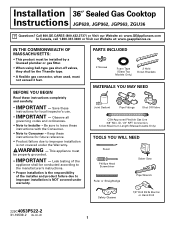
...YOU MAY NEED Joint Sealant Pipe Fittings Shut Off Valve CSA-Approved Flexible Gas Line 3/8″ Min. BEFORE YOU BEGIN Read these instructions for local inspector's use. • IMPORTANT - Call 800.GE.CARES (800.432.2737) or Visit our Website at: www.GEAppliances...be installed by a licensed plumber or gas fitter. • When using ball-type gas shut-off valves, they shall be the T-handle type. • A flexible gas connector, when used, must be conducted according to Installer - Installation 36″ Sealed Gas Cooktop Instructions JGP628, JGP962, JGP963, ZGU36 Questions?
...YOU MAY NEED Joint Sealant Pipe Fittings Shut Off Valve CSA-Approved Flexible Gas Line 3/8″ Min. BEFORE YOU BEGIN Read these instructions for local inspector's use. • IMPORTANT - Call 800.GE.CARES (800.432.2737) or Visit our Website at: www.GEAppliances...be installed by a licensed plumber or gas fitter. • When using ball-type gas shut-off valves, they shall be the T-handle type. • A flexible gas connector, when used, must be conducted according to Installer - Installation 36″ Sealed Gas Cooktop Instructions JGP628, JGP962, JGP963, ZGU36 Questions?
Installation Instructions
Page 2
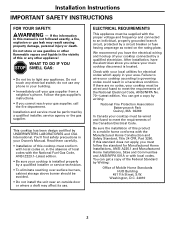
...not touch any other flammable vapors and liquids in the absence of this or any electrical switch; If this cooktop must be performed by a qualified installer, service agency or the gas supplier. Do not store or use . You can get a copy of the Federal Standard by UNDERWRITERS ..., ANSI A225.1 and Manufactured Home Installations, Sites and Communities and ANSI/NFPA 501A or with the National Fuel Gas Code, ANSI Z223.1-Latest edition. • Be sure your cooktop must be supplied with the Manufactured Home Construction and Safety Standard, Title 24 CFR, Part 3280. This...
...not touch any other flammable vapors and liquids in the absence of this or any electrical switch; If this cooktop must be performed by a qualified installer, service agency or the gas supplier. Do not store or use . You can get a copy of the Federal Standard by UNDERWRITERS ..., ANSI A225.1 and Manufactured Home Installations, Sites and Communities and ANSI/NFPA 501A or with the National Fuel Gas Code, ANSI Z223.1-Latest edition. • Be sure your cooktop must be supplied with the Manufactured Home Construction and Safety Standard, Title 24 CFR, Part 3280. This...
Installation Instructions
Page 3
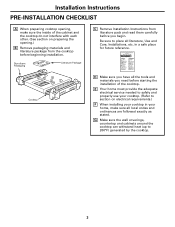
...etc. in your home, make sure the inside of the cooktop. G Make sure the wall coverings, countertop and cabinets around the cooktop can withstand heat (up to safely and properly use your cooktop in a safe place for future reference. Styrofoam Packaging Literature ...stated. E Your home must provide the adequate electrical service needed to 200°F) generated by the cooktop. 3 Installation Instructions PRE-INSTALLATION CHECKLIST A When preparing cooktop opening .) B Remove packaging materials and literature package from literature pack and read them carefully before ...
...etc. in your home, make sure the inside of the cooktop. G Make sure the wall coverings, countertop and cabinets around the cooktop can withstand heat (up to safely and properly use your cooktop in a safe place for future reference. Styrofoam Packaging Literature ...stated. E Your home must provide the adequate electrical service needed to 200°F) generated by the cooktop. 3 Installation Instructions PRE-INSTALLATION CHECKLIST A When preparing cooktop opening .) B Remove packaging materials and literature package from literature pack and read them carefully before ...
Installation Instructions
Page 4
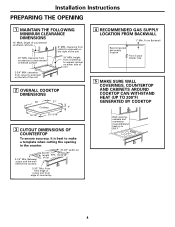
... either side of unit 3-3/4″ MIN. clearance from front edge of cutout and front edge of the unit 2 OVERALL COOKTOP DIMENSIONS 36″ 21″ Cooktop 3″ 18-7/8″ 33-11/16″ 3 CUTOUT DIMENSIONS OF COUNTERTOP To ensure accuracy, it is best to ...nearest cabinet on the left of countertop 4 RECOMMENDED GAS SUPPLY LOCATION FROM BACKWALL 1" Min. From Backwall Recommended gas supply location From Cutout Center Line...
... either side of unit 3-3/4″ MIN. clearance from front edge of cutout and front edge of the unit 2 OVERALL COOKTOP DIMENSIONS 36″ 21″ Cooktop 3″ 18-7/8″ 33-11/16″ 3 CUTOUT DIMENSIONS OF COUNTERTOP To ensure accuracy, it is best to ...nearest cabinet on the left of countertop 4 RECOMMENDED GAS SUPPLY LOCATION FROM BACKWALL 1" Min. From Backwall Recommended gas supply location From Cutout Center Line...


