Owners Manual
Page 1
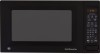
Microwave Oven www.GEAppliances.com SENSOR COOKING POPCORN BEVERAGE REHEAT BAKED POTATO VEGETABLE TIME COOK REMINDER AUTO/TIME DEF. CLEAR OFF SOUND CLOCK AM/PM SCROLL SPEED Owner's Manual JES1855 GE Answer Center ® 800.626.2000 164D3370P283 49-40353 06-03 JR TIMER HELP GUIDE BEHIND DOOR 1 EXPRESS COOK 4 EXPRESS COOK 2 EXPRESS COOK 5 EXPRESS COOK 3 EXPRESS COOK 6 EXPRESS COOK 789 START PAUSE POWER LEVEL 0 DISPLAY ON/OFF 30 SEC.
Microwave Oven www.GEAppliances.com SENSOR COOKING POPCORN BEVERAGE REHEAT BAKED POTATO VEGETABLE TIME COOK REMINDER AUTO/TIME DEF. CLEAR OFF SOUND CLOCK AM/PM SCROLL SPEED Owner's Manual JES1855 GE Answer Center ® 800.626.2000 164D3370P283 49-40353 06-03 JR TIMER HELP GUIDE BEHIND DOOR 1 EXPRESS COOK 4 EXPRESS COOK 2 EXPRESS COOK 5 EXPRESS COOK 3 EXPRESS COOK 6 EXPRESS COOK 789 START PAUSE POWER LEVEL 0 DISPLAY ON/OFF 30 SEC.

Owners Manual
Page 2
... accidental tipping of the door three grounded. I Install or locate this oven with the safety interlocks. Connect only inches or more back from to a properly grounded the countertop edge to microwave energy. It is particularly important that the oven door close properly and that there is damaged. Operating Instructions Troubleshooting Tips WARNING! section above. Consumer Support SAFETY PRECAUTIONS When using electrical appliances basic safety precautions...
... accidental tipping of the door three grounded. I Install or locate this oven with the safety interlocks. Connect only inches or more back from to a properly grounded the countertop edge to microwave energy. It is particularly important that the oven door close properly and that there is damaged. Operating Instructions Troubleshooting Tips WARNING! section above. Consumer Support SAFETY PRECAUTIONS When using electrical appliances basic safety precautions...

Owners Manual
Page 3
... not support any openings on top of the microwave. Do not use . - Do not use Time Cook for additional cooking time. I This microwave oven is in operation. I Do not store this product near water- for example, in a wet basement, near a swimming pool, near any appliance, close supervision is not intended for laboratory or industrial use. Remove wire twist-ties and metal handles from heated surfaces. I Do not let power cord...
... not support any openings on top of the microwave. Do not use . - Do not use Time Cook for additional cooking time. I This microwave oven is in operation. I Do not store this product near water- for example, in a wet basement, near a swimming pool, near any appliance, close supervision is not intended for laboratory or industrial use. Remove wire twist-ties and metal handles from heated surfaces. I Do not let power cord...
Owners Manual
Page 4
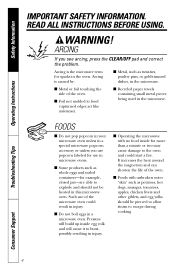
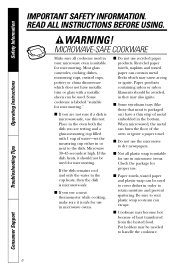
... Information Operating Instructions IMPORTANT SAFETY INFORMATION. Arcing is the microwave term for use of the microwave oven could start a fire. Pressure will build up inside for example, closed jars-are able to burst, possibly resulting in a special microwave popcorn accessory or unless you see arcing, press the CLEAR/OFF pad and correct the problem. I Foil not molded to escape during cooking...
... Information Operating Instructions IMPORTANT SAFETY INFORMATION. Arcing is the microwave term for use of the microwave oven could start a fire. Pressure will build up inside for example, closed jars-are able to burst, possibly resulting in a special microwave popcorn accessory or unless you see arcing, press the CLEAR/OFF pad and correct the problem. I Foil not molded to escape during cooking...
Owners Manual
Page 5
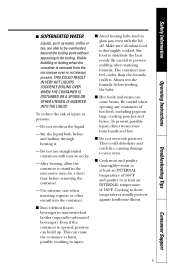
... in glass jars, even with narrow necks. - Cooking to prevent scalding when warming formula. Do not use straight-sided containers with the lid off. I Don't defrost frozen beverages in the microwave oven for a short time before removing the container. - I Avoid heating baby food in injury. Make sure all infant food is . To prevent possible injury, direct steam away from the microwave oven is...
... in glass jars, even with narrow necks. - Cooking to prevent scalding when warming formula. Do not use straight-sided containers with the lid off. I Don't defrost frozen beverages in the microwave oven for a short time before removing the container. - I Avoid heating baby food in injury. Make sure all infant food is . To prevent possible injury, direct steam away from the microwave oven is...
Owners Manual
Page 6
... cookware used to cover dishes in microwave ovens. Recycled paper towels, napkins and waxed paper can escape. Troubleshooting Tips Consumer Support 6 I Paper towels, waxed paper and plastic wrap can burn the floor of heat transferred from the heated food. Be sure to handle the cookware. I Do not use a meat thermometer while cooking, make sure it should be needed to vent plastic wrap so steam can...
... cookware used to cover dishes in microwave ovens. Recycled paper towels, napkins and waxed paper can escape. Troubleshooting Tips Consumer Support 6 I Paper towels, waxed paper and plastic wrap can burn the floor of heat transferred from the heated food. Be sure to handle the cookware. I Do not use a meat thermometer while cooking, make sure it should be needed to vent plastic wrap so steam can...
Owners Manual
Page 7
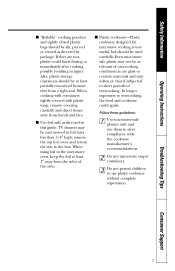
...: Use microwave-safe plastics only and use plastic cookware without complete supervision. When cooking with containers tightly covered with the cookware manufacturer's recommendations. TV dinners may be microwaved in strict compliance with plastic wrap, remove covering carefully and direct steam away from the sides of the oven. Even microwavesafe plastic may not be slit, pierced or vented as directed by package. Safety Information Operating Instructions I "Boilable" cooking...
...: Use microwave-safe plastics only and use plastic cookware without complete supervision. When cooking with containers tightly covered with the cookware manufacturer's recommendations. TV dinners may be microwaved in strict compliance with plastic wrap, remove covering carefully and direct steam away from the sides of the oven. Even microwavesafe plastic may not be slit, pierced or vented as directed by package. Safety Information Operating Instructions I "Boilable" cooking...
Owners Manual
Page 8
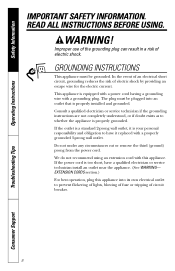
READ ALL INSTRUCTIONS BEFORE USING. Improper use of the grounding plug can result in a risk of electric shock by providing an escape wire for the electric current. The plug must be plugged into its own electrical outlet to prevent flickering of lights, blowing of fuse or tripping of circuit breaker. 8 Troubleshooting Tips Consumer Support If the outlet is a standard 2-prong wall outlet, it replaced with a grounding plug. WARNING! This appliance...
READ ALL INSTRUCTIONS BEFORE USING. Improper use of the grounding plug can result in a risk of electric shock by providing an escape wire for the electric current. The plug must be plugged into its own electrical outlet to prevent flickering of lights, blowing of fuse or tripping of circuit breaker. 8 Troubleshooting Tips Consumer Support If the outlet is a standard 2-prong wall outlet, it replaced with a grounding plug. WARNING! This appliance...
Owners Manual
Page 10
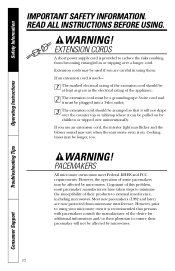
... used - WARNING! Cooking times may be affected by microwaves. 10 Troubleshooting Tips Consumer Support The extension cord must meet Federal DHHS and FCC requirements. WARNING! PACEMAKERS All microwave ovens must be a grounding-type 3-wire cord and it can be affected by microwaves. READ ALL INSTRUCTIONS BEFORE USING. However, prior to using them. EXTENSION CORDS A short power supply cord is recommended that it will not be pulled on . Safety Information Operating Instructions...
... used - WARNING! Cooking times may be affected by microwaves. 10 Troubleshooting Tips Consumer Support The extension cord must meet Federal DHHS and FCC requirements. WARNING! PACEMAKERS All microwave ovens must be a grounding-type 3-wire cord and it can be affected by microwaves. READ ALL INSTRUCTIONS BEFORE USING. However, prior to using them. EXTENSION CORDS A short power supply cord is recommended that it will not be pulled on . Safety Information Operating Instructions...
Owners Manual
Page 13
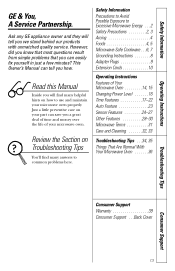
... your microwave oven properly. This Owner's Manual can save you how. Safety Information Operating Instructions GE & You, A Service Partnership. Just a little preventive care on your part can tell you a great deal of time and money over the life of Your Microwave Oven 14, 15 Changing Power Level 16 Time Features 17-22 Auto Feature 23 Sensor Features 24-27 Other Features 28-30 Microwave Terms 31 Care and Cleaning 32, 33 Troubleshooting...
... your microwave oven properly. This Owner's Manual can save you how. Safety Information Operating Instructions GE & You, A Service Partnership. Just a little preventive care on your part can tell you a great deal of time and money over the life of Your Microwave Oven 14, 15 Changing Power Level 16 Time Features 17-22 Auto Feature 23 Sensor Features 24-27 Other Features 28-30 Microwave Terms 31 Care and Cleaning 32, 33 Troubleshooting...
Owners Manual
Page 14
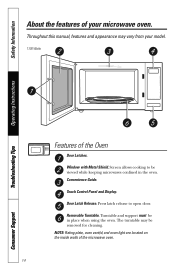
...allows cooking to open door. Touch Control Panel and Display. Door Latch Release. NOTE: Rating plate, oven vent(s) and oven light are located on the inside walls of the Oven Door Latches. Press latch release to be viewed while keeping microwaves confined in place when using the oven. Removable Turntable. Turntable and support must be removed for cleaning. The turntable may vary from your microwave oven. Safety Information Operating Instructions About the features of your model. 1100 Watts Features of the microwave oven. 14 Troubleshooting Tips Consumer Support Window...
...allows cooking to open door. Touch Control Panel and Display. Door Latch Release. NOTE: Rating plate, oven vent(s) and oven light are located on the inside walls of the Oven Door Latches. Press latch release to be viewed while keeping microwaves confined in place when using the oven. Removable Turntable. Turntable and support must be removed for cleaning. The turntable may vary from your microwave oven. Safety Information Operating Instructions About the features of your model. 1100 Watts Features of the microwave oven. 14 Troubleshooting Tips Consumer Support Window...

Owners Manual
Page 15
Safety Information You can microwave by time, with the sensor features or with the auto feature. Operating Instructions Troubleshooting Tips AUTO/TIME DEF. Power level 1-10 Starts immediately! Sensor Features and Auto Feature Press Enter POPCORN Starts immediately! BEVERAGE Starts immediately! Press once Food weight Option more/less time more/less time more/less time more/less time more/less time more/less time (on some models) 15 Consumer Support BAKED POTATO Starts immediately! VEGETABLE Starts immediately! Press...
Safety Information You can microwave by time, with the sensor features or with the auto feature. Operating Instructions Troubleshooting Tips AUTO/TIME DEF. Power level 1-10 Starts immediately! Sensor Features and Auto Feature Press Enter POPCORN Starts immediately! BEVERAGE Starts immediately! Press once Food weight Option more/less time more/less time more/less time more/less time more/less time more/less time (on some models) 15 Consumer Support BAKED POTATO Starts immediately! VEGETABLE Starts immediately! Press...
Owners Manual
Page 16
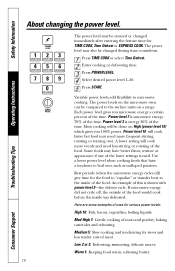
... to "equalize" or transfer heat to microwave cooking. Safety Information About changing the power level. Each power level gives you 100% power. baking casseroles and reheating. Select desired power level 1-10. Med-High 7: Gentle cooking of the food. delicate sauces. Power level 3 is used. Operating Instructions Troubleshooting Tips POWER LEVEL 1 EXPRESS COOK 2 EXPRESS COOK 3 EXPRESS COOK 4 EXPRESS COOK 5 EXPRESS COOK 6 EXPRESS COOK 789 0 DISPLAY ON/OFF START PAUSE 16 The power level may also be...
... to "equalize" or transfer heat to microwave cooking. Safety Information About changing the power level. Each power level gives you 100% power. baking casseroles and reheating. Select desired power level 1-10. Med-High 7: Gentle cooking of the food. delicate sauces. Power level 3 is used. Operating Instructions Troubleshooting Tips POWER LEVEL 1 EXPRESS COOK 2 EXPRESS COOK 3 EXPRESS COOK 4 EXPRESS COOK 5 EXPRESS COOK 6 EXPRESS COOK 789 0 DISPLAY ON/OFF START PAUSE 16 The power level may also be...
Owners Manual
Page 20
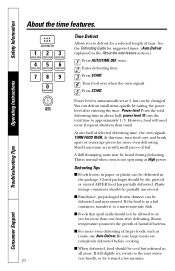
... storage containers should be defrosted and microwaved. Defrosting Tips I For more than usual. Be sure large meats are completely defrosted before cooking. Enter defrosting time. Operating Instructions Troubleshooting Tips AUTO/TIME DEF. 1 EXPRESS COOK 2 EXPRESS COOK 3 EXPRESS COOK 4 EXPRESS COOK 5 EXPRESS COOK 6 EXPRESS COOK 789 0 DISPLAY ON/OFF START PAUSE 20 Time Defrost Allows you to defrost for more even defrosting of selected defrosting time, the oven signals TURN FOOD OVER.
... storage containers should be defrosted and microwaved. Defrosting Tips I For more than usual. Be sure large meats are completely defrosted before cooking. Enter defrosting time. Operating Instructions Troubleshooting Tips AUTO/TIME DEF. 1 EXPRESS COOK 2 EXPRESS COOK 3 EXPRESS COOK 4 EXPRESS COOK 5 EXPRESS COOK 6 EXPRESS COOK 789 0 DISPLAY ON/OFF START PAUSE 20 Time Defrost Allows you to defrost for more even defrosting of selected defrosting time, the oven signals TURN FOOD OVER.

Owners Manual
Page 23
... roasts should stand for meat, poultry and fish. Use Auto Defrost for about 30 minutes. I Remove meat from package and place on the inside front of a pound. Press AUTO/TIME DEF. I Twice during defrost, the oven signals TURN FOOD OVER. At each signal, turn the food over. Operating Instructions Troubleshooting Tips AUTO/TIME DEF. 1 EXPRESS COOK 2 EXPRESS COOK 3 EXPRESS COOK 4 EXPRESS COOK 5 EXPRESS COOK 6 EXPRESS COOK 789 0 DISPLAY ON/OFF START PAUSE Guide Auto Defrost The Auto/Time Defrost...
... roasts should stand for meat, poultry and fish. Use Auto Defrost for about 30 minutes. I Remove meat from package and place on the inside front of a pound. Press AUTO/TIME DEF. I Twice during defrost, the oven signals TURN FOOD OVER. At each signal, turn the food over. Operating Instructions Troubleshooting Tips AUTO/TIME DEF. 1 EXPRESS COOK 2 EXPRESS COOK 3 EXPRESS COOK 4 EXPRESS COOK 5 EXPRESS COOK 6 EXPRESS COOK 789 0 DISPLAY ON/OFF START PAUSE Guide Auto Defrost The Auto/Time Defrost...

Owners Manual
Page 26
.... Troubleshooting Tips Consumer Support 26 it and press START immediately. Place covered food in temperature. The oven starts immediately. Do not open the oven door until time is sensed and the time remaining begins counting down . Some Foods Not Recommended for Use With Reheat It is not hot enough after the feature pad. I Bread products. To add 10% to Change the Automatic Settings To reduce time by...
.... Troubleshooting Tips Consumer Support 26 it and press START immediately. Place covered food in temperature. The oven starts immediately. Do not open the oven door until time is sensed and the time remaining begins counting down . Some Foods Not Recommended for Use With Reheat It is not hot enough after the feature pad. I Bread products. To add 10% to Change the Automatic Settings To reduce time by...
Owners Manual
Page 27
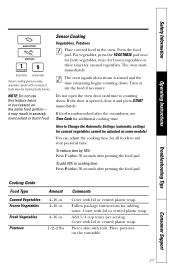
.... Do not open the oven door until time is undercooked after the countdown, use this feature twice in the oven. Follow package instructions for all foods to Change the Automatic Settings (automatic settings for canned vegetables cannot be adjusted on some models): You can adjust the cooking time for adding water. Sensor Cooking Vegetables, Potatoes Place covered food in succession on the turntable. it and press START immediately. Cover with lid...
.... Do not open the oven door until time is undercooked after the countdown, use this feature twice in the oven. Follow package instructions for all foods to Change the Automatic Settings (automatic settings for canned vegetables cannot be adjusted on some models): You can adjust the cooking time for adding water. Sensor Cooking Vegetables, Potatoes Place covered food in succession on the turntable. it and press START immediately. Cover with lid...
Owners Manual
Page 31
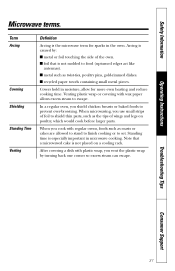
... use small strips of the oven. Note that is not molded to prevent over-browning. Venting plastic wrap or covering with wax paper allows excess steam to shield thin parts, such as twist-ties, poultry pins, gold-rimmed dishes. Standing time is especially important in moisture, allow for sparks in the oven. Safety Information Operating Instructions Microwave terms. Term Arcing Covering Shielding Standing Time Venting...
... use small strips of the oven. Note that is not molded to prevent over-browning. Venting plastic wrap or covering with wax paper allows excess steam to shield thin parts, such as twist-ties, poultry pins, gold-rimmed dishes. Standing time is especially important in moisture, allow for sparks in the oven. Safety Information Operating Instructions Microwave terms. Term Arcing Covering Shielding Standing Time Venting...
Owners Manual
Page 34
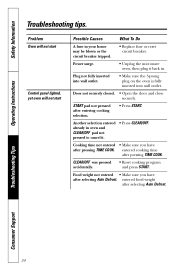
... cooking selection. • Press START. Cooking time not entered • Make sure you have after pressing TIME COOK. entered food weight after selecting Auto Defrost. Plug not fully inserted into wall outlet. • Make sure the 3-prong plug on the oven is fully inserted into wall outlet. Problem Oven will not start Control panel lighted, yet oven will not start Possible Causes What To Do A fuse in . Power surge. • Unplug the microwave oven, then plug...
... cooking selection. • Press START. Cooking time not entered • Make sure you have after pressing TIME COOK. entered food weight after selecting Auto Defrost. Plug not fully inserted into wall outlet. • Make sure the 3-prong plug on the oven is fully inserted into wall outlet. Problem Oven will not start Control panel lighted, yet oven will not start Possible Causes What To Do A fuse in . Power surge. • Unplug the microwave oven, then plug...

Owners Manual
Page 39
... of God. Exclusion of implied warranties: Except where prohibited or restricted by accident, fire, floods or acts of your unit. This owner's manual provides information regarding operating instructions and user controls. Warrantor: General Electric Company. Operating Instructions In Order to make a warranty claim. I Failure of incidental or consequential damages. I Incidental or consequential damage caused by possible defects with this appliance. Safety Information GE Microwave Oven Warranty.
... of God. Exclusion of implied warranties: Except where prohibited or restricted by accident, fire, floods or acts of your unit. This owner's manual provides information regarding operating instructions and user controls. Warrantor: General Electric Company. Operating Instructions In Order to make a warranty claim. I Failure of incidental or consequential damages. I Incidental or consequential damage caused by possible defects with this appliance. Safety Information GE Microwave Oven Warranty.


