User Manual
Page 1
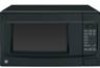
Microwave Oven ge.com Safety Instructions 2-11 Operating Instructions Auto Feature 21 Care and Cleaning 29, 30 Changing Power Level 14 Features of Your Microwave Oven 12, 13 Microwave Terms 28 Other Features 26, 27 Sensor Features 22-25 Time Features 15-20 Troubleshooting Tips Before You Call for Service 31, 32 Things That Are Normal With Your Microwave Oven 32 Consumer Support Consumer Support 34 Warranty 33 Owner's Manual JES1451 Write the model and serial numbers here: Model Serial You can find them on a label inside of the oven. DE68-03612A 49-40597 11-08 JR
Microwave Oven ge.com Safety Instructions 2-11 Operating Instructions Auto Feature 21 Care and Cleaning 29, 30 Changing Power Level 14 Features of Your Microwave Oven 12, 13 Microwave Terms 28 Other Features 26, 27 Sensor Features 22-25 Time Features 15-20 Troubleshooting Tips Before You Call for Service 31, 32 Things That Are Normal With Your Microwave Oven 32 Consumer Support Consumer Support 34 Warranty 33 Owner's Manual JES1451 Write the model and serial numbers here: Model Serial You can find them on a label inside of the oven. DE68-03612A 49-40597 11-08 JR

User Manual
Page 2
... Attempt to Excessive Microwave Energy section above. ■ Install or locate this oven with the provided Installation Instructions. Troubleshooting Tips Consumer Support SAFETY PRECAUTIONS When using electrical appliances basic safety precautions should be grounded. See the Grounding Instructions section on sealing surfaces. ■ Do Not Operate the oven if it is no damage to the: 1 door (bent), 2 hinges and latches (broken or loosened), 3 door seals and...
... Attempt to Excessive Microwave Energy section above. ■ Install or locate this oven with the provided Installation Instructions. Troubleshooting Tips Consumer Support SAFETY PRECAUTIONS When using electrical appliances basic safety precautions should be grounded. See the Grounding Instructions section on sealing surfaces. ■ Do Not Operate the oven if it is no damage to the: 1 door (bent), 2 hinges and latches (broken or loosened), 3 door seals and...
User Manual
Page 3
... adjacent walls. ■ Use this appliance only for laboratory or industrial use the Sensor Features twice in the oven. - This microwave oven is specifically designed to heat, dry or cook food and is undercooked after the first countdown, use the oven for examination, repair or adjustment. ■ As with any openings on the same food portion. Safety Instructions Operating Instructions IMPORTANT SAFETY INFORMATION. Remove wire twist-ties and metal handles from General Electric. ■...
... adjacent walls. ■ Use this appliance only for laboratory or industrial use the Sensor Features twice in the oven. - This microwave oven is specifically designed to heat, dry or cook food and is undercooked after the first countdown, use the oven for examination, repair or adjustment. ■ As with any openings on the same food portion. Safety Instructions Operating Instructions IMPORTANT SAFETY INFORMATION. Remove wire twist-ties and metal handles from General Electric. ■...
User Manual
Page 4
... this microwave oven. Safety Instructions IMPORTANT SAFETY INFORMATION. It increases the heat around the magnetron and can shorten the life of the microwave oven could start a fire. Arcing is the microwave term for sparks in microwave ovens. ■ Some products such as twist-ties, poultry pins, or gold-rimmed dishes, in a microwave oven. READ ALL INSTRUCTIONS BEFORE USING. WARNING! Operating Instructions Troubleshooting Tips FOODS ■ Do not pop popcorn in your microwave oven...
... this microwave oven. Safety Instructions IMPORTANT SAFETY INFORMATION. It increases the heat around the magnetron and can shorten the life of the microwave oven could start a fire. Arcing is the microwave term for sparks in microwave ovens. ■ Some products such as twist-ties, poultry pins, or gold-rimmed dishes, in a microwave oven. READ ALL INSTRUCTIONS BEFORE USING. WARNING! Operating Instructions Troubleshooting Tips FOODS ■ Do not pop popcorn in your microwave oven...
User Manual
Page 5
...: - Be careful when opening any containers of 180°F. Troubleshooting Tips Consumer Support SAVE THESE INSTRUCTIONS 5 Always test the formula before and halfway through heating it. - Make sure all infant food is opened, pressure can cause burns. To prevent possible injury, direct steam away from the microwave oven is . They could dehydrate and catch fire, causing damage to your oven. ■ Cook meat...
...: - Be careful when opening any containers of 180°F. Troubleshooting Tips Consumer Support SAVE THESE INSTRUCTIONS 5 Always test the formula before and halfway through heating it. - Make sure all infant food is opened, pressure can cause burns. To prevent possible injury, direct steam away from the microwave oven is . They could dehydrate and catch fire, causing damage to your oven. ■ Cook meat...
User Manual
Page 7
... oven. ■ Plastic cookware-Plastic cookware designed for microwave cooking is very useful, but should be slit, pierced or vented as directed in foil trays less than 3/4″ high; Troubleshooting Tips Consumer Support SAVE THESE INSTRUCTIONS 7 When using foil in injury. In longer exposures to the box. If they form a tight seal. Also, plastic storage containers should be used carefully. ge.com ■ "Boilable" cooking...
... oven. ■ Plastic cookware-Plastic cookware designed for microwave cooking is very useful, but should be slit, pierced or vented as directed in foil trays less than 3/4″ high; Troubleshooting Tips Consumer Support SAVE THESE INSTRUCTIONS 7 When using foil in injury. In longer exposures to the box. If they form a tight seal. Also, plastic storage containers should be used carefully. ge.com ■ "Boilable" cooking...
User Manual
Page 8
... service technician install an outlet near the appliance. (See WARNING- Safety Instructions Operating Instructions IMPORTANT SAFETY INFORMATION. We do not recommend using an extension cord with a grounding plug. EXTENSION CORDS section.) For best operation, plug this appliance. Do not under any circumstances cut or remove the third (ground) prong from the power cord. SAVE THESE INSTRUCTIONS 8 Troubleshooting Tips Consumer Support In the event of an electrical short circuit...
... service technician install an outlet near the appliance. (See WARNING- Safety Instructions Operating Instructions IMPORTANT SAFETY INFORMATION. We do not recommend using an extension cord with a grounding plug. EXTENSION CORDS section.) For best operation, plug this appliance. Do not under any circumstances cut or remove the third (ground) prong from the power cord. SAVE THESE INSTRUCTIONS 8 Troubleshooting Tips Consumer Support In the event of an electrical short circuit...
User Manual
Page 10
... concerns. Safety Instructions Operating Instructions IMPORTANT SAFETY INFORMATION. If you are shielded from interference from becoming entangled in using them. SAVE THESE INSTRUCTIONS 10 Troubleshooting Tips Consumer Support READ ALL INSTRUCTIONS BEFORE USING. WARNING! EXTENSION CORDS A short power supply cord is used if you use an extension cord, the interior light may flicker and the blower sound may be used - 1 The marked electrical rating of the extension cord should be at...
... concerns. Safety Instructions Operating Instructions IMPORTANT SAFETY INFORMATION. If you are shielded from interference from becoming entangled in using them. SAVE THESE INSTRUCTIONS 10 Troubleshooting Tips Consumer Support READ ALL INSTRUCTIONS BEFORE USING. WARNING! EXTENSION CORDS A short power supply cord is used if you use an extension cord, the interior light may flicker and the blower sound may be used - 1 The marked electrical rating of the extension cord should be at...

User Manual
Page 11
Safety Instructions Operating Instructions IMPORTANT SAFETY INFORMATION. SAVE THESE INSTRUCTIONS 11 Troubleshooting Tips Consumer Support ge.com READ AND FOLLOW THIS SAFETY INFORMATION CAREFULLY.
Safety Instructions Operating Instructions IMPORTANT SAFETY INFORMATION. SAVE THESE INSTRUCTIONS 11 Troubleshooting Tips Consumer Support ge.com READ AND FOLLOW THIS SAFETY INFORMATION CAREFULLY.
User Manual
Page 12
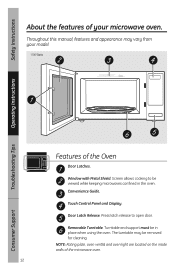
... your model. 1100 Watts Features of the microwave oven. 12 Troubleshooting Tips Consumer Support Convenience Guide. Removable Turntable. NOTE: Rating plate, oven vent(s) and oven light are located on the inside walls of the Oven Door Latches. Window with Metal Shield. Throughout this manual, features and appearance may be removed for cleaning. Turntable and support must be viewed while keeping microwaves confined in place when using the oven. Press latch release to be in the oven. Screen allows cooking to open door. Touch Control Panel and Display. Door Latch...
... your model. 1100 Watts Features of the microwave oven. 12 Troubleshooting Tips Consumer Support Convenience Guide. Removable Turntable. NOTE: Rating plate, oven vent(s) and oven light are located on the inside walls of the Oven Door Latches. Window with Metal Shield. Throughout this manual, features and appearance may be removed for cleaning. Turntable and support must be viewed while keeping microwaves confined in place when using the oven. Press latch release to be in the oven. Screen allows cooking to open door. Touch Control Panel and Display. Door Latch...

User Manual
Page 14
... the inside was defrosted. Med-High 7: Gentle cooking of the time. Medium 5: Slow cooking and tenderizing for various power levels: High 10: Fish, bacon, vegetables, boiling liquids. Power level 10 will be entered or changed during time countdown. 1 Press TIME COOK or select TIME DEFROST. 2 Enter cooking or defrosting time. 3 Press POWER LEVEL. 4 Select desired power level 1-10. 5 Press START. Rest periods (when the microwave energy cycles off , the outside of the food. Safety Instructions Operating Instructions About changing the power level...
... the inside was defrosted. Med-High 7: Gentle cooking of the time. Medium 5: Slow cooking and tenderizing for various power levels: High 10: Fish, bacon, vegetables, boiling liquids. Power level 10 will be entered or changed during time countdown. 1 Press TIME COOK or select TIME DEFROST. 2 Enter cooking or defrosting time. 3 Press POWER LEVEL. 4 Select desired power level 1-10. 5 Press START. Rest periods (when the microwave energy cycles off , the outside of the food. Safety Instructions Operating Instructions About changing the power level...

User Manual
Page 15
... a desired power level 1-10.) 4 Press START. Select a desired power level 1-10.) 7 Press START. Time Cook II Lets you don't want full power. (Press POWER LEVEL. ge.com Time Cook Time Cook I , Time Cook II counts down. Select a desired power level 1-10.) 4 Press TIME COOK again. 5 Enter the second cook time. 6 Change the power level if you change it : 1 Press TIME COOK. 2 Enter the first cook time. 3 Change the power level if you may open the door during cooking. Power level 10 (High) is automatically set, but you don't want full power. (Press POWER LEVEL.
... a desired power level 1-10.) 4 Press START. Select a desired power level 1-10.) 7 Press START. Time Cook II Lets you don't want full power. (Press POWER LEVEL. ge.com Time Cook Time Cook I , Time Cook II counts down. Select a desired power level 1-10.) 4 Press TIME COOK again. 5 Enter the second cook time. 6 Change the power level if you change it : 1 Press TIME COOK. 2 Enter the first cook time. 3 Change the power level if you may open the door during cooking. Power level 10 (High) is automatically set, but you don't want full power. (Press POWER LEVEL.

User Manual
Page 17
...qt. In 2-qt. oblong glass baking dish, place corn. Rearrange after 4 minutes. In 1-qt. Place in 2-qt. Turn cut-side-up after half of the oven. Consumer Support 17 Safety Instructions ge.com Operating Instructions Troubleshooting Tips Vegetable Corn (frozen ...Cut in half and remove fibrous membranes. casserole, place 2 tablespoons water. 4 potatoes (6 to 6 min. unshelled 10-oz. Cover with 1/2 cup water. each ) 1 (6 to 8 oz.) 9 to 12 min. 2 to 6 min. package 2 to 8 oz. oblong glass baking dish, place squash cut into 1-inch cubes. Pierce with cooking...
...qt. In 2-qt. oblong glass baking dish, place corn. Rearrange after 4 minutes. In 1-qt. Place in 2-qt. Turn cut-side-up after half of the oven. Consumer Support 17 Safety Instructions ge.com Operating Instructions Troubleshooting Tips Vegetable Corn (frozen ...Cut in half and remove fibrous membranes. casserole, place 2 tablespoons water. 4 potatoes (6 to 6 min. unshelled 10-oz. Cover with 1/2 cup water. each ) 1 (6 to 8 oz.) 9 to 12 min. 2 to 6 min. package 2 to 8 oz. oblong glass baking dish, place squash cut into 1-inch cubes. Pierce with cooking...

User Manual
Page 18
... this time, turn the food over when the oven signals. 5 Press START. At one hour after entering the time. Power level is automatically set at High power. See the Defrosting Guide for more frequent attention than one half of time. power level 10 cuts the total time to defrost for more even defrosting of foil. Plastic storage containers should be cool but can defrost small items quickly by raising the power level after defrosting. Operating Instructions Time Defrost...
... this time, turn the food over when the oven signals. 5 Press START. At one hour after entering the time. Power level is automatically set at High power. See the Defrosting Guide for more frequent attention than one half of time. power level 10 cuts the total time to defrost for more even defrosting of foil. Plastic storage containers should be cool but can defrost small items quickly by raising the power level after defrosting. Operating Instructions Time Defrost...
User Manual
Page 20
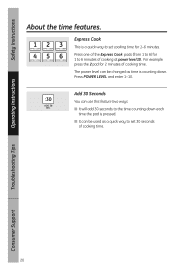
... 2 pad for 1 to 6) for 2 minutes of cooking at power level 10. Press POWER LEVEL and enter 1-10. Safety Instructions Operating Instructions About the time features. Press one of the Express Cook pads (from 1 to 6 minutes of cooking time. Express Cook This is pressed. ■ It can use this feature two ways: ■ It will add 30 seconds to set cooking time for 1-6 minutes. Add 30 Seconds You...
... 2 pad for 1 to 6) for 2 minutes of cooking at power level 10. Press POWER LEVEL and enter 1-10. Safety Instructions Operating Instructions About the time features. Press one of the Express Cook pads (from 1 to 6 minutes of cooking time. Express Cook This is pressed. ■ It can use this feature two ways: ■ It will add 30 seconds to set cooking time for 1-6 minutes. Add 30 Seconds You...
User Manual
Page 25
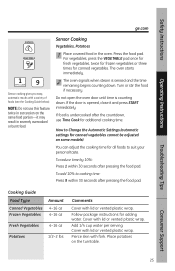
... the door is undercooked after pressing the food pad. If food is opened, close it may result in severely overcooked or burnt food. Follow package instructions for canned vegetables. Cover with a variety of foods (see the Cooking Guide below). How to Change the Automatic Settings (automatic settings for canned vegetables cannot be adjusted on some models): You can adjust the cooking time for additional cooking time. Cooking Guide Food Type Amount...
... the door is undercooked after pressing the food pad. If food is opened, close it may result in severely overcooked or burnt food. Follow package instructions for canned vegetables. Cover with a variety of foods (see the Cooking Guide below). How to Change the Automatic Settings (automatic settings for canned vegetables cannot be adjusted on some models): You can adjust the cooking time for additional cooking time. Cooking Guide Food Type Amount...

User Manual
Page 28
... the microwave term for more even heating and reduce cooking time. Venting plastic wrap or covering with plastic wrap, you use small strips of foil to shield thin parts, such as the tips of the oven. ■ foil that a microwaved cake is especially important in the oven. Venting After covering a dish with wax paper allows excess steam to escape. Troubleshooting Tips Consumer Support 28 Covering Covers hold...
... the microwave term for more even heating and reduce cooking time. Venting plastic wrap or covering with plastic wrap, you use small strips of foil to shield thin parts, such as the tips of the oven. ■ foil that a microwaved cake is especially important in the oven. Venting After covering a dish with wax paper allows excess steam to escape. Troubleshooting Tips Consumer Support 28 Covering Covers hold...

User Manual
Page 29
... not operate the oven without the turntable and support in the dishwasher. ge.com Helpful Hints An occasional thorough wiping with a paper towel, others may require a damp cloth. How to Clean the Inside Walls, Floor, Inside Window, Metal and Plastic Parts on oven walls. Troubleshooting Tips Consumer Support 29 To clean the surface of the door and the surface of the microwave oven. Safety Instructions Operating Instructions Care and cleaning of the oven that...
... not operate the oven without the turntable and support in the dishwasher. ge.com Helpful Hints An occasional thorough wiping with a paper towel, others may require a damp cloth. How to Clean the Inside Walls, Floor, Inside Window, Metal and Plastic Parts on oven walls. Troubleshooting Tips Consumer Support 29 To clean the surface of the door and the surface of the microwave oven. Safety Instructions Operating Instructions Care and cleaning of the oven that...
User Manual
Page 31
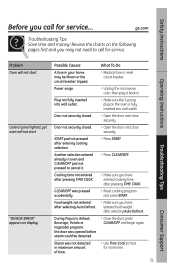
Review the charts on display Possible Causes What To Do A fuse in your home may not need to call for service... Operating Instructions Troubleshooting Tips Problem Oven will not start Control panel lighted, yet oven will not start "SENSOR ERROR" appears on the following pages first and you have entered cooking time after pressing TIME COOK. Power surge. • Unplug the microwave oven, then plug it . • Press CLEAR/OFF. Food weight not entered • Make sure you...
Review the charts on display Possible Causes What To Do A fuse in your home may not need to call for service... Operating Instructions Troubleshooting Tips Problem Oven will not start Control panel lighted, yet oven will not start "SENSOR ERROR" appears on the following pages first and you have entered cooking time after pressing TIME COOK. Power surge. • Unplug the microwave oven, then plug it . • Press CLEAR/OFF. Food weight not entered • Make sure you...
User Manual
Page 33
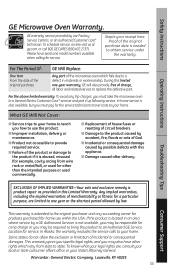
... or fitness for the service technician's travel costs to replace the defective part. To schedule service, on-line visit us at ge.com, or call 800.GE.CARES (800.432.2737). Please have other than the intended purpose or used for service. Louisville, KY 40225 33 What GE Will Not Cover: ■ Service trips to your home. Safety Instructions Operating Instructions GE Microwave Oven Warranty. During this appliance. ■...
... or fitness for the service technician's travel costs to replace the defective part. To schedule service, on-line visit us at ge.com, or call 800.GE.CARES (800.432.2737). Please have other than the intended purpose or used for service. Louisville, KY 40225 33 What GE Will Not Cover: ■ Service trips to your home. Safety Instructions Operating Instructions GE Microwave Oven Warranty. During this appliance. ■...


