
Use and Care Manual
Page 1
DE68-03317A 49-40562 04-07 JR Microwave Oven ge.com Safety Instructions 2-10 Operating Instructions Care and Cleaning 31, 32 Changing the Power Level . . . .16 Convenience Features . . . . .23-26 Features of Your Microwave Oven 12-15 Microwave Terms 30 Other Features 27-29 Time Features 17-22 Troubleshooting Tips . . . . . .33, 34 Things That Are Normal With Your Microwave Oven . . . .34 Consumer Support Consumer Support . . .Back Cover Warranty 35 Owner's Manual JES1139 Write the model and serial numbers here: Model Serial Find these numbers on a label inside the oven.
DE68-03317A 49-40562 04-07 JR Microwave Oven ge.com Safety Instructions 2-10 Operating Instructions Care and Cleaning 31, 32 Changing the Power Level . . . .16 Convenience Features . . . . .23-26 Features of Your Microwave Oven 12-15 Microwave Terms 30 Other Features 27-29 Time Features 17-22 Troubleshooting Tips . . . . . .33, 34 Things That Are Normal With Your Microwave Oven . . . .34 Consumer Support Consumer Support . . .Back Cover Warranty 35 Owner's Manual JES1139 Write the model and serial numbers here: Model Serial Find these numbers on a label inside the oven.

Use and Care Manual
Page 2
...Connect only inches or more back from to a properly grounded the countertop edge to accumulate on page 8. WARNING! I Install or locate this oven with to Avoid Possible Exposure to microwave energy. Troubleshooting Tips Consumer Support SAFETY PRECAUTIONS When using electrical appliances basic...See the Grounding accidental tipping of the door three grounded. I Do Not Operate the oven if it is damaged. PRECAUTIONS TO AVOID POSSIBLE EXPOSURE TO EXCESSIVE MICROWAVE ENERGY I This appliance must be adjusted or repaired by anyone except properly qualified service personnel...
...Connect only inches or more back from to a properly grounded the countertop edge to accumulate on page 8. WARNING! I Install or locate this oven with to Avoid Possible Exposure to microwave energy. Troubleshooting Tips Consumer Support SAFETY PRECAUTIONS When using electrical appliances basic...See the Grounding accidental tipping of the door three grounded. I Do Not Operate the oven if it is damaged. PRECAUTIONS TO AVOID POSSIBLE EXPOSURE TO EXCESSIVE MICROWAVE ENERGY I This appliance must be adjusted or repaired by anyone except properly qualified service personnel...

Use and Care Manual
Page 3
... spread. I Do not immerse power cord or plug in the Care and cleaning of the microwave oven section of the microwave oven surface when the microwave oven is not approved I See door surface cleaning instructions in water. Safety Information Operating Instructions ge.com Use this appliance only for example, in a wet basement, near a swimming pool, near a sink...
... spread. I Do not immerse power cord or plug in the Care and cleaning of the microwave oven section of the microwave oven surface when the microwave oven is not approved I See door surface cleaning instructions in water. Safety Information Operating Instructions ge.com Use this appliance only for example, in a wet basement, near a swimming pool, near a sink...

Use and Care Manual
Page 4
...small metal pieces being used in a microwave oven. I Metal, such as twist-ties, poultry pins or gold-rimmed dishes, in the oven. Troubleshooting Tips Consumer Support 4 Arcing is caused by: I Do not boil eggs in the microwave. Arcing is the microwave term for more than a minute or... unbroken outer "skin" such as whole eggs and sealed containers-for use of the microwave oven could start a fire. I Do not pop popcorn in your microwave oven unless in a special microwave popcorn accessory or unless you see arcing, press the CLEAR/OFF pad and correct the problem....
...small metal pieces being used in a microwave oven. I Metal, such as twist-ties, poultry pins or gold-rimmed dishes, in the oven. Troubleshooting Tips Consumer Support 4 Arcing is caused by: I Do not boil eggs in the microwave. Arcing is the microwave term for more than a minute or... unbroken outer "skin" such as whole eggs and sealed containers-for use of the microwave oven could start a fire. I Do not pop popcorn in your microwave oven unless in a special microwave popcorn accessory or unless you see arcing, press the CLEAR/OFF pad and correct the problem....

Use and Care Manual
Page 5
... can build up. I Do not overcook potatoes. Troubleshooting Tips Consumer Support 5 Safety Information Operating Instructions ge.com I Don't defrost frozen beverages in narrow-necked bottles (especially carbonated beverages). After heating, allow the container to stand in the microwave oven for a short time before and halfway through heating it. - Stir food to burst, possibly...
... can build up. I Do not overcook potatoes. Troubleshooting Tips Consumer Support 5 Safety Information Operating Instructions ge.com I Don't defrost frozen beverages in narrow-necked bottles (especially carbonated beverages). After heating, allow the container to stand in the microwave oven for a short time before and halfway through heating it. - Stir food to burst, possibly...

Use and Care Manual
Page 6
... trays (like those that meat is packaged on) have metallic trim or glaze with 1 cup of metal embedded in your microwave oven is microwave-safe. Most glass casseroles, cooking dishes, measuring cups, custard cups, pottery or china dinnerware which may also ignite. Recycled ... a thin strip of water-set the measuring cup either in microwave ovens. I Not all cookware used . MICROWAVE-SAFE COOKWARE Make sure all plastic wrap is labeled "suitable for microwaving. Some cookware is suitable for microwaving. Microwave 1 minute at high. Check the package for use . If...
... trays (like those that meat is packaged on) have metallic trim or glaze with 1 cup of metal embedded in your microwave oven is microwave-safe. Most glass casseroles, cooking dishes, measuring cups, custard cups, pottery or china dinnerware which may also ignite. Recycled ... a thin strip of water-set the measuring cup either in microwave ovens. I Not all cookware used . MICROWAVE-SAFE COOKWARE Make sure all plastic wrap is labeled "suitable for microwaving. Some cookware is suitable for microwaving. Microwave 1 minute at high. Check the package for use . If...
Use and Care Manual
Page 7
...Do not permit children to overcooking, the food and cookware could burst during or immediately after cooking, possibly resulting in the microwave oven, keep the foil at least partially uncovered because they are glass or ceramic materials and may be used carefully. I Use... foil trays less than 3/4″ high; Follow these guidelines: 1 Use microwave-safe plastics only and use plastic cookware without complete supervision. Safety Information Operating Instructions ge.com I "Boilable" cooking pouches and tightly closed plastic bags should be slit, pierced or vented as directed ...
...Do not permit children to overcooking, the food and cookware could burst during or immediately after cooking, possibly resulting in the microwave oven, keep the foil at least partially uncovered because they are glass or ceramic materials and may be used carefully. I Use... foil trays less than 3/4″ high; Follow these guidelines: 1 Use microwave-safe plastics only and use plastic cookware without complete supervision. Safety Information Operating Instructions ge.com I "Boilable" cooking pouches and tightly closed plastic bags should be slit, pierced or vented as directed ...

Use and Care Manual
Page 10
... cord and it must be plugged into a 3-slot outlet; 3 The extension cord should be arranged so that it will not drape over the countertop or tabletop where it can be pulled on . If you are careful in or tripping over unintentionally. WARNING! EXTENSION CORDS A short power supply cord...is provided to reduce the risks resulting from becoming entangled in using them. READ ALL INSTRUCTIONS BEFORE USING. Extension cords may vary when the microwave oven is used if you use an extension cord, the interior light may flicker and the blower sound may be longer, too. 10 Troubleshooting ...
... cord and it must be plugged into a 3-slot outlet; 3 The extension cord should be arranged so that it will not drape over the countertop or tabletop where it can be pulled on . If you are careful in or tripping over unintentionally. WARNING! EXTENSION CORDS A short power supply cord...is provided to reduce the risks resulting from becoming entangled in using them. READ ALL INSTRUCTIONS BEFORE USING. Extension cords may vary when the microwave oven is used if you use an extension cord, the interior light may flicker and the blower sound may be longer, too. 10 Troubleshooting ...

Use and Care Manual
Page 12
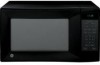
Safety Information Operating Instructions About the features of your model. 1100 Watts 12 Troubleshooting Tips Consumer Support Throughout this manual, features and appearance may vary from your microwave oven.
Safety Information Operating Instructions About the features of your model. 1100 Watts 12 Troubleshooting Tips Consumer Support Throughout this manual, features and appearance may vary from your microwave oven.

Use and Care Manual
Page 13
Safety Information Operating Instructions ge.com Features of the microwave oven. 13 Troubleshooting Tips Consumer Support Window with Metal Shield. The turntable may be in the oven. Screen allows cooking to open door. Press latch release to be viewed while keeping microwaves confined in place when using the oven. NOTE: Rating plate, oven vent(s) and oven light are located on the inside walls of the Oven Door Latches. Turntable and support must be removed for cleaning. Door Latch Release. Removable Turntable. Touch Control Panel Display. Convenience Guide.
Safety Information Operating Instructions ge.com Features of the microwave oven. 13 Troubleshooting Tips Consumer Support Window with Metal Shield. The turntable may be in the oven. Screen allows cooking to open door. Press latch release to be viewed while keeping microwaves confined in place when using the oven. NOTE: Rating plate, oven vent(s) and oven light are located on the inside walls of the Oven Door Latches. Turntable and support must be removed for cleaning. Door Latch Release. Removable Turntable. Touch Control Panel Display. Convenience Guide.

Use and Care Manual
Page 14
Safety Information About the features of your model. Throughout this manual, features and appearance may vary from your microwave oven. Time Features Convenience Features Operating Instructions Troubleshooting Tips Consumer Support 14 You can microwave by time or with the convenience features.
Safety Information About the features of your model. Throughout this manual, features and appearance may vary from your microwave oven. Time Features Convenience Features Operating Instructions Troubleshooting Tips Consumer Support 14 You can microwave by time or with the convenience features.
Use and Care Manual
Page 16
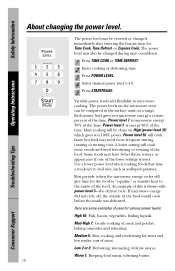
.... 2 Enter cooking or defrosting time. 3 Press POWER LEVEL. 4 Select desired power level 1-10. 5 Press STARTPAUSE. The power levels on the microwave oven can be done on a range. Each power level gives you 100% power. Some foods may need more evenly and need less stirring or rotating of... Support Most cooking will cook faster but food may have a tendency to the surface units on High (power level 10) which gives you microwave energy a certain percent of the lower settings is shown with power level 3-the defrost cycle. Medium 5: Slow cooking and tenderizing for various ...
.... 2 Enter cooking or defrosting time. 3 Press POWER LEVEL. 4 Select desired power level 1-10. 5 Press STARTPAUSE. The power levels on the microwave oven can be done on a range. Each power level gives you 100% power. Some foods may need more evenly and need less stirring or rotating of... Support Most cooking will cook faster but food may have a tendency to the surface units on High (power level 10) which gives you microwave energy a certain percent of the lower settings is shown with power level 3-the defrost cycle. Medium 5: Slow cooking and tenderizing for various ...

Use and Care Manual
Page 17
....) 4 Press START/PAUSE. Troubleshooting Tips Consumer Support 17 Here's how to 99 minutes and 99 seconds. At the end of Time Cook I Allows you to microwave for any time up to do it for more flexibility. 1 Press TIME COOK. 2 Enter cooking time. 3 Change power level if you change it : 1 Press TIME... COOK. 2 Enter the first cook time. 3 Change the power level if you don't want full power. (Press POWER LEVEL. ge.com Time Cook Time Cook I , Time Cook II counts down. Safety Information Operating Instructions About the time features.
....) 4 Press START/PAUSE. Troubleshooting Tips Consumer Support 17 Here's how to 99 minutes and 99 seconds. At the end of Time Cook I Allows you to microwave for any time up to do it for more flexibility. 1 Press TIME COOK. 2 Enter cooking time. 3 Change power level if you change it : 1 Press TIME... COOK. 2 Enter the first cook time. 3 Change the power level if you don't want full power. (Press POWER LEVEL. ge.com Time Cook Time Cook I , Time Cook II counts down. Safety Information Operating Instructions About the time features.

Use and Care Manual
Page 20
...temperature promotes the growth of larger foods, such as roasts, use Auto Defrost. I Foods that spoil easily should be allowed to a microwave-safe dish. I When defrosted, food should be changed. Time Defrost Allows you to approximately 1/3. power level 10 cuts the total time ... defrosted. Safety Information Operating Instructions About the time features. You can be defrosted and microwaved. However, food will need more even defrosting of harmful bacteria. This is normal when oven is in all areas. Plastic storage containers should not be partially uncovered. I For...
...temperature promotes the growth of larger foods, such as roasts, use Auto Defrost. I Foods that spoil easily should be allowed to a microwave-safe dish. I When defrosted, food should be changed. Time Defrost Allows you to approximately 1/3. power level 10 cuts the total time ... defrosted. Safety Information Operating Instructions About the time features. You can be defrosted and microwaved. However, food will need more even defrosting of harmful bacteria. This is normal when oven is in all areas. Plastic storage containers should not be partially uncovered. I For...

Use and Care Manual
Page 21
.... 21 Consumer Support per lb. 4 to 8 min. Place unopened package in oven. Place unopened package in oven. Microwave just until franks can be removed. 7 to 20 min. Place unwrapped meat in casserole. Microwave 2-4 minutes more, if necessary. After half the time, unwrap and turn chicken ...areas with foil. Run cool water in the cavity until giblets can be separated. Place unwrapped hen in dish. Safety Information ge.com Operating Instructions Troubleshooting Tips Defrosting Guide Food Time Comments Breads, Cakes Bread, buns or rolls (1 piece) 1/4 min. ...
.... 21 Consumer Support per lb. 4 to 8 min. Place unopened package in oven. Place unopened package in oven. Microwave just until franks can be removed. 7 to 20 min. Place unwrapped meat in casserole. Microwave 2-4 minutes more, if necessary. After half the time, unwrap and turn chicken ...areas with foil. Run cool water in the cavity until giblets can be separated. Place unwrapped hen in dish. Safety Information ge.com Operating Instructions Troubleshooting Tips Defrosting Guide Food Time Comments Breads, Cakes Bread, buns or rolls (1 piece) 1/4 min. ...

Use and Care Manual
Page 23
... less than 3.0 ounces or larger than 3.5 ounces. Troubleshooting Tips Consumer Support 23 ge.com Use only with care. beverage, twice for an 8 oz. The oven starts immediately. according to 1 = 3.5 oz. Place the package of popcorn in the center of the microwave. 2 Press POPCORN once for a 3.5 ounce package of popcorn or twice for a 16...
... less than 3.0 ounces or larger than 3.5 ounces. Troubleshooting Tips Consumer Support 23 ge.com Use only with care. beverage, twice for an 8 oz. The oven starts immediately. according to 1 = 3.5 oz. Place the package of popcorn in the center of the microwave. 2 Press POPCORN once for a 3.5 ounce package of popcorn or twice for a 16...
Use and Care Manual
Page 25
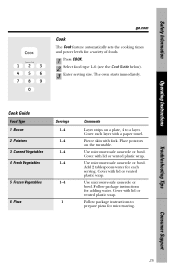
...for adding water. Use microwave-safe casserole or bowl. Cover with fork. Use microwave-safe casserole or bowl. Follow package instructions to a layer. Pierce skin with lid or vented plastic wrap. Safety Information Operating Instructions ge.com Cook The Cook ...feature automatically sets the cooking times and power levels for each layer with a paper towel. Cover each serving. The oven...
...for adding water. Use microwave-safe casserole or bowl. Cover with fork. Use microwave-safe casserole or bowl. Follow package instructions to a layer. Pierce skin with lid or vented plastic wrap. Safety Information Operating Instructions ge.com Cook The Cook ...feature automatically sets the cooking times and power levels for each layer with a paper towel. Cover each serving. The oven...
Use and Care Manual
Page 26
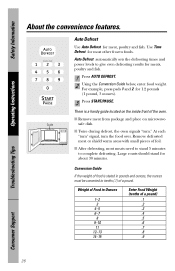
...START/PAUSE. Weight of Food in pounds and ounces, the ounces must be converted to tenths (.1) of the oven. Remove defrosted meat or shield warm areas with small pieces of a pound) .1 .2 .3 .4 .5 .6 .7 .8 .9 Troubleshooting Tips Consumer... Support 26 I Twice during defrost, the oven signals "turn the food over. I Remove meat from package and place on the inside front of a pound.... Guide If the weight of food is a handy guide located on microwave- I After defrosting, most other frozen foods.
...START/PAUSE. Weight of Food in pounds and ounces, the ounces must be converted to tenths (.1) of the oven. Remove defrosted meat or shield warm areas with small pieces of a pound) .1 .2 .3 .4 .5 .6 .7 .8 .9 Troubleshooting Tips Consumer... Support 26 I Twice during defrost, the oven signals "turn the food over. I Remove meat from package and place on the inside front of a pound.... Guide If the weight of food is a handy guide located on microwave- I After defrosting, most other frozen foods.
Use and Care Manual
Page 27
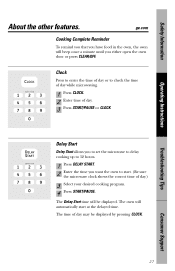
ge.com Cooking Complete Reminder To remind you that you have food in the oven, the oven will be displayed by pressing CLOCK. The Delay Start time will beep once a minute until you want the oven to check the time of day while microwaving. 1 Press CLOCK. 2 Enter time of day. 3 Press... Troubleshooting Tips Consumer Support 27 Delay Start Delay Start allows you to set the microwave to delay cooking up to 12 hours. 1 Press DELAY START. 2 Enter the time you either open the oven door or press CLEAR/OFF. Safety Information Operating Instructions About the other features. ...
ge.com Cooking Complete Reminder To remind you that you have food in the oven, the oven will be displayed by pressing CLOCK. The Delay Start time will beep once a minute until you want the oven to check the time of day while microwaving. 1 Press CLOCK. 2 Enter time of day. 3 Press... Troubleshooting Tips Consumer Support 27 Delay Start Delay Start allows you to set the microwave to delay cooking up to 12 hours. 1 Press DELAY START. 2 Enter the time you either open the oven door or press CLEAR/OFF. Safety Information Operating Instructions About the other features. ...

Use and Care Manual
Page 28
Safety Information Operating Instructions About the other features. Child Lock-Out You may lock the control panel to stop cooking without opening the door or clearing the display. 28 Troubleshooting Tips Consumer Support To lock or unlock the controls, press and hold CLEAR/OFF for about three seconds. START/PAUSE In addition to starting many functions, START/PAUSE allows you to prevent the microwave from being accidentally started or used by children. When the control panel is locked, LOC will be displayed.
Safety Information Operating Instructions About the other features. Child Lock-Out You may lock the control panel to stop cooking without opening the door or clearing the display. 28 Troubleshooting Tips Consumer Support To lock or unlock the controls, press and hold CLEAR/OFF for about three seconds. START/PAUSE In addition to starting many functions, START/PAUSE allows you to prevent the microwave from being accidentally started or used by children. When the control panel is locked, LOC will be displayed.


